March Madness!

One of my favorite times of the year (in the sporting world, that is) is finally heeeeeeeere! First day of SPRING and it’s March Madness!

Now, I would never classify myself as a huge college basketball fan. I really don’t watch much during the regular season, though I am a huge Ohio State fan in all sports so I will occasionally watch a game of theirs. All that being said, I just LOVE the March Madness tournament!

Every year, I fill out two brackets. One is what I call my “coin flip bracket,” where every decision is based on the flip of a quarter (heads = top team wins, tails = bottom team wins). It’s so fun to see how things work out when it’s left purely to chance! I also fill out a “date night” bracket; Justin and I each fill out a bracket and exchange them. At the end of the tournament, whoever had the better bracket gets taken out to dinner by the loser. It’s a fun excuse to go out to eat and have some fun. 🙂 **Sidenote: Justin has beaten me the last two years but I have a good feeling about this year! Time to win a date!!

I have so much fun filling out my bracket that I thought I should incorporate it into my classroom too. Here’s what I did during my planning period today: Using March Madness in the classroom
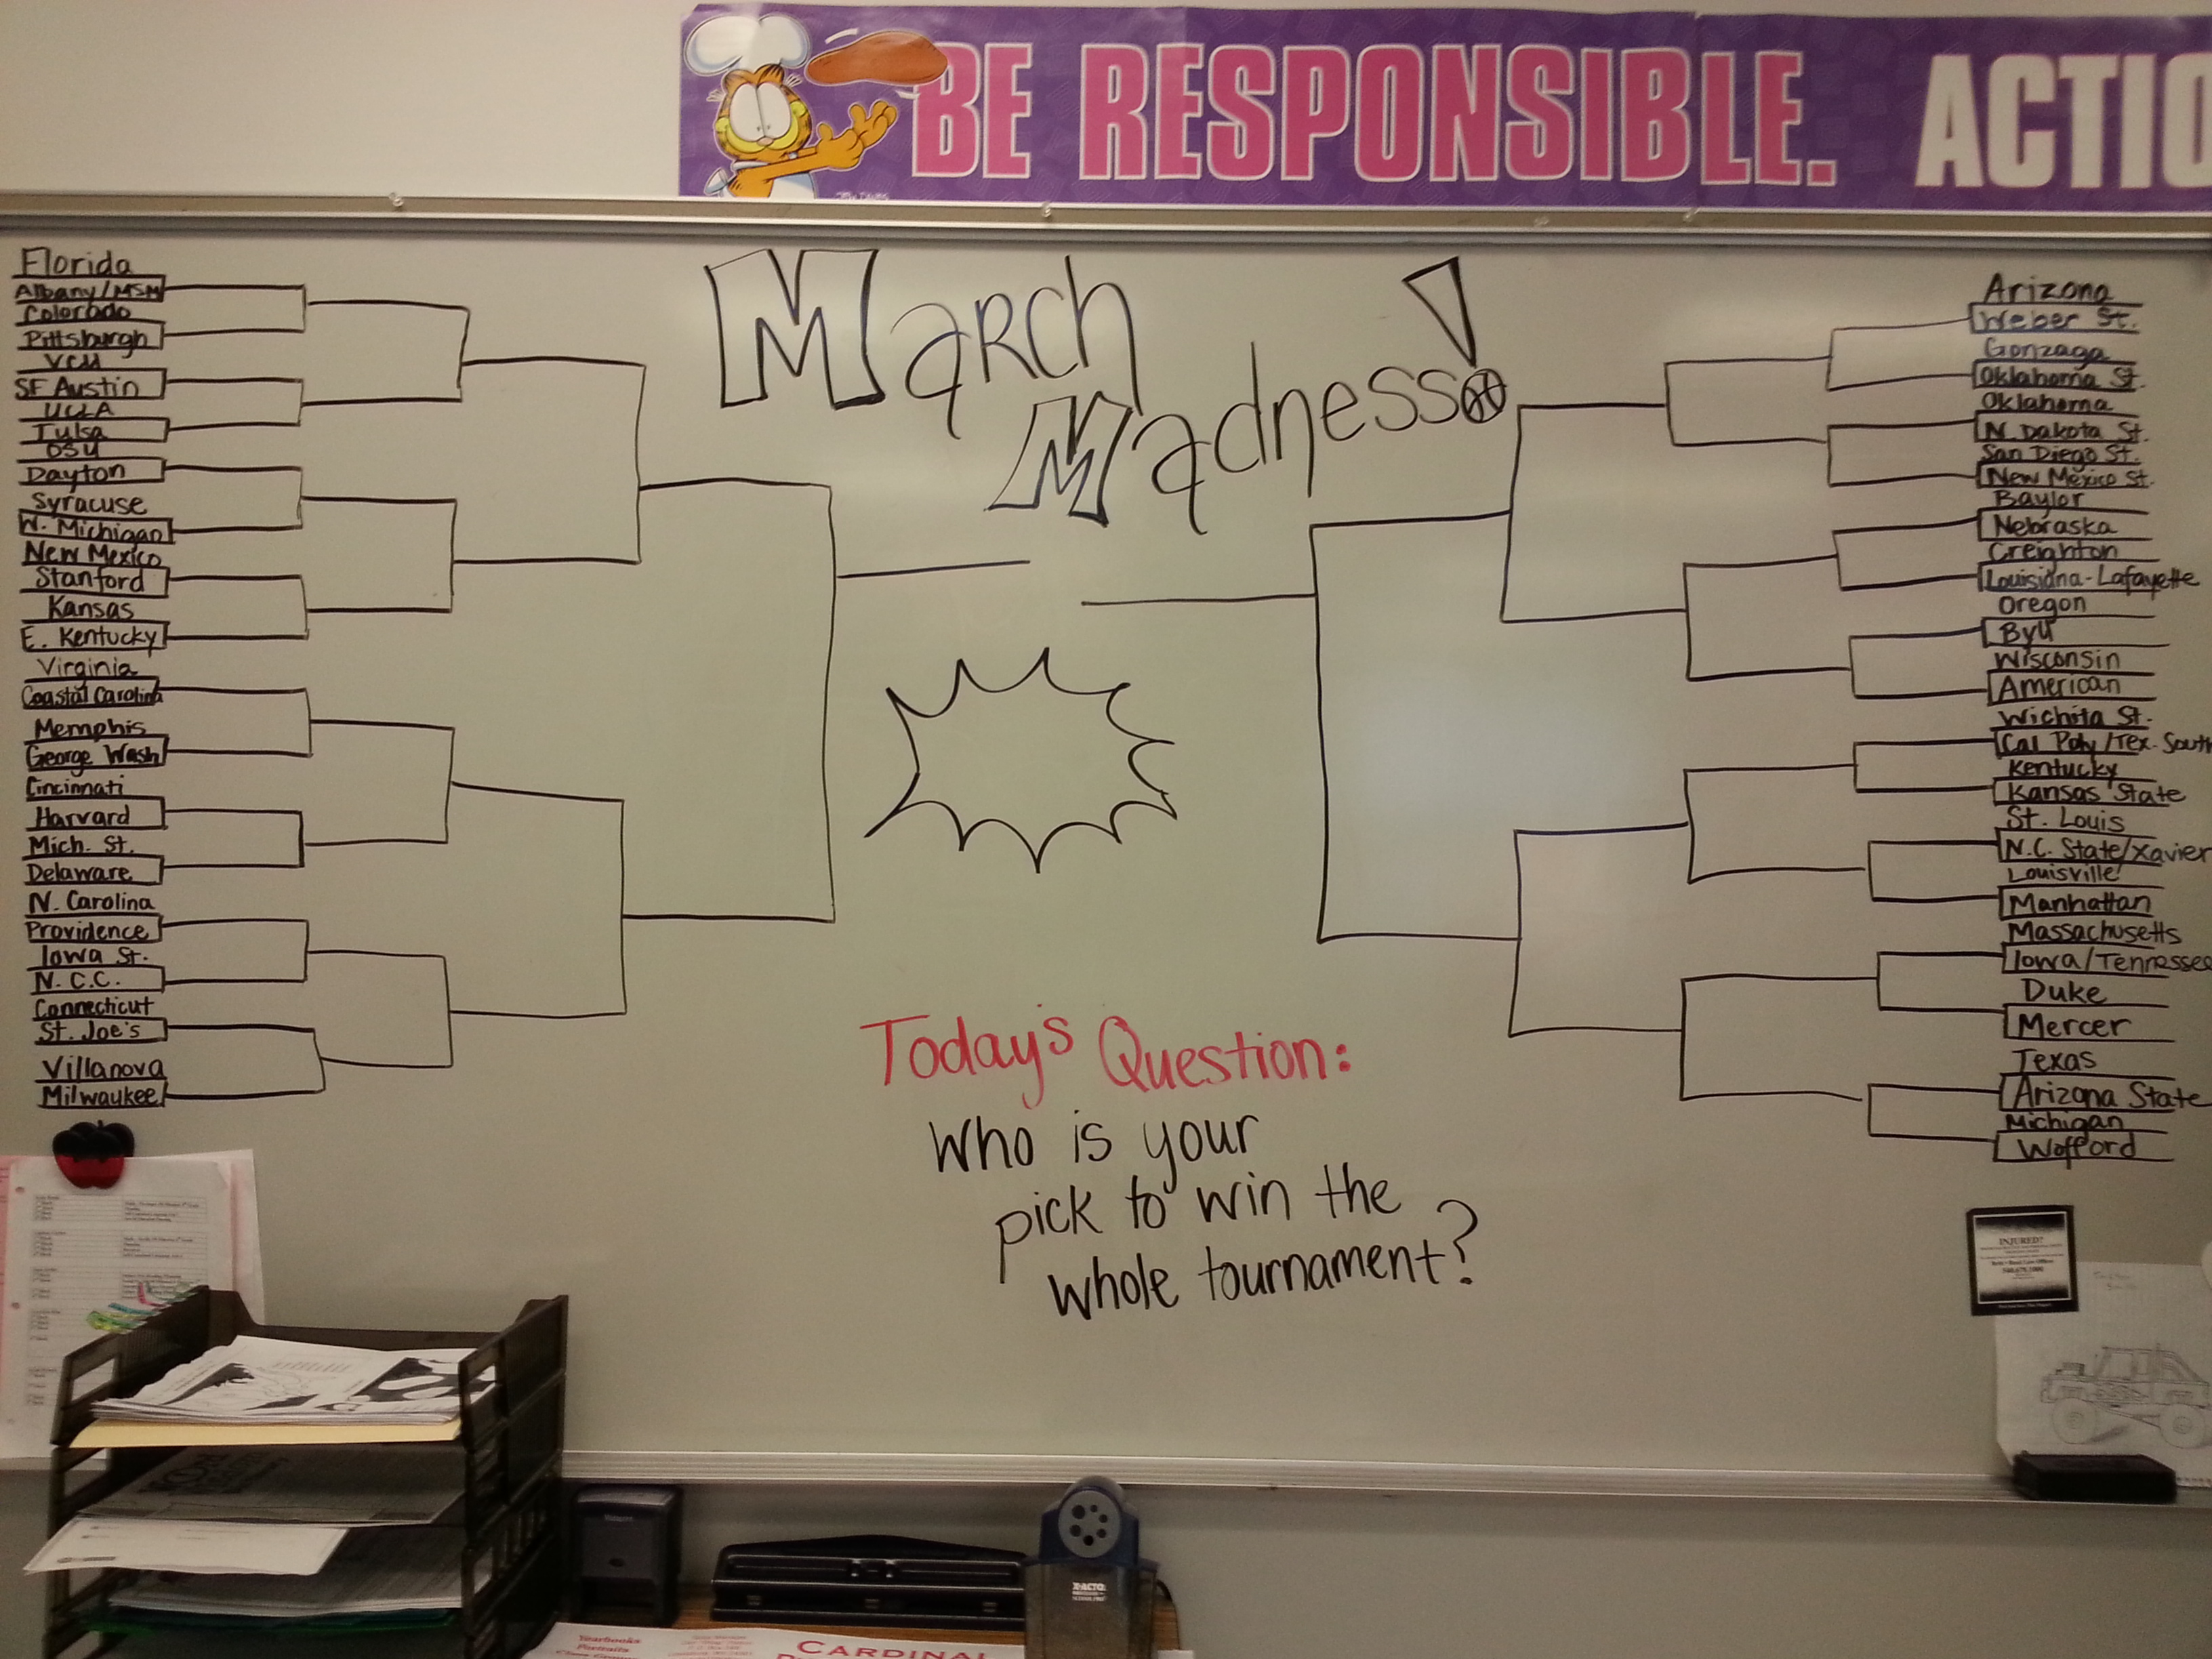
My students all got really excited when they saw the bracket! I knew it would be a fun thing for them to see and keep track of the tournament with, but then I thought about trying to make this a learning experience too. Turns out, there are a lot of ways to make the bracket fun and educational! Here are a few ideas I came up with:

Making March Madness Work in the Classroom

1. Probability For this one, you have to take rankings out of the equation. I’d phrase a question like: “If all teams had identical records, what is the probability that . . .”

  • “. . . a team from the West wins the tournament?”
  • “. . . a team that begins with an ‘A’ or ‘C’ wins the tournament?”
  • “. . . Ohio State will win the tournament?”
  • “. . . the final match-up will be between Villanova and Arizona?”

Get creative! We did probability with marbles and cards and the students all felt that it wasn’t relevant to their lives. Now is a good time to engage their attention (even if it isn’t truly chance since there are rankings in real life)

2. Statistics Use the records to your advantage! Have the students discuss a particular game (have info up on the board for those who didn’t watch) and figure out a particular player’s statistics. (i.e. “Player B made 5 of 9 shots last night. What was his percentage of made shots?”)

3. Writing assignment Have the students make-up a story about an unbelievable upset (they can pick the teams from the bracket to write about) and have them give specific details using whatever writing strategy you’re currently working on (i.e. using specific adjectives, adding proper nouns, etc)

4. Graphing Have a poll question written on the board (I’m going to let students actually write on the board since they love to do that but you could have them do it by raising their hands). For example, your question could be:

  • “Who do you think will win the whole tournament?”
  • “Who do you think will win the South/East/West/MidWest?”
  • “Which is your favorite team still in the tournament?”

Collect student answers (you can have one student be the recorder as other students raise their hands or you can have them write their answer on the board — perhaps in simple tally form depending on how you worded the question). Then you can work on graphing the student responses in pie charts, bar graphs, etc.

5. Summary writing. Write a ton of statistics from a game that has been played up on the board and have students take that information and write a game re-cap summary. Remind them of important things summaries need (recount highlights and include major details such as the score) and have them make up a quote from a player or coach to include as practice for writing with quotations.

I’m very excited to implement this in my classroom! I’m going to just have a fun poll question on the board each day too so it stays interactive and keeps the students engaged. I think it will be fun! Please let me know if you have any other fun strategies for involving students in March Madness and I’ll gladly add them to my list!

***

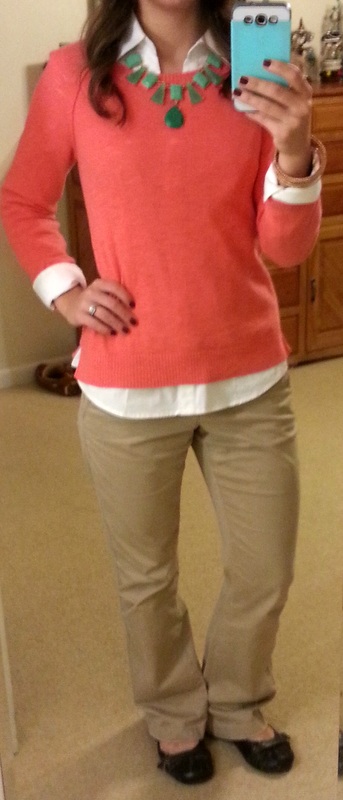
Today’s outfit didn’t exactly scream “spring” but when it’s only gonna be a high in the mid-50s, it’s hard to go too crazy.

navy and white stripes, white pants, statement necklaceShirt: TJ Maxx (exact unavailable) ~ Pants: New York & Company (similar here) ~ Flats: Target (exact here) ~ Necklace: Purple Peridot (exact here)

Teacher Tuesday: Fraction Practice

Hi y’all!

Thanks to a light dusting of snow this morning, I got to sleep in a bit! Love two-hour school delays! 🙂 I had time to get a gym session in before heading to school — I ended up being very glad for the calories I burned when I opened the lunch my hubby had prepared for me (thoughtful, huh?) and saw it included two packs of Fun Dip and a sucker. Definitely a sign that I need to go grocery shopping!

Teacher Tuesday

With all the school we have missed over the last two months, the classes I co-teach in have been focusing on getting caught up and back on track with our yearly pacing guides; therefore, I haven’t done nearly as much remediation in math and have mostly just helped give extra support to the students in class. Now that we are back on track I am back doing remediation of old topics. We’re currently reviewing fractions and I’ve come up with a few fun ways to engage the students in fraction practice.

Fraction Practice1. Simplify fractions with playing cards.

For this activity, I had the students get with a partner and each place a pencil longways on their desk. Each set of partners had a deck of cards (you could use a half-deck or a smaller amount of cards if you need it to be divided amongst several students.) The partners would take turns drawing two cards. I instructed them to put the larger card on the bottom (Ace = 1, Jack = 11, Queen = 12, King = 14, Joker = wild) and the smaller one on top. They then used an Expo Marker ((see from this post—it wipes right off!)) to simplify the fraction. If it was not possible to simplify, they just re-wrote the fraction. The partners had to check one another’s work before they could draw two more cards and create new fractions.

Variations

1. Have them put the first card they draw on top and the second card on bottom regardless of which is bigger. This may result in an improper fraction, which they can change to a mixed number.

2. Turn it into a game. When partners check one another, the students keep their cards if they simplified correctly. If one partner catches a mistake the other made, that partner gets to keep the cards. At the end of the deck, whomever has the most cards wins.

3. Change the values of the face cards. This is an easy way to differentiate instruction for learners at different levels. For a struggling group, face cards can be eliminated or simply assigned numbers under 10. For an advanced group, face cards can be assigned higher number with more multiples (24, 30, etc) to give the students an extra challenge.

4. Add operations! You can do this activity with the various operations (add, subtract, multiply, and divide) and students can show their work using the dry erase marker. See photo below for clarification!

Fraction 22. Use dominoes!

Even simpler than playing cards are dominoes! They come as fractions so it’s easy for the students to visualize the fractions. My students really loved getting to use dominoes and, of course, getting to work out problems on their desks. Ways you can incorporates dominoes include:

Practice simplifying.

Fraction 4You can have the students put the smaller number on the top if you don’t want improper fractions or you can have them just flip the domino and if it is improper, simplify it to a mixed number.

Add operations

Fraction 3  Fraction 6

Fraction 5You may want to encourage students to set up their dominoes to make simplifying easier. For example, with adding and subtracting try to find either the same denominator or ones where they can easily find a common denominator. For multiplication, encourage them to try to find “shortcuts” that help them.

The bottom line is, get creative! I have found students are WAY more willing to work if they can use manipulatives or get to try something they normally don’t get to do. These activities keep them engaged, help them practice, and are way more exciting than just another worksheet. Try something new! 🙂

Past Teacher Tuesdays

Picture Schedules

Desk Decorating

Dice Multiplication

Writing on Desks?

***

Today’s outfit was includes some bright bold colors to contrast all this snow! Details and links to available pieces on wear page.

02-18 LookShirt: Express

Tank: Target

Skirt: Express

Tights: J. Crew

Shoes: Maurices

Necklace: Lia Sophia

Teacher Tuesday: Picture Schedules!

Happy Teacher Tuesday!

Today I want to share something that I came up with last year and used on a daily basis. At the time, I was teaching students with multiple disabilities, and all of my students had sensory processing needs. On top of that, nearly all of them had visual needs and limited fine motor skills.

When it came time to create our classroom schedule, a list on a wall just wasn’t going to cut it for me. I wanted to come up with a way to involve my students and ensure that they could actively participate when we talked as a class about our schedule and daily activities. I also wanted to have a schedule that was versatile and allowed the students to understand the transitions we were making throughout the day. Here’s what I came up with:

Tactile Picture Schedule Baskets!

Here’s how it worked:

I bought several baskets from the Dollar Store. They came in packs of 3 for $1 each. I had six students so I bought enough baskets for them each to have a white one and a green one. (Twelve baskets at $1 for 3 = $4 total. Definitely worth it!)

I printed out a small sign to attach to the front of each basket. The white basket’s sign said “It’s time for . . .” and the green basket’s sign said “I am finished with . . .”

Next, I created visual representations of all of our major activities, starting with our morning routine. I first cut out strips of black construction paper. I then printed out Boardmaker symbols for each of the major tasks we complete each morning. I laminated the symbols and attached them to the top of the strip of black paper. I then found a real-life, concrete example of each activity and Velcroed it to the bottom of the paper, which allowed the students to pull it off if they wanted to explore the object closely. The end result looked like this:

For “meal time,” I attached a real plastic fork identical to the ones the students ate with. For my students who used a feeding tube for meals, I used an extra feeding tube in place of the fork to make it applicable to them.

For “wipe face,” I attached a piece of a real wipe identical to the ones we use after meals.

P104

For “brush teeth,” I attached a dollar store tiny toothbrush, and for “comb hair,” I attached a dollar store comb.


As we went through our morning routine, we would show the students the picture and object for each task. The students had a chance to touch and feel each object. When we started a task, the picture went into the white basket. When we finished a task, the picture went into the green basket. Some students were able to move the picture from one basket to the other independently. I think this provided a great transition visual!

As tasks finished, we allowed the students to stack the tasks in the green basket so they could see how much we had already done.

I also created strips for our daily “specials” classes.

This one was a little more difficult to come up with concrete objects for, but I’m very pleased with the results!

For “arts and crafts,” I used pieces of Model Magic, which my students frequently use in art class.

For “P.E.” class, I used a small plastic ball identical to the ones they sometimes use in the gym.

For “music” class, the music teacher did me a HUGE favor and lent me some small instruments (small maracas and bells) that he didn’t use anymore. I Velcroed these on so we could still pull them off and use them for musical activities in class.

For “library”, I found tiny board books (at a thrift store for cheap! Whoohoo!) and attached them to the strip.

“Guidance” class was the hardest for me to come up with a concrete object. I finally settled on a giant fuzzy ball. The guidance teacher often used these as visuals for feeling “warm and fuzzy” and also for rewards in class. It was something my students were used to seeing in guidance and no where else so it worked out perfectly! (I’d also like to note that there wasn’t a good picture for “guidance” in terms of attending a class, so I used another picture and wrote in “guidance” at the top. This was in the best interests of my students’ learning and understanding.)

I should mention that I did a picture strip of everything for EACH student. I had six library strips, six music strips, etc. It was exactly what I wanted: a simple way to keep my students actively engaged and allow them to access the schedule and understand what was going on in their surroundings. It was also a great visual way to teach transitions.

You could do this for an infinite number of school activities (recess, calendar time, subjects like math, science, etc. The list goes on and on!) It takes some work but it is worth it in the end!

***

Today’s teaching outfit:

Cardigan: Old Navy

Dress: American Eagle

Cami underneath: Express

Tights: Express

Boots: Payless

Necklace & bracelet: Lia Sophia

Teacher Tuesday: Dice Edition

Another Teacher Tuesday is here!

As I mentioned in last week’s post, I do a lot of remediation with my students, particularly in math. While I am a special education teacher, I do a lot with the whole class because there are many students without disabilities who still struggle with retaining math facts.

I’ve come up with several games and activities to play to practice the facts in new ways so they get exposure to the facts and practice them while staying engaged the whole time.  All the activities I’m sharing today are done with dice. I have found that while many multiplication games feel “baby-ish” to my middle schoolers, they love to roll the dice for these games. It allows them to take some ownership in their math facts since they’re the ones “creating” the facts  and it’s a nice break from yet another worksheet.

Easy ways to practice multiplication with dice

1. Simple roll and multiply. First up is extremely simple. The students get two die (di? dice? I’m never sure with this one.) Because I had green and white available, students got one of each but you can use the same color. They roll both and multiply the two numbers together. They then have to write the multiplication problem down and roll again to create a new problem. I like this too because it is self-paced. If a student has to think for five minutes to remember what 3 x 6 is, no problem! The rest of the class isn’t held up.

Variation #1 of simple roll and multiply. Students get three dice. Here I gave them two green and one white. They roll the white to get the first number in the multiplication problem. Then they roll BOTH green dice together and find the sum of the numbers rolled. This gives them the second number in the multiplication problem. This involves a little more higher-level thinking but my students caught on quick!

Dice game on desk (2)-001

And yes, I let the students write on their desk! They use an Expo dry erase marker and it wipes right off with a paper towel and a small amount of dry erase board cleaner. No damage to the desks and the students LOVE it!

Variation #2 of simple roll and multiply. Same as above but students get four dice. Here I gave them two green and two white. They roll both white together and find the sum to get the first number in the multiplication problem. Then they roll both green dice together and find the sum of the numbers rolled to get the second number in the problem. I like this because it asks them to do two operations, which is a skill they will need to use a lot as they move forward in math! I would not do this variation until they are solid with the simple roll and multiply.

Dice game on desk (3)-001

Multiplication Chart Fill-In. Here I gave the students blank multiplication charts and dice. I gave them four but you could make it work with two.

Multiplication practice with dice (1)-001

The goal of this activity was to fill in as much of the chart as they could in a certain amount of time. They couldn’t just fill it in though, they had to roll the multiples!

I gave them one minute with rolling just TWO die. The rules were the same as the “simple roll and multiply” above. I did let them fill in both squares for each problem (2 x 3 = 6 and 3 x 2 = 6) because it was a good opportunity to expose them to the commutative property of multiplication.

Multiplication with dice (2)-001

After one minute was up, I had them roll three die. Same as the variation of the simple roll and multiply above: the single di was the first number and the sum of the next two di was the second number in the multiplication problem. My students were so used to all the variations of the simple roll and multiply that they could easily transition to this without getting confused. Then I gave them one minute with rolling all four dice (sum of first two = first number, sum of second two = second number).

Multiplication with dice (3)-001 Multiplication with dice (4)-001

Variations: 

1. Continue 3 minute cycles for however much time you have (last 15 minutes of class? Do five one-minute cycles of each. Just a few minutes? Do one or two cycles of each)

2. With one or two minutes left at the end of this activity, tell the students to put down the die and now fill in as many as they can on their own.

3. Turn it into a competition

a. First student to get thirty boxes filled in gets a prize.

b. First student to fill the whole chart gets a prize.

c. All students get a prize as they get thirty/whole chart/etc.

4. If your students are just beginners, give them only a 6 x 6 multiplication chart and have them fill in using the simple roll and multiply.

Whole Class Activity: Multiplication Dice “Bingo.” I’ll admit, this isn’t truly Bingo; however, my students still had fun with it. Each student gets a Bingo chart with products in it. I got simple charts here but you could make your own to reflect the specific fact families you want to work on.

Students would come up one at a time to roll two giant foam di in the front of the room (this was fun for them because I allowed them to gently bounce it off the wall if they wanted.) The student would roll the di, following the simple roll and multiply rule, and tell us the product. For example, if he rolled a 2 and a 5, he would say “2 x 5 = 10.”

I would have 2-3 students come up and repeat the same process, then I would switch and have the next 2-3 students do the first variation of the simple roll and multiply (first dice rolled = first number, second roll uses two di and the sum = the second number). For example, the student may now roll a 3 on the first roll and a 4 and a 5 (4 + 5 = 9) on the second roll so she would call out “3 x 9 = 27.”

The next 2-3 students would do the second variation of the roll and multiply (first roll uses two di, sum = first number; second roll uses two di, sum = second number). This student may roll the two di and get a 1 and 4 (1 + 4 = 5) on the first roll and a 3 and 5 (3 + 5 = 8) on the second roll so he would call out “5 x 8 = 40.”

This activity sounds rather complex, but even my lowest students understood the concept once I demonstrated each type of roll (keep in mind they are sixth graders). They all enjoyed it! The standard rules of Bingo apply: once you get five across or down, call out “Bingo” and tell us all the multiplication facts you got.

You may be thinking “why are we even bothering with dice?” You make a valid point. These activities can all be done without dice. However, I have found that the students stay engaged and practice their facts more if they are actively involved. They really seem to enjoy rolling the dice and it is a new, fun way to practice the same facts over and over.

***

Today I had a doctor’s appointment, so no school outfit to share. I have to admit it was nice to spend an entire day in sweats! Whoo hoo!

Here’s one for the alliteration lovers

*Nerd alert*

I’m a sucker for some good alliteration. So when I was thinking about what to post today, the idea of a “Teacher Tuesday” popped into my head and just wouldn’t go away. I’m not sure I’m ready to commit to posting a teaching activity every Tuesday, but the idea sure sounds good at least for today!

As a special education teacher in a middle school, I do a lot of remediation. It’s so heartbreaking for me to see the gaps that some students have in their foundational knowledge. I’m currently working with a group of sixth graders who have somehow made it to middle school without knowing their times tables. Since sixth graders in Virginia cannot use calculators on the statewide assessments, it’s essential that my students commit the facts to long-term memory; however, many of them have a disability that hinders their ability to do this without a lot of repetition. Because of this, I am taking the last 15 minutes of my co-taught math class everyday to practice, practice, P-R-A-C-T-I-C-E!

While repetition is good, it can also be pretty darn boring to just repeat facts over and over again. Flash cards are great but over and over again, every single day? Snooze.

One way I keep my students interested is to let them practice multiplication facts on their desk. As in, I let them write on their desks. Like, ON their desks.

Multiplication Practice-Write facts on desk with expo marker!-001All you need is an expo marker, a clean desk, some dry erase board cleaner spray, and a paper towel. Before introducing this to your students though, I would TEST a tiny area to make sure it will wipe off. It has worked on every “wooden” desk I’ve tried but if you have a white-top desk, you may want to proceed with extreme caution.

Ways I use this activity include:

1- Giving students a fact family and having them write all facts 0-12 on their  desks (above I had them write all the “3’s”).

2- Clear 12 desks and number them all 1-12. Each desk is a fact family and the student needs to travel the room and write one (or two) fact for each family on that desk.

3- Call out products and have them write the problem that would go along with that product on their desk. For example, I might call out “21” and the student would write ‘7 x 3 = 21’ on his or her desk. It’s also a good way for them to think about products with many factors (i.e. “24” can be ‘2 x 12,’ ‘3 x 8,’ ‘4 x 6’ so challenge students to come up with all three problems on their own). They should write small enough to have space for several problems and then you can check them over or go over them as a class.

4- Roll dice and write a multiplication problem on the desk with the numbers rolled. (More to come on that in next week’s Teacher Tuesday!)

I occasionally have students walk around and check another student’s desk. They love being able to “grade” and give their peers 100% or stars. (I don’t do this until every student is nearing mastery of the particular fact family).

My students LOVE this activity because it is something different. They never get to write on their desks and, in fact, normally get in trouble for it. Getting to “break the rules” and write on their desks is fun and motivates them to practice. I actually had one student who hates completing worksheets tell me how much fun he was having writing his times tables. Did you catch that? Fun. Writing his times tables. I don’t know about you, but I consider that to be a major success!

***

Today’s outfit was bright and colorful–it was our first “snow” (more like a dusting) and the weather was pretty dreary so I needed to brighten it up with my wardrobe!

11-12 Outfit 3

Sweater: Target

White button down: Express

Khaki pants: Maurices

Shoes: Kohls

Necklace: Bluetique

Bangle set: Ruche (shopruche.com)

Cheap Fidget Tools

I don’t know about you, but I love a good deal. As a special education teacher, I especially love good educational deals!

The other day, I was at the dollar store looking for balloons. My quest took me to the party aisle, where I happened to notice all the cheap party favors they had. That’s when I saw them. Squishy balls! Three for $1.00! A lightbulb went off in my brain and I immediately knew how I was going to put them to use. I bought six packs for a total of eighteen squishy balls and took them all to school. I opened all the packs, put the balls in an empty notecard container, and voila!

Squishy Balls

A class set of fidget tools!

I teach in a middle school, and one class that I co-teach in has a lot of students who struggle with attention. While a few students do have ADHD or other types of sensory processing disorders, most just simply have to stay busy or they get bored. Boredom = lots of extra pencil tapping, talking to a neighbor, fidgeting in their seat, or (in extreme cases) falling asleep. The class was getting out of control! I had thought about using fidget tools before, but I simply didn’t have enough for everyone that needed one. I knew the students would complain about “fairness” if they didn’t all have the same thing but buying 18 similar fidget tools was going to get expensive quick! This was the perfect solution. I got enough for everyone in the class and passed them out at the beginning of class. I’ve been amazed at how just having something small in his or her hand to play with in a non-disruptive way can really help a student focus! I collect them at the end of class and they’re ready to go for the next day. This has made a big difference in keeping noise level down and helping students stay focused. $6.00 well spent!

After this success, I rooted around in my fidget tool box and dug out a lot of other items that I’ve found over the years at dollar stores. Here’s a quick list of some of the things I have found nice and cheap:

Fidget Tools Pic

-textured pencil grips or eraser tops

-squishy balls

-firmer “porcupine” balls

-mini Slinkys

-mini rubber balls

-mini Play-Doh (or other brands of craft dough) packages

-hacky sacks (I confess I did not buy these but my husband had several from childhood. They can be found online for under $2 though!)

-rubber poppers

-string of Mardi Gras beads

-yarn (sometimes it’s as simple as having a piece of yarn to fiddle with!)

-coiled bracelets (sometimes they come as keychains)

-pipe cleaner

-rubber bands/silly bands

-mini koosh balls (the kind with the rubber-like strings)

-silly putty

The list goes on and on! I have found the most helpful aisles to be the party aisle and craft aisle. Be creative! Finding good tools to help your students concentrate does not have to be complicated and it does not have to be expensive! All of these items can be found for under $3. I also collect stress balls at every chance I get–many companies use them as promotional items so they are f-r-e-e! Doesn’t get better than that!

**A quick note: I make sure my students know my fidget tool rules before I give them one. The rules are:

1- Your fidget tool does not leave your hand unless it is sitting on your desk.

2- You may only use one hand with your fidget tool. The other must be working (writing, using a calculator, following along on the page, etc).

3- Do not throw your fidget tool.

4- If you are misusing your tool or are unable to work and/or listen to the teacher when you have your fidget tool, we will need to discuss whether this is actually an appropriate tool for you (and it will be taken away if it is not).

Enjoy a fidget-free (or at the least, reduced!) classrroom!

***

Today’s school outfit was based on neutral shades. I did add some jewelry after this but didn’t have time to take another picture. Quick and easy look for fall!

10:29 Outfit

T-shirt dress: Express

Black leggings: Express

Boots: CL by Laundry

Switch-Access Links

As all my teacher friends can attest, there are a lot of websites that are great as learning resources. And I mean a LOT.

Many of my students access computer games and activities by using a switch, and in my years of teaching, I have accumulated quite the collection of websites for switch use, some for academic purposes and some just for fun when a student has free time. I hate filling up my bookmark bar with a million and five (okay, slight exaggeration) of these sites, and I didn’t like having to search through my chaotic “Teacher Things” Pinterest board to find them all, so in an effort to simplify, I’ve compiled a list of sites that I have found to be useful for varying levels of abilities and needs. I categorized them so I could easily find sites that would work for each student based on need. Some of the sites are repeated below because they fit more than one category of use.

Single-Press Cause & Effect Learning. These sites are for beginning switch users or users who are still working on learning that hitting the switch will produce a result or desired effect. They give the student 100% chance of success because they cannot hit a “wrong” answer.

  • SENSwitcher Students can work their way up to multi-press as they improve their skills.
  • Priory Woods A fun way for students to activate a short video. Lots of songs and variety of popular TV shows and movies to keep students interested.
  • HelpKidzLearn This website has a TON of great cause & effect games and stories for switch use. The free subscription gets you access to a few activities under each category, but you can choose to subscribe for less than $2 monthly and gain access to all the activities.
  • KneeBouncers Unfortunately, this site requires a paid membership for almost all activities (although you can sign-up for a one-month free trial). It has lots of games and activities for cause & effect learning and is even great for young children without disabilities.
  • Dartboard Hit the switch two times  (once for horizontal coordinate and once for vertical) in order to “throw” the dart. While it is easy to participate in this game, the concept may be better suited for higher-level users.
  • Papunet First Games Simple clicks allow different pictures to pop up around the screen. There are some simply-for-fun games and some are great for practicing vocabulary of fruits, vegetables, and animals.
  • Shiny Learning Very simple games that are lots of fun! Some single hit, some press and hold, and some multi-click  activities.

Academic Learning & Stories

  • Hiyah Slideshows This website allow your student to use a switch to click through a ready-made slideshow to learn about a concept such as colors, shapes, seasons, holidays and can also be used to increase learning with dolch words and basic math.  There are also stories they can read.
  • Papunet Games This site is FULL of learning activities. Puzzles, dominoes, memory games, games of precision, sudokus, word exercises, drawing exercises, first games, and more!
  • Storyline Online Short videos of famous actors talking about and reading their favorite children’s stories. The story illustrations are “brought to life” for the viewers to watch and all stories are read in around 5-7 minutes.
  • Tar Heel Reader Users create powerpoint books that students can read through by having their switch set to left and right arrows or by having the switch “click” the left arrow like a mouse. The cool thing about this website is you can search for a topic (i.e. “Halloween,” “Dr. Seuss,” etc) and find lots of books on that topic. All the books can be set to be read aloud. You can also upload your own books!
  • Online Talking Stories The title is pretty self-explanatory. Lots and lots of stories to choose from that are animated and read aloud.

Multi-Switch/Keyboard User Games. These games are for experienced switch users who have moved past the cause & effect understanding and are ready for a challenge. Some of these are pretty high level so make sure you experiment with them first to make sure they’re right for your student.

  • BBC Games These games are fairly complex and may be best for two players.
  • Dartboard This fun game allows a student to hit the spacebar twice in order to throw darts. Could be used as a cause & effect activity with two single-presses, but the strategy and game itself is probably best suited for a higher-level user.

Enjoy these sites! And please let me know if you have found other ones to be helpful and I will gladly add them to my list.

***

Disclaimer: I received no compensation, monetary or otherwise, for endorsing any of these websites. I had no contact with the administration of any site and am recommending them only as sites that worked well and allowed success for my students in my classroom.