Halloween Procrastination

I am way late on yesterday’s blog post! After school, I hit the ground running with preparations for the Halloween party Justin and I are throwing tonight. After several trips to the dollar store (and, I confess, I even caved and went to Wal-Mart), I had plenty of decorations and ingredients for everything I needed!

Two things I love are the holidays and hosting people at my house. Put them together and I am one happy girl; however, the night before the hosted holiday party, I’m typically one stressed-out girl. This is mostly because I tend to procrastinate. One way I tried to cut out the most stress this time was with food preparation. Our party is after dinner so I knew I just wanted finger food and treats. My requirements for the food were: quick (due to procrastination), easy, budget-friendly, and able to be made ahead of time! I’m a bit of a procrastinator, so waiting until the day before limited my options, but I’m happy with the results!

Final Treat Collage

Let’s be honest. As much as I love things to look cute and festive, I also know my limits as far as time and skill. Decorated cupcakes and cookies look so great (and relatively simple) in pictures, but I know I just do not have six hours to figure how how to decorate them and then actually do the decorating. As as for the intricate decorations, my skill level would fall embarrassingly short. The simple process with making these treats was much more my speed.

Final Oreo Collage

I started with Oreo “mummies.” If you are an Oreo freak like me, these are going to be right up your alley.

Step 1: I purchased a package of Oreos (double-stuf of course!) and vanilla candy coating.

Step 2: Follow the directions on the package to melt the candy coating. For me, this meant heating for one minute, stirring, and heating for 15 more seconds. Then I dropped an Oreo in the goo and used a spoon to cover it with the coating.

Step 3: I lifted the Oreos out with a toothpick (to let the extra coating drip off) and placed them on parchment paper to cool and harden.

Step 4: I used white cookie icing and drew it back and forth to make the “mummy” wrap. I then put mini chocolate chips on each cookie for the eyes.

Step 5: Let the mummies completely cool and harden before storing.

See? Quick and easy!

I also employed a similar tactic to make super simple “ghost” cookies.

Final Ghost Collage

This time I did the same thing, but with Nutter Butter cookies. I added the mini chocolate chips to make eyes and a mouth. I think this could also be easily adjusted to make snowmen cookies at Christmastime!

From start to finish, this whole project took about an hour to make tons of cookies. The candy coating cools quickly and once they were cooled, I just put them all in an airtight container so they’re ready to go for tonight! I’m so excited! And the whole thing cost under $15. Yes!

Have a happy Halloween!

***

Yesterday was so chaotic I had to just snap a quick photo at school.  It was an Express kind of day 🙂

10-30 Outfit

Sweater: Express

Ruffle Tank: Express

Cream Pencil Skirt: Express

Peep-toe Pumps: Lulu Townsend

Necklace: New York & Co.

I may as well post today’s outfit too since tonight will be party time! Since it’s Halloween, we were allowed to dress up. Comfy scrubs all day? Yes please!

Doctor

Label-less scrubs: From my husband’s closet 🙂

Cheap Fidget Tools

I don’t know about you, but I love a good deal. As a special education teacher, I especially love good educational deals!

The other day, I was at the dollar store looking for balloons. My quest took me to the party aisle, where I happened to notice all the cheap party favors they had. That’s when I saw them. Squishy balls! Three for $1.00! A lightbulb went off in my brain and I immediately knew how I was going to put them to use. I bought six packs for a total of eighteen squishy balls and took them all to school. I opened all the packs, put the balls in an empty notecard container, and voila!

Squishy Balls

A class set of fidget tools!

I teach in a middle school, and one class that I co-teach in has a lot of students who struggle with attention. While a few students do have ADHD or other types of sensory processing disorders, most just simply have to stay busy or they get bored. Boredom = lots of extra pencil tapping, talking to a neighbor, fidgeting in their seat, or (in extreme cases) falling asleep. The class was getting out of control! I had thought about using fidget tools before, but I simply didn’t have enough for everyone that needed one. I knew the students would complain about “fairness” if they didn’t all have the same thing but buying 18 similar fidget tools was going to get expensive quick! This was the perfect solution. I got enough for everyone in the class and passed them out at the beginning of class. I’ve been amazed at how just having something small in his or her hand to play with in a non-disruptive way can really help a student focus! I collect them at the end of class and they’re ready to go for the next day. This has made a big difference in keeping noise level down and helping students stay focused. $6.00 well spent!

After this success, I rooted around in my fidget tool box and dug out a lot of other items that I’ve found over the years at dollar stores. Here’s a quick list of some of the things I have found nice and cheap:

Fidget Tools Pic

-textured pencil grips or eraser tops

-squishy balls

-firmer “porcupine” balls

-mini Slinkys

-mini rubber balls

-mini Play-Doh (or other brands of craft dough) packages

-hacky sacks (I confess I did not buy these but my husband had several from childhood. They can be found online for under $2 though!)

-rubber poppers

-string of Mardi Gras beads

-yarn (sometimes it’s as simple as having a piece of yarn to fiddle with!)

-coiled bracelets (sometimes they come as keychains)

-pipe cleaner

-rubber bands/silly bands

-mini koosh balls (the kind with the rubber-like strings)

-silly putty

The list goes on and on! I have found the most helpful aisles to be the party aisle and craft aisle. Be creative! Finding good tools to help your students concentrate does not have to be complicated and it does not have to be expensive! All of these items can be found for under $3. I also collect stress balls at every chance I get–many companies use them as promotional items so they are f-r-e-e! Doesn’t get better than that!

**A quick note: I make sure my students know my fidget tool rules before I give them one. The rules are:

1- Your fidget tool does not leave your hand unless it is sitting on your desk.

2- You may only use one hand with your fidget tool. The other must be working (writing, using a calculator, following along on the page, etc).

3- Do not throw your fidget tool.

4- If you are misusing your tool or are unable to work and/or listen to the teacher when you have your fidget tool, we will need to discuss whether this is actually an appropriate tool for you (and it will be taken away if it is not).

Enjoy a fidget-free (or at the least, reduced!) classrroom!

***

Today’s school outfit was based on neutral shades. I did add some jewelry after this but didn’t have time to take another picture. Quick and easy look for fall!

10:29 Outfit

T-shirt dress: Express

Black leggings: Express

Boots: CL by Laundry

Three Words: Apple Cider Donuts

Today was one of those Mondays where I woke up in disbelief that my weekend was over. Okay, truthfully, this happens nearly every Monday, but today was especially so! This weekend FLEW by!

Justin had a study-free weekend and since that rarely happens, we decided to take advantage by road-tripping to Charlottesville, VA to visit some friends. We have several friends who live in the city and we don’t often get to see them so it was a treat to spend the whole weekend catching up!

Some highlights:

-Taking Macie to her very first dog park (She LOVED it! She ran the whole time and was the star of the show; the dogs all flocked to her puppy energy! And I had two people tell me and I quote: “She is the cutest puppy I have ever seen!” I was one proud mama!!)

-My first time ever inside a Trader Joe’s (I think I’m in love.)

-Made homemade pizza with friends (One of our friends is pregnant and pizza is her craving! How fun!)

-Annual trip to Carter’s Mountain Orchard!

If you are ever in the Charlottesville area in the fall, you simply must check this place out. It is a GORGEOUS orchard on top of a mountain! You can walk down the mountain into the orchard on both sides and the view is incredible.

Orchard

This picture does not even do it justice at all!

After getting our bags, we made a beeline to the Pink Lady trees (my favorite!) Unfortunately, by this late in October, many of the trees have no apples within reach anymore so Justin and I employed some married teamwork to get the yummy ones at the top of the trees!

apple 5 apple 3 apple 1 apple 2

As you can see we do not mess around. And it was worth it when we got perfectly pinkish-red apples! Yes!! We also got some Jonagolds which were also delicious! And since it was all outdoors, dogs were allowed to go in the orchard. Macie loved it!

Before leaving, we had to take our “annual” family pumpkin picture! We were actually at Carter’s over the same weekend (with the same friends!) last year. Justin and I took a picture in front of a giant pumpkin painting and we decided to make it a tradition and take a picture again this year.  Now I guess we will just have to go back next year and take another one!

Pumpkin2 Pumpkin

It was a lot colder this year, hence the winter coats! But I love seeing how our family has changed; now we’re married with the “cutest puppy ever!”

Speaking of love, Carter’s Mountain also has little stores at the top. One of them is a bakery and they sell APPLE. CIDER. DONUTS. My life is completely changed. Delicious! I forgot to take a picture of ours this year, so a picture of last year’s will have to suffice. Although it should be noted that this year we upgraded from a half dozen to a full dozen. Yum!

Donuts

And yes, my man was rocking mutton chops last year. We went to a country concert later that day so it was fitting. Love that guy!

As fun as our trip was, it went way too fast! I’m already looking forward to our next visit!

***

Since today was one of those “I can’t believe it’s already Monday” days, I went for a simple, comfy look. You can’t go wrong with a classic v-neck sweater and understated jewelry! Since I didn’t have time to take a picture this morning (may have slept in a bit too long!) I had to take a mirror selfie in the gym locker room before my workout after school. Classy, huh?

Outfit #1

Sweater: Express

Layering Tank: Mossimo (Target)

Dress Pants: T.B.A.

Shoes: Maurices

Monogramed necklace: Lia Sophia

Operation Stress-free Christmas Card Picture: Step #1

Today, a very exciting package came in the mail!

Macie Hat #2

A puppy Santa hat for Macie!

This past weekend, a few friends and I drove to a nearby city for an overnight girls’ shopping trip/weekend away. (It was SO nice to get some quality girl-time in . . . and of course, score some major deals!) As we were browsing one of the many stores, one of the girls picked out coordinating outfits for herself and her husband and casually mentioned they’d probably wear them for Christmas card pictures.

Pause. What? People are thinking about Christmas? Didn’t fall just begin?

Truth is, I’m a bit of a procrastinator and had my friend not said something, Christmas card pictures wouldn’t have even crossed my mind for about another month. Then it would have taken me a week or two to decide what to do and at least another week to get it done. I’d be lucky to get the cards out by Christmas eve! The  whole thing would be rushed and stressful, and I’d probably be dissatisfied with the results.

Not gonna happen this year! I’m inspired to “simplify the [upcoming] chaos” by planning ahead! Let Operation Stress-free Christmas Card Picture begin!

All my enthusiasm aside, I have no delusions that I’ll be able to pull off something glamourous. I see all the adorable Christmas card pictures where the couple is wrapped up cozily in Christmas lights (J & I would just look like a tangled mess) or is having a cute snowball fight and still looking picture perfect (My face gets ridiculously red in the cold so I’d look like Rudolph). Then I realized that J and I don’t need to do anything spectacular because we have a spectacularly cute puppy who can steal all the limelight and be adorable enough for us all!

Macie Hat #1

Cue Santa hat! (Bonus that is was only $2.99 plus shipping!) Now I just have to get her to like wearing the hat so it will stay on long enough for a picture. So far, she’s up to keeping it on for about 1.2 seconds. Anyways, I consider this a significant success on Step #1 of Operation Stress-free Christmas Card Picture. Yes!

***

Last week, I posted about re-vamping spring clothing to give it new life for the fall/winter. Even though I did score some new clothing on the shopping spree, I’m still digging out spring clothes and giving them new life. It’s actually fun to find new ways to wear things and it’s also very budget-friendly!

Here’s today’s teacher-friendly work outfit:

Outfit #1

Cardigan: Old Navy

Lace cami: Express

Grey pencil skirt: Laundry by Shelli Segal (found at Ross!)

Grey suede pumps: Bandolino

Bangles and earrings: Ruche (shopruche.com)

I LOVE mint and paired it with other pastels all spring and summer long. I paired it with grey to transition it to winter and really like the way it turned out!

On a side note, taking self-timed shots with a puppy in the room sometimes leads to this:

Outfit #1b

Hmm. We might need to work on her a bit before she’s ready for her big Christmas card debut after all . . .

What’s a shopaholic to do?

I can reasonably be classified as a shopaholic.

As the wife of a medical school student, I can also be classified as broke.

Ever since the leaves began to change color, I have been itching to get some new fall clothing. I just love trying out new trends/colors/patterns with each new season of the year! However, this year I have been really trying to stick to a budget since I am the money maker (or as my husband affectionately says, the sugar mama) in our family for the time being. I’ve been saving up my extra earnings from my second job for a shopping trip/girls’ weekend coming up (which I am SUPER excited about!), but until then, I’ve had to nix the shopping and avoid buying new clothes for this fall. This has caused me to get creative with my wardrobe.

Last weekend when getting ready for T.O.O.T., I had one of those “I have nothing to wear” moments. You know the kind: you open your closet and feel completely uninspired by everything you see. I realized I had already worn all my “fall” outfits at least once, if not twice, since mid-September. Now, I know that I am not defined by my appearance. I know my husband thinks I’m beautiful even in sweatpants and no make-up. I know I can have a good time in an outfit my friends have already seen 30 times. I also know that many of my friends wouldn’t even notice if I repeated the outfit 30 times. But I also know that I feel better about myself on the inside when I’m know I’m looking cute on the outside. I wanted to feel good about my outfit, so I decided to dig out some off-season clothes and see what I could put together.  I found the answer to my problem laying on my shelf of spring clothing.

In the spring, I found a plain, thin, bright coral sweater at Target. It’s fairly sheer so I always layer a long tank underneath it. By pairing it with “fall” accessories, I was able to make a look appropriate for an outdoor event in mid-October while feeling cute and saving money. And I actually kind of liked that it wasn’t a traditional fall color. Usually I reserve bright coral for spring or summer and pair it with sandals, but it was fun to mix it up in an unexpected way. Now I’m going through all my “spring” clothes looking for ways to re-vamp looks for the cooler weather! And when I (finally!) get to go shopping with the girls this weekend, I’m going to try to find clothing that will be good both for this fall and for other seasons so I can continue to get lots of use out of my purchases throughout the year!

20131012_165026

Sweater: Target

Layering tank: Target

Jeggings: American Eagle

Boots: Old Navy

Scarf: Bought on a trip in India (similar)

T.O.O.T. = the best acronym ever

T.O.O.T is here!

Yes, I have a bit of a childish sense of humor. But I did not make up this acronym!

TOOT

Taste of our Towns is a yearly festival in the town we moved to. As a lover of festivals, I was excited. As a lover of food, so was Justin.

We set off with our umbrellas since the morning was drizzly, but by the time we parked and walked into the heart of the festival, the actually rain had passed and we didn’t get a single drop! Justin had to take blood pressures at a booth for his medical school for an hour, so after letting him take mine (102/78 baby!!) I scoped out the booths while I waited for him to finish.

20131012_125032

T.O.O.T. works by using a token system. You buy tokens (1 token = $1) and then trade in tokens for food at the various booths. There were 50+ booths from different local restaurants, bakeries, coffee shops, frozen yogurt stands, and food stores. Most of the food was sold in smaller portions than normal so you can sample many different types of food rather than fill up on just one or two things. And everything sold is the best of the best that the businesses offer so it is all delicious! 

20131012_124144

There were also different entertainers throughout. My personal favorite were the people on stilts. Scary!!

20131012_111940

Once Justin was done taking blood pressures, we met up with a group of our friends and got to work selecting foods to try! After a delicious pulled pork sandwich for lunch, my sweet tooth won out and I tried chocolate peanut butter fudge (seriously, how can you turn that down?!), a chocolate covered pretzel, and beautifully dipped chocolate covered strawberries. Notice the trend. I adore chocolate. It’s probably a good thing that I got my blood pressure taken before all this food!

strawberries

Justin had a bit more restraint and tried more “real” foods like a loaded bratwurst, a prime rib potato bowl, and bread pudding.

20131012_121834

20131012_125219

We had such a great day hanging out with fantastic friends and sampling phenomenal foods! I already can’t wait for T.O.O.T. 2014!

Simple, Creative Flower Pot Gift

Yesterday was a pretty long day at school, and I found myself really missing my kiddos from my last teaching job. Before I got married and relocated, I taught elementary-aged students with multiple disabilities and absolutely loved it!! Those students became so dear to me and they will forever have a place in my heart. And thanks to my thoughtful and creative teaching assistant, they will also always have a place on my back deck!

flowerpot

At the end of last year, my class surprised me with the BEST gift ever! My teaching assistants chipped in and bought me a large flower pot. Then they painted the rim blue for the sky and a border of green grass at the bottom. They had each child stick their hand in green paint (great feeling for these children who love sensory activities!) and press it onto the pot for flower stems. The students all got to choose the color they wanted to paint the flower centers and petals. Since all of my students had communication needs, they indicated their color choices either by eye gaze or using gestures.

Each flower center and petal was carefully made using the child’s thumbprints. And the cutest finishing touch was the little critters! Each student made a little thumbprint critter (i.e. ladybug, butterfly, ant) next to their flower. Adorable!!

I liked that they also wrote each student’s name on their flower so I will always know whose is whose. I really really loved this idea and thought it was such a creative and thoughtful gift! I also loved that it actually involved my students, who have more limitations with fine motor skills. This was the perfect craft to get them really involved and now I always have a piece of them with me even though I moved far away!

pot2

The gift also included a Lowe’s gift card so I could purchase a pre-potted flower arrangement (my assistants know full well my complete LACK of a green thumb!) which was also a very thoughtful gesture. I’m so thankful to have had the opportunity to work with such wonderful people!

“Bye Bye Bye” to my youth

Today, I aged 15 years.

Someone once told me that a “generation” is roughly 25 years. And something happened today that made me realize that though there are only about 10 chronological years between myself and the average eighth grader, I am really in a totally separate generation.

In the last block English class I co-teach in, the other teacher passed out a sheet detailing ways to “hook” your readers using different tactics. One of the tactics was to make a pop culture reference and the example sentence talked about N’Sync. LESS THAN HALF of the class knew who that was.

WHAT!?

I could almost feel the wrinkles form instantly.

After agonizing for roughly 30 minutes about how to re-work my budget to include all the anti-age creams and serums I would now have to buy, I realized how ridiculous I was being and decided to embrace my old goat status.  So tonight, I’m going to sit back with a nice glass of wine and crank up the “classic” Backstreet Boys (on my antiquated CDs no less).

And I will also need to tell my husband that he owes me a lot of missed  birthday gifts  for all the years that have just flashed before my eyes. 🙂

Backstreet’s Back ALRIGHT!!

Week started out a little . . . wet

Oh Monday. How I didn’t miss you.

I am actually normally a very positive person who really tries to make the best of a Monday. However, all that positivity went out the window (literally) when, at 7 am, I walked out to my car in the pouring rain only to realize I left all four windows rolled down after taking Macie to the park yesterday. I had to attempt to keep my bottom dry by sitting on my stash of re-usable grocery bags in the car.

Not exactly the best way to start out a week, but at least it made me thankful to get to work and get out of my car!

***

In the spirit of fall, I thought I would share a simple fall craft that I did last year with my students. My first two years of teaching, I taught students with multiple disabilities in an elementary school. My students had little to no fine motor skills, so I had to get creative in order to make sure they could all still participate in making crafts.  This simple Indian corn craft is perfect for students with developing fine motor skills! It’s also a good sensory activity; my students love the feel of dipping their fingers into the paint!

Indian Corn

You will need:

-yellow construction paper

-green construction paper

-brown, orange, and red finger paint

-small bowls or a plate for the finger paint

-glue (or you could use a gold brad if you want to make the leaves moveable)

-scissors

Instructions:

1. Cut the orange construction paper into the shape of a large oval. If the child has the fine motor skills, you can have him or her cut this paper after you draw a simple outline. I made my oval “bumpy” to look like the edge of an ear of corn.

2. Cut out two green leaves. I free-handed this step but if you are not comfortable with that, I’d suggest finding an outline online to trace and use as a template.

3. Here’s the fun part! Have the child dip their fingers into different colors of paint. (For some of my students with more limited abilities, I used a paint brush to apply paint to their fingertips.) Then they can make kernels all over their yellow ear of corn. They can do a pattern or just dot away until the ear is full of kernels!

4. Allow time for the paint to dry. After it’s dry, attach the leaves to the ear. I used glue to keep mine in place; however, I wish I had used a brad to attach the leaves so the students could have practiced pulling back the husk to reveal the corn!

This would also be a good lesson around Thanksgiving to teach about the first Thanksgiving and the help that the Native Americans gave to the Pilgrims in planting maize.

Enjoy!

Fall: Reflect & Recharge!

There is something about the transition to fall that causes me to pause and reflect. The leaves burst into vibrant, warm colors seemingly overnight and the crispness of the air brings new life to my soul. I feel both refreshed and reflective.

While walking at the park today with Macie, I took extra care to step on every crunchy leaf I could find and to inhale extra deep breaths of the fresh air. The weather was perfect and it recharged all my batteries for the week ahead. Not to mention my park excursion wore Macie out so for once she is resting peacefully at my feet rather than racing around the living room. Success!

The weather also brought back memories of this time last year, when I was planning for my engagement shoots. I absolutely LOVED the idea of fall engagement photos and was so excited to get the chance to have two shoots! The first was with Steven Mark Stauffer, an up-and-coming photographer who is one of Justin’s childhood buddies (and an usher in our wedding). The second shoot a few weeks later was with Tim & Sasha Rothwell of Rothwell Photography. They were our wedding photographers and are also good friends of Justin’s family.   Getting to have two fall engagement sessions allowed me the chance to try out different things and see what I really loved, and I thought I would share some tips I discovered through these two sessions.

Fall Engagement; Photo Credit Steven Mark Stauffer

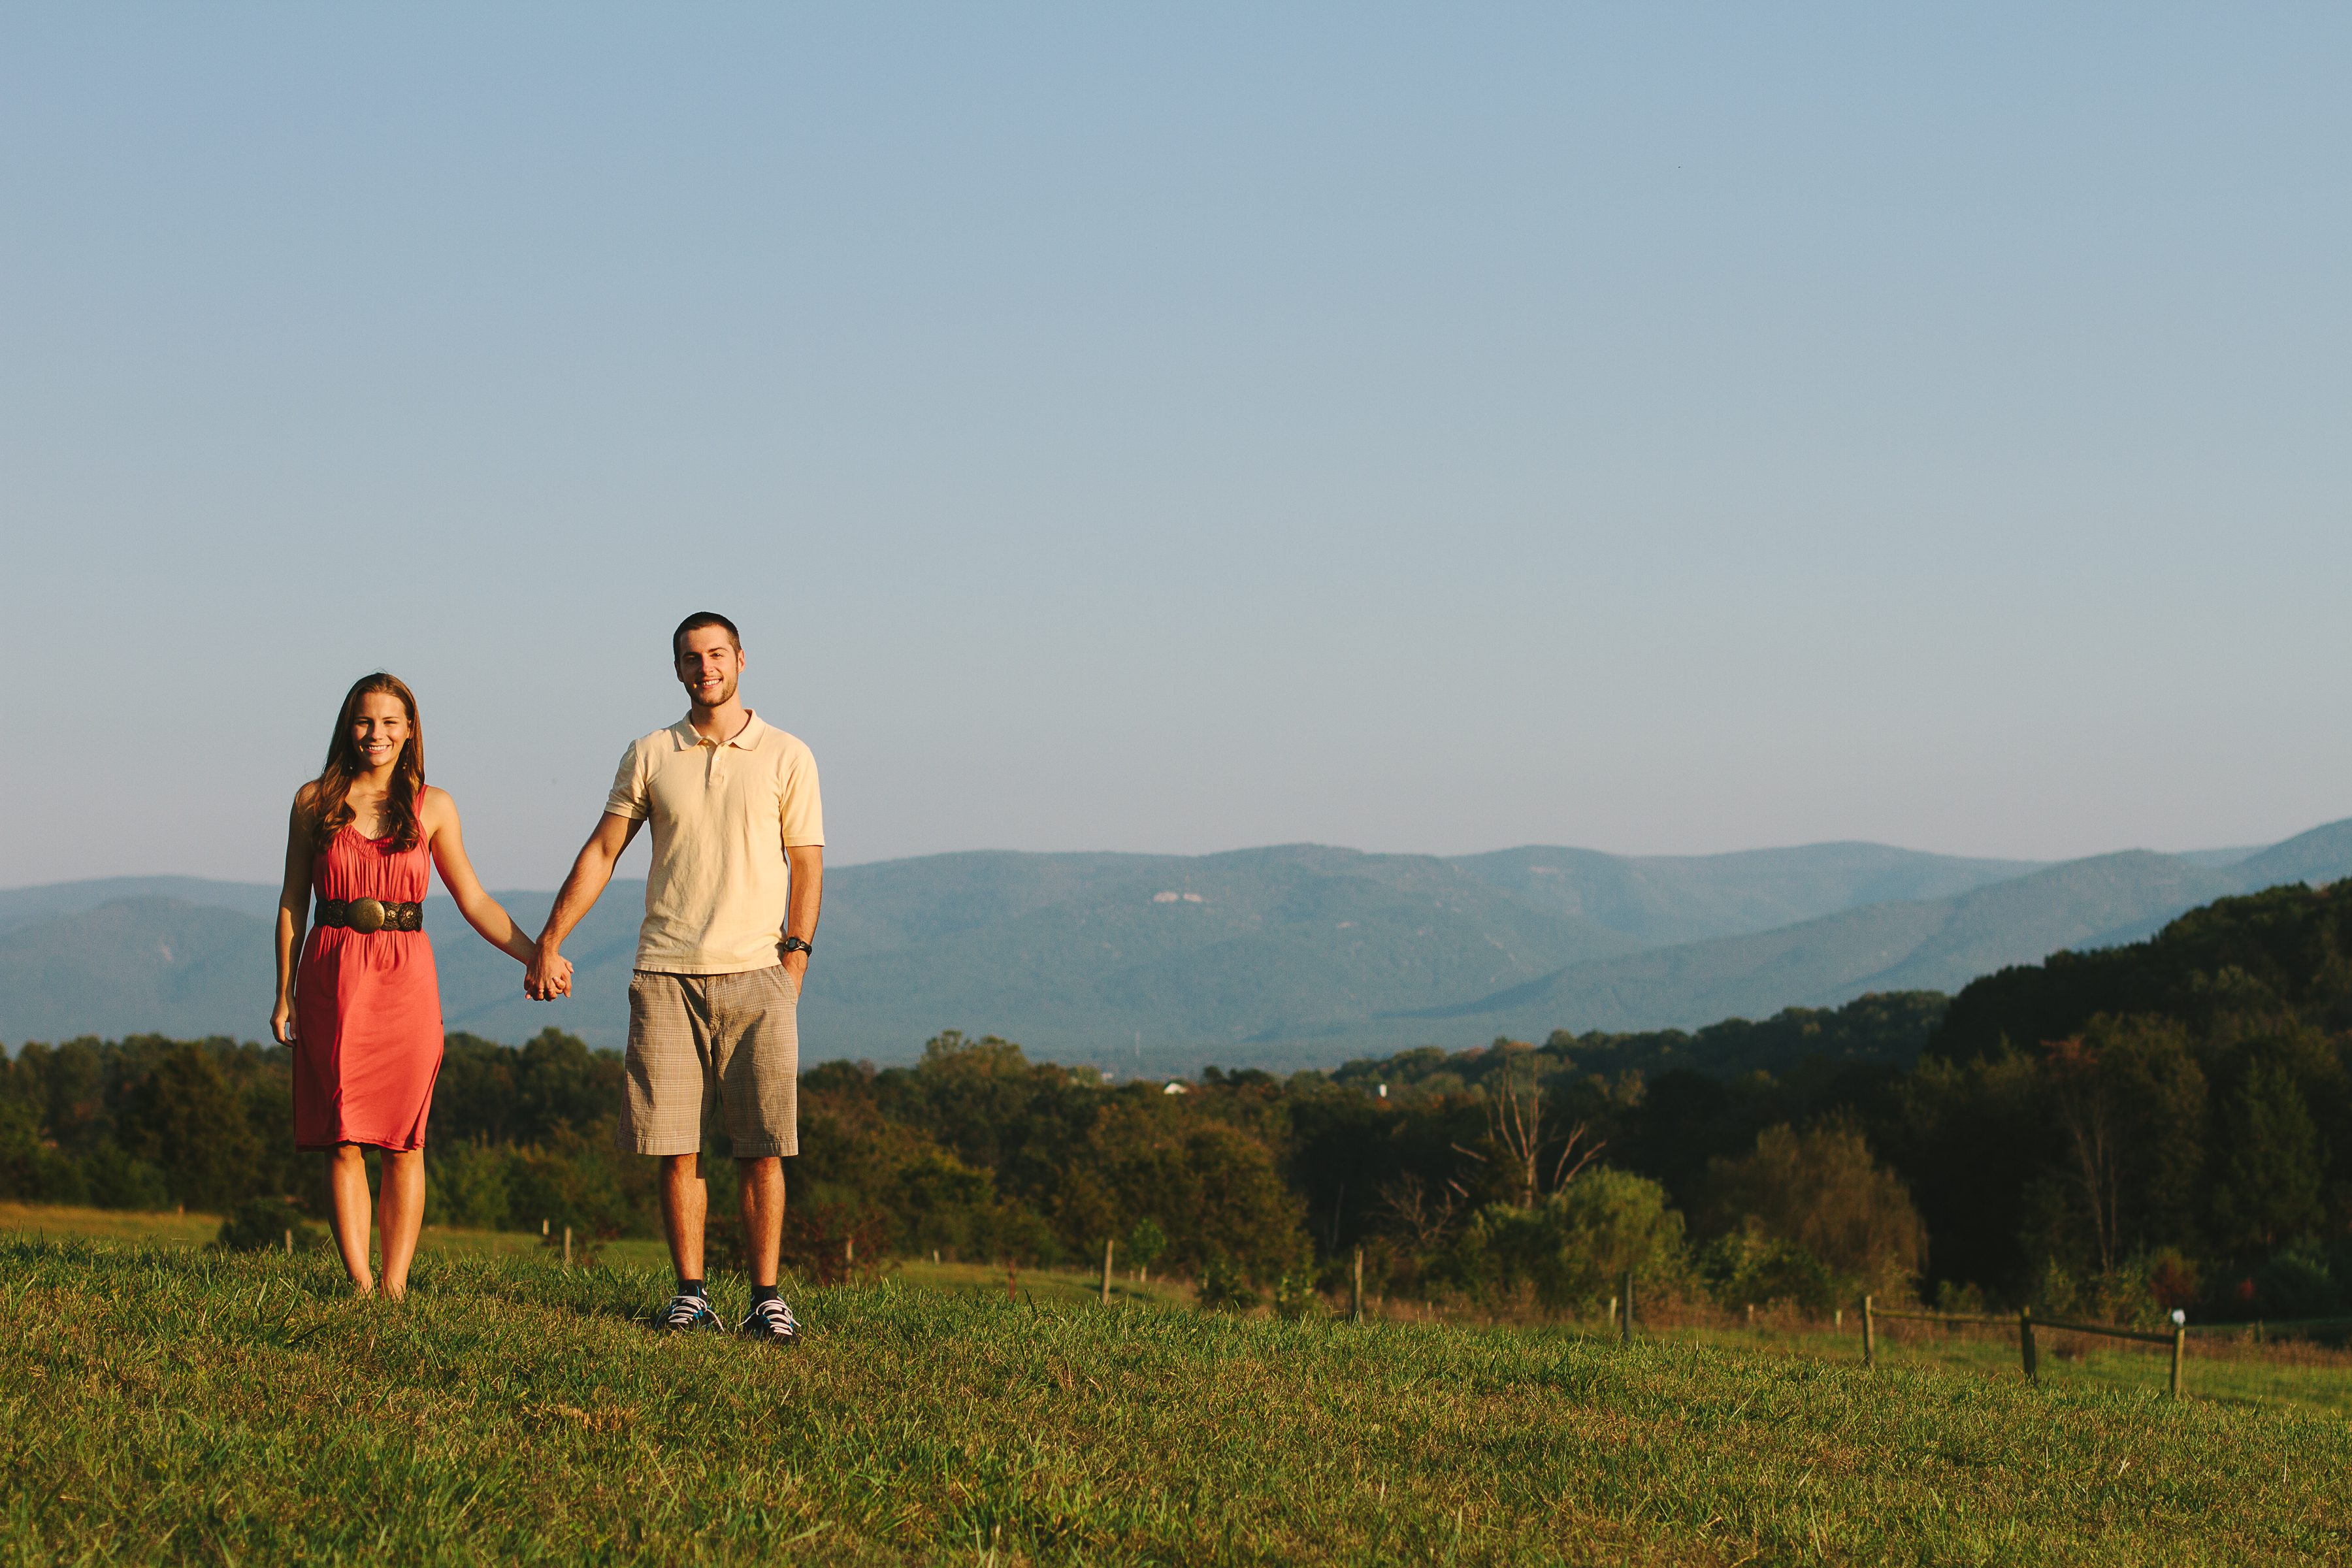
1. Find a meaningful location. Our first shoot took place outside my school, a place I dearly loved to work. I loved the view I got to see every day driving in to the parking lot, and it made the perfect backdrop for pictures! The second shoot took place at a local park where Justin and I had our first non-official “date” where we ran the path that circled the park, played frisbee, and ended up playing on the playground for an embarrassingly long time. It was the perfect start to our fun-loving relationship and the perfect place to take engagement pictures. Whenever I look at any of our pictures, I’m reminded of the special memories we have in each location and it warms my heart to think of the meaning those places have in my life.  Whether you take pictures in your hometown, at your college campus, at your favorite vacation spot, or in your backyard, I encourage you to make sure at least a few of them are taken in a meaningful location. Trust me, it makes looking back at the pictures even better!

                    JustinSarah-72 JSE131

2. Embrace fall’s color scheme… I have a soft spot for bright colors. I have several pairs of hot pink shoes in my closet that I frequently wear. I love to punch up an outfit with pops of bright color, but a fall engagement shoot is not the time to bust those out. In my first shoot, I stuck with warm orange, yellow, gold, and brown tones to complement the surrounding landscape and loved the result! We did swap outfits in our first shoot to add a little variety.

JustinSarah-12

3. …but also be yourself! In the second shoot, I decided to still go with neutral colors, but I chose gray and ice blue as a contrast to the warm fall colors. I then could add a pop of color in my necklace and loved the result! The key to using different colors is to keep it subtle. Now is still not the time for those hot pink shoes.

JSE113

4. Explore! I firmly believe fall is the best time to discover beauty in unexpected places. In our first photo shoot, we did some wandering (with permission) on the property and found a small shed that made a nice backdrop for a few pics. At the second shoot, we wandered away from the playground area to a pond. We had never walked around the pond before, but when we did we found some beautiful spots for pics!

JustinSarah-64

JSE053

5. Stay flexible with the weather. Our first shoot was supposed to happen on a Sunday; however, on Friday we looked ahead at the radar and saw it was supposed to POUR! We called Steven up and asked if we could bump up the time. He only had about an hour slot to squeeze us in later that same day but we made it work! I was nervous because it was so last minute and I worried about sunlight, but I LOVED the way the pictures turned out! If possible, try to keep a few time slots open to work around weather situations. This will depend on the schedule of your photographer as well.

5a) If it does rain, don’t panic! While I got lucky with two gorgeous days to shoot engagement pictures, it did completely pour on my wedding day (but that’s another post). Suffice to say, rain happens. We deal with it! If it does rain on your day and you can’t change the shoot, get creative! There are some super cute rain boots and umbrellas out there and I have seen some pictures turn out very well with them! Maybe you can even get a Notebook-worthy kiss-in-the-rain picture. 🙂

JustinSarah-28

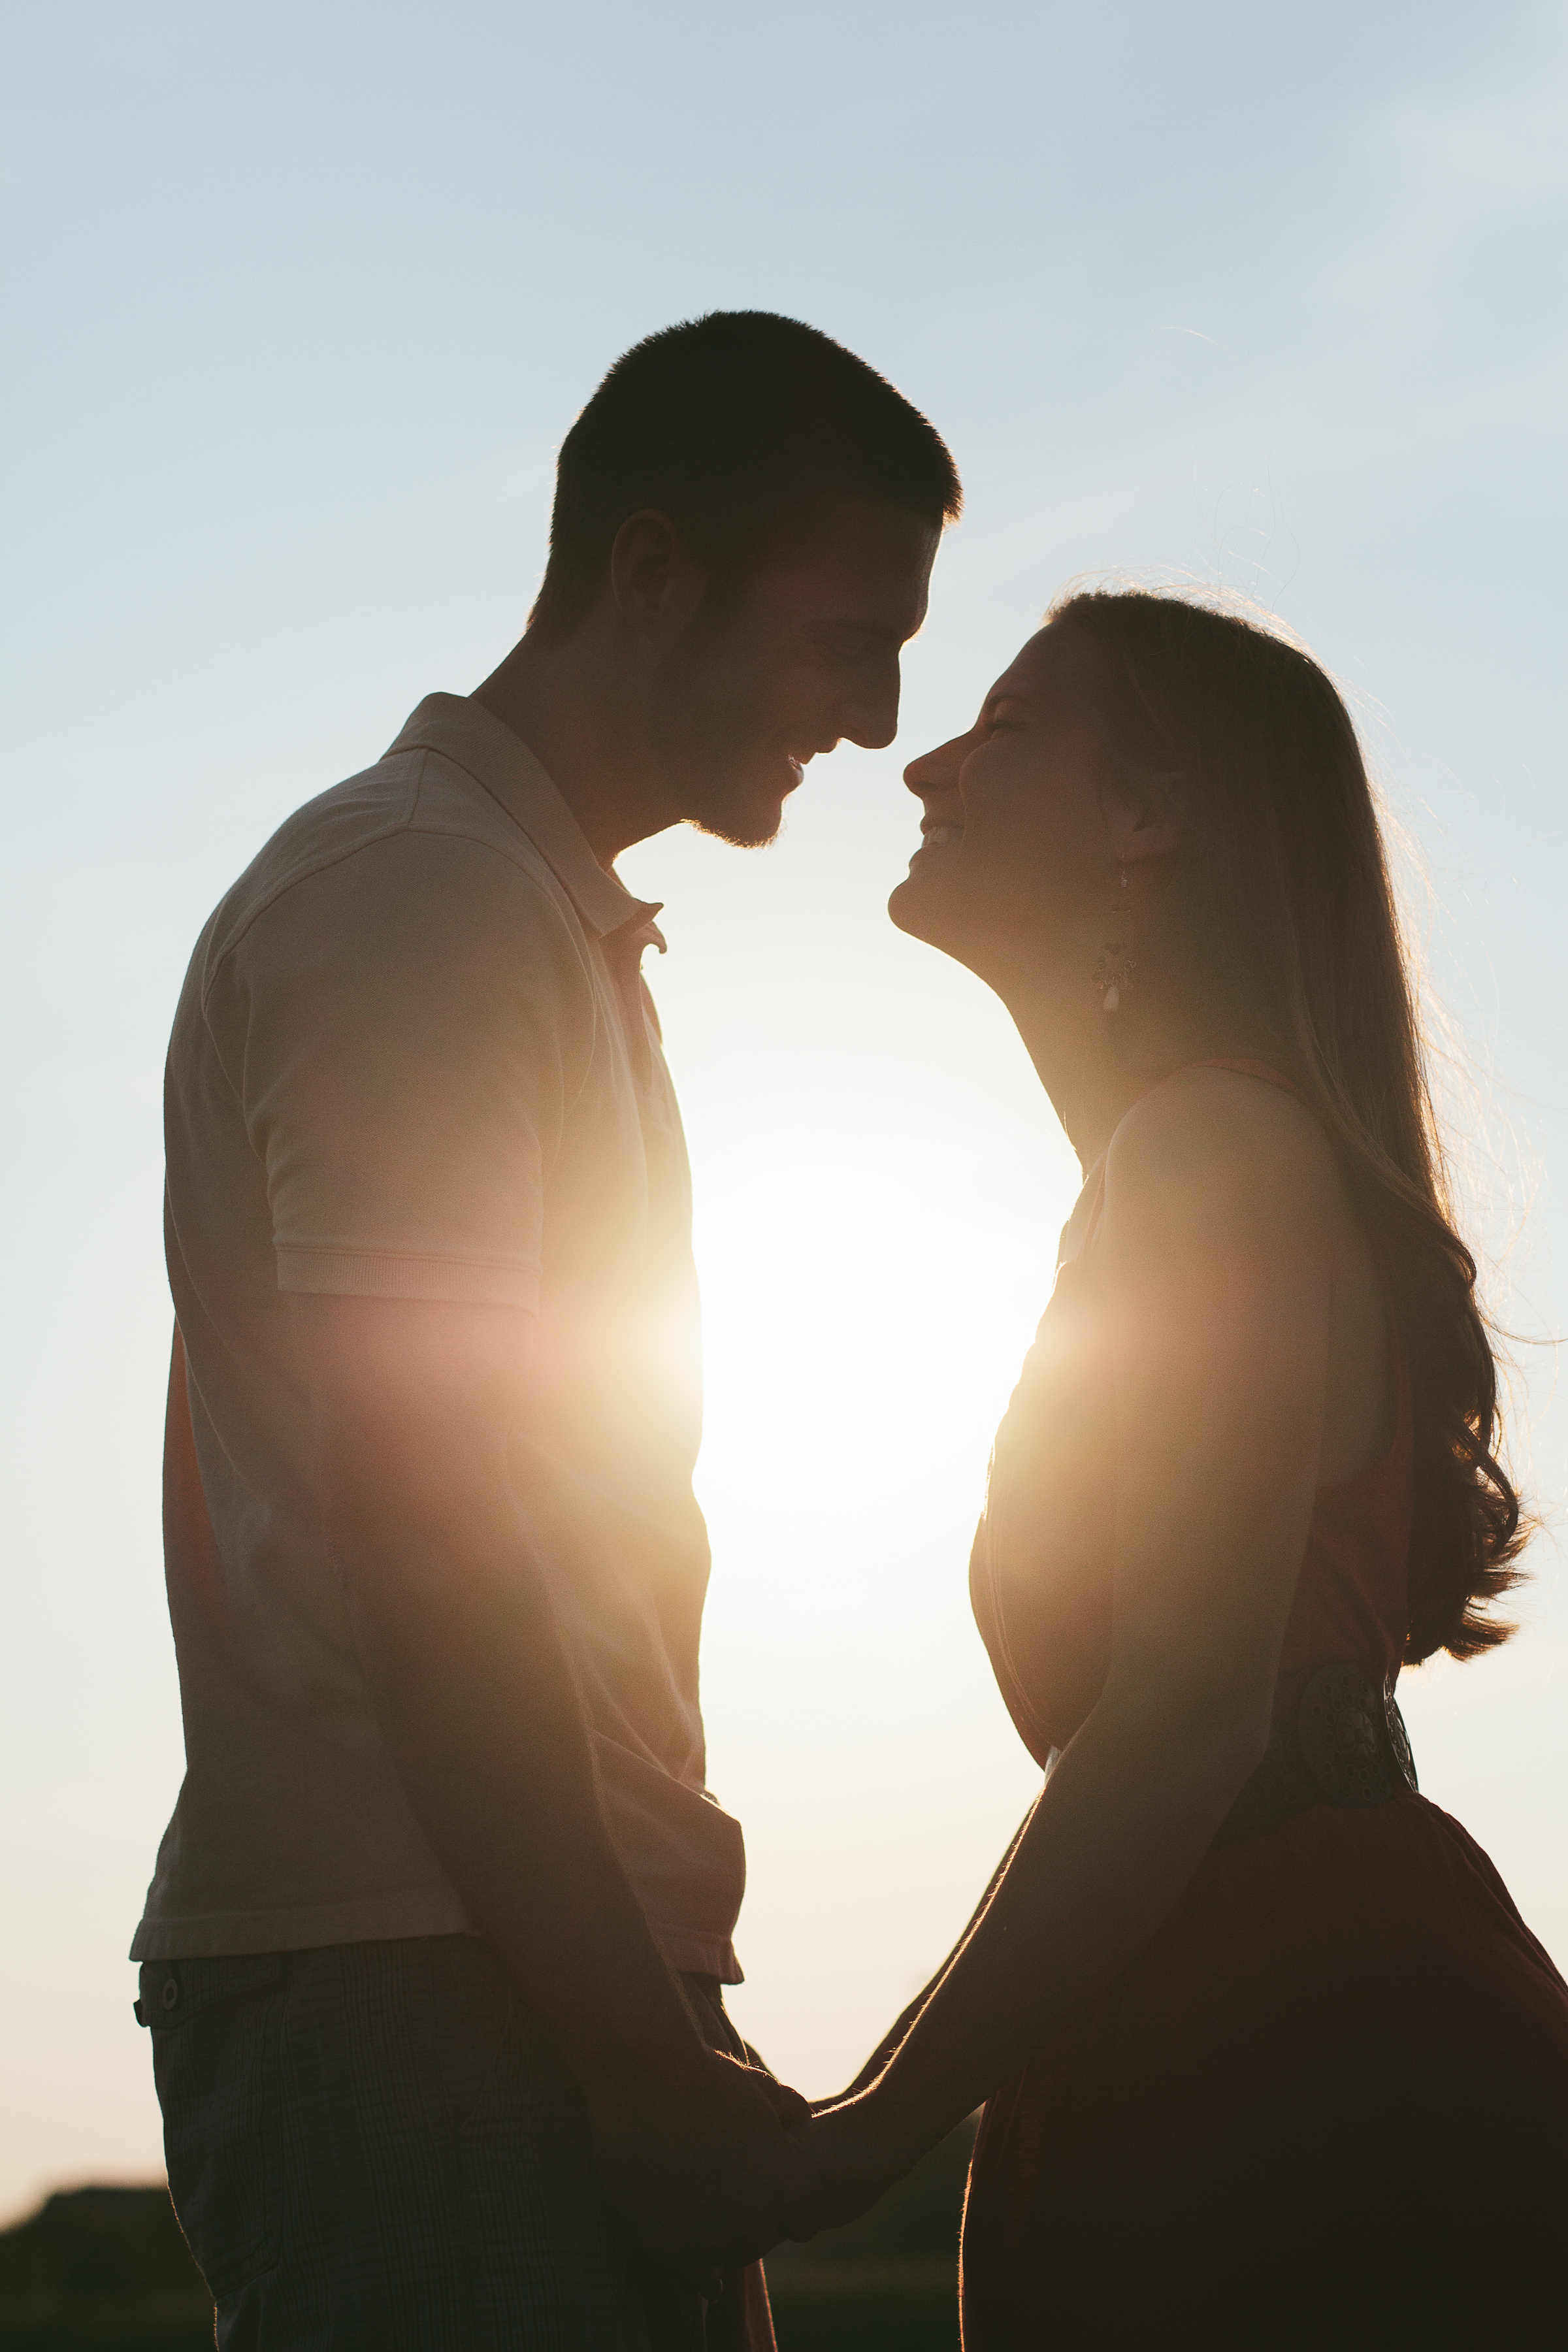
6. Consider the fall lighting. When our photographers told us to head to this spot along a river at the park, we thought they were crazy. It looked like just a bunch of weeds to us. But their well-trained eye saw that the lighting was just right for a stunning set of pictures. Check out the ways that light is changing the look of seemingly unordinary things around you.

JSE009

7. Add personality in the details. Justin loves mullets. (Yes, you read that right). While he thankfully did not grow one out for the shoot, he did wear a belt buckle proclaiming his love for them. And that turned out to be one of my favorite pictures because it totally embraced the uniqueness of his mullet love. I also think the picture of our shoes is a cute way to some some personality. Find ways to get creative showing your true colors in the detail shots!

JustinSarah-88 JustinSarah-53

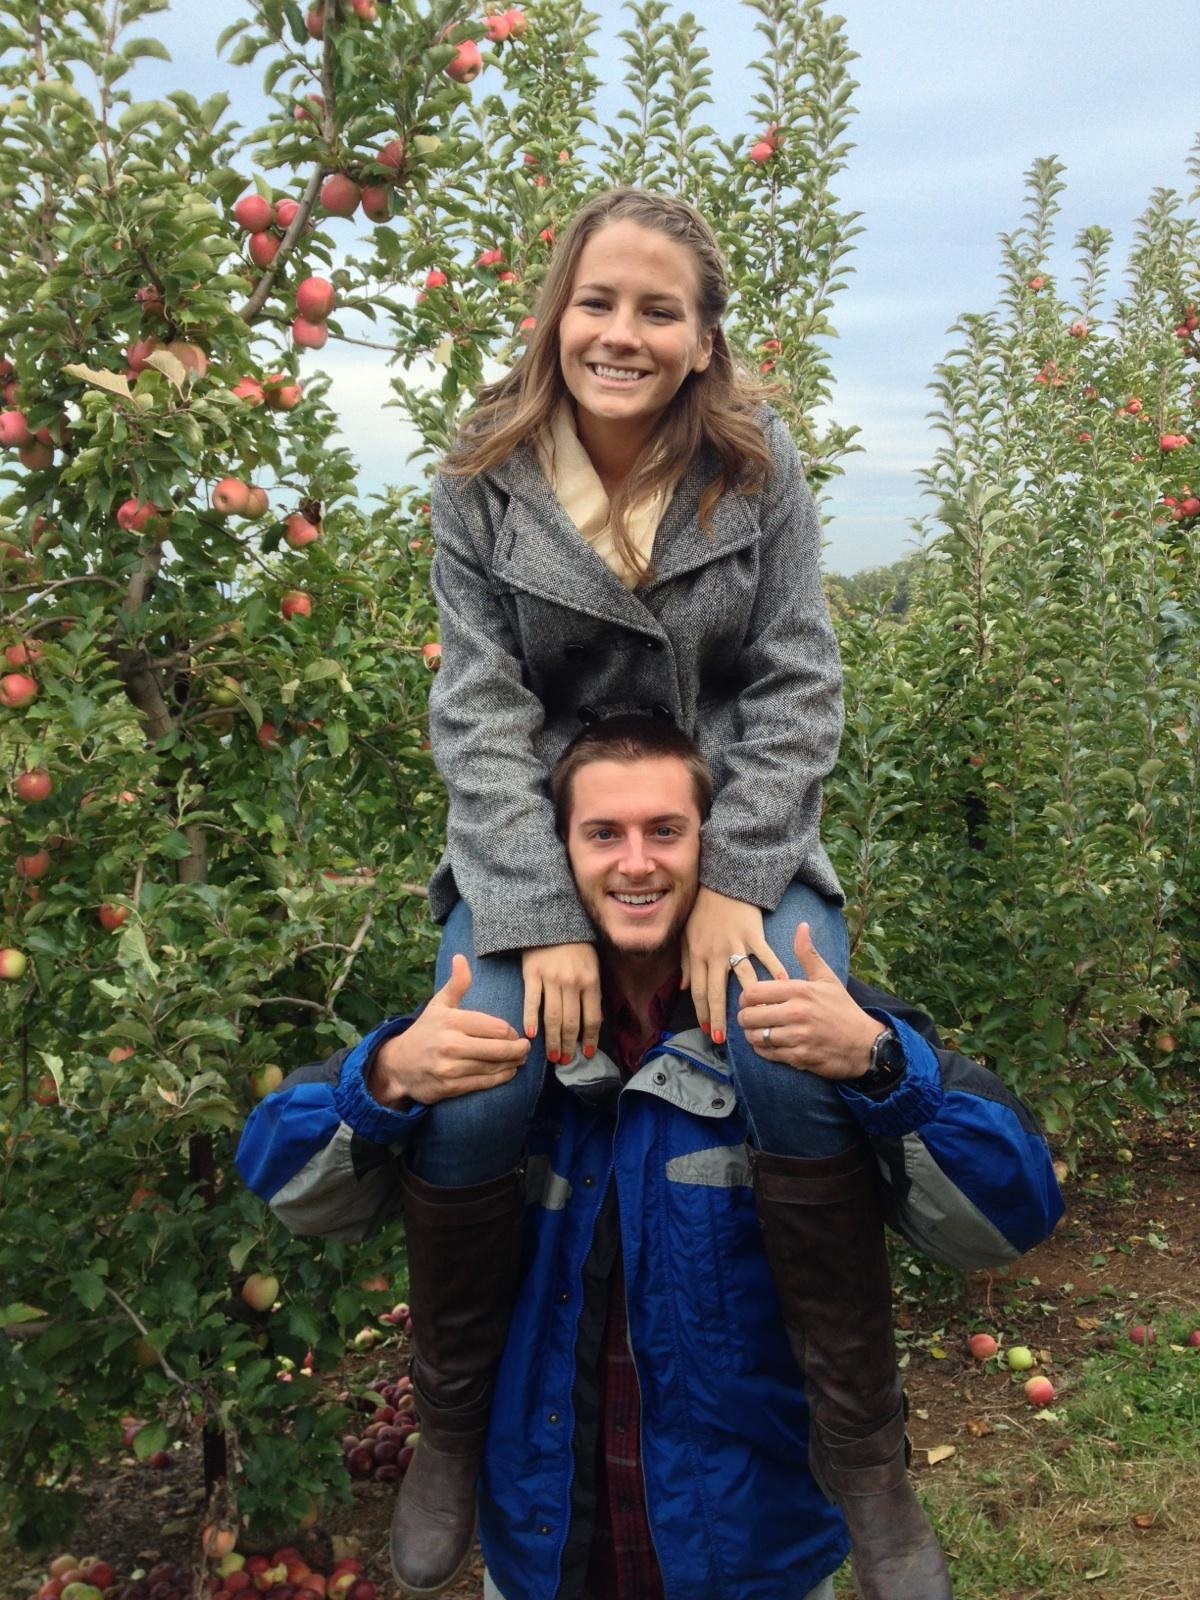
8. Candid. Candid. Candid. Some posed pictures are fine. Having all your pictures in poses can look fake. Find photographers you are comfortable being yourself around, take a few formal/posed pictures, and then have them snap away! I love the pictures that capture Justin and I in a truly spontaneous moment because those pictures show us in our element. They capture our love for each other way better than a posed picture does.

JSE002

 JSE003

9. Have fun! I had SO much fun at both shoots! Make sure you are having a good time. It shouldn’t be stressful. It should be exciting and fun! Roll with the punches, don’t try to control everything, and just have a ball! Believe me, I am a Type-A personality and I sometimes have trouble following that advice but I’m so glad I let loose during these shoots. We found this random exercise equipment along a cross-country path on our first photo shoot and we just goofed around on it taking some pictures that now make me smile every time I see them. So choose JOY over perfection and have a great time!

JustinSarah-55

10. Don’t forget that sunset! Fall sunsets are truly the best. Need I say more?

JustinSarah-80 JustinSarah-85 JustinSarah-81