Top 10 Staples for My DIY Projects

Ever since my post about our $0 bathroom makeover on Monday, I’ve been thinking about the zero dollar aspect of the project. I said again and again that I didn’t want to spend any money, and I am really proud to say I made the space shine and didn’t spend a dime. But maybe I should say, I didn’t actively spend a dime. Because when I really think about it, it’s not *truly* $0. Like, I didn’t just revamp a space using absolutely nothing. It was $0 because I didn’t actively spend money on the project – everything I used was something I already had.

I love to share my DIYs and I often share how I was able to complete them for a super low cost (like this dresser for under $50 , this special wall and surrounding area in our garage for $0, or this secret nook I revamped for $75). So many of these projects are very low cost and easy because I usually have many of the supplies on hand. And I’m not talking about just the random, junky things left in the back of the drawer from a project 8 years ago (although I don’t count those items out either haha), but quality products that I’m intentional about having in my stash.

Today I thought it would be fun to talk about the things that I find myself reaching for and using in project after project – the go-to things that I always stock up on because it’s not only more economical to use the same things for multiple projects, but it ensures I’m ready to dive in whenever the mood for a project strikes. I would venture to say that 98% of my projects involve at least one of the items listed below, and more often than not I’m using a combination of them. This is my all-star lineup!

1. Black Spray Paint

$0 Bathroom Makeover

I always always always have a can of black spray paint handy. Black is a tireless workhorse – it can make a hodgepodge of items look cohesive (like in the photo above!), it can freshen up outdated fixtures, and it can work in every space. It seems like anytime I need an inexpensive and easy update, I’m reaching for my black spray paint. I’ve used it on planters, handles, light fixtures, frames, chairs, and more! I like to have both a satin and a matte finish on hand and I’m always sure to replenish as soon as one can gets low, because I know I will use it!

2. Gold Spray Paint and/or Rub n Buff

Modern, Bright Entryway Makeover

Gold spray paint is another staple I always have on hand (this one is my favorite!) It gives a modern touch to dated pieces and it can add some warmth to a space. Similarly, rub n buff is a newer product to my arsenal, but I’m already obsessed and know it is here for the long haul. This little miracle worker is a great way to add some character to a piece. So far I have mostly used it on frames that I’ve thrifted, but it could work for freshening up lots of different kinds of decor.

3. Caulk

Caulk is one of those things that you don’t really notice – and that’s the point. It’s the finishing touch that makes a project look polished without actually standing out. Even if you do no other update to a space other than running fresh caulk around a sink or bathtub, it can make a big difference! I also use it to fill in gaps along trim or baseboards or do things like attach our “new” vanity sink to a cabinet. I always have a paintable white silicone caulk (and a caulk gun) on hand, but I’ve also started keeping a clear acrylic as well since this works well along sinks.

4. Electric Screwdriver

20200524_092650

This is my go-to tool for projects around the home. It’s perfect for taking out or installing hardware, removing cabinet doors, swapping out switch plates, etc. All the little projects that require a screw driver, this makes things super quick and easy. Justin and I are constantly reaching for it during projects! I couldn’t find our exact brand online but this one looks similar to the one we use.

5. Painter’s Tape

This obviously comes in handy to give me nice crisp lines anytime I decide to paint a wall, but I also like to use it to map out where I want a picture frame to hang or plan the size of a cabinet against the wall or a rug on the floor. It really helps me visualize a space!

6, 7, & 8. Paint Roller Covers, Brushes, and Tray Liners

Items to Always Have on Hand for DIY Projects

I buy roller covers and paint tray liners in bulk, and I try to take good care of my paint brushes so they last a long time ( I use this multi-tool for cleaning brushes and it really helps prolong the life of a brush by getting all the paint out of the bristles after a project). I re-use a lot of the same colors throughout my house, so I often already have the paint I want to use and having the other supplies on hand allows me to jump right in to a project without having to go to the store to buy a roller. Plus, I know that I will go through this items eventually and it is more economical to buy in bulk.

9. Primer

Along the same lines, I buy my favorite primer in huge 3.5 gallon buckets because it is more economical: one 3.5 gallon bucket costs about $47, wheras if I’d buy the same amount in 1 gallon quantities at a time, I’m spending about $59. It’s a lot of primer, but looking around at all the projects in my house, I know that I’ll go through it. I use primer as the first step for not only painting walls, but also cabinets and other furniture and it’s nice to be able to just start a project and have the primer ready to go.

10. Wood Filler

20200611_071352

This stuff comes in handy for both big and small projects. I’ve used it in everything from filling the extra holes in cabinet doors when swapping hardware from handles to knobs, to covering the holes left by a nail gun when installing wood trim and baseboards, to patching old holes in the DIY frames that Justin makes me from scrap wood. Since I am often repurposing something instead of using a brand new item, there are often dings, nicks, holes, etc to fill in and smooth out so I’m often reaching for wood filler to help me with the job.


What products or tools are your DIY go-tos?

A $0 Bathroom Makeover

Do you ever get a strong desire to just DO something? I sometimes get this restless energy and just feel the need to accomplish something. It can be big, it can be small, but I just want to see tangible progress and a finished product. Last week, I got that urge. I wanted to channel my restless energy into a project, which is all well and good but … I also felt strongly that I did not want to spend any money. Hmm.

I looked around my house and decided to challenge myself to do a $0 makeover to one of our bathrooms. Using only items that I already had around the house, I set out to transform this room and I have to say, even without spending a dime, I’m absolutely thrilled with the result!

$0 Bathroom Makeover

I wasn’t really sure what to expect from this endeavor, but I decided to just dive on in without giving it much thought (seriously, I decided to do this and then started a half hour later). Sometimes it helps to not overthink things and just get moving!

Here’s what the bathroom looked like last week:

20200722_151004

Located right off our laundry room, just a few steps from the garage, this full bathroom is handy to have if you get really dirty outside and don’t want to track dirt through the house, or if you happen to be in the middle of a pandemic and want to shower after work before interacting with your family (who would’ve thought?!). Otherwise, the only time it gets used is when we have multiple guests staying with us and we use the nearby office as a spare bedroom and this as its accompanying bathroom.

HouseTour2020-2
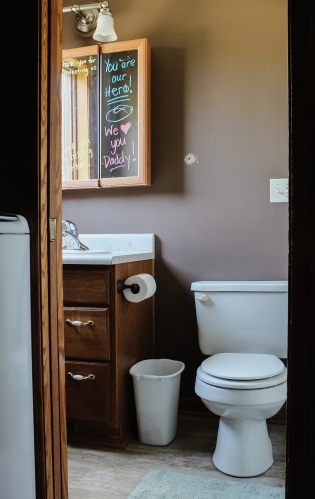
A few encouraging mirror notes from me and LJ back in May when Justin was using this bathroom after work. ❤

The bathroom itself may not be used much, but since we use the garage as our main entry to the house, we see this room every single day. I would love to gut the space and expand our laundry room, but we’re probably at least 10 years away from making that dream a reality. In the meantime, I wanted to freshen this dingy and sad bathroom, and so the $0 bathroom update challenge began!

The very first thing I did was take down the old medicine cabinet mirror. Since we don’t really use this bathroom, there was no need to for that storage anyways. And bonus – I then sold it on Facebook Marketplace for $15, making this my first (and likely, only) renovation to actually turn a profit!  Once that was down, I wiped down all the walls, filled all the old holes with plaster, sanded, and primed all the walls.

I keep all the leftover paint from past projects and I raided my stash to find a color for the walls. I decided to go with a two-toned look and measured up 5 feet from the floor and taped a line around the room. I used Benjamin Moore Smoky Mountain on the bottom portion, trim, and baseboards (the same paint I used in our guest bathroom and secret nook) and Sherwin Williams Alabaster on the top and ceiling (the same paint I used in our basement kitchen).

Justin took leftover pine 1×3 boards we had in our barn and cut them to size and I painted them with stain from a previous project (Miniwax Provincial). We used a nail gun to attach them to the wall over the colorblock line and I love how this wood detail adds character and warmth to the room. We have a mudroom with all these unused hooks on the walls (the previous owners stored all their outdoor coats there) and I raided the stash to find three black hooks to add to the wood trim for towels. Perfect!

Laundry Bath-14

On to my favorite update: the vanity! After removing all hardware, I used deglosser leftover from painting the kitchen cabinets to prep the wood. I painted a layer of primer over top and went back to my stash to pick a cabinet color. This was a trickier process, because I had to find something that worked with the other colors already in the room. None of my initial colors felt quite right and I worried I didn’t have anything that would work, but then…waaaaaay in the back of my drawer full of paint samples, I found a small sample size of Sherwin Williams Agreeable Gray that I bought last year as a contender for the walls in our Phase One master bathroom update. I can’t even believe how perfect it is for this space and it made the vanity look 1000x better.

$0 Bathroom Makeover

I originally planned to keep all the handles and just spray paint them, but then I noticed the handles in our main floor powder room…

HouseTour2020-4

Eventually, we will update this half bathroom, but until then, it can have ugly old gold and white handles. 😉 I took the half bathroom’s vanity handles and spray painted them with a black spray paint from my stash.

Laundry Bath-12

I didn’t originally plan to replace the counter and sink, but as the project was underway, I remembered that we had an extra vanity top out in storage. We bought it at a Habitat for Humanity ReStore over a year ago – we thought we could use it in our guest bathroom and it was too good a deal to pass up (new for $45!!) so we bought it, only to come home and realize it was not the correct size. It’s just been in our barn ever since. Turns out, it was the exact size needed for this vanity – feels like it was meant to be! I guess this could feel like cheating the $0 goal since it’s something new, but since we’ve had it for over a year and didn’t spend the money specifically for this project, I’m still counting it as just using something we already had. 🙂 We caulked the sink in place on the cabinet and then ran another line of clear caulk (leftover from the basement kitchen project) around the edge to seal it along the walls.

Laundry Bath-2

The “new” faucet and stopper came from the old sink we took out during the guest bathroom renovation – we had kept it in our barn and the faucet was still in really good shape so we swapped it in and it completes the look! I like that it brings in a mixed metal look and ties in all the silver from the shower area.

I kept the same light above the mirror and the toilet paper holder, but I gave them a few coats of the same black spray paint I used on the vanity handles to give everything a nice cohesive look.

The last thing I needed to find was a mirror. I was super committed to spending $0, but it was tricky to find a mirror in our house that worked in the space. We tried three different ones – one was unframed and too hard to attach with the wood trim. One was too big, one was too small. I went searching the house in search of the “Goldilocks” mirror – one that was just right. I found the perfect mirror in the kids’ bathroom upstairs!

I loved the size and style, but did not love the color. I tried updating it with Rub n Buff, but that was too shiny and looked cheap. Then I tried my favorite gold spray paint and that was just right! I used this same spray paint to give a little update to the fan light on the ceiling too.

A $0 Bathroom Makeover

I raided my house for decor to finish off the space. The gorgeous pottery bowl on the wall was a wedding present – I have loved displaying in our previous homes but I hadn’t found the right place for it in this home until now. I love how it plays off all the different colors in the room and the round shape brings some softness to all the straight lines and angles in the room. I pulled an old planter that wasn’t being used and transplanted a few leaves from the snake plant in our playroom. I pulled soap from my stash (and even the colors work perfectly!) and a towel from my basement kitchen. A few items I had previously thrifted without a specific purpose in mind were suddenly just right for this space: a decorative bowl to store spare toiletries and washcloths and some cute pottery vessels to hold cotton balls and q-tips. A glass vase I had and some branches from a bush in our yard. It always amazes me how things I’ve had for years can feel fresh and new when I put them in a different place!

Laundry Bath-8

I could not be more thrilled with how this space turned out. Not only does it make me so happy to now have a cute bathroom instead of an eyesore, but this challenge served as such a great reminder that creating a home you love doesn’t have to cost a lot of (or in this case, any!) money. Shopping my house for decor, using up leftover paint and supplies from other projects, giving old fixtures a fresh look with simple spray paint, repurposing items from other renovations instead of just junking them . . . instead of just buying something to fit my needs, taking things I already had and getting creative with them is so satisfying! It stretched me and challenged me and that makes me love this bathroom even more now.

Laundry Bath

Sources

Wall Color: Sherwin Williams Alabaster (top), Benjamin Moore Smoky Mountain (bottom) both in Eggshell finish

Vanity Color: Sherwin Williams Agreeable Gray

Gold Spray Paint

Black Spray Paint


A Quick Patio Entryway Refresh!

The entryway into our house from the patio got a little flash makeover this past week and I’m loving it!

Modern, Bright Entryway Makeover

After finishing our basement kitchen update, I realized that this entryway space next to it also needed a little TLC. It is essentially an extension of the kitchen (the tile from the kitchen wraps around and leads to the door) and since it leads directly out to our patio, it’s a natural storage space + drop zone for all the things that we need and use when we’re outside: everything from sunscreen and bug spray to towels and swimsuits. Visually, when standing in the middle of our basement, you would see our gorgeous new kitchen on one side and in the same line of sight, this hot mess of an entryway on the right side.

20200708_180721

Yikes.

Earlier in the year when I did a few easy projects for our basement refresh, the walls got a fresh coat of paint (Sherwin Williams Repose Gray) and then later when I did the kitchen update, the floor tiles got painted. Here’s what the space looked like a few months ago before any updates (I had moved the bookshelf so I had a space to photograph the finished dresser update I did for my niece’s nursery):

screenshot_20200714-233103_gallery

We don’t have a closet or storage room near this door, so we definitely needed something to corral all of our outdoor things. When we first moved, the little bookshelf (that I built in eighth grade woodshop!) landed here, but after a year in the house, it became obvious that the bookshelf wasn’t cutting it. It wasn’t big enough to hold all of our things and it looked super chaotic with all the colors of items and mess of storage on open shelves.

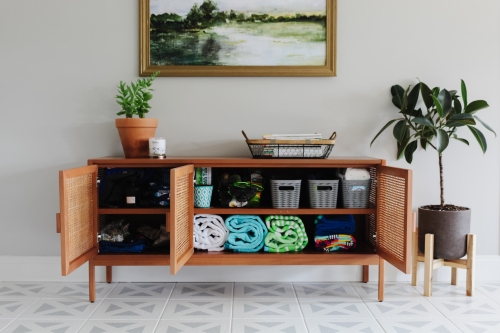
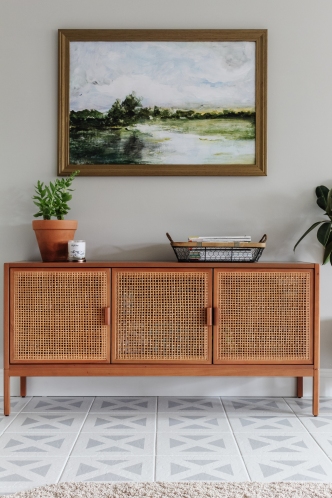
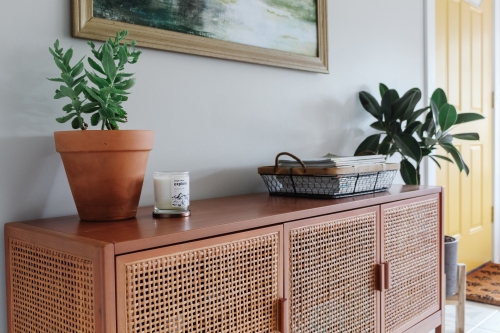
I searched and searched for the perfect affordable storage solution and I fell in love with this cabinet (it’s actually a TV stand!) It is a super popular item on Target and kept selling out quickly every time it came back with limited stock, but I was finally able to snag one!

Entryway-9Modern, Bright Entryway Makeover

It is shorter than the bookcase that was there before and at first I worried that it wouldn’t be big enough to actually hold everything we need it to. I’m so happy to report that it fits all we need – and we could even fit a little more in there if we needed!

Entryway-10

When it came to decor, I started with things I already had. The potted plant was given to us from my in-laws (it’s actually eventually going to be planted outside) and the candle was a previous purchase from a local company. I’ve had the metal and wood basket for several years and I rounded up a bunch of magazines to store inside so that they’re easily accessible if someone wants to grab something to read while lounging outside.

Modern, Bright Entryway Makeover

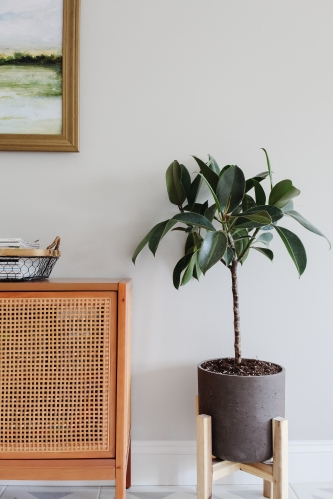
This sweet little rubber plant was my Mother’s Day gift from Justin and the kids this year and I love how it looks here. (I took the guessing out of things – which I highly recommend – and told Justin exactly what I wanted, including the local shop and exact link to this tree, but I made him be the one to actually purchase and pick it up so it still felt like a gift haha!)

Entryway-6

Since the cabinet was short and there was a lot of wall space, I wanted a huge statement piece of artwork above it but I did not want to shell out a ton of money. I found this digital download print on Etsy and had it printed for pickup at my local FedEx in a 24″ x 36″ size.

Modern, Bright Entryway Makeover

Justin actually took the casing from the old trim around the door and used it to make this frame! We got the idea from Cass Makes Home – she shared a tutorial on her Instagram a few months ago. Justin just cut each piece to length (corners cut at 45 degree angles with his miter saw), then he used epoxy and corner clamps to attach all the corners and gave it extra stability with two staples as well. I then filled all the old nail holes with wood filler, sanded it down, and spray painted it with this subtle gold color. The print is attached in a super sophisticated way – the back of it is taped to a piece of cardboard and the cardboard is then duct taped to the back of the frame. Ha! Justin attached two sawtooth hangers to the wooden frame and we hung it up. I think it turned out great for a giant piece of inexpensive art!

Entryway-4

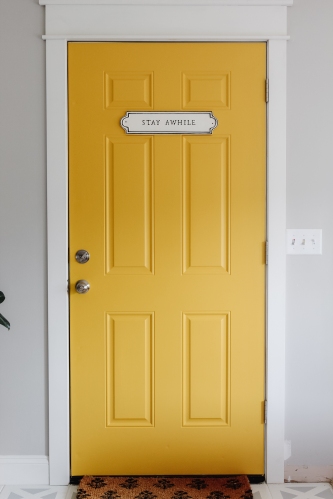
And then there’s the door leading out to the patio. Justin and I updated the trim and baseboards to match the renovated kitchen (eventually we’ll run this all the way around the basement) and I felt like this was a perfect opportunity to go for something bold and fun with the door. I went for it with Sherwin Williams Brittlebush, a snappy golden yellow, and I love it! It just feels like sunshine and brings a little bit of the outdoors inside.

Entryway-11

Fun Fact: Yellow is actually my favorite color but I don’t use it a ton in the house because it can very quickly feel like too much. An accent door was the perfect way to pack a punch of personality (say that five times fast!) in this space and I’m obsessed. I found this little sign at Target and it felt just right – we love to host guests and we do want them to relax and stay awhile. 😊

Modern, Bright Entryway Makeover

I’m so thrilled with how this space turned out. It’s functional and beautiful and now feels like it complements the kitchen and the rest of the basement instead of being a chaotic eyesore. It was definitely worth spending a few days updating this space!

Entryway-12Entryway-7

Sources

Wall Color: Sherwin Williams Repose Gray in Eggshell

Trim Color: Sherwin Williams Alabaster in Satin

Door Color: Sherwin Williams Brittlebush in Satin

Cane Cabinet

Stay Awhile Sign

Landscape Print (digital download)

Doormat

Candle

20 for 2020 Mid-Year Update

At the beginning of the year I shared my “20 for 2020” goals and since we’re already over halfway (what!?) through 2020 it felt like a good time to check in with how the list is going. I do these lists every year in lieu of resolutions and it makes for a fun way to set some goals and see progress happen over the year.

When I first wrote this list I obviously did not know that we were headed for a global pandemic with months of social distancing – I probably would have chosen to put a few more house projects and a few less “let’s hang out with people” goals ha! Even though some goals aren’t possible to do right now, it is still fun to look at all I have been able to do this year, and it gives me some other things to continue to look forward to someday!

20 for 2020 Goals

1 – Plan a dreamy office/reading room. I’ve made definite progress on this goal! We have a room in our house that is currently a hot mess of random storage but I dream of it being a gem. I’ve started mapping out the plan for the room and working on a projected budget and timeline and it’s making me really excited for this project! I had so much fun participating in the One Room Challenge with my basement kitchen renovation that I’m thinking about doing this room during the ORC’s fall challenge in October. Stay tuned!

2- Select pictures for family photo albums.  I was really hoping to have at least started in on this, but alas, I have not.

3  – Create family photo albums Since the photos aren’t selected, I have obviously not created the albums.

4 – Update the Simplify the Chaos website Done! I updated all the homepage’s menu tabs and I feel like it a much better navigational resource now. Now I just need to keep them updated as I add more and more content to the blog…

5 – Replace basement carpet. We made some strides towards this – we looked at carpet samples and had someone out here to measure the basement and give us a quote. However, COVID-19 hit and it just wasn’t the right time to have people over to our house to get work done. Then our A/C system died in June and we ended up having to replace the entire furnace. Pandemic + huge house expense + no one is hanging out in our basement anyways right now = this project is officially relegated to the back burner for the foreseeable future.

That being said I do have BIG NEWS on the basement front! You might remember that one of my “19 for 2019” goals was to get rid of the big ugly brown recliner from Justin’s college days and it didn’t happen last year. I’m happy to report that Justin finally gave me the green light to sell it and it went to its new home last week! Whoo hoo!

20200708_112255
One last rock for old times sake 😉

6 – Update book recommendations list. Done! You can check out the updated post of my top book recommendations here.

7 – Get a dip manicure. Haven’t done this yet, and I’m honestly not sure when I’ll feel comfortable enough to go to the nail salon. My birthday is in September, so depending on what COVID-19 is doing at that point, that might be a good time to check this one off the list!

8 – Invest in footwear with a purpose. I haven’t updated any part of my wardrobe this year because I’m not going anywhere ha! This goal is still really important to me and I’m on the hunt for a great pair of ethical shoes.

9 – Try at least 5 brand new (to me) foods. I was hoping to try a bunch of new foods on our trip to New Orleans, but that got cancelled due to coronavirus. We haven’t really been branching out with food since we’re just staying at home but I did try some of my dad’s homemade spicy Thai noodles for the first time and they were delicious!

10 – Set up a 529 for Vi. Done!

11 – Read 60 books. I have 37 books read so far this year and I definitely think I’ll meet this goal!

20200712_185258

12 – Take a continuing education class. Not done, but I’ve started this process. I have looked into a few different options, and I’m working on narrowing down and choosing a class. One silver lining of the pandemic is there are a LOT of online options being offered right now which is just what I need. I hope to take a class during the fall semester.

13 – Host a big summer party. Well if ever there was a goal that didn’t anticipate a global pandemic, it’s this one. While we won’t get the big summer bash we hoped for, we have started to host small outdoor gatherings with a few friends. We stay outside and use the patio and pond – I’m very thankful that we’re able to have little get-togethers while keeping safe practices in place. This weekend my family is coming out to our house for a day of grilling, swimming, yard games, etc. and I’m really looking forward to that so it will count as our “big” summer party this year 😉

14 – Update Vi’s room. Done! I did a very simple scalloped accent wall and added a little gallery wall of artwork and now it feels fresh and fun and just right for our baby girl.

HouseTour2020-3520200712_180908

15 – Plan a family staycation. Ugh. This very week is the week that Justin took time off work (months ago) so that we could have a little summer staycation . . . but, pandemic. We are still going to enjoy lots of family time outdoors and we’re going to try to find at least one new-to-us park or nature walk in the area for our little family to explore outside. We will make the most of it!

16 – Take LJ to swimming lessons. I was planning to sign him up in the spring, but once again, COVID-19 had other plans.  LJ has really taken to using his life jacket vest (similar to this one) and does a great job with it; however, I still want to enroll him in swimming lessons as soon as it feels safe to do.

17 – Create something. This was a really vague goal of mine at the beginning of the year, but I do feel like I have been able to stretch some creative muscles, particularly with home projects. Things like our using date night to build DIY shelves, making over an old dresser, tricking out the Secret Nook, and renovating the basement kitchen (especially painting the tile floors and counter top!) have been a fun way for me to channel creativity while staying home. And I’m definitely not done creating!

screenshot_20200712-190311_instagram

18 – Have professional family photos taken. We had a professional photographer scheduled to come out to our house in April…you see where this is going. #pandemic

19 – Actually use my InstantPot. I still haven’t touched this thing. I’m not sure what that says about how successful this goal will be – if I don’t use it in the middle of a pandemic where all of our meals are at home, will I ever use it? Time will tell. (If you have any great Instant Pot recipes, please send them my way!)

20 – Host at least 4 game nights. We did have one game night with my parents when they came to stay overnight with us. That isn’t exactly the type of game night I was envisioning but since this year is so crazy I will count it!


It feels insufficient to describe 2020 as a roller coaster – this year has truly been unlike any other year I have ever experienced. It is definitely not one I will ever forget, and it will be interesting to see what the second half of the year brings.

Road Trip Tips for Traveling with a Toddler (and baby!)

When I was sharing about our family beach trip over on Instagram two weeks ago, I got a few messages asking about traveling with kids and the tips and tricks we use to make the experience as fun as we can. Travel is normally a big part of our life (in this pandemic, the beach trip was our one and only trip planned for the foreseeable future) and I’ve previously shared about simplifying trip preparationroad trip tips for traveling with a baby, tips for flying with a baby, tips for hotel stays with a baby, and simplifying packing for travel with a baby. I feel like I’ve sufficiently covered what works for us and traveling with a baby, but a long road trip with a toddler is a whole other ball game! LJ is now 2 1/2 years old and we definitely needed to adjust our travel game accordingly. Today I thought I’d share some of the things that we do to make the road trip a fun extension of the vacation instead of a miserable bookend to an otherwise great trip.

20200620_093814

Just like every baby is different, every toddler is too – these are just the things that work well for our family when we travel.  I just wanted to share in case another parent out there might find one of these ideas helpful. I think the travel sets the tone for the start of your vacation so whatever we can do to make it a little more positive is great!

Pack. Snacks.

This is an obvious one, so I won’t waste much time elaborating. Pack a ton of easy snacks and have them accessible (I keep the big back of snacks right behind the driver and passenger seats) as well as water bottles. I would say pack more than you think you’ll need too – you definitely do not want to run out!

Load up on mess-free non-food treats

I got a small plastic basket at the dollar store to store things to occupy LJ throughout the trip. Our van is 14 years old and far from swanky, but it does have a DVD player and for that we are thankful haha. If your vehicle doesn’t have one, a portable DVD player might be a worthwhile investment for a long trip. We were in the car for 12+ hours, so an hour or two here and there of screen time helped all of us pass the time.

20200619_195838

I also like to have little mess-free activities for LJ to have every once in a while. I’ve had people tell me that they have little things to bring out at milestones (like every 100 miles or every hour or something), but I just brought things out as needed. I hit up the dollar spot at Target before long trips to find little activities for LJ – things like felt books, mess free markers, stickers, etc are perfect for the car!

20200619_200211

We also have a few of these Water Wow books and they are a HUGE hit. LJ loves them and will color them over and over. You just put a little bit of water in the brush and the water colors in the picture. Then it dries clear and you can color it again. These occupy him for a long time!

20200619_200012

Sometimes, desperate times call for desperate measures. In the moments where the kids are going crazy or crying (or both) and we just can’t stop quite yet, my solution is bubbles! While not necessarily 100% mess-free, bubbles floating around the back of the car instantly turn both my kids’ moods around and can help make a tough stretch of driving much more bearable. This is also something we can break out during a pit stop and need a little something to do.

20200619_200241

And speaking of pit stops…

Plan to stop, but keep it flexible

In our experience, traveling with kids is not the time to have a tight schedule. We assume that we will need to stop at least once every 2-3 hours and plan our travel time accordingly. Each stop is about 30-45 minutes to give our kids adequate time out of the car seats to stretch and burn off some energy. So if a drive is going to take 8 hours, we mentally plan for it to be at least 10 hours with stops. This keeps us from getting frustrated when there are inevitably delays or extra stops.

We typically do not plan stops in advance. We have a general idea of places we’d like to stop (i.e. let’s see if we can make it to X city) but we don’t plan specific places, mostly because it is really hard to plan hours in advance when your kids are going to need to stop. When it seems like our kids are getting restless or it’s getting close to meal time or we need to stop for gas, we stop wherever we are.

Find a Green Space for Pit Stops

We try to avoid high-traffic areas like rest stops – especially in a pandemic! – so our trick is to search for green spaces.

20200627_110706

My process is simple. I open up Google Maps, find where we are, and look around at the upcoming exits (if you’re not on an interstate, just look at the next few miles of your route). I try to find green spaces within 1-2 miles off the road. You can also search “park” or “playground” to help find a good stopping point. (Note: I did pack plenty of hand sanitizer to use after we left each playground, even though we were the only ones playing at most of them).

Here’s an example of a place I found just looking ahead at our route when we drove to the beach:

screenshot_20200628-192204_maps

Even if there is no playground, a place like Schwartzkopf or Millcreek Park is a good place to try because it’s near the interstate we’re driving, the green space is relatively large, and there’s a creek next to it. At the very least, we could run in the grass and find sticks and rocks to toss in the river (which we did!) It turns out that that park also had a small playground though, so it was a double win!

This is another park we found and I ended up saving it in my maps for future road trips because it was an exceptionally good stop: it’s off the beaten path, there’s a scenic walking trail around a small lake, a nice playground, and working bathrooms. It’s definitely somewhere I’d like to visit again!

screenshot_20200628-192022_maps

The “search for green space” method has honestly never steered us wrong. The worst case scenario would be we show up and it’s just a flat space of grass. Even then, we could still run around and hunt for rocks or sticks or dandelions or bugs, or we could break out the bubbles I brought along. The point is to get energy out and have some fun so that the kids (and adults) are happier for the next stretch of driving. (And for the record, so far it’s never been just a boring flat space of grass. There has always been something!) This is also good for Vi – at 10 months old, she loves the change in scenery of a park or playground and there is also usually a bench for me to use to sit and breastfeed.

20200620_100139

Pit stop for meals too

In a pre-pandemic world, we would always stop at a restaurant and eat inside, even if it was fast food, instead of just going through a drive through and continuing on. This actually saved us time later because it counted as a pit stop for our kids to get out some energy and would allow us to keep going for another 2-3 hours after eating.

In this pandemic, we obviously did not want to stop and eat in a restaurant. Instead, we got drive-thru food, took it to a park (again, just looking around on Google Maps for nearby green space) and had a little picnic.

20200628_132708

I keep a picnic blanket in our van at all times and this is handy to pull out if there’s no picnic table around! It also makes for a great place for Vi to crawl around since she’s too small for playgrounds.

20200628_132832

I can’t emphasize this enough: try to make your pit stops fun! If you only allow for a 10 minute stop + bathroom break, your kids will likely not last as long back in the car before needing to stop again. Trying to power through a long drive with babies and toddlers, at least in our experience, just leads to a more miserable time in the car because they are cranky and tired of sitting in their car seats. By incorporating a little bit of fun through pit stops, it not only makes the actual time in the car more pleasant (and quiet), but it also makes the traveling feel like a fun part of the vacation too and not just something to endure to get to the good part. Our pit stops were all fun and unique times to explore a new area as a family and create memories just like the actual time at our destination did. So worth it!

For extra long trips, consider stopping overnight

Our beach trip was a 12 hour drive with no stops, so we planned for it to be at least a 16 hour trip with stops. We could have tried to power through and do it in one day, but we had the ability to stop overnight and break it up into two 8 hour travel days instead and we were all much happier about that. It’s not always feasible, but when it is, this can be a really helpful option! Hotels have cribs and pack and plays for use (usually for free!) and we can usually find a good, relatively inexpensive option (we love Holiday Inns) last minute. If we happen to know someone who lives along our route, we’ve also asked to stay with them to break up the trip!

If we do plan to stop overnight, I pack a small suitcase with everything we need for the night: toiletries, LJ’s blankets and stuffed animals, our sound machine, pajamas, etc. We pack it last, so it’s right there when we open the trunk and it’s super easy to just grab that one bag and take it in without trying to wrangle multiple bags and kids.

20200628_180806

And an extra tip, the Slumberpod is an absolute GAME. CHANGER. for traveling with kids. Our family of four shared a hotel room in our overnight pit stop and then we shared a room at the beach house with Vi, and this thing was AMAZING. It is a black out tent that fits over the pack n play. It is breathable and totally safe, but it completely blacks out the crib so baby can easily sleep in the middle of the day or we can keep the lights on in our room at night. We will absolutely take this on all future trips with babies! (Also, in the beach house Vi did sleep in the large closet, but we didn’t close the doors 😉 )

20200627_070924

It worked so well in the hotel room too because Vi went down before LJ did and we could leave the lights on for him until it was his bedtime too. Win!

20200620_070525-1

Take along a Toddler Potty

LJ is 90% potty trained at this point, and he does not wear diapers on the drive. We keep his little Paw Patrol potty right in front of his seat, so when he tells us he has to go, we can stop anywhere. We’ve pulled over on the side of the road (if it’s safe), pulled into empty church parking lots, pulled into subdivisions to park along a quiet street . . . when he tells us he has to go, we can stop wherever. I highly recommend this if you have a very young toddler who cannot hold it to wait for a bathroom. This was also really helpful in the pandemic because it meant LJ never had to go inside a gas station or restaurant to go potty during the trip.


What tips do you have for traveling with a toddler?

DIY Painted Counter Tops

I’m still pinching myself over the basement kitchen transformation I shared earlier this week – I am so in love with the new look of the space! One of the things that made a huge difference in this renovation was updating the counter tops. Today I’m sharing the process I used to take these counter tops from a lackluster dated pattern to a clean, fresh marble look. The process seemed intimidating at first, but it was actually surprisingly easy to do!

counter

After installing the butcher block counter top for the island, I decided I wanted to keep that as an accent look and not continue butcher block all the way around the kitchen. I looked into replacing the counter tops with a faux marble laminate, but the estimate came back at around $1800-2000 and I was not about to spend that much on this renovation. I decided instead to proceed with the same simple, budget-friendly tool I had already used to update the tiles, walls, and cabinets: paint!

counter-5

The previous counters were brown and had a pressed leaf patterned look to them, which was not exactly the look I was going for here.

20200630_13050720200630_144654

I ordered this marble paint kit for just under $200 total with tax (and free shipping), and while that it not an insignificant amount of money, it is a heck of a lot cheaper than $2,000. I appreciated that the kit came with everything I needed to complete the project except for painter’s tape, which I already had.

20200630_133350

The first thing I needed to do was remove all existing caulk around the counter top and sink area and scrub the counter with an SOS pad. After wiping it down and taping off around the counter with painter’s tape, I was ready to paint. I used the included sponge brush to edge and the roller to cover the counter top with their white base primer. I applied a base coat, waited four hours, and applied a second coat.

20200630_220411

At this point, I realized that the counters were VERY white. The rest of the kitchen has a lot of warmer tones and the starkness of a cool, bright white counter top was just too much. I waited until morning to see how it looked fully dry and in natural light, and it was still a touch too bright. I had enough base primer for one more coat and I decided to veer from the kit’s instructions and try to tint and tone down the color a bit. I used baby food jars to try out different combinations of paint using the base primer, my wall paint, and the included gray paint for veining.

20200701_144021

I finally settled on a proportion of base primer + gray paint that felt right, crossed my fingers, and mixed up the combination in a larger scale with the rest of my base primer.

The change was very very subtle but just enough to take us from Colgate Toothpaste advertisement white to a slightly less shocking white hue. It was really hard to document the change on camera, but if you look closely in the corner where the counter top meets the backsplash, you can see a little bit of the original white that I missed when I put on the second coat. I was much happier with the slightly subdued new shade! I applied one full coat with the new color and made sure to touch up every area before letting it dry overnight.

20200701_215702

The next day I was ready to create the veins for a marble look. I put everything I needed on a paper plate so it would be easy to move along the counter top and not drip paint where I didn’t want it. For this step, I used the gray veining paint, small artist brush, spray bottle filled with water, angled brush, and a paper towel for blotting.

20200702_084529

I would highly recommend watching this video tutorial produced by Giani before attempting this step. It was so helpful to me to see exactly how veins are produced and the type of veins that look natural. The thought of drawing veins was intimidating to me, but it actually was quite easy. I just used the tiny brush to draw a slanted line, sprayed it with water to make the paint bleed, and then feathered the wet paint out to give it a lighter, blurred look. I used the paper towel to dab extra moisture and also soak up excess paint to achieve a faded look.

20200702_103617

I finished the major veins first, then drew on the edges and backsplash, and finished with “ghost” veins, which are smaller, more faded veins. I tried not to do too many, as I wanted a somewhat simple and clean look. If I ever started a line that I didn’t like, I could just spray more water on it, wipe it off, and try again! As long as the paint was wet, it was very easy to work with and fix. The kit also came with a white highlight paint to add texture by lightly dabbing on the paint with a sponge. I used this maybe in 3-4 places where the gray lines were a bit thicker, but I did not really utilize this optional step.

After letting all the veins dry four hours, it was time for the final step: epoxy. We first taped off every surface and appliance and attached the included plastic drop cloths to the bottom of the counter with painter’s tape to protect the cabinets and floors from any drips.

20200702_225847

Epoxy can be finicky and messy, so I would recommend this step happen when you have dedicated time to focus. While it can be done by one person, I would highly recommend doing it with two people. Justin and I worked together on this step after our kids went to bed and I was so thankful to be able to tag team! The instructions recommend setting aside four hours for this step but it only took us two hours working together.

The kit includes epoxy resin + activator in three small batches. This is because once the two are mixed together, you have about a 30 minute window to apply before it starts to set and harden. Smaller batches allow you to get good coverage with each section without rushing too much to try to cover the entire counter.

Justin mixed up the first batch of resin + applicator (it needs to be stirred continuously for exactly 3 minutes and 15 seconds before applying). He then poured it over about a 7 foot stretch of counter in a Z formation (the kit recommends a 6 foot run, but we needed to stretch it just a little to cover everything). He used the included brush to apply epoxy to the backsplash and edges and I used the roller to smooth it out over the counter top. Since brushing took longer than rolling, when I finished with the rolling, I would start mixing and stirring the next batch of epoxy while Justin finished brushing. By the time the epoxy was adequately stirred, he was finished with his section and we started on the next one. We continued this process over the whole counter, and we had to continuously go back over our work to check for drips, pools in the corners, and missed sections.

20200702_225833

Once we were totally satisfied with how it looked, we went to bed (it was past 11 pm). I needed to set an alarm to wake up in an hour to come down and remove the tape – you need to give it enough time for the epoxy to set but not fully harden before removing the tape. At that time, I also smoothed the drips along the bottom edge of the counter and went back to sleep. When we woke up, it was finished!

counter-4

The high gloss shine definitely took the look to the next level! The epoxy takes 48 hours to harden for light use and 7 days to fully cure. After about 40 hours (I got impatient haha), I went over the counter top edges and around the sink with a clear silicone caulk to finish it off.

counter-3

We did have some friends over for an outdoor, socially-distanced picnic two days later and we used the counters to set food on and they held up perfectly. It was fun to see people’s reactions – they couldn’t believe the counters were painted!

Kitchen-22

The counter tops are far from perfect and there are a few areas where I wish I had done a vein a little differently, but overall I am so happy with how they turned out! Will anyone ever think this is real marble? Of course not. But it does look like a new laminate and I think it really upgraded the look of the counters without a high cost. Win!

Kitchen-21

One thing I would do differently if I were to do this again is try to complete the epoxy step during the day. We did it at night after the kids went down because that’s when we both had the time to focus, but I wish we had asked my mom to come watch them during the day so we could do it with good, natural lighting. With only artificial light at night, there were a few places where we didn’t see a tiny missed spot with no epoxy or an imperfection like a small piece of lint that settled in the top and we didn’t pick out. These are very slight surface imperfections, but I think we would have caught them under natural light.

counter-2

Another benefit to doing it during the day is – you are awake to monitor the drying. I went to bed after taking off all the tape. At the time, I ran the brush over all the bottom edges again to make sure they were smooth and had no drips. Overnight, the epoxy continued to drip down a bit and it caused a bumpy, uneven look in some areas underneath the counter (in the picture below, look at the counter above the left corner of the dishwasher). We still hope to be able to sand these little bumps down for a smoother finish, but if I had done this during waking hours, I could have just lightly gone back over it with a brush every 30 minutes or so until it hardened to keep the edge nice and smooth.

Kitchen-19

Overall, I’m really happy with the process and I’m thrilled with the outcome.  I found this to be a fairly easy DIY and I would definitely recommend this brand of paint kit for the job. They also have less expensive kits that give a granite look that I also think could look really nice in a space. If there’s a counter top in your house you just don’t like but you’re not ready to fully replace, painting is a perfect way to refresh a space without a ton of time or money. Go for it!

One Room Challenge: The Finished Kitchen!

After two months full of renovating, I am absolutely thrilled to say that THE BASEMENT KITCHEN IS FINISHED!

$1500 Kitchen Renovation!

I started this project as part of the One Room Challenge and due to unexpected delays (hello mold) and a week off for our family vacation, I got it done just as the challenge ends today. Whew!

ORC-Guest-400white.jpg?format=300w

Before I dig deep into the finished space, let’s revisit where we started two months ago.

20200428_155845

We were thrilled that the house had a full kitchen in the basement for guests and entertaining, but it was definitely a little lackluster and a lotta orange. I set out to transform this kitchen while sticking to a small budget of $1500 max, and while I knew the space had potential, the final result is even better than my wildest dreams.

The first project I tackled was painting the tile floors. I used a special paint made for flooring from Rustoleum and a whole lot of painter’s tape to create a simple patterned look and I love it! To read more about the process, you can check out this blog post. So far, the paint has held up really well and only needed some small touch ups after the drywall guys were not careful moving the stove.

20200313_092504Kitchen-15Next up were the cabinets. Justin and I first chose to completely remove the single cabinet that was in between the sink and the window. We still have plenty of storage and this really helped open up the room a little bit more. It actually seems bigger without that cabinet blocking the way!

20200313_092810$1500 Kitchen Renovation!

After removing all cabinet doors, drawer fronts, and hardware, deglossing and priming every surface, and debating color choices for a few days, I finally painted them Rock Bottom by HGTV Home by Sherwin Williams. It’s the perfect moody gray/green chameleon color and I love it so much! I chose a high quality paint so I only needed one gallon (and I still have paint to spare). You can read more about the painting process in this blog post. I did place these bumpers behind each door and drawer to keep the painted surfaces from sticking to one another and pulling off the paint. So far, everything has held up well!

20200428_155858Kitchen-12

As for cabinet hardware, I wanted to change things up a bit from the previous look. I wanted the door handles to be single knobs instead of handles, so I used wood filler to fill in the extra holes and then painted over them – the holes are now practically invisible unless you know where to look for them. I found these knobs for the doors and these bin pulls for the drawers and I love the combined look!

$1500 Kitchen Renovation!

When it came time for counter tops, I had to make some big decisions. In order to stay within budget, replacing all the counter tops was not an option, but I knew I wanted to at least replace the top of the “island” (it’s technically not an island but just go with it). The previous owners had created extra counter space by wrapping the laminate around to the wall to create a small ledge. While I can appreciate the function of this, I wasn’t a fan of the look, and I knew we wouldn’t miss that bit of counter space. Plus, without the ledge in the way, we would have room for three stools instead of two and that was going to be way more functional for our purposes anyways. There was no way to remove just that extra ledge of laminate, so we removed the whole thing and created an accent island look with a butcher block counter top.

20200313_082145Kitchen-31

We got the butcher block counter top from Menard’s and I ADORE IT. It is exactly what I hoped for and I love the look so much. We did hit some major hiccups through this process though and it became quite the saga (mold behind old paneling, wonky cabinets that needed moving, tile needing to be cut away…) If you want to read more about how this transformation took shape you can read about it in this blog post.

Since I couldn’t replace the rest of the counter tops, I decided to paint them instead. I ordered this kit to create the look of marble and while it certainly isn’t cheap, it came with absolutely everything needed to complete the project and it was still MUCH cheaper than replacing (the quote for new laminate came back at nearly $2000 including install, while this paint kit was just under $200. I’ll take that savings!)

20200630_130507Kitchen-17

I plan to write an entire blog post hopefully later this week that shows the process of painting the counter tops, but for now, I will just say that it was not at all as complicated as I expected and while it is far from perfect, I am very happy with the results. It really feels like I have new counters!

Kitchen-21

Now, no one would walk in to this kitchen and think that I got real marble installed, but I really do think it looks convincingly like I got new marble laminate. It is definitely better than the brown, pressed leaf pattern that was there previously so I am counting this as a major win. Stay tuned for a post with all the details!

Kitchen-22

We also replaced all the baseboards and window trim in the kitchen. I wrote all about the DIY window trim we (okay, mostly Justin) installed and you can read about it here. I just wanted a simple trim that framed our gorgeous view of the outdoors without distracting from it and this was perfect.

Kitchen-20

The sink faucets got upgraded as well. There were previously two faucets: the main one for filtered water and the little one for unfiltered well water (preference for the previous owner). The main faucet was replaced by this gorgeous matte black one, which I bought from the new and used options for a small discount, and we closed off the well water faucet hookup and installed a matte black soap pump for dishwashing soap instead.

20200313_092801Kitchen-23I tried not to buy a ton of new decor for the space and instead shopped my own house for plants, art, towels, and other decor to put the finishing touches on. With the exception of this vintage floral print from BFF Print shop, I already had all of the framed artwork. I loved taking off the extra trim and using this ledge (where the house foundation is) as a functional place to stack lots of art and plants. It feels extra special because the artwork is all personal!

Kitchen-28

Overall, I could not be happier with how this kitchen turned out. I poured tons of hours and a lot of hard work into this and really had to stretch myself to solve some problems and come up with budget-friendly DIY solutions. I also have to give a huge shout out to Justin for all his help with many of my projects – he is so awesome! I’m so proud of how we made this kitchen come to life AND I’m extra proud that we stayed within budget. The grand total for this entire renovation was $1,494.27!! I am doing a happy dance over here!

Kitchen-25$1500 Kitchen Renovation!Kitchen-13I could go on and on about this space, but I’ll leave you with this. If there’s a change you want to make to your home, I encourage you to go for it! There were a lot of things with this project that I had never done before, and it can be intimidating to try new things, but you don’t know what you can do until you TRY. And while I stand by the fact that you can transform a room without a huge budget, even a teeny tiny budget can make a difference. Have $100? Try swapping out cabinet hardware. Have $30? Try painting the walls. Have $5? Scour your local thrift stores for a piece or two of decor to spruce up your space. It doesn’t have to be the biggest, fanciest, best renovation possible. I have been discouraged before watching people transform rooms and they gut it down to the studs and completely remodel everything. While that’s great, and I certainly hope to do that with a few rooms in our house, it’s very expensive and therefore not always a realistic option. But even if you can’t do everything, you can do SOMETHING. And each little thing you do can help you fall more and more in love with your home. ❤

Sources + Budget Breakdown

Flooring

Rustoleum Home Floor Paint (Steam Gray & Haven Gray base coats; Top Coat): $160.44

Delicate Surface Painter’s Tape (6 rolls): $57.59

Misc supplies (rollers, Krud Kutter, etc.): $31.22

Cabinets

Kilz 2 Primer (already had – I buy a 3.5 gallon bucket at a time because I use this for so many projects!)

Liquid Deglosser: $8.53

Showcase Paint (in Rock Bottom by HGTV HOME by Sherwin Williams): $41.71

Hardware (cabinet knobs, drawer pulls): $99.90

Bumpers: $6.69

Paneling for island: $22.02

Counters

Butcher Block: $212.93

Giani Marble Paint Kit: $192.55

Misc Materials

Lumber for Window Trim: $36.02

Baseboards: $32.36

Wall Paint (Sherwin Williams Alabaster in Eggshell): $28.86

Window + Baseboard Trim (Sherwin Williams Alabaster in Satin): already had from previous project

Dish Soap Pump: $23.53

Faucet: $64.96 (bought from new/used)

Caulk: $7.89

Wood Filler: $5.33

Brushes: $12.79

Rollers: $4.98

Decoranything not listed below was either thrifted or I previously owned!

Counter stools: $284.60

Rug: $83.67

Clock: $25.48

Hand Soap Dispenser: $10.18 (used antique gold rub n buff to change silver to gold!)

Goldenrod faux plant: $20.04

Vintage floral art Print: $15 digital download + $5 printing

GRAND TOTAL: $1,494.27

*Note: we did not factor in the cost of having to hire drywallers to repair the mold because that was a repair our home needed (multiple areas of drywall needed repaired, not just in the kitchen) and that cost came out of a separate home maintenance fund. This is why it’s so important to have money set aside as a homeowner – you never know what will pop up!


June 2020 Book Reviews

I am having a hard time wrapping my head around the fact that it is July already. March seemed to last 239 days, April was another long month of quarantine and monotonous days . . . and now suddenly it’s July. What in the world?

This month I finished five books (and there’s a bonus book that I forgot to review previously) and genres were all over the place – just the way I like it!

20200701_140216

I feel like this month was split pretty evenly with books I really loved and books that were kind of a bummer. Let’s get into it!

99 Percent Mine by Sally Thorne

Darcy has inherited her grandmother’s house in a 50-50 split with her twin brother Jamie and she is determined to restore the home and make it shine. Heading up the renovation is Tom, Darcy and Jamie’s best friend from childhood who Darcy just so happens to be in love with. She’s always only had 1 percent of his heart, but now she’s going to do everything she can to claim the other 99%.

I read The Hating Game from this author back in December and really enjoyed it, so I was excited to check out another rom-com from her. I wanted to love this, but unfortunately it fell flat for me. The dynamics between the characters seemed really off and it was hard for me to connect with Darcy and Tom’s relationship. It felt forced, I did not understand the appeal, and I was confused at times by the Jamie-Darcy-Tom dynamics. And honestly, Darcy was just not a main character I enjoyed. She alternated between whiny and super aggressive and needy and it was just a lot to handle. I did like certain aspects of the book – the renovation plot line and pretty much anything with Darcy’s best friend Truly, and I think it was kind of hard not to love Tom – but it was not enough to love the book. This ended up being just an okay read for me.

The Friend Zone by Abby Jimenez

I actually read this book a few months ago, but when I went to write the review for its sequel this month, I realized that I somehow never reviewed this book! This is the problem with reading so many books on Kindle; I don’t have the physical book as a reminder to include it in my review and somehow this one slipped through the cracks. Whoops! Before I start this review, I do want to include a trigger warning for infertility. If this is a subject that is difficult for you, you may want to skip this one. Also, both books are pretty heavy on the language and there are a few steamy scenes (which you know are coming and can easily skip if you prefer) so keep that in mind if that’s not your cup of tea.

Kristen is a no-nonsense, highly sarcastic, witty and fun woman who has a lot going for her and one big thing working against her: she has health issues that have been causing some major problems and are likely leading to a life of infertility. As the festivities begin for her best friend Sloan’s upcoming wedding, she meets the best man Josh, who just so happens to check all the boxes of her dream guy. Their chemistry is undeniable, but Kristen refuses to allow a relationship to develop because Josh has made it no secret that he wants to have a huge family someday and she can’t bring herself to tell him that it isn’t in the cards for her. Okay. First of all, freaking Josh. He was a rockstar for me. Sweet, patient, earnest – he endeared himself to me and I loved the alternating perspectives so we could get his point of view too. I loved their dynamic and was rooting for them the whole time, but the book did get a little frustrating. I just wanted to shake Kristen so many times and say “JUST TELL HIM.” Like, so many things could have been solved with just a conversation. It had some heavy elements but this book was a fun, flirty rom com and I overall enjoyed it. I will say – I’m not sure how I feel about how the infertility was handled and I can see how this could be a really problematic plot line and conclusion for someone who struggles with this in real life, so please keep that in mind.

The Happy Ever After Playlist by Abby Jimenez

Okay! Back to The Happy Ever After Playlist. I didn’t realize until I went to write this review and saw an author note that this book was actually written first, and then The Friend Zone was written as a prequel to it. While both could be standalone books, I definitely recommend reading The Friend Zone first. In fact, if you haven’t read it yet, stop reading this review immediately, because there is about to be a major spoiler.

Seriously, don’t read more if you haven’t read The Friend Zone.

Two years after the tragic death of her fiance, Sloan is still entrenched in her grief and struggling to move on with her life, until one day a lost dog comes into her life and gives her purpose again. When she can’t get in touch with the owner, she adopts the dog as her own and starts to regain control on her life. That is, until the owner reaches out to her two weeks later. Jason is an up-and-coming musician who was touring in Australia; he’s coming home soon and wants his dog back. Texts turn into long phone calls and undeniable chemistry develops as the days count down to Sloan and Jason meeting in person. While I  liked The Friend Zone, I absolutely adored The Happy Ever Playlist. I loved that it had depth and Sloan and Jason dealt with real, actual struggles and problems as their relationship evolved. It’s fun, but far from fluffy. Their long-distance get to know you was just the cutest. Delightful, sweet, adorable, heartwarming, satisfying. You just want to cheer for each of them and honestly, I was swooning a little bit by the end. It’s just a super fun read and was perfect for vacation. I loved it!

One of Us is Next by Karen M. McManus

Back in November, I read the young adult novel One of Us is Lying and I loved it, so I was really excited for the sequel to come out. A year and a half after Bayview High was entrenched in scandal over the death of Simon Kelleher and his “About That” gossip app, a new copycat emerges. Only this time, it’s not an app, it’s a text-based game of Truth or Dare. Take the dare, or else a dark secret will be revealed about you to the whole school. Secrets are revealed, dares are taken, and soon, the game takes a deadly turn.

This book focuses on alternating points of view from main characters Maeve, Phoebe, and Knox and I loved getting to know them and their relationships with one another as they were each dragged into the game. There is also some crossover with characters from the first book which added a really fun element. I honestly felt like I knew everyone and I don’t know how the author can manage to make you love like 15 different people and want to just hang out with them all, but she does and it’s amazing. This book was an easy, quick read with an intriguing mystery. It’s bingey, interesting, and while I did guess some of the twists, there were still some surprises. I want to say that while this is a young adult novel, it’s definitely PG-13 with some sexual references and swearing, so be aware of that before recommending it to a young teen. You don’t have to read One of Us is Lying first, but there would be some small plot holes if you don’t, so I would encourage reading them in order. And I highly recommend you do –  I thoroughly enjoyed each book!

We Are All Completely Beside Ourselves by Karen Fowler

This book was recommended to me by a friend and I knew very little about it before diving into reading, which is definitely the way to go here. I would recommend reading this book with as little information about it as possible. The story follows Rosemary as she recounts her life story and the unraveling of her once close-knit family. And that’s all I’m going to say. 😉 There is a pretty big twist to the plot that I do not want to spoil, but I also am struggling a bit to explain my thoughts without addressing it or giving anything away. I will say that this was unlike any other book I’ve read and had a unique, thought-provoking plot that I wasn’t expecting. Poignant, heartfelt, complex, easy to read but really compelling. I think it would be an excellent candidate for an interesting book club discussion. Definitely recommend!

The Wives by Tarryn Fisher

The Wives: A Novel by [Tarryn Fisher]

The narrator of this book presents herself as Thursday, because that is the day she gets to be with her husband. The rest of the week he splits time with his two other wives whom she has never met. This polygamous marriage isn’t what she hoped for, but she loves her husband so much that it’s worth it. Until one day, she discovers some information that leads her to one of the other wives, and it changes things irrevocably.

Meh.

I think this is supposed to be in the psychological thriller category of books but truthfully it’s not very thrilling. There was never a point where my heart was pounding or I was jumpy or anything, and the few twists that were there felt disappointing and even ridiculous. It’s hard to even decide if I liked it. This book had elements of mystery and it was a good enough beach read thriller – not really too dark or twisty and easy to binge while lounging in the sun. I read it pretty compulsively, so I enjoyed it enough to want to find out what was going on. But I was also very aware of the fact that I felt underwhelmed by it for pretty much the whole second half of the book and I was definitely thrown by the ending – not in a good way. I would not recommend it if you’re wanting an edge-of-your-seat nail biting thriller (there are SO many other good thrillers with unreliable female narrators like Girl on a Train and A Woman in the Window), but if you’re in the mood for what I would call “psychological thriller lite,” than this is a decent option.

Now it’s nap time for my kids and I think the outdoors is calling me to go read a book on my porch swing. 😉 Do you like to read outside when the weather is nice?