Happy Halloween!

I love Halloween!

Historically, Halloween is a time I go all out. I loved coming up with costumes and especially themed costumes. Ever since Justin and I have been together, I’ve tried to do a couples costume and then once LJ came along, we did a family costume. I had originally hoped to do a family costume again this year, but with 2 under 2, it’s been a bit hectic around here and coming up with and executing a family costume just wasn’t a top priority.

So instead of a family costume, I kept things relatively simple. For Vi, I found a 0-3 month unicorn “costume” (it’s just a headband and tutu) at a consignment store for a couple bucks and decided that was good enough for an infant who a) doesn’t care about this holiday b) will likely sleep through the whole thing and c) depending on weather, may be too bundled up for anyone to see what she’s wearing anyways.

20191031_084324

For LJ, I went with his interests and what I already had. Someone gifted us an 18-month engineer costume about a year ago and I’ve been saving it for Halloween. LJ is currently obsessed with trains so he’ll be a train engineer (provided the outfit fits – I actually haven’t tried it on him yet – eek!). Then yesterday during naptime I fashioned a Thomas the Tank Engine costume based loosely on something I found on Pinterest.

Look, the key here for me was to shoot for “adequate at best.” I’m not trying to win a costume contest or get a thousand likes on social media. I’m just trying to come up with a cute idea that my son will love and may or may not decide he’s in the mood to wear. I mean, he is a toddler. I found a DIY Thomas costume that had an internal contraption for storing candy so when you trick or treat, the candy goes through the steam pipe and gets stored inside the costume. Look, maybe that mama has an engineering degree or just really loves intricate costumes. Good for her! I’m happy if she’s happy. But I’m not using that as my measuring stick for success.

There are a ton of ideas for how to make a Thomas costume on Pinterest and the end results are all more impressive than mine, so I’m not going to give you a step by step. All I did was take a Pampers diaper box and cut the top flaps to the general shape of the train. When I cut out the bottom flaps, I used the extra cardboard and duct-taped the pieces to the top flap to fashion the back of the train. I had a red box from Aldi that I cut into the shape of the front grill (do trains have grills? I don’t even know that that is called) and I cut circles out for the wheels and taped them to the inside of the box.

20191030_12420420191030_154839-scaled-2560-e1572527852909-scaled-2560-e1572527974486-scaled-2560-e1572528106938-scaled-2560.jpg

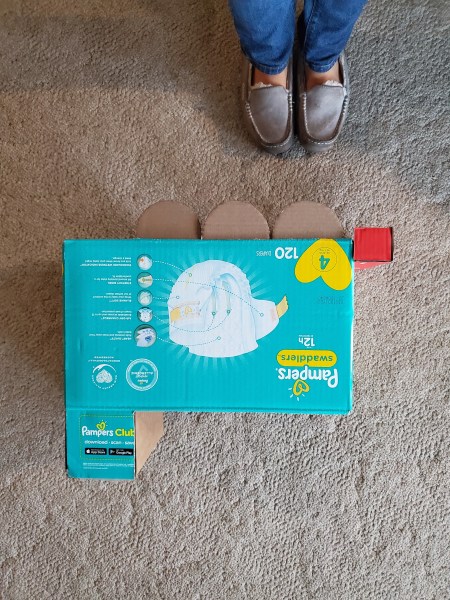
I painted the train blue (I just got a color sample jar from Lowe’s in Sherwin Williams Georgian Blue) and used red masking tape, yellow washi tape, and black construction paper to decorate the sides to look like Thomas. Justin printed out a Thomas face, and I just used construction paper to form a circle around his face which I taped to the front of the box. I wrapped half a paper towel roll in black construction paper and taped it on top and voila!

20191031_091435-scaled-2560.jpg

It took me about 2 hours (not counting the dry time) and cost about $10 for materials. I’m happy with it and LJ is thrilled. Well, thrilled with the box, we’ll see if he actually wants to wear it tonight  (I do still have to attach some straps today).

I’d love to have a picture of my kids in their costumes to post here, and I give mad props to all the mamas who have already wrangled their kids into costumes to take photos before Halloween. For me, I’m pretty sure I’ve only got one shot to get LJ into his costume so I’m waiting for the main event tonight. So I’ll just leave you with some costumes from years past. Enjoy!

IMG_4324
2010: Katy Perry
P1010717
2012: Haymitch & Effie from The Hunger Games
P1040844
2013: Little Bo Peep & her sheep (and bumblebee)
20141101_200248
2014: Progressive Flo & Jake from State Farm
20191031_090027
2015: Abby from NCIS
20191031_090015
2016: Nick & Jess from New Girl
20191031_090400
2017: Backstreet Boy & Brittney Spears (BABY one more time!)
20191031_090529
2018: Pooh, Tigger, and Rabbit

Have a safe and happy Halloween!


Tuesday Toddler Thoughts

Today, LJ turned 23 months old. The last little milestone before TWO! I can hardly believe it.

If you follow me on Instagram, you may have seen in my stories a bit about our recent library adventure. For those that don’t follow me, let me paint you a little picture.

img_20191015_134723_377

With the cooler weather lately, I’ve been trying to find more indoor activities that I can take the kids to. I recently learned that our library has a toddler story time on Tuesday mornings so I signed us up. The first two times went pretty well, so I decided to try out another class they offer on Thursdays which is called Music and Movement. It’s an awesome program for littles, and after the 30 minutes was up the librarian unlocked the closet in the room and brought out a bunch of toys for some free play afterwards. Fun, right?

Well.

The following Tuesday (which was one week ago), we rolled in to our normal story time class right before it began. The room was full of toddlers and their moms and so of course the only available floor space is up front next to the librarian. Not really a problem, except LJ saw The Closet. You know, the closet full of fun toys that he now knows about thanks to the Music and Movement class.

Do you think my toddler wanted to sit quietly in a circle and listen to a book?

No.

He wanted to play with the stuff in the closet.

I told him no, we were not going to open the closet, and he proceeded to throw a mini tantrum. Right in front of the class. Tears, cries, refusing to come sit down.

The poor librarian is trying to start the book and here my toddler is right next to her throwing a fit. I’m not going to lie, it was tempting to just pick up LJ and leave. I already felt like a bit of a hot mess rolling into class right before it started with my toddler and infant trying to squeeze into the front. Then my toddler melts down and I’m all hot and flustered and honestly, embarrassed.

Instead of carting off my crying toddler and sleeping infant, I stuck it out. I continued to tell LJ no, the closet was going to stay closed and encouraged him to sit. I attempted to draw his attention to the librarian reading the book and the pictures she showed. It wasn’t easy to keep calm and stay in the room, but after about 6 or 7 minutes, LJ realized he wasn’t going to get his way and he started participating in the class. He danced and followed the songs, he followed directions (I mean, as well as any of the other toddlers did anyways 😉 ) and he had FUN.

I’ve been thinking a lot about that day in the past week, and I have a lot of thoughts about it.

It would have been so. easy. to just call it a day, leave, and try again another time. And I know there are some situations where it’s better to lower expectations and/or head home. But I don’t think this was one of them. Story time at the library is for kids 18 months – 3 years so there is plenty of grace for typical toddler behavior. The activities are catered to them and if they throw a fit, the other moms get it. Even though I was flustered, I trusted that the other moms were thinking “been there, sister!” instead of “can’t you control your kid!?” (Who knows what they were really thinking but I’m not going to lose sleep over that).

LJ needs to learn how to act in social settings. He needs to learn how to be told no and process and cope with his feelings. He needs to learn that he won’t always get what he wants. And if I had given in and just taken him home or left the story time room to let him go play with toys in the kids’ corner, he would probably have stopped crying. But he wouldn’t have learned any of those things. Better to learn these skills in a toddler story time setting than melt down in a crowded restaurant or on an airplane, right?

I can’t expect him to behave perfectly every time. I know he won’t. He’s learning! But we practice and stick it out and celebrate the victories, like how when we played in the kid’s corner afterwards he shared toys SO much better this time than last time. And today, when we go back to story time, he might do a little better. Or he might not. But we’re going to keep showing up and trying!

I don’t know why all this was on me heart to share today. I guess I feel like my social media/blog/online life has been very baby-focused lately but the truth is we are firmly entrentched in TODDLERHOOD around here. And for any other mama out there experiencing the same thing, I see you. I’m right there with you. Toddlers are wonderful and sweet and hilarious and TOUGH. Hang in there. We’re all just doing the best we can.

Phase One Master Bathroom Progress

A little while ago, I shared in my Instagram stories that we are doing a “Phase One” master bathroom update. It’s consumed most of my free time over the past week so today I thought I’d share our progress so far.

First of all, what do I mean by “phase one?” I was inspired by Chris Loves Julia and their Phase One kitchen update. After moving into their house, they weren’t ready for a full kitchen renovation but they did not like the look, feel, and function of their kitchen. So they set up to update it for under $1000 and make it work for the short term.  It’s still not their ideal kitchen, but the goal was to “fall in love with what they already had” with a few simple updates. I thought this was such a good idea, and it made me think of our bathroom.

When we first moved into our house, I knew I wanted to do major work in the master bathroom. Ideally, I’d like to completely gut it and re-work the layout (particularly the shower area, which is off to the right of the large vanity). We have a plan to do that someday, but we need to pay down Justin’s student loans first. It will likely be at least 5+ years until we can make it the bathroom of our dreams, so we decided in the meantime to just do a “phase one” refresh. My goal was to spend under $500 and do some simple updates to fall in love and be content with the layout as is, but make it feel fresh and clean.

Here’s what the bathroom looked like to begin with:

Phase 1 Bath 2Phase 1 Bath 3

The room is definitely dated, but the dark walls and carpet were my two biggest complaints. I am not a fan of carpet in the bathroom and this one had stains (mostly rust stains from the previous owners’ antique vanity) and other signs of wear and tear. That combined with dark colors just made it feel dingy.

The first thing we did was rip up the carpet. My dad came over last week and we spent an afternoon pulling it up and removing all the staples from the subfloor.

Phase 1 Bath 4

The nice thing about no flooring was it made painting easier – no worries about drips! I primed and trimmed out the walls quickly. You’ll notice I even painted a little love note in the space behind where my mirror will go on the wall. ❤

Phase 1 Bath 5

We’re going to lay down an inexpensive peel-and-stick vinyl and the directions called for the wood floor to be primed first. We used a shop vac to remove all debris and then primed the floors.

Phase 1 Bath 6

I finished painting the walls and then was inspired to also paint the vanities. I had plenty of paint in Sherwin Williams Urbane Bronze leftover from our previous house so this didn’t cost anything extra. Score!

Phase 1 Bath 1

Now my plan from here was just to paint the ceilings a fresh white, lay down the flooring, touch up some caulk, and be finished BUT . . . I can’t decide if I like the wall color! I chose Sherwin Williams Gray Screen and tested it in multiple places around the room before painting. It always looked gray when I tested, but now that it’s fully on the walls, it looks blue! I think the issue is the wood trim. When I tested the paint, it was surrounded by white primer and looked gray, but now that it’s outlined by wood, it brings out the brown undertones and looks blue. Depending on the amount of natural light, it does vary a little (you can see in the above picture that the walls around the tub even look different than other walls) but it never really looks like the gray I envisioned. So I can either repaint the walls a different color, paint the trim white to help it look gray, or leave it as is and deal with the blue. Sigh. None of those options are particularly appealing so I need to spend some time thinking about this.

I’ll be sure to report back once the room is totally finished in a week or two – I’m so excited to have an updated bathroom soon!

Let’s Look: Favorite Fall Recipes

Today I’m linking up once again with Shay and Erika for their monthly “Let’s Look” post and today is all about fall recipes which is perfect because it is FINALLY is starting to feel like fall around here! 

A quick recap of our recent fall fun before I share my favorite recipes: Justin and I took the kids to a fall festival at a dairy farm in our area on Saturday and it was a blast! The weather was a little cooler and I was feeling ALL the fall things. Hayrides, corn mazes, and pumpkins galore!

Fall 5

It was so much fun to get to experience the festival with LJ: he absolutely LOVED it!

He played in a giant bin of corn, which just cracked me up. I mean, does it get any more Midwestern than that?

Fall 1.jpg

We also got to see how their cows were milked, pet a baby calf, and take a ride on a train pulled by a tractor through a corn maze. I think LJ’s favorite part was getting to play on the giant jump pad – he wants to do everything he sees the big kids doing and he had so much fun running from end to end and getting bounced around (I love the progression of pictures haha!) It was SUCH a fun fall day!

Fall 6Fall 2Fall 3Fall 4

Alright, now on to fall recipes! Now I’m not one to go crazy over pumpkin spice everything as soon as the temperatures drop, but I do get excited for a few things every fall. My absolute favorites are:

THESE BARS from Sally’s Baking Addition. They’re called Apple Butterscotch Magic Bars and they really do feel like fall magic. I am not a coconut fan so I leave out the shredded coconut and they are still so delicious!

THESE COOKIES from Dear Crissy are the perfect pumpkin cookie. I love making these for a party because otherwise I end up eating them all myself. If you prefer a cream cheese frosting, these cookies from Cooking Classy are also very good.

And as for Halloween festivities, I wrote a blog post several years ago about simple Halloween treats for procrastinators (basically, a few festive and easy treats you can whip up quickly). These are sweet and simple additions to a Halloween party!Final Treat Collage

What are your favorite recipes for fall?


Simplify the Diaper Bag {Two under Two}

I’ve now been a mother of two for just over six weeks and I’ve made it a point to get out of the house as often as we can. I want to enjoy the warm weather while it lasts and leaving the house to go to the library, playground, or a playdate boosts my mood and helps LJ burn off a lot of energy. Win win! In order to leave the house though, I have to be prepared to take a diaper bag.

I have blogged several times about what I carry in my diaper bag (newborn, infant, toddler) and it may sound strange but these posts kind of serve like snapshots into my life at various points of motherhood. I like to share these posts not only to give some ideas to fellow mamas who might be looking to streamline their diaper bags but also to document what I carried at that point in time so I can look back later and reminisce on that stage of life. 😉

My goal with a diaper bag is simple: I want to have access to the things I may need when we’re out of the house but avoid feeling like I’m carrying around everything we own. I don’t want it to be so full that it puts strain on my back or is impossible to find anything quickly.

Today I’m going to share everything that I carry in my diaper bag these days with “two under two” (two kids under two years old). As with all my previous posts on this, I want to emphasize that this is what works for me. It might not be what works best for anyone else and that’s okay. I personally want my diaper bag to be efficient and minimal-ish (more than just a bare minimum of diapers and wipes). I know I could pack more items that may offer convenience in various situations, but I choose not to. I pack what I am most likely to need and anything not listed is honestly something we can do without in 99% of situations.

Diaper Bag 7.jpg

First up, I have a new diaper bag! I had used this diaper bag since LJ was born and I honestly loved it; however, it got such heavy use that it was getting pretty worn down and the front compartment zipper had completely broken. Rather than get the same bag again, I chose this one because it offered a similar look but had a few more inner pockets which I wanted now that I have stuff for two kiddos. One thing I definitely wanted to keep the same was a backpack-style bag – my arms are full enough these days that I don’t want to have multiple bags slung over arms. I want one bag that holds what I need and allows me to be hands-free so I can push a stroller/carry a carseat/hold my toddler’s hand, etc.

As it was with my first diaper bag, the front pocket is my “mom” pocket. This takes the place of carrying around a purse and holds a pen, a few snacks (I like to have protein-packed snacks while breastfeeding), hand sanitizer, headphones, and gum.

diaper-bag-3.jpeg

The side pockets are great for carrying my water bottle and I also slip my phone into the other side (usually I slip it in my jeans back pocket but if I don’t have one, I can quickly stash it there).

The main compartment is where I keep everything for the kids. I roll everything and place it on its side to maximize space and keep things easy to access. The main space holds a muslin blanket, flannel blanket, two burp cloths, a spare outfit for Vi (a sleeper, because that’s easy right now!), my wallet, a nursing cover, and a toy for LJ. I also usually throw in a snack container for LJ with crackers or something similar and his water.

diaper-bag-1.jpeg

Additionally, there are 5 pockets around the side and I’m purposeful with each one (counter clockwise from “top” of picture): The back pocket holds a changing pad (came with the bag) and a reusable clutch of wipes.  The next pocket is insulated for a bottle, but since I’m currently breastfeeding I store extra pacifiers and a pair of socks for Vi here. The next pocket holds 3-4 diapers for LJ. The next pocket holds 4-5 diapers forVi, along with diaper cream. The last pocket is LJ’s “snack” pocket. It holds a reusable placemat (handy at restaurants), a bib, spoon and case, and snacks (typically 1-2 pouches, fruit snacks or a fruit strip, and some type of bar).

diaper-bag-2.jpegdiaper-bag-6.jpeg

There is one last thin pocket outside the diaper bag (in the back) and it is usually empty, but it’s a handy place for me to slip something small I might need to carry for a particular purpose, like our mail, a book for my bible study, etc.

A few additional tips for a “two under two” diaper bag:

-Repack when you get home. It’s not exactly calm when we’re trying to get out the door. I’m getting kids changed, breastfeeding, getting myself ready, cleaning up spit up, changing a final diaper, grabbing LJ’s water bottle, trying to find shoes, wrangling LJ into his shoes, etc. The minutes leading up to us leaving the house are often hectic and rushed. It is not the time to realize “oh shoot, we have no diapers for Vi” or scramble to grab snacks in for LJ. And I certainly don’t want to leave the house and realize I have no wipes to clean up a poop mess (have you seen this!? OMG – hilarious, but also I would be so stressed out if this happened to me!) So in order to avoid that extra stress right before leaving or realize too late that we forgot something vital, I “reset” it each time we get home. I refill diapers, wipes, snacks, take out anything extra we used last time, and just get the bag back to baseline. I may not have time to do this right away when I get home, but I don’t put the bag in its “spot” unless it’s reset and ready. This way, the ONLY thing I have to do before leaving is throw in LJ’s water and zip it up! So much less stressful.

-Have an extra diaper clutch ready to go for your toddler. The first time I took both kids to my bible study, I went to drop LJ off in childcare and realized I couldn’t leave the diaper bag with him because I needed it for Vi! So I clipped his diaper name tag to one single diaper and handed it to his teacher like “uhh, sorry this is the best I can do.” Such a rookie mistake! I purchased this simple clutch and it’s the perfect size for a small pack of wipes and a few diapers (and even his water and one snack if needed). I keep it stocked with wipes and 1-2 diapers and store it next to my diaper bag; any time I’m going somewhere where LJ and Vi will be in separate places, I throw it in with my main diaper bag and then have something to leave with LJ. So much easier!

Diaper Bag 8Diaper Bag 4

Diaper Bag 5

As you can see, I still carry quite a few things around in the diaper bag. I’m prepared for the situations that are most likely to happen (hangry toddler, messy diapers, etc) but I’m not going to stress out about every possible situation (if LJ gets bored or restless, I don’t need 7 toys in the bag to distract him because we’ll typically be able to find something in our surroundings to focus on). That’s what works for me!

What are your purse or diaper bag must haves?

September 2019 Book Reviews

It’s that time of the month again – book review day!

It goes without saying that my life is pretty busy these days, so I’m not getting through as many books as I was before, although to be honest I’m just glad I’m able to read at all! I was kind of expecting to not be able to finish any books during this stage of two kids under the age of two years old. But then I discovered this:

20190926_155916.jpg

Turns out, there’s a lot of time I’m just sitting on the couch breastfeeding and the Boppy pillow makes a perfect book rest! I was able to get through two full books this month and they were both excellent so I’m excited to share them with you today. Here we go!

1570107041046.jpg

The Tattooist of Auschwitz by Heather Morris

If you’ve been following my book reviews for a while, you know that I’m a bit of a historical fiction junkie. I love all types of historical fiction, but my favorite are the books that are based off of actual people or events that I haven’t known about before reading (books like The Alice Network, Before We Were Yours, etc.) This book falls into that category and I could not put it down. The book follows Lale, a young Jewish man from Slovakia who is taken to Auschwitz. Once there, he is given the role of tattooist and is made to mark all the new arrivals with their numbers. Since his role is so important, he has some special privileges and uses them to help out his fellow prisoners, particularly a woman named Gita. The author had interviewed Lale before his death and so the story was a re-creation of his experiences at the concentration camp, many of which were utterly horrifying. No matter how many times I read a novel about the Holocaust, I am still shocked and sickened by the depths of cruelty that occurred. There were parts that were very hard to read, but the story itself was gripping. Lale’s determination and courage are truly remarkable and I was inspired by the small acts of kindness that made such a huge difference to those they were bestowed upon. There were even moments that were romantic and sweet. It feels strange to say I enjoyed it, because it was difficult subject matter, so I will say that I was fascinated and highly recommend it.

Searching for Sylvie Lee by Jean Kwok

Sylvie Lee is a smart, successful daughter of Chinese immigrants who travels to the Netherlands, the place where she spent seven years of her childhood, to visit her dying grandmother and afterwards . . . she disappears. Her younger sister Amy is distraught with worry and heads to the Netherlands in search of her sister. Her desperation only increases as she encounters a slew of unanswered questions and limited police help. The more people she meets, the more it seems like no one is telling her the full story. It’s hard for me to sum up this book without giving too much away because it touches on so much: family, cultural difference, racism, life as an immigrant family. I will say that the first half started out very slowly for me. It felt like I had only questions and no answers, and I wasn’t even sure I cared enough to find out. I was kind of annoyed by Amy and how sheltered and naive she was. BUT. Around the halfway point, things took a turn and got very interesting and I was hooked! It became a true mystery for me; I was intrigued and flew through the second half. Overall I really enjoyed this read and definitely recommend it!

What have you been reading lately?

New and Improved Playroom

As many of you know, we moved to a new house in May. The house originally had two eating areas: a large but casual space off the kitchen and a formal dining room. I knew from the get-go that I wanted to convert the formal dining room into a playroom. It’s a great size and there is a large cased opening into the living room so it’s easy to keep an eye on what’s going on in there. It was the first room we decided to put some time and energy into updating since it gets used every single day and all the changes we wanted to make were cosmetic and pretty straightforward and budget-friendly. Today I’m going to share a bit about what we did to update the space for use in our daily lives.

Here’s what the space looked like when we first moved in:

Playroom 14Playroom 13

It didn’t exactly scream “fun room for kids to hang out” huh? I was itching to brighten the room up with paint, but it unfortunately wasn’t as easy as grabbing a brush. The previous homeowners had painted the walls with a textured paint (we think they may have mixed sand in with the paint to create a texture because it was very uneven on the walls). This made the walls look dingy even after they had been cleaned. Before we could paint, we needed to remove the texture. There were a few ways to go about this but we ended up just taking an oscillating sander and buffing the wall smooth.

Playroom 12
Justin testing out whether the sander would work for this project.

This process was very time-consuming and created a lot of dust. We had a bag attached to the sander to catch dust, windows open and box fans going to encourage the dust to go outside, and we blocked off the room as best we could but dust still ended up traveling into adjacent rooms. The process of sanding took a few days because we did it in short spurts to avoid inhaling lots of dust (we did wear masks to help) and to give our arms a break, as this was a workout for them! We also had to spend quite a bit of time on each section to get things as smooth as we wanted. It felt like forever but when we finally finished the walls looked so much better!

We washed down the walls to remove lingering dust, patched little dings and holes and then it was time to paint! Because the previous paint was so dark we first went over the walls with a layer of primer and then two coats of Benjamin Moore paint in Greyhound. We only painted three walls because my plan for the remaining wall was to use a fun accent wallpaper. We did put a fresh coat of paint on the ceiling because it also looked a little dingy, and this made the room feel much brighter.

For the wallpaper, I wanted something fun, a little whimsical, yet not too crazy bold. I bought three rolls of Magnolia Home wallpaper in Pick-Up Sticks in blue. It was the perfect choice, although hanging was a bit of a challenge. The wallpaper is prepasted and (theoretically) easy enough to hang – you just spray it with water, let the water absorb for a few minutes, and then press it to the wall. It doesn’t dry immediately so you have a chance to slide it around a bit and make sure it’s lined up the way you want. The problem for us was, even after all that sanding, our wall still wasn’t perfectly smooth. This created some wrinkling and made things stressful and incredibly frustrating for Justin and I. There were also a few places where we couldn’t get the seams to line up perfectly because it would have made the pattern crooked and created really noticeable wrinkling so we had small gaps. Our solution to this was to fill in the seam gaps with a white paint marker after the wall was dry, which did help to mask the gap. It’s not a flawless wall, but thankfully the pattern is subtle enough that it’s hardly noticeable at all, especially now with furniture and art on it.

The final thing we did was remove the old light fixture. We had replaced the flush mount that was in our master bedroom with a ceiling fan, so I just updated the flush mount with some black spray paint and we moved it down to the playroom. I would have loved a new light but we were trying to keep the room budget-friendly so for now this was a good solution.

The room was finally finished and it was time to move in furniture! Justin made a bookcase for toy storage loosely following these plans from Bless’er House. We bought inexpensive ready-to-assemble bookcases from a local company which he screwed together and used thin lattice board on the side fronts to create the look of a custom piece. I painted the shelves in Sherwin Williams Oceanus (the previous owners fixed up cars and they had a perfect paint room already set up in the garage) and Justin topped the whole thing off with a long plank of stained oak. He finished by nailing thin strips around the plank to give it the look of a chunky butcher block-style top which I LOVE.

I adore how the piece turned out, but there were many snags along the way. The shelves didn’t hold paint well and required many coats (and will need subsequent touch-ups). One shelf was slightly bigger than the other three (even though they were the same style from the same company) which created measurement nightmares. The top plank was initially cut a few centimeters too short so it required Justin to cut notches in the trim pieces he used on the side to make it look flush. There were just a lot of little logistical things and the project had more headaches than we anticipated. We’d probably never do it again, but I’m glad we did it this once because it works perfectly in the space!

We got a super inexpensive futon from Aldi (anyone else love Aldi??) and finished off the room with a few plants, a colorful gallery wall using frames and mirrors I already had, and an oversized alphabet print from a local company. And with that, the room is done!

Finished playroom 8Finished playroom 3Finished playroom 6Finished playroom 5Finished playroom 4Finished playroom 7Finished playroom 2

I’m absolutely thrilled with it!

I love that the room has gone from dingy to bright and airy. LJ plays in it everyday and I can testify that while it’s cute (in my opinion ha!) and decorated, it’s also very kid-friendly and functional in our daily lives. It was the perfect first room to tackle in making this house into our home and I’m so happy with how it turned out!

Playroom 14Finished playroom 1

I can’t wait to continue to transform rooms throughout the house!