My Mom Uniform

Good morning!

Today I’m once again joining Erika & Shay‘s monthly Let’s Look link-up (which will actually be tomorrow, I’m just posting a day early) and this month’s topic is your favorite “outfit of the day” or OOTD. 

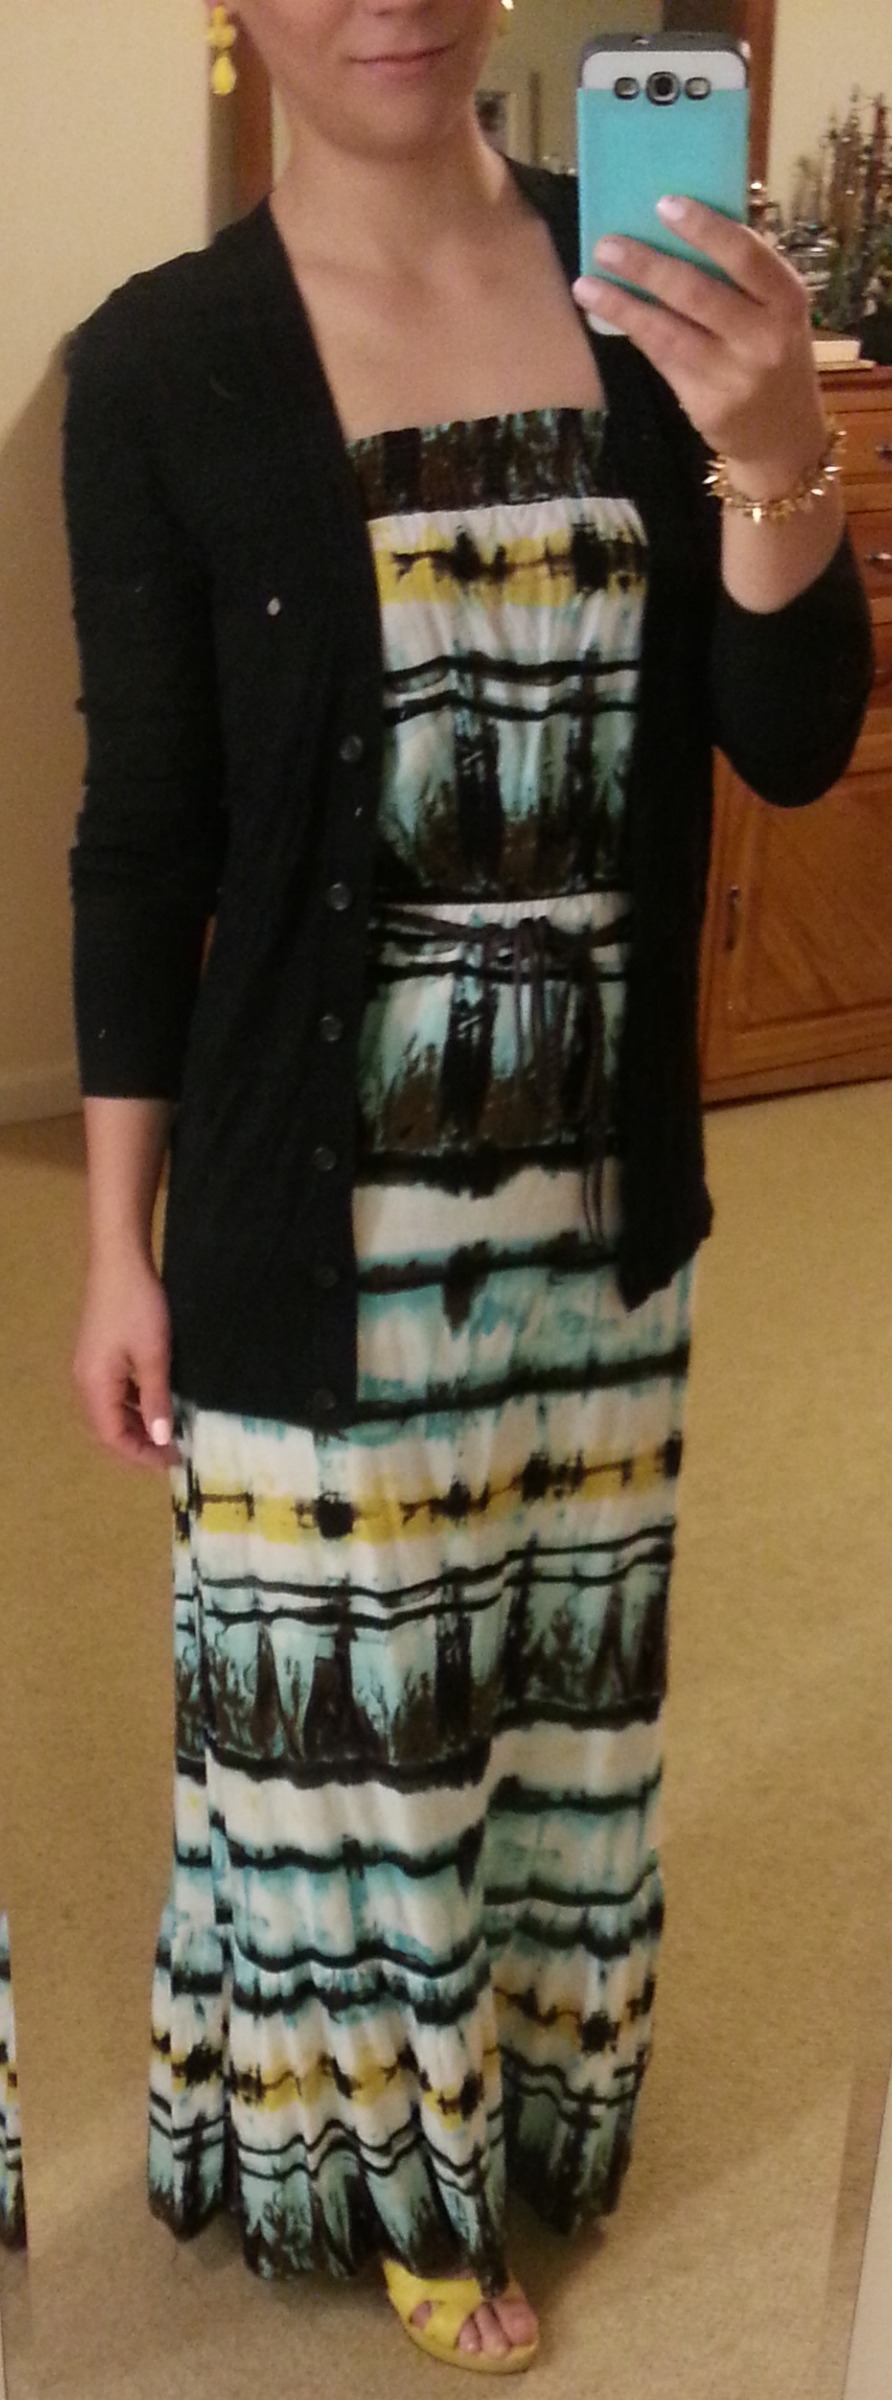
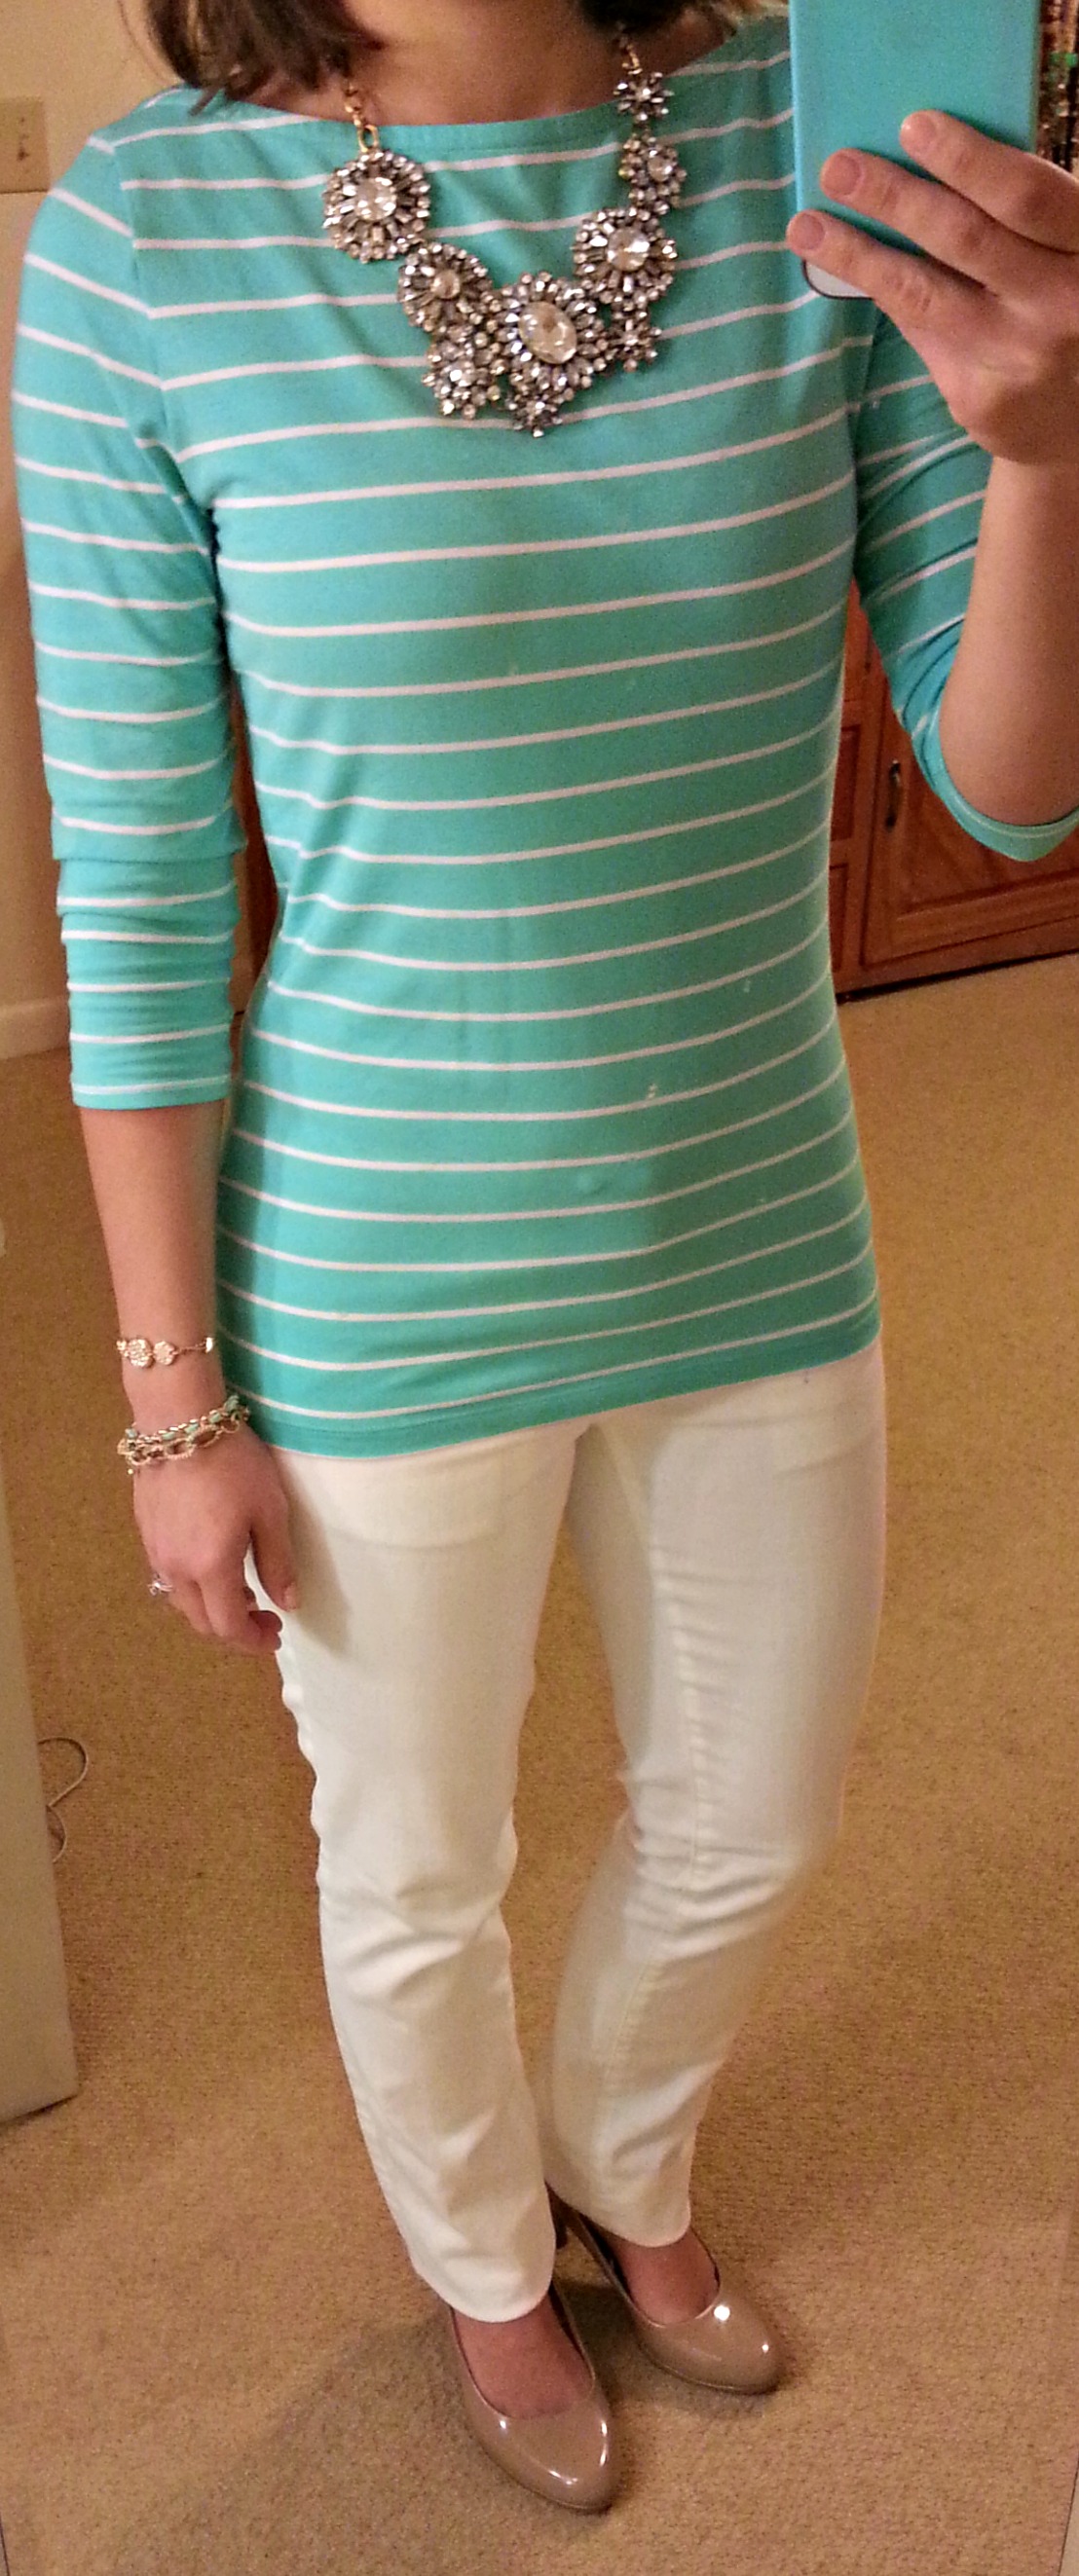
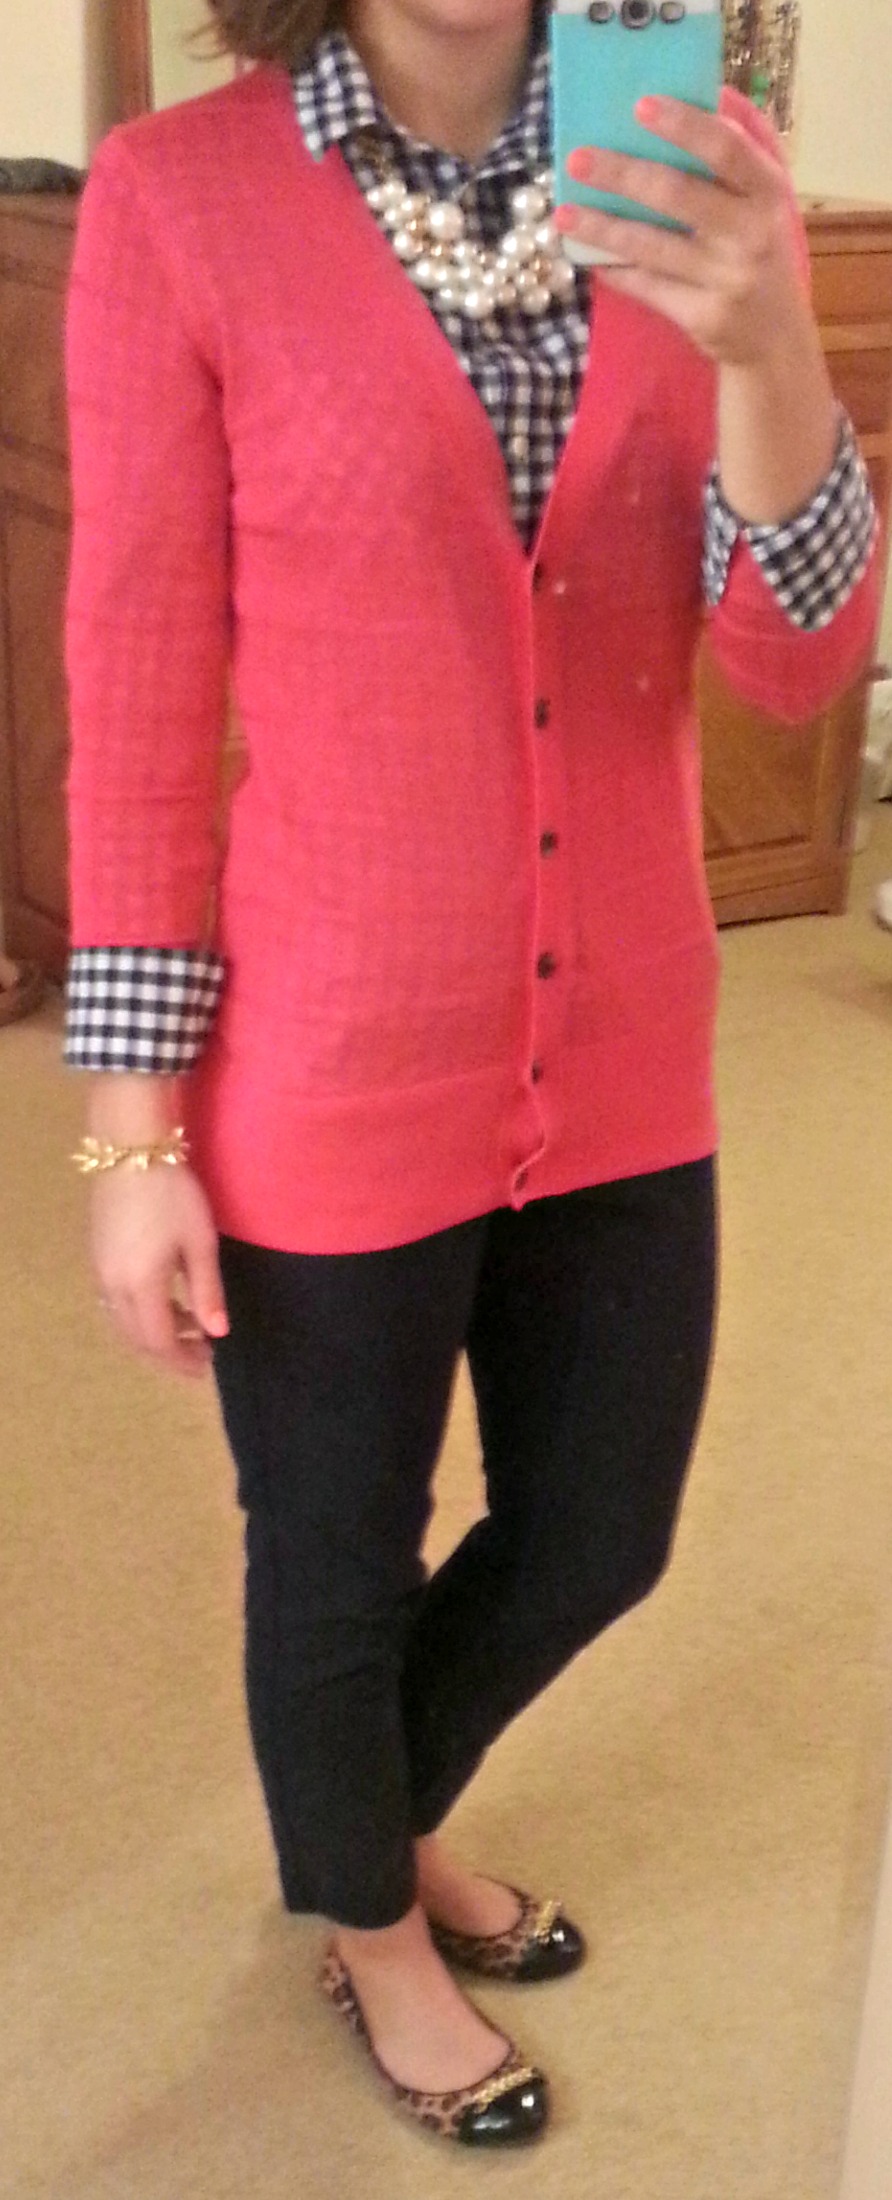
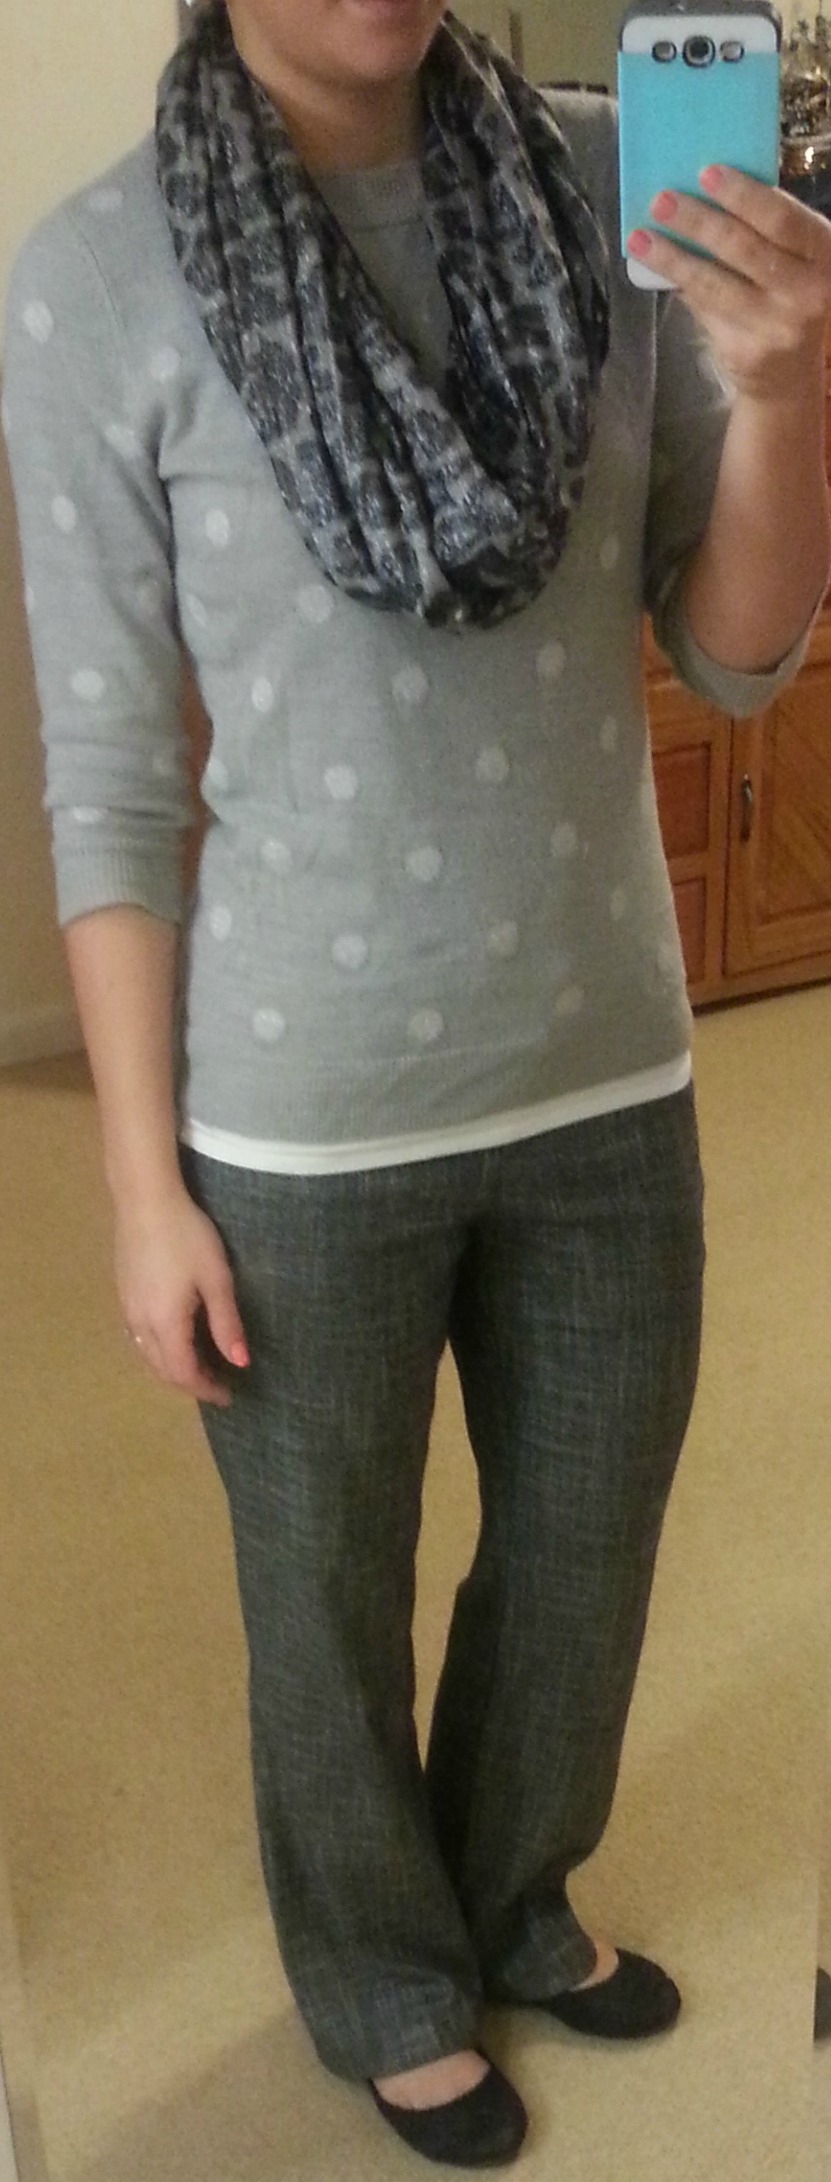
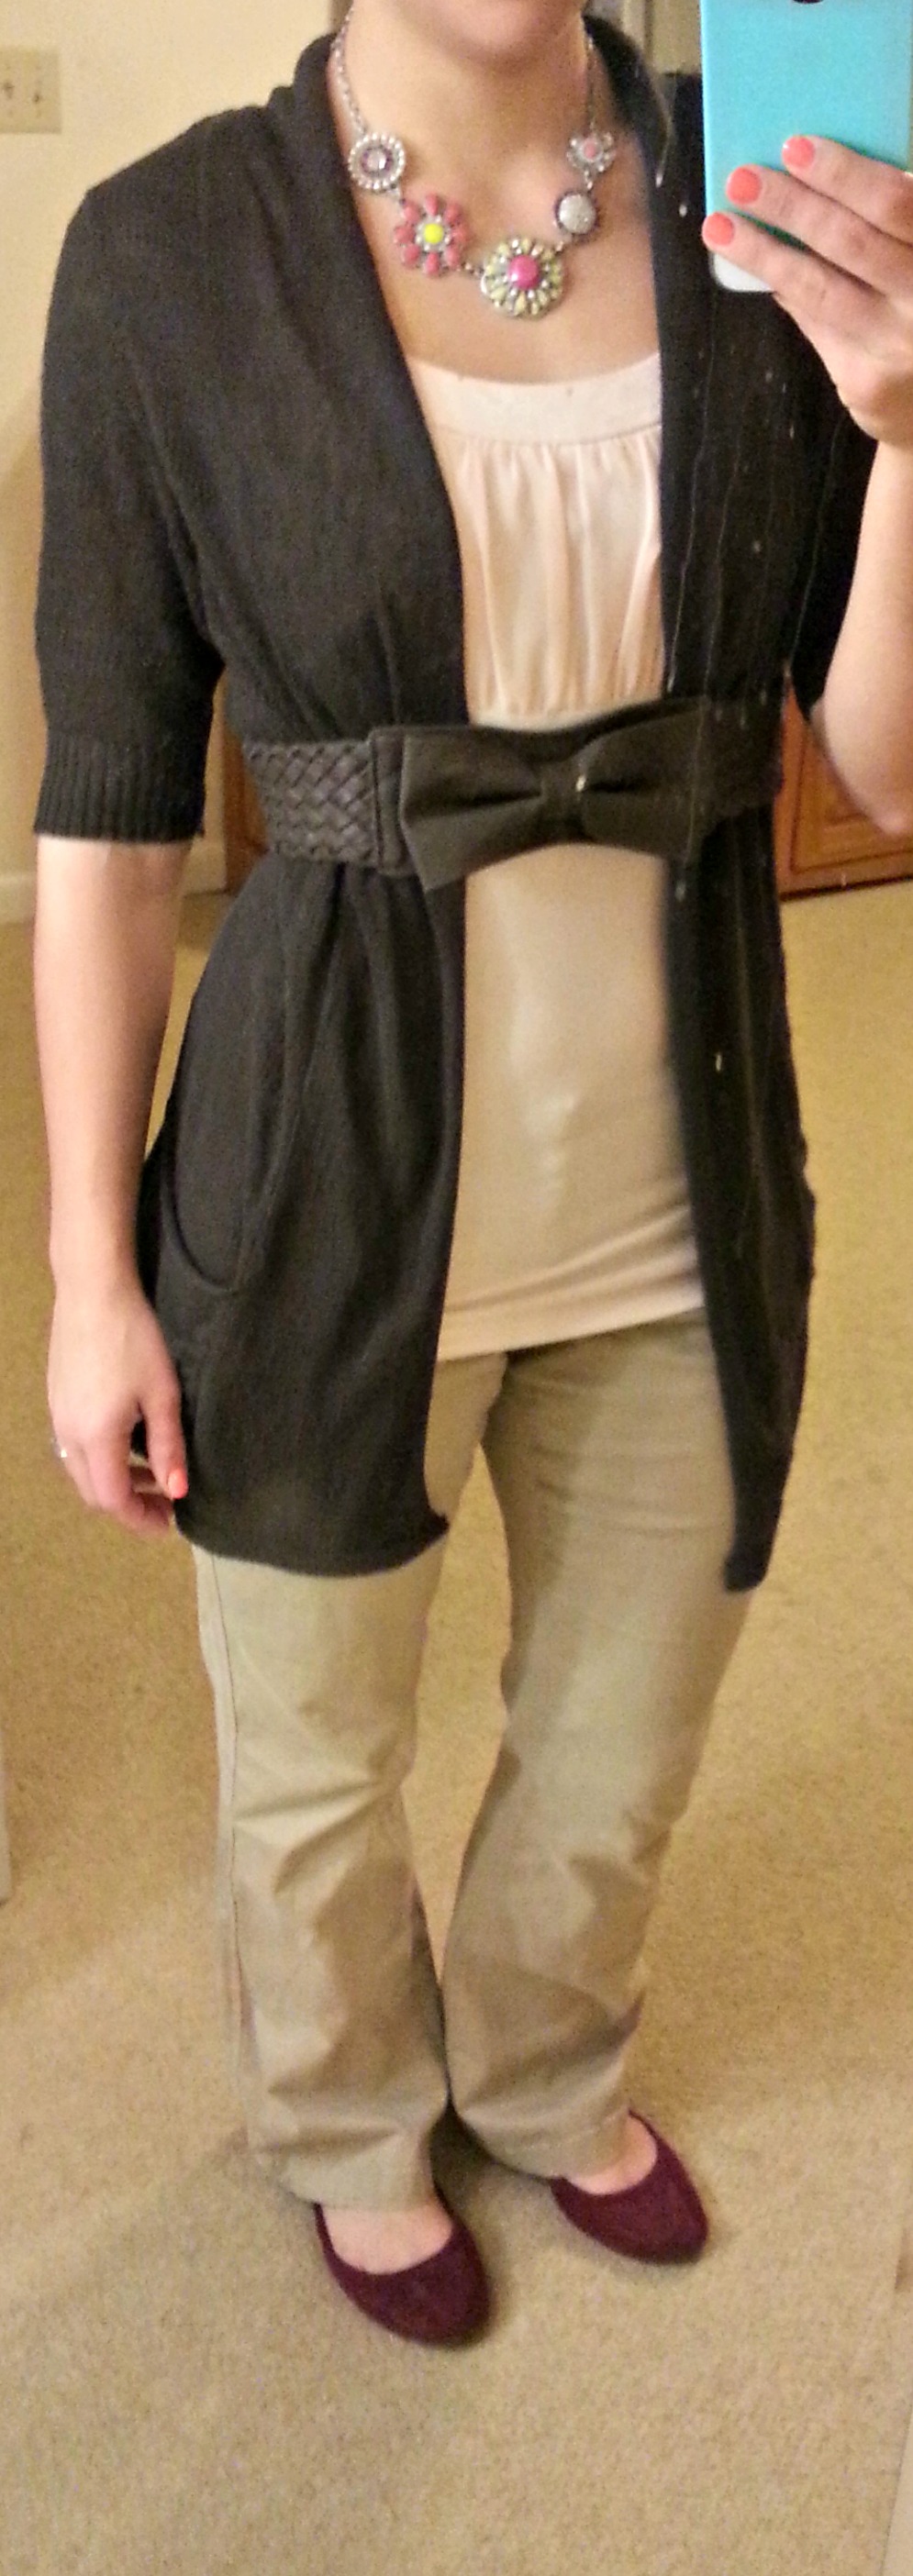
If you’ve been around for a long time, like 5 years ago before my blog’s hiatus, you know that this space started out as a place to share lots of teacher outfits. My Instagram used to be exclusively dedicated to sharing my teacher ootd and I would share simple, everyday looks that were professional, comfortable, and affordable. The outfits are all still saved under my closet archives but here’s a little sampling of what my professional wardrobe used to be:


I loved mix-and-matching basic pieces in different ways – I loved little details like a fun ruffle, statement jewelry, or unique shoes and I enjoyed finding fun ways to layer. I still enjoy dressing up like this if I have the occasion to!

Now that I am no longer teaching and stay at home with LJ all day, it would be super easy to live in sweatpants, but I still try to get dressed every day. I don’t mean get dressed up, I mean just get dressed in anything other than the same old sweats.  It is literally JUST as easy to throw on a basic striped shirt as it is to throw on a sweatshirt, and it may seem silly but it affects my overall confidence and happiness. I’m way happier bumping into a friend in the grocery store if I’m wearing a “real” shirt. I’m way more confident kissing my husband when he comes home if I’m not in the same sweatpants I was wearing when he left for work in the morning. When I feel like I look even just a little bit put together, I feel better about myself and a happier, more confident Sarah is honestly a happier, more confident wife and mom.

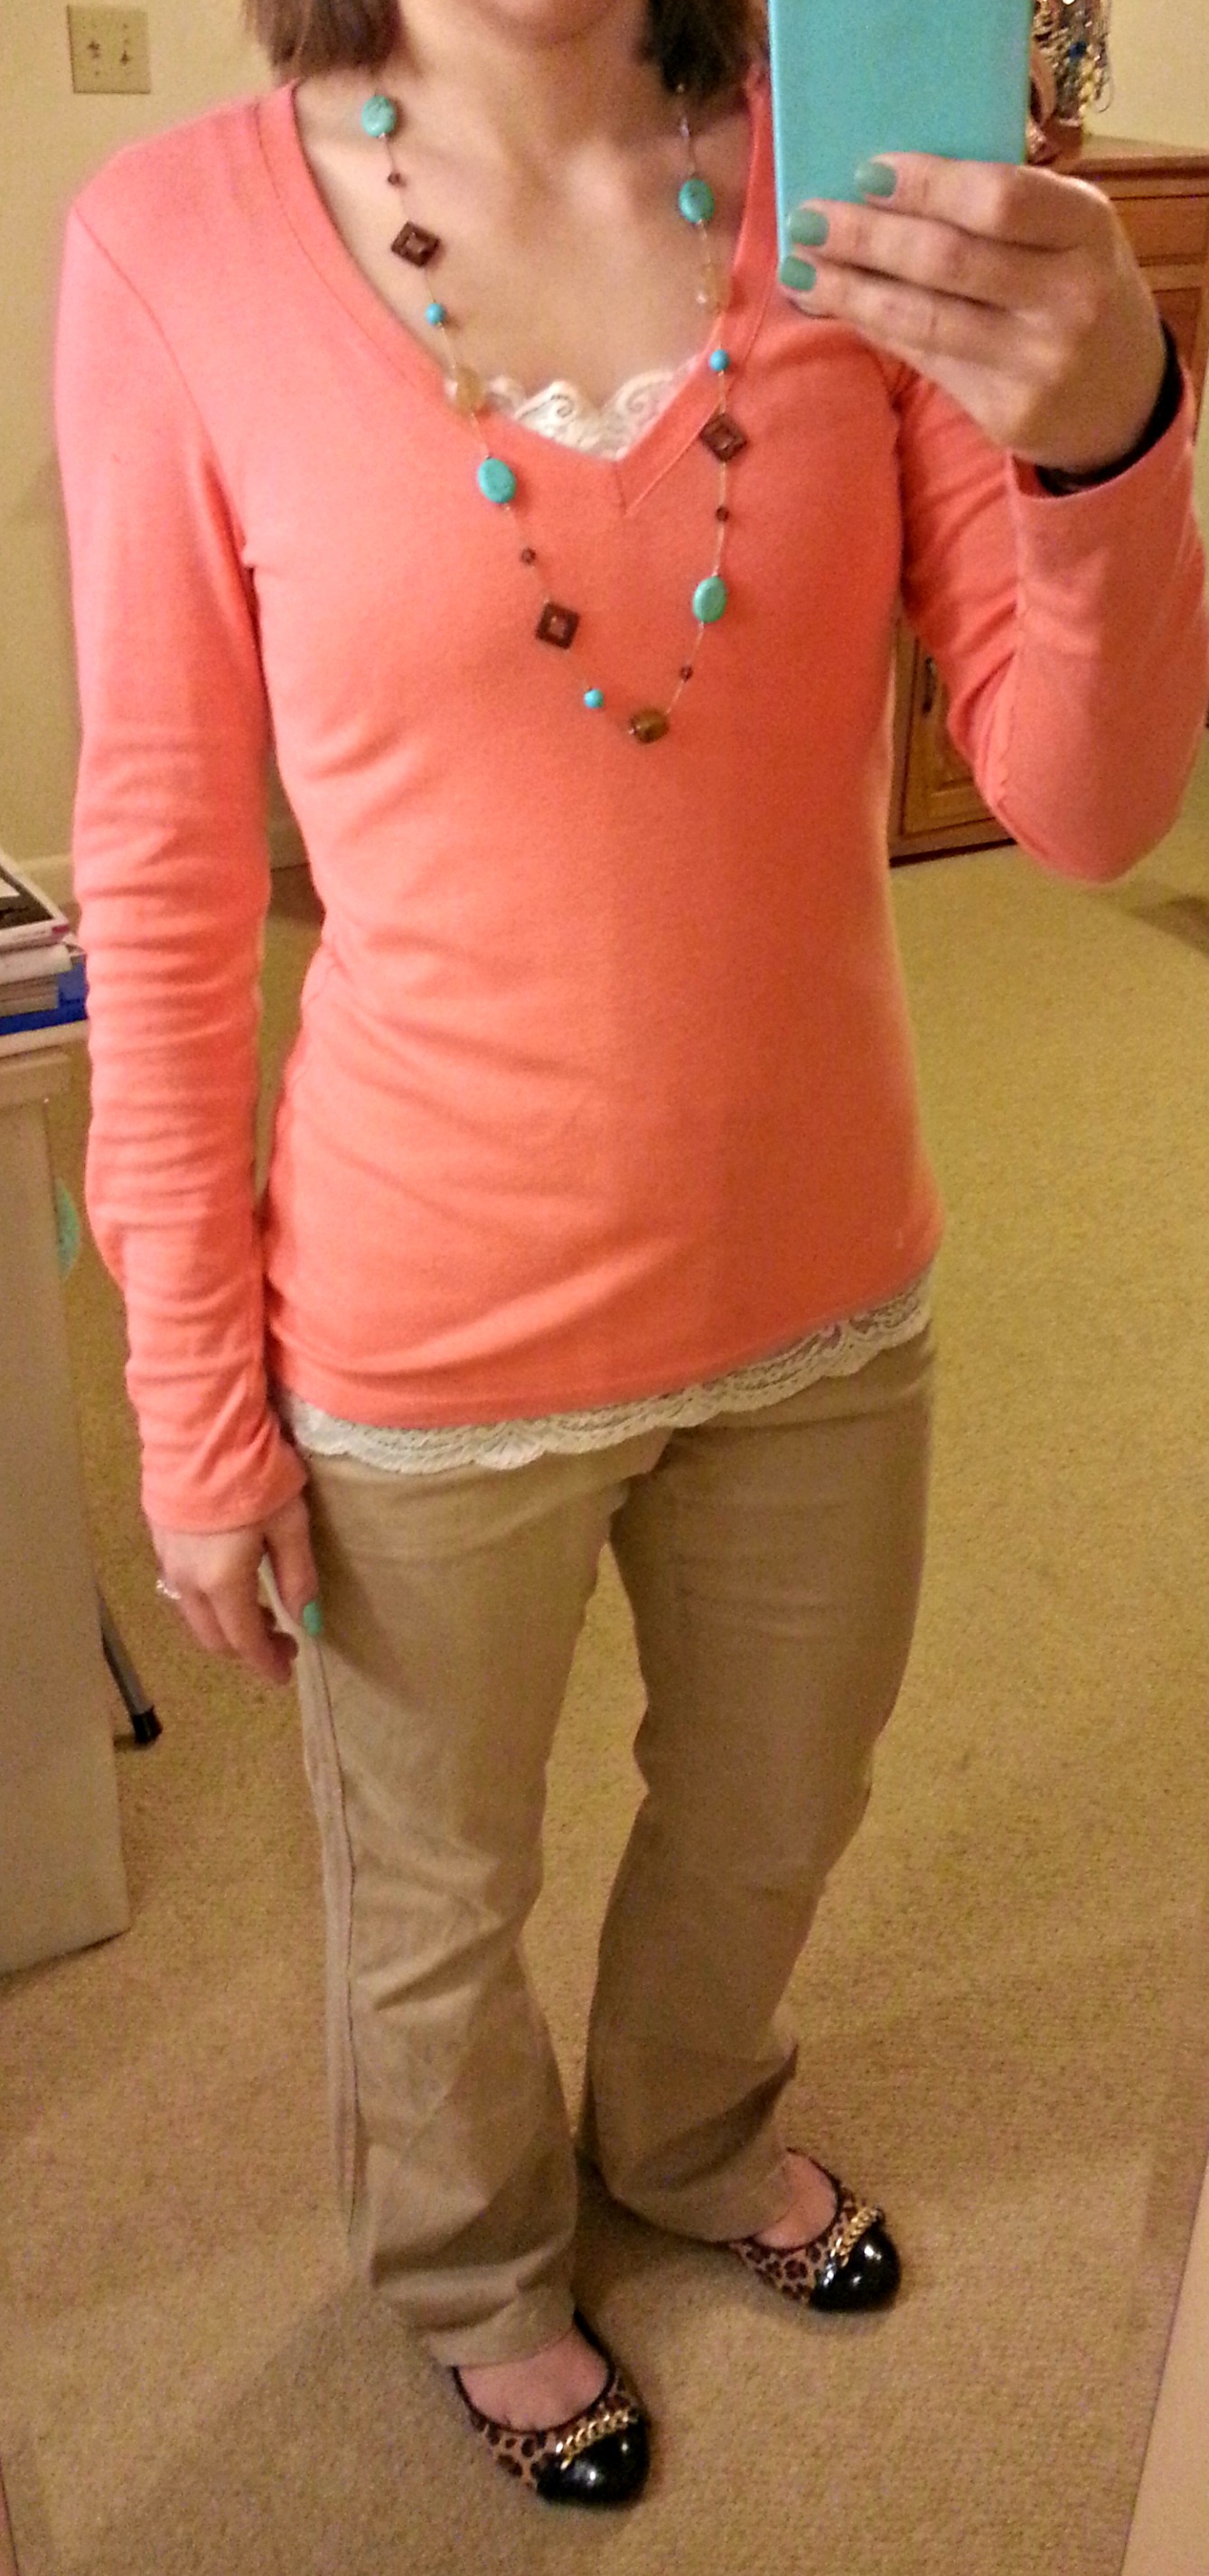
All that being said, I don’t have the same about of time to piece together a daily outfit like I did when I was teaching and even if I did, there’s no real reason to go to that level of thought and effort. My days usually include pushing a stroller on a walk or running around my backyard or reading books on the floor so the heels have taken a leave of absence. Plus, many days I end up with yogurt on my pants or have a strawberry thrown at my shirt (thanks LJ) so I stick with basic, easy to clean clothes. I have a “mom uniform” of sorts that goes something like this: easy top in a classic pattern (stripes, plaid, etc), one piece of simple or statement jewelry, skinny jeans, and flats. It maybe takes an extra two minutes to pull these items from my closet instead of reaching for sweats, but the minimal amount of extra effort makes a huge difference.

All of those outfits were super easy to thrown on, and I felt so much happier and more confident heading out the door. And they are all still comfortable and easy to “mom” in!

Now do I also take the time to do full-on hair and make-up everyday? Heck no. I’m often in a messy bun with maybe a few swipes of bronzer and mascara. And of course there are days where LJ and I are in jammies and sweats all day long. But I really do try to put at least a little effort into getting dressed more often than not.

I also want to address that now that I’m pregnant, my wardrobe is reduced and comfort is the name of the game, but I still try to look put together. I’m rocking a comfy, simple top, skinny jeans, and my Converse most days.

Also, since it’s approaching summer, we’re outside playing a lot now so I’m often wearing some form of athleisure.

My favorite OOTD is one that is comfy, cute, and requires minimal thought and effort while still staying a step or two above my ratty college sweatshirt. By keeping a simple “mom uniform” in mind, it’s easy for me to feel put together every day.

What’s your standby, go-to outfit that makes you feel put together and confident?

Wedding Wednesday: Reception Decorations

Jambo!!

Today is the TEN YEAR anniversary of the premiere of “Mean Girls.”

Wait.

Mean Girls

WHAT!?

Yes, it’s true. Regina George came into my life ten years ago!

Regina GeorgeI seriously love this movie! My friends and I watched it at least once a week in high school — I can quote Every. Single. Line. And it makes me laugh every time I watch it! It is an absolute classic in my book! So of course, I’m celebrating it’s 10th anniversary by . . . wearing pink (because it’s Wednesday, and that’s a rule) and watching it for the trillionth time!

Because of this oh-so-fetch celebration, I’m gonna make my weekly Wednesday post nice and quick!

Wedding Wednesday

My final decoration post is about our wedding reception. We kept things nice and simple — a big white tent in the front yard of the farmhouse with a few decorations to add pops of color! Once again, all photographs are copyright the AMAZING Rothwell Photography.

First of all, MAD PROPS to my awesome hubby for creating these paper flower poms:

DIY flower pom for weddingThe boy spent hours creating 30 of these babies! Each petal was a piece of paper and you need 5 petals to make a flower, 12 flowers to make one pom. Do the math — that’s 1800 flower petals to fold!! I was so impressed with how they all turned out though. We got tons of compliments on them! All we did was hang them from fishing line across the length of the tent at varying heights (we used a hold punch and those paper reinforcer donut hole stickers to hang them).

DIY flower poms :: wedding ceremony decorationSimple and beautiful! And I love the way they pulled everything together without trying too hard.

First DanceThis was one of my favorite shots of our first dance — mostly because I love the way J and I are laughing and loving life in that moment but also because the poms look sa-weet! I absolutely love how they turned out! So proud of my crafty hubby (even if he did only do it to have an excuse to take study breaks! Haha!) See the full directions here for how to make them.

Really the only other reception decoration was the centerpieces. Each table’s set-up looked like this:

DIY wedding centerpieces :: yellow and green wine bottles and tree stumps-Square piece of green burlap

-Large stump cut to a height of about 2 inches (thanks dad!)

-five wine bottles (more on this below!)

-a few bits of moss around the stump

-one small stump with a notch cut in it for cardstock (again, thanks dad!)

-table numbers (each table had a fun fact about us corresponding to the table number i.e. Table 7 — the number of states we’ve traveled to together. It was a fun way for our guests to learn a little more about us as a couple!)

-green, yellow, and white flowers (got these in bulk from my florist. They were all the same types of flowers incorporated into my bouquet and other flower arrangements, which helped tie everything together. By buying in bulk and assembling ourselves, we saved a ton of money too! Yay!)

Justin and my table looked a little bit different. We didn’t have a bridal party table because we wanted our attendants to sit with their significant others so we had our own simple little table:

Simple bride and groom tableA nice green tinted jug with flowers and some Mr. & Mrs. stumps (made last minute with a sharpie marker and some extra little stumps!) kept things sweet and simple. We knew we wouldn’t be at the table that much anyways so why overdo it?

We hung a few strands of white Christmas lights around the tent and called it good! Easy peasy!

Wine Bottles

The wine bottles was a simple project. We collected tons of wine bottles from family, friends, restaurants (not kidding), and anywhere else I could find them. Some were already tinted green and yellowish, so we left them as is! Labels are easily removed by soaking the bottles in warm water (make sure the water inside the bottles is really warm!) and removing it with a kitchen scraper.

The bottles that were clear or a color other than green or yellow got spray painted. I used lime green, yellow, and cream (hotel vanilla, technically) spray paint. I didn’t take pictures of the process but it was super simple:

1- Lay out newspapers in a large space outside. Make sure to lay out a lot of newspapers — the spray paint goes further than you’d think!

2- Place the clean, dry bottle on the newspaper (my dad eventually crafted a bottle holder out of a block of wood and doll rods but most of the bottles were sprayed on paper).

3- Spray thin coats of paint on the bottles. I waited 30 minutes in between coats and each wine bottle got at least 3 coats.

4- Let the bottles dry for at least an hour or two, depending on the temperature of wherever you’re spraying them.

5- Smile! You’re done!

We used rubber bands to create a striped look on some of the bottles (see white bottle above). To do this, all you have to do is wrap a bunch of rubber bands in varying sizes around the bottle between steps 2 & 3. It looks better in the end if the bands are lying flat against the glass and not twisted. I cut the bands off with scissors then — do not remove the bands until the paint is completely 100% dry!

And there you have it! Super easy and it looked great! Plus now the wine bottles make great decorations around the house!

Have a great hump day! Love, me and Mrs. George 🙂

Mean Girls***

Today’s outfit. Unfortunately, there was no pink involved so I couldn’t sit with the Plastics at lunch . . .
Maxi dress & cardigan :: teacher outfit blog Dress: via Ross (no longer available) ~ Cardigan: Target (exact here) ~ Shoes: Nine West (no longer available; similar here)


Wedding Wednesday: Ceremony Decorations

Hey Mike! What day is it!?

Hump Day

The students at my school absolutely love quoting this commercial. I have to admit that it does bring some much-needed energy to help push through the day! Whoot whoot! 😉

Wedding Wednesday

Continuing on my decoration trend, let’s talk ceremony decorations!

Since the ceremony was happening outdoors, I wanted to keep the decor to a minimum and let nature do most of the work. We had white chairs arranged on the lawn in a semi-circle with a middle aisle. At the entrance to the main aisle, there were sets of three tall tree stumps of varying heights.

wine bottles and stumps // simple wedding decorEach of the stumps had a glass bottle (these were all beer bottles spray painted in wedding colors) holding a single flower. We varied the flowers to give it a little more pizazz.

easy DIY wedding decor

I really liked the way this turned out! It gave just the right touch without going overboard or taking tons of time.

The only other ceremony decorations were at the front of the aisle. A dear family friend of mine (basically a grandfather for me) constructed a beautiful arch for us. I absolutely loved it!

simple white wedding arch

Side note: I also really enjoyed this moment of the ceremony. 😉

We had some slate tiles to stand on since there was a chance of rain (and it did rain) so we wouldn’t be standing in wet grass or mud. Under the arch I placed an antique table that belongs to my family. I covered it with a simple lace doily from my mom’s house and set three pitchers on top.

simple wedding table for footwashing

The pitcher in the middle was a gift from our pastor. It was handmade (though not by him) and came with a matching basin. Instead of a unity candle, we decided to have footwashing. This is an important tradition in our denomination and we really wanted this to be part of our ceremony. I’ll give more details in a future post!

simple wedding footwashing

The other pitchers belong to Justin’s mother. They each had water in them; instead of our mother’s lighting candles, we had them pour water from the pitchers into the main pitcher we used for footwashing.

white coffee filter pom hanging at wedding

The only other decorations we had were a few white coffee filter poms hanging in the trees. These were made by my sister-in-law and provided a nice little touch.

Other than that, we let nature do the talking. And I was okay with that. 🙂

backyard wedding ceremony

Happy hump day!

All wedding photos are copyright Rothwell Photography.

***

I love maxi dresses; they are so simple but still look like you put in some effort! Today’s look:

Striped blazer, black maxi dress

Blazer: Maurices (exact old) ~ Maxi Dress: Modcloth (no longer available; cute option here) ~ Earrings: Premier Designs (exact old) ~ Bangle set: Shop Ruche (exact here) ~ Ballet Flats: Fergalicious by Fergie (similar here)


Catching up!

Ever since I got back from vacation, blogging has taken a serious backseat. Now that it’s finally starting to actually feel like spring, I’m spending a lot more time in the evenings outdoors with my fur babies (yay!!) and other shenanigans with the hubby.  Here are a few pictures to give you a snippet of life over the last few weeks:

The Good:

Art ShowChecked out my beautiful sister’s senior art show! So proud of her amazing talent (which I have less than none of).

CavernsVisited a cavern with my parents and Justin. The pictures turned out pretty awful but it was beautiful in real life!

FestivalSpent the day at a local downtown festival with the love of my life. Music, food, and lots of glorious sunshine!

The bad (for my health):

Chocolate shoesToo much wine and food at the aforementioned festival = sickness. 😦 But it was worth it to snag one of these beauties: a chocolate shoe lollipop!!

OreosMy youngest sister visited and brought me these. Tastes like an Oreo with Dunkaroo frosting — best combination ever?? I think YES. Unfortunately, I polished this package off way too quickly and need to log some serious hours at the gym to make up for it!

The ugly:

Granola failAn entire box of my favorite granola ruined thanks to a not-as-closed-as-I-thought container. Complete and utter lunch-packing fail.

WindshieldThank goodness for insurance! My entire windshield cracked after a stray rock hit it on our trip to Charleston. Yikes!

The Threads:

A round-up of work outfits from the last few weeks. I finally got to break out some warmer-weather stuff! Yay!

03-27 Look 03-28 Look 03-31 Look 04-01 Look 04-04 Look 04-07 Look 04-08 Look 04-09 Look 04-11 Look

***

And lastly, today’s outfit! I’m totally loving this new dress from Target! And thanks to the Cartwheel app, it was 15% off. Score!

04-13 Look 1 04-13 Look 2

Dress: Target (exact here) ~ Cardigan: Target (exact here) ~ Necklace: Maurices (similar here and here) ~ Bracelet: J. Crew Factory (exact here) ~ Shoes: Nine West (exact old, similar here)

Wedding Wednesday: The Decorations, Part 2

Not gonna lie, it’s been a long day and my hubster wants to chillax on the couch and catch up on last night’s episode of “The Voice” so I’m gonna just get right down to it so I can go join him! It’s Wedding Wednesday and the decorating fun continues!!

Wedding Wednesday

Our wedding took place on my grandparent’s farm, which is now owned by my parents. My parents decided to renovate the old farmhouse in the months before the wedding, and one of the things they updated was the windows. Putting new windows in = tons of old, rustic wooden windows for me to use for DIY decorations!! YAY!

Here are some of the ways I incorporated these windows into the decor:

DIY Window Pane with blown up photo

Believe it or not, this window frame came with the perfect amount of aging/distressing so I didn’t have to do anything to it. All I did was clean the window with some simple wood cleaner and it was done! I printed out the photo at Costco because it was the only place I could find that would print off a near poster-size picture and didn’t charge a ridiculous amount of money for it. Score!

Engagement pictures in rustic window frame. Wedding DIY.

I used the same process as before (but with smaller pictures) in the above window frame. I’m sure you can find some super crafty way of attaching photos to a window on Pinterest, but I’m going to be very real about the un-crafty way I created these.

1. I cleaned the window and glass.

2. I placed one picture at a time behind the glass of the window and moved it until the exact part of the picture I wanted to see was “framed” by the window pane.

3. Without shifting the picture, I carefully pressed it into into the glass. Making sure the picture was flat against the window glass, I used my nail to bend a crease in the picture up against the side of the window frame. This marked the outline of the part of the picture I wanted to see

4. I cut out the picture using my crease as an outline (I left a slight edge around the crease in case I needed to shift the picture. Better to have to trim it a little more than realize I came up short!)

5. I used masking tape to attach the picture to the side of the window glass.

6. I repeated all those steps for the remaining three window panes!

Like I said, you’ll probably find a more conventional, “crafty” way to do this using fancier tools and a more exact method on different blogs or DIY websites; however, this is what worked for me because it was quick and easy! I loved the result and no one saw the back of the windows anyways so the whole tacky-masking-tape-thing can stay our little secret, right?

Engagement photos in old window frame, stacked crates, DIY wedding decor

While I liked the first two window frames (which were placed by the “welcome table” that I talked about in last week’s post), this last one was probably my favorite. I loved the double window; it was so unique! I propped it up against this display of new and old crates found in my parents’ attic near the walkway where people went from the ceremony to the reception. The yard at the farmhouse was very big and thus, difficult to decorate, so this display was a simple way of adding some cool decorations without spending a lot of time or effort or going overboard. I found the J & S letters at TJ Maxx and the wooden hearts were handcrafted by a dear family friend. The wine bottles were part of a whole ‘nother DIY project that I’ll discuss in a later post. I was really happy with how this display turned out!

In the spirit of window crafting, I’ll share one more thing! Our seating arrangement was created using an old storm door found in the attic of the old farmhouse.

Old door used to display seating chart. Wedding DIY

I alternated seating arrangement cards with engagement photos on the windows of the door and absolutely loved the way it turned out! For this, I used clear reusable tabs on the back of the photos and seating cards to attach them to the glass. My dad created a simple arch and used swinging screws to attach the door to the arch to put it at eye level with our guests.

seating arrangement on window pane

If you look closely, you’ll see I used the same tree design on the seating cards that we had on our invitations and programs. It was the perfect way to tie everything together!

All photographs are copyright of the fantastic Rothwell Photography.

And that concludes another Wedding Wednesday! Have a good evening!

***

I am slowly inching my way into a spring wardrobe — here’s hoping the cold winter is finally gone!

Teacher outfit blog: pink and brown, bow belt, flower necklace

Sweater cardigan: Maurices (similar here)~ Cami: Express (exact old)~ Khaki pants: Maurices (similar here) ~ Flats: Target (exact here) ~ Belt: Via Plato’s Closet ~ Necklace: Lia Sophia “Flower Pot” (no longer available; similar here)

Wedding Wednesday: Decorations, Part 1

Hi there!

I hope you all are having a great week so far! My week seems to be going SO slow; Justin and I leave on Friday after work for a vacation and I am so excited! I have to keep distracting myself so that I don’t focus on time or otherwise this week will seem never-ending. Come on Friday!!

Wedding Wednesday: “Welcome Table” decorations

For today’s Wedding Wednesday post I thought I’d start re-capping some of the decorations we had around our wedding. I should preface this by saying Pinterest became my BFF during the wedding planning and it was definitely reflected in the decorations. Wish I could take all these ideas as mine alone but I took lots of inspiration from others. I still tried to put my own spin on things so that counts for originality points, right? All photographs below are copyright Rothwell Photography.

For today, I’m gonna focus on the things on the tables at what I call the “welcome table.” This was the first thing guests saw: where they were dropped off gifts, signed the guestbook, and got programs! I wanted it to be functional, interesting, and helpful to our guests.

I incorporated chalkboards in a couple different ways. I bought mini chalkboards from a local store and used them as signs to give info to guests.

Wedding Decoration: Simple chalkboard sign for cards

I used one small one in front of a wooden box to tell guests where to leave their cards. (Props to my wedding coordinator for thinking to use extra painted bottles and flowers to spruce up the area. More on the painted bottles in another post!)

Chalkboard sign at wedding

I didn’t ask anyone to hand out programs so I used one chalkboard to instruct guests on what they needed to do. I had a basket with song sheets, another wooden box with programs, and a huge tub with bottled waters for guests to grab before they went on to the ceremony.

Speaking of programs . . .

DIY Wedding Fan Programs DIY Wedding Fan Programs

My amazing sister helped me put together these cute fan programs in the days before the wedding. I used navy and green font and the same tree drawing (which my other amazing sister drew herself!!) that was used on our invitations. Making the fans was super simple! I printed out the programs on cardstock, folded them in half, used spray glue (found here) to attach popsicle sticks to the back of the cardstock, and sealed the fold together. Once the glue had dried, I used a scrapbook corner cutter to round the edges so they looked more polished. Easy! And it was very appreciated by my guests since it was a hot day!

Now on to a few more things!

Also on the welcome table was the guest book.  For this, I found a giant letter “W” (for our last name) at Hobby Lobby and I had a friend paint and distress it using green paint. (Not only was green a wedding color but it’s also a color I use in almost every room of our house so I knew I could use the letter to decorate later!)

Last name initial for guestbook! Last name initial for guest book!

I absolutely loved that we did this! The letter is now hanging up in our living room — the perfect reminder of our special day and all the loved ones who shared it with us!

And speaking of loved ones who shared it with us, there were a lot of loved ones who couldn’t make it to the wedding. Specifically, Justin’s grandparents were both in poor health and lived four hours from our wedding site so they were unable to attend. We wanted to pay respects to them so we put their pictures on a table near the guestbook with a little sign that said “Loved ones celebrating from afar” because we knew they were celebrating in spirit!

Table remembering loved ones who can't make it to your wedding

We also included a picture of Justin’s grandpa, my grandpa, and one of my childhood best friends, all of whom unfortunately passed away long before Justin and I knew one another. We wanted to remember them too so we included a sign that read “loved ones celebrating from above” — it was hard to not have them with us at our wedding but I love knowing they were still watching over us!

And continuing the picture theme, on the other side of the table, we had a grouping of pictures from our ancestor’s weddings. We were lucky enough to find pictures of all of our grandparents at their weddings in addition to our parents. For fun, we also threw in baby photos of the two of us. 🙂

Photos of parents and grandparents weddings on display

I’m glad we had all the photos out because it gave our guests something to look at while waiting in line for the guest book and programs. And it was a great way to pay to tribute to all the marriages that we respect and admire!

And that’s all for now! All of the decorations were super simple and easy — just the way I like it! And none of them took very long to put together except for the fans which did take over an hour to complete.

More decorations to come in the next Wedding Wednesday! Which will not be next week because I’ll be on VACATION!! Whoop whoop!!

***

Today’s outfit was warm weather wishful thinking. Can’t wait to not have to wear cardigans and tights with everything!

black and white dress, cardigan, fun peacock earrings

Dress: Maurices (exact unavailable) ~ Cardigan: Maurices (exact here) ~ Tights: Express (exact here; similar here) ~ Black suede pumps: Target (exact old, similar here and here) ~ Belt: Maurices (exact here) ~ Earrings: Gift from a friend

The after-effects of a Juice Cleanse

Ugh. Today has not been the most fun of days.

After three days of nothing but fruits and veggies (whether in whole form or in juice), my body is not adjusting back to my “normal” food well.

This morning I had a bowl of cereal and skim milk, the same thing I’ve had every morning for the last several months. Normally I love starting my day out with cereal but today I didn’t feel that great afterwards. I kind of missed my refreshing morning juice! Tomorrow I’m definitely going to start my day off with some nice fresh juice.

For lunch I had yogurt with granola, like a normal lunch. I didn’t feel too bad after that, but then I made a mistake. Remember that delicious looking birthday cake my co-worker had yesterday? She saved me a piece and after eating it, I felt horrible. There was so much butter and sugar in it that I felt like sludge afterwards.

This has really made me realize how much food impacts your energy level and regular functioning. Even though I’m off my cleanse, I still need to incorporate lots of fruits and veggies into my everyday eating. And I really need to be careful about the amount of artificial sweeteners I eat. Butter, sugar, chocolate, and oils are things that suck my energy — and they’re not good for me anyways so limiting my intake of them can only be a good thing! 🙂

Tonight I’m making dinner and I think a nice fresh salad sounds like the perfect addition to the meal! I love that I’m actually craving veggies now!

***

Today’s outfit retreated back into winter layers and colors because it SNOWED last night and is cold again. I’m officially done with cold weather!

black cardigan, purple tank, black pinstripe pantsBlack cardigan: Express (exact old, similar here and here) ~ Purple tank: Express (exact old) ~ Black cami layered underneath: Express (exact here, similar here) ~ Pinstripe pants: Express (exact old, similar here) ~ Black beaded necklace: Premier Jewelry (exact old, similar here)

Wedding Wednesday: Operation Honeymoon!

First and foremost, today marks the last day of my 3-day juice cleanse!!

In the first two days of the cleanse, I made a huge juice in the morning and split it between breakfast and lunch. Yesterday, however, I was craving some change so I made a smaller juice for breakfast and then a different juice for lunch.

My breakfast juice was DELICIOUS! I’m going to call this my Peaches & Cream Morning Juice 🙂

Peaches & Cream Breakfast Juice

Ingredients:

-1 large handful of kale

-2 peaches

-10-12 strawberries

-1 banana

-a sprinkling of chia seeds (I added these to the juice afterwards)

This was probably one of my favorite juices so far — I stuck it in the freezer for about 20 minutes before leaving the house and it froze just enough to taste like a delicious smoothie! YUM!

For lunch, I made a greener juice.

Green Lunch Juice

Ingredients:

-2 handfuls spinach

-1 handful kale

-1/2 cucumber (I am not a huge fan of the cucumber taste in juice and I didn’t want it to be overwhelming. If you love cucumber, you could use the whole thing)

-1 pear

-1 apple (wish I had green apples for a true “green” juice!)

This juice was pretty good as well, although not as delectable as the morning juice. By lunchtime, I was just craving real food! While I wasn’t hungry (an 8 oz. juice is actually very filling!) I missed the texture of different types of foods. It didn’t help that it was my co-worker’s birthday and I had to stare at this all day long:

Temptation!

Yeah. It was brutal! I had to watch everyone eat it while munching on carrot sticks at my desk.

Yet another carrot

Pathetic, I know.

After a quick workout at the gym, it was time to head home and freshen up for DINNER. A real live dinner!! We went over to our friends’ house where they had prepared a feast!

First meal!!

My friend Kristen was the one who initially suggested doing the cleanse and we were both salivating watching her husband prepare lemon alfredo chicken pasta and perfectly steamed broccoli! This meal was perfection and it was definitely worth the wait!

A few tips for anyone considering a juice fast:

-Listen to your body! I tried a 3 mile run the first day of the cleanse and that was a mistake — my body was still adjusting at that point and I wish I would have done a lighter workout.

-Incoroporate whole fruits and veggies. I never would have survived on just juice so I munched on bananas, strawberries, and carrots in between meals.

-Do it with a partner! Kristen and I both admitted we would have cheated many times had we not known there was someone there to keep us accountable. We were both really proud of ourselves for sticking with it and not cheating or giving up!

While I’m actually glad I had this experience, I think I’ll stick to juicing just once a day for the time being. 🙂

Wedding Wednesday: Operation Honeymoon!

About this time last year, my workout routine was getting more and more intense to prepare for the wedding! There are few things more motivating to get your butt to the gym than knowing you’re going to stand in front of 200+ people in a form-fitting dress and have pictures in it that last a lifetime! Also motivating is knowing you’ll frolic on the beach in a bikini the next week on your honeymoon. Needless to say, I was working hard! I found that having an actual plan for my workout helped me adequately rotate muscle groups and make sure I was getting a good mix of strength training and cardio. I even created a workout chart I called “Operation Honeymoon” to help motivate me! I wrote down everything I wanted to do each day (i.e. Monday: 60 minute kickboxing class; Tuesday: 2 mile run, 30 minutes arms strength training; Wednesday: 30 minutes on bike, 30 minutes legs strength training, etc). My plan was for 6 days a week and I tried to keep mixing up what I did so I never got into a workout rut. I was really thankful for all my hard work once my wedding day came! There is nothing quite like feeling fabulous and fit on your wedding day! 🙂

If you are getting married and want to get in shape (or just want to have a healthy workout plan), I highly recommend created an actual physical plan of what you want to do each day. It helps keep you accountable and also gives you and idea of what you need to work on each time you go to the gym!

***

Today’s outfit was filled with bright colors because it’s finally sunny and warm! (Never mind that it’s supposed to snow tomorrow…)

coral shirt with turquoise jewelry

 V-neck shirt: Old Navy (similar here) ~ Lace cami: Express (similar here and here) ~ Khaki pants: Maurices (similar here) ~ Leopard Flats: Target (exact here) ~ Necklace: Premier Jewelry (exact old)

Juice Cleanse Day Two!

Day two of the juice cleanse is on! So far I’m feeling pretty good, but yesterday I ran 3.25 miles (I’m running a 5k on Saturday) and by the end I was NOT feeling very well. I’m not sure this juice cleanse provides enough calories (and possibly not enough protein) for such strenuous exercise. I think today I’ll just stick to a light workout.

Last night’s dinner was the first real challenge for me because before I made my juice, I cooked a huge pot of chili for Justin. OH MY GOSH it was ridiculously tempting. Luckily, I made enough chili for leftovers so I won’t have to cook again tonight and be tempted again.

03-10 DinnerI had to throw in a bunch of strawberries for something to chew. The juice was yummy but I just needed something “extra!”

My dinner juice consisted of:

-2 handfuls of spinach

-1 banana

-1 apple

-4-5 pieces of bok choy (kind of a mix between lettuce and celery if that makes sense at all)

Morning Beet Juice

Morning Beet Juice Ingredients :: simplifythechaos.comMy juice this morning consisted of:

-2 apples

-4 clementines

-1/4 pineapple (half of what is shown)

-handful of kale

-2 large handfuls of spinach

-1 beet (peeled)

This juice is also really good but the beet kind of gives it what my husband calls “a dirt taste.” I have to agree that the beet significantly changes the taste but it was good variety to add! I had half the juice for breakfast and half for lunch with a banana and carrots as snacks. Tonight I want to try a juice with lots of greens–we’ll see how that goes. I’m halfway through this juice cleanse!!

***

Today’s outfit was simple with a touch of sparkle!

cardigan, pencil skirt, statement necklace. teacher outfit blog :: simplifythechaos.com  Cardigan: Old Navy (similar here) ~ Lace cami: Express (similar here and here) ~ Grey pencil skirt: Laundry by Shelli Segal (similar here and here) ~ Grey pumps: Bandolino (similar here) ~ Necklace: Purple Peridot “Crystal Sparkler” (exact here)

Let the Juice Cleanse begin

Well, Daylight Savings Time is officially kicking my booty. Last night Justin and I thought we had changed all the clocks, but we forgot one crucial one in our living room and by the time we realized it, it was already way past our bedtime (yes, we have a bedtime). Needless to say, that led to accidentally sleeping in WAY too long this morning so it’s been a bit of a rough start for me with the time change!

Juice Cleanse

I have really enjoyed the juices that Justin and I have been trying lately; it’s been fun to come up with different combinations! Yesterday I was talking to one of my good friends and she expressed a lot of interest in doing a 3-day juice cleanse. Even though I initially said I had no interest in a juice fast of any kind, she convinced me to give it a try with her. We started today and so far, so good! I made an extra big juice for breakfast and brought half with me to school for lunch.

Morning Burst JuiceI had to drink it on the way to work because of my super hurried morning!

I made my Morning Burst Juice again but added an extra apple and pineapple. It was a pretty frothy juice (I blame the banana) but very yummy! I enjoyed having another one for lunch as well. In addition to the juices, I packed lots of carrot sticks and a banana; there is NO way I’d be able to survive on only three juices! I plan on making a snack juice after my run this afternoon and then a dinner juice later in the evening. It will be hard to cook Justin dinner and watch him eat it, but I really want to try to make it through this cleanse!

***

It was finally above 60 today and it’s sunny so it feels like spring is really on its way! I wanted to pick fun springy colors for my outfit and here’s what I came up with (open-toed shoes!! Yay!) Details on wear page.

Orange stripes, green statement necklace, navy ankle pants, orange strappy heelsSweater: Express

Pants: Target

Shoes: Bakers

Necklace: Bluetique