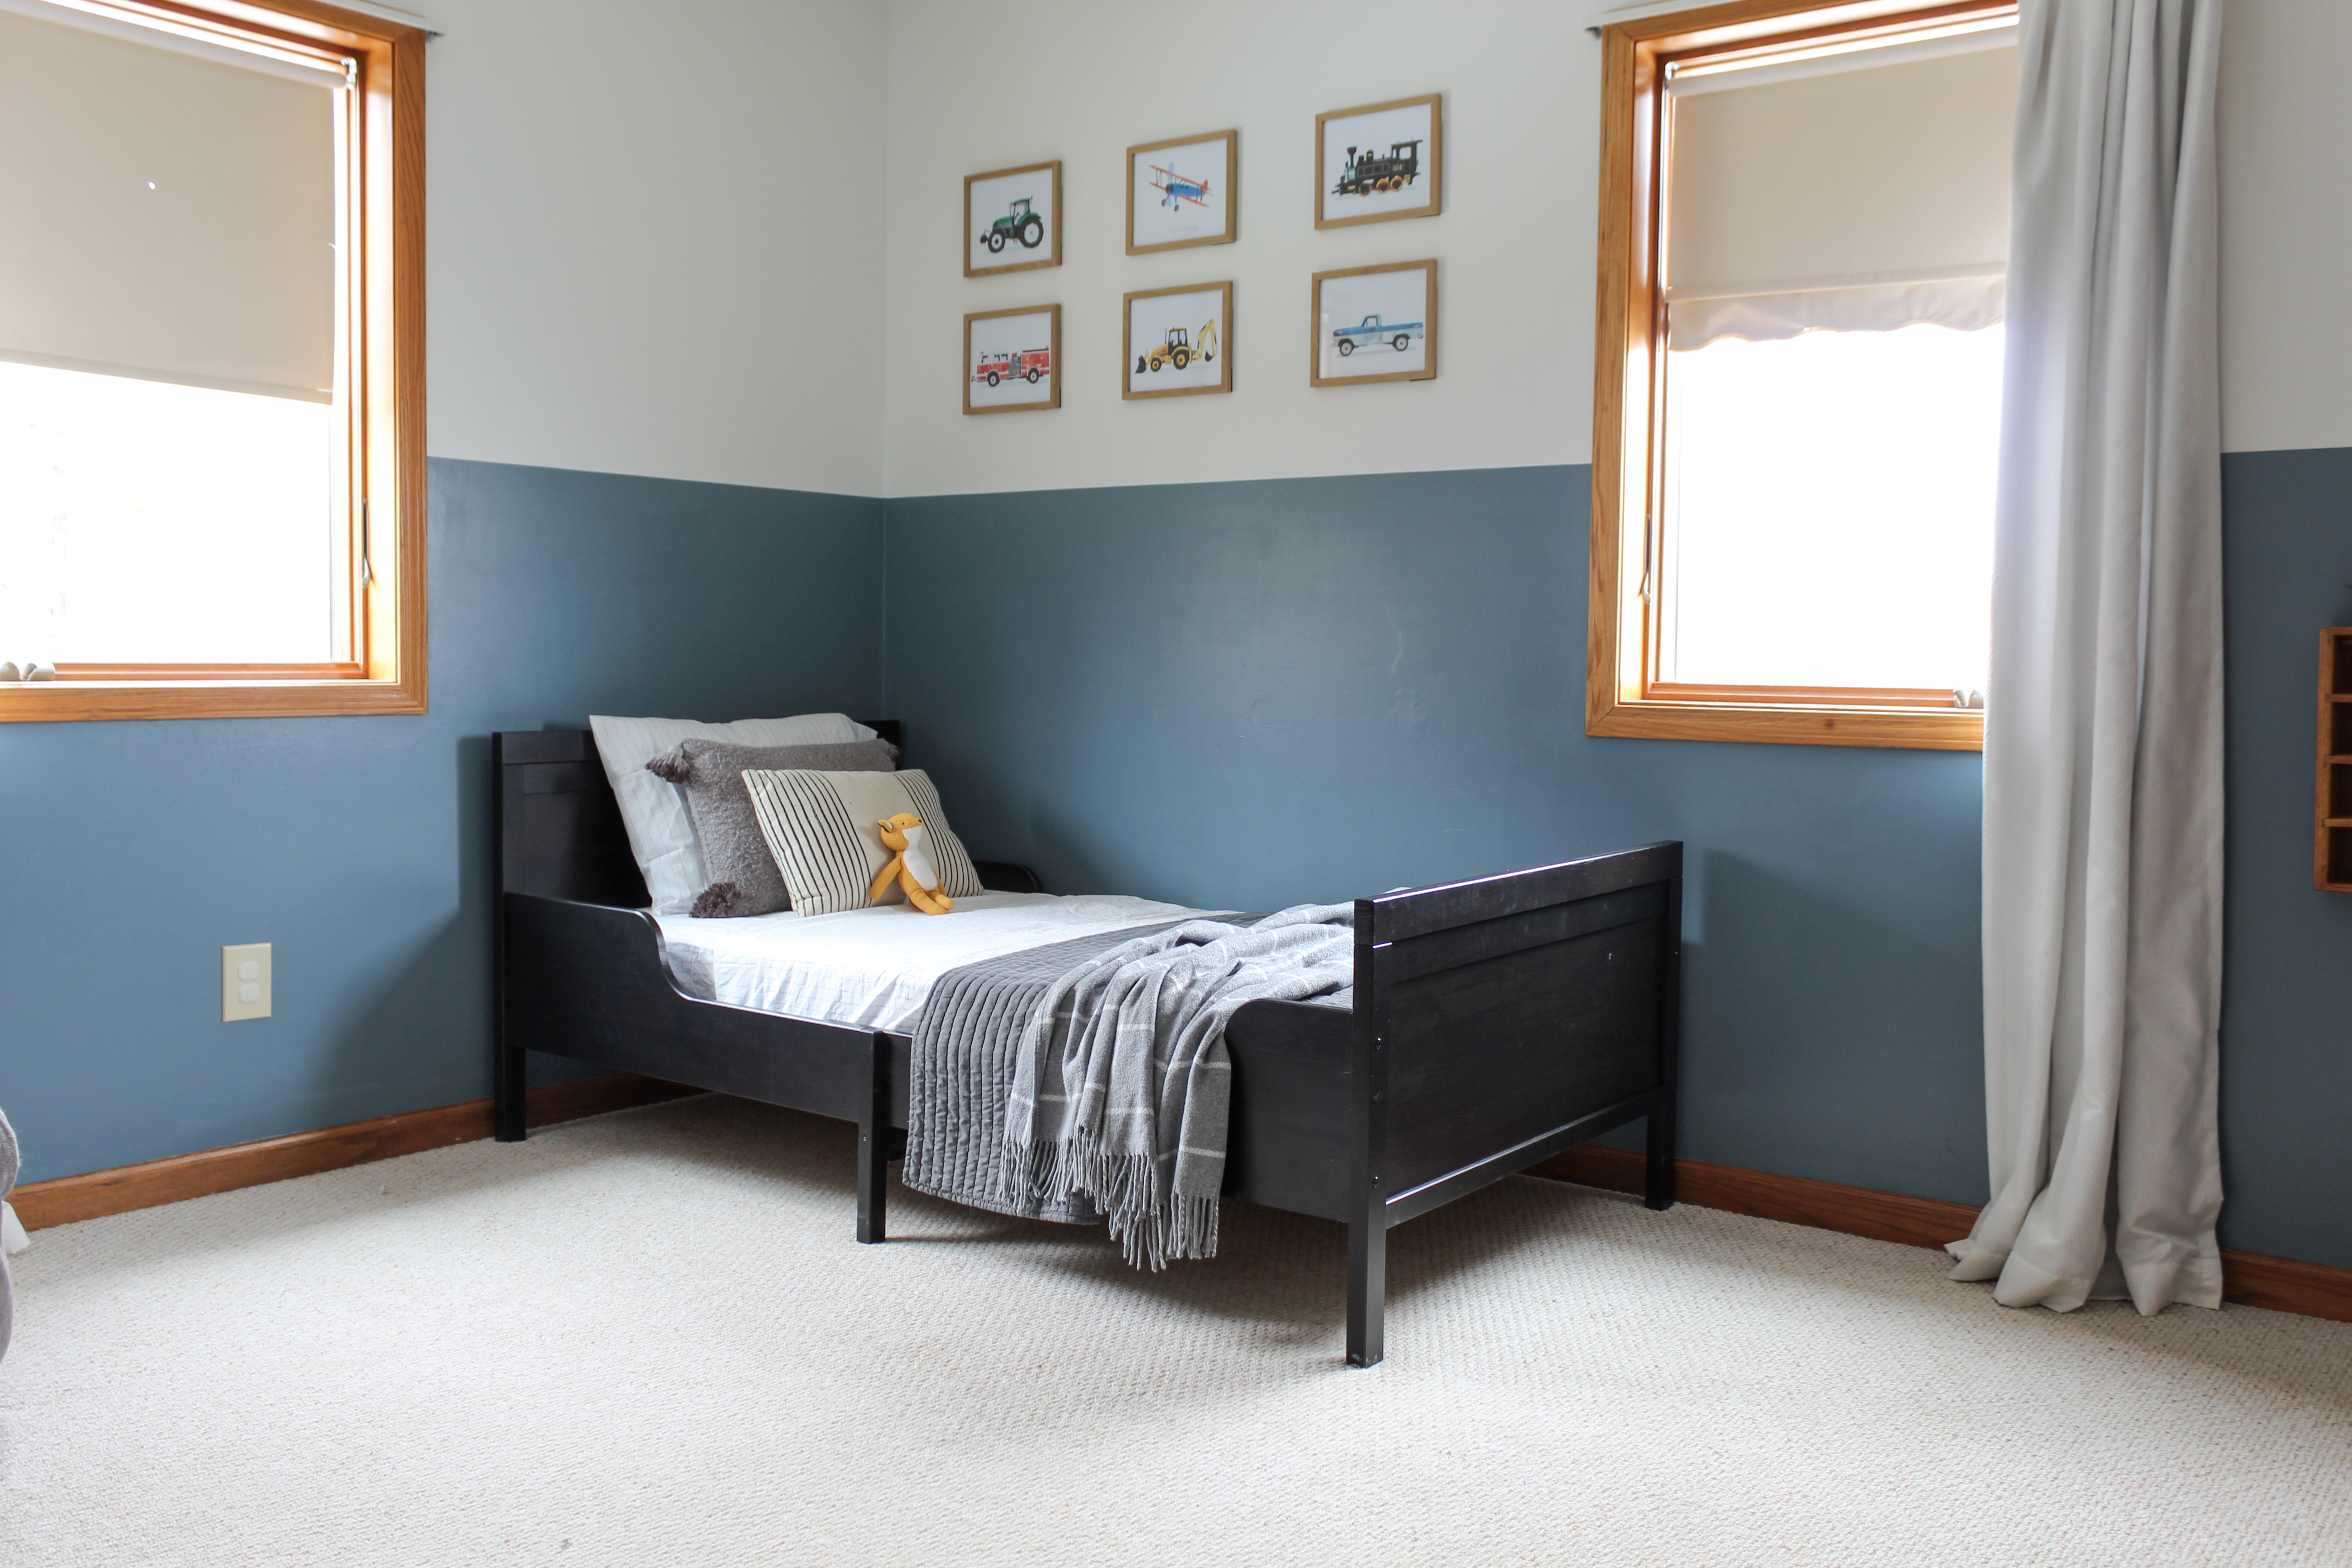
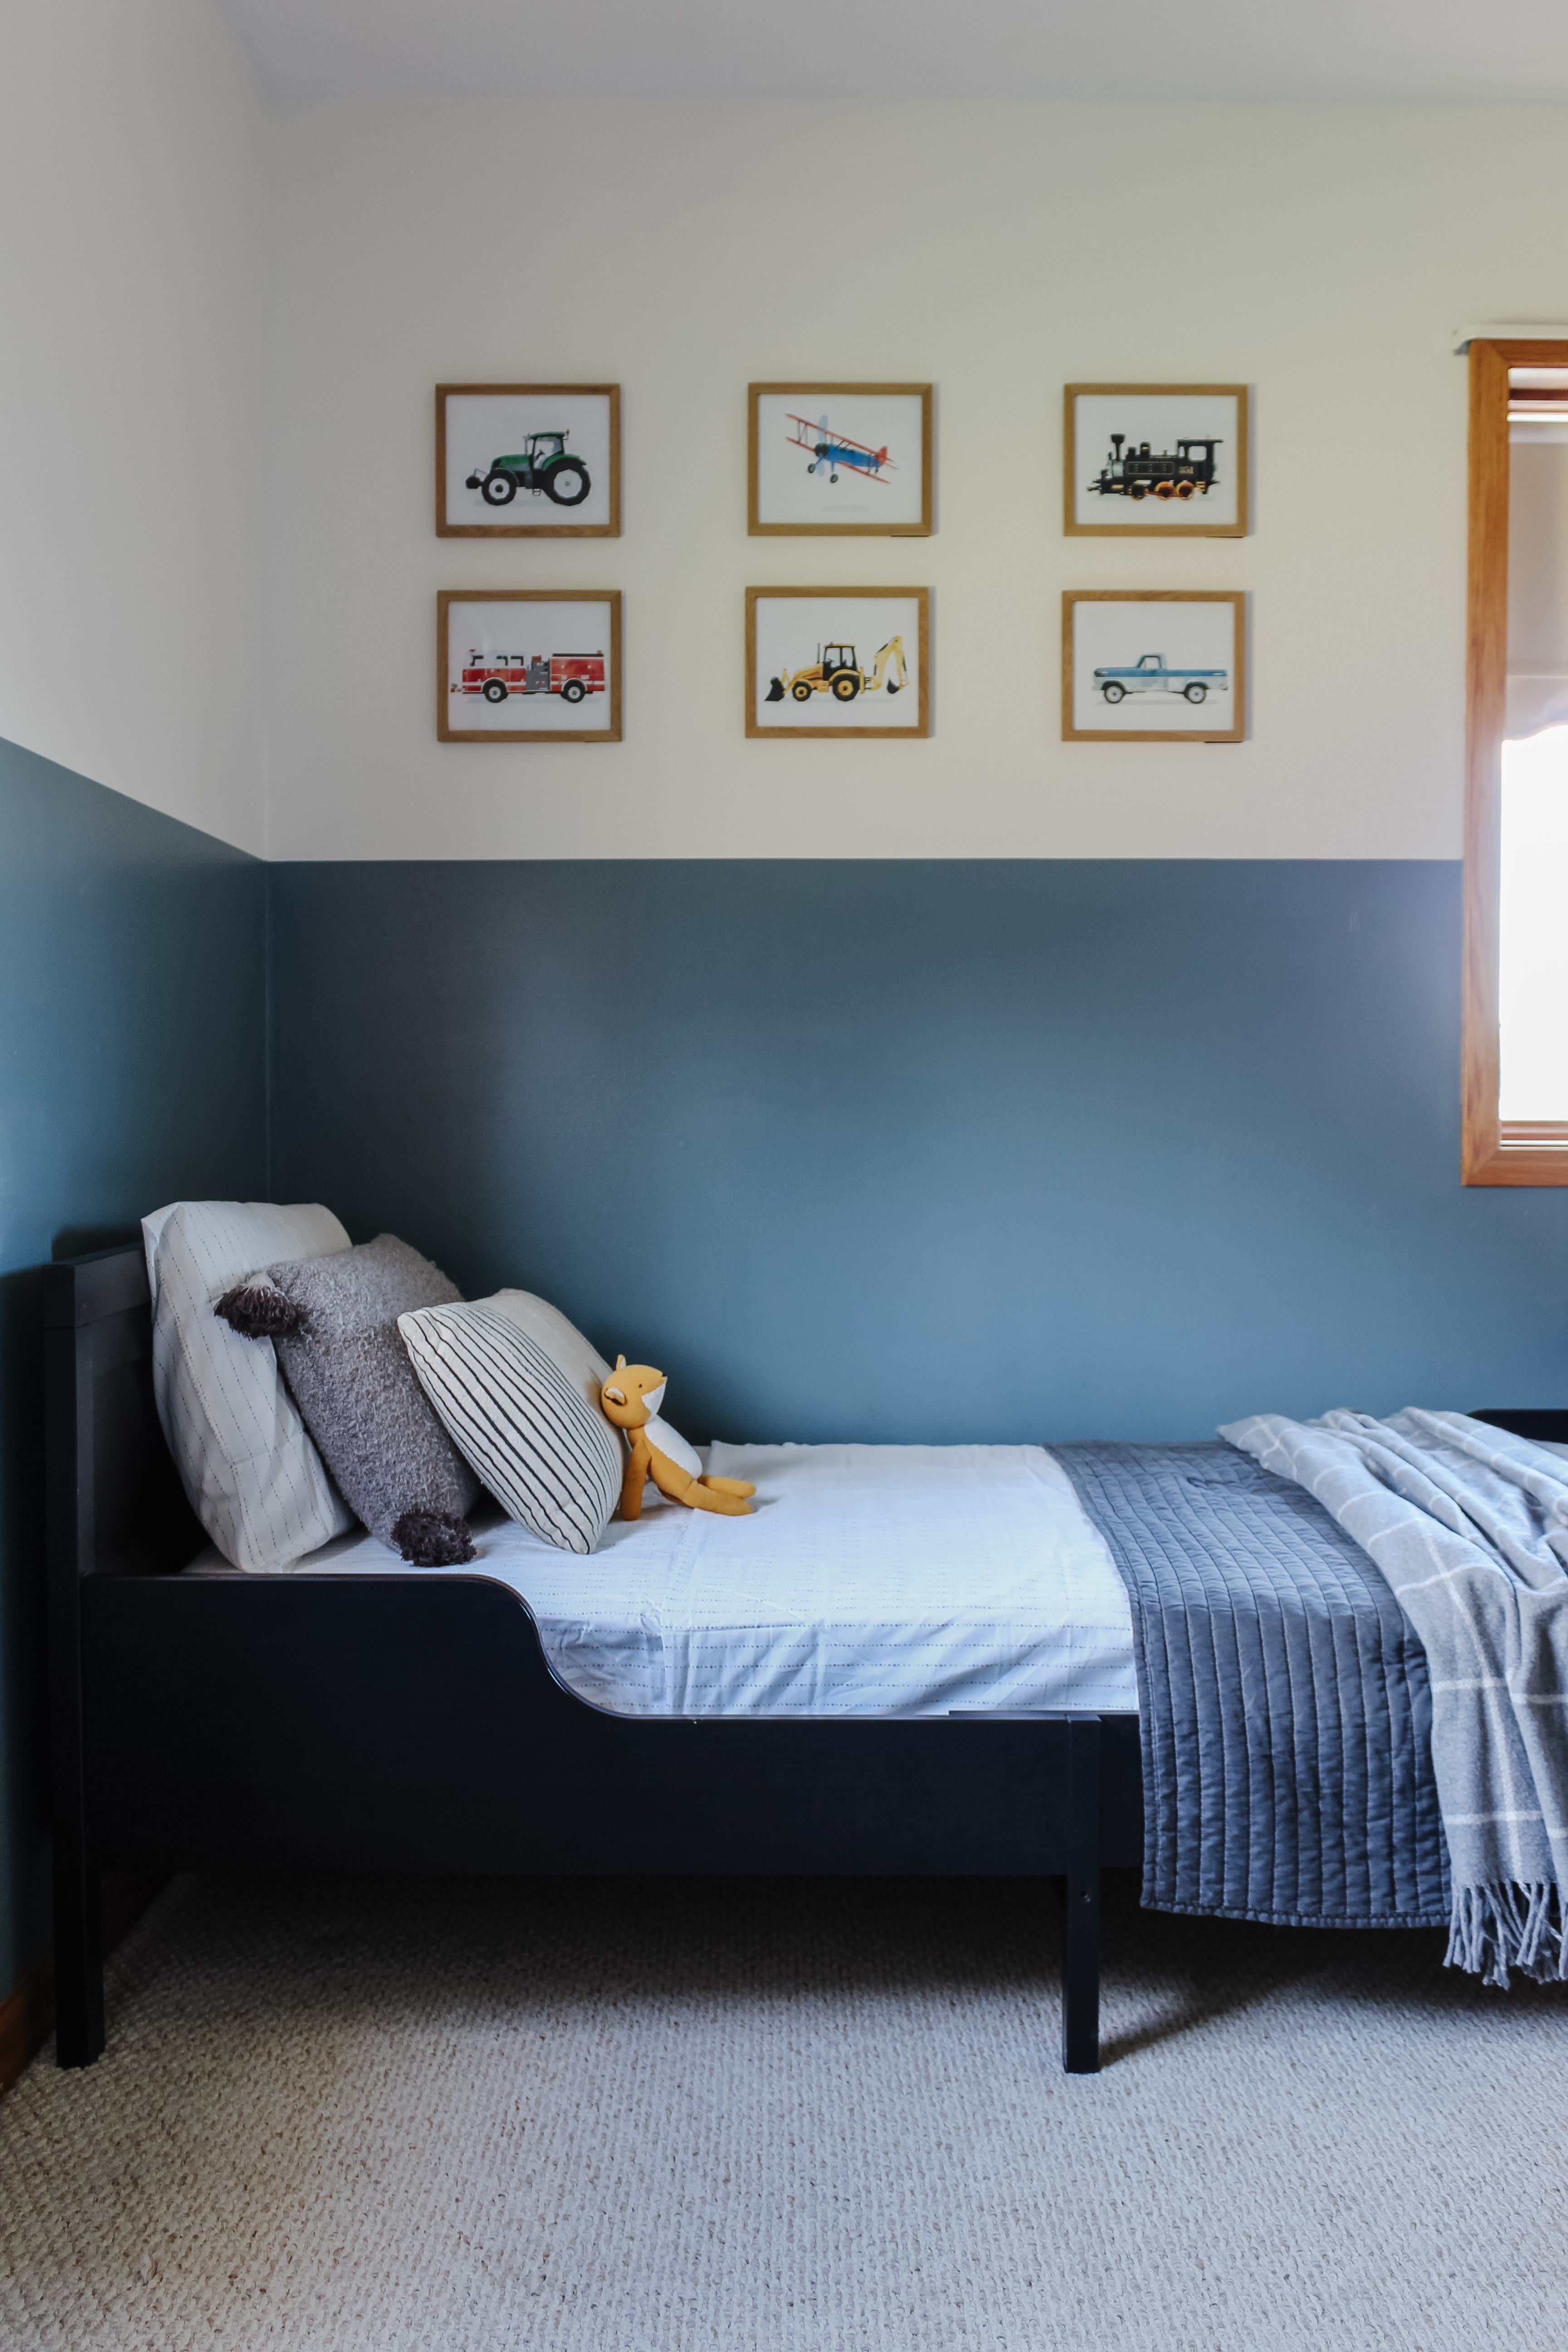
We’ve been celebrating a few milestones around here! About two weeks ago, LJ transitioned out of his crib into a bed, and shortly after that, we celebrated his third birthday. These events happening so close together made it feel like the right time to give his bedroom a little refresh to make it feel like a “big boy” space.
Since moving into this house, we’ve only done a small amount of work to LJ’s room. We kept the roller shades on the window (even though they have some holes and don’t match each other) because they’re functional and help keep his room dark during daytime naps. We kept the original curtain rods and just hung his old curtains (his old room had one window, and we’ve split those curtains to each cover one window). Again, not super pretty, but it’s been functional for now. We did paint the previously brown walls into a colorblock pattern and I printed out a few pieces of artwork from Etsy, but other than that, I haven’t spent much time decorating. It was time for a little upgrade!
I unfortunately don’t have any pictures from before we painted, but here’s what the room looked like when it was set up as a nursery:
And here’s what it looks like with a new bed!
The bed frame is a hand-me-down from a friend and it works perfectly for our needs. We purchased a new twin mattress from a local business on Black Friday, bought sheets and a comforter, and I shopped my home for a few extra pillows and a throw.
I loved mixing some patterns and textures here – it feels cozy and sweet, but still very toddler friendly!
In addition to the bed, I decided to also do a quick update to LJ’s dresser area. Specifically, I was ready to change up the mirror. We bought this mid century dresser off Craigslist several years ago and I painted it for his previous nursery. When we moved to this house, we decided to add the original mirror back on but . . . I hated it. I don’t like the style, and the glass itself was cloudy and had a few black spots. I dealt with it for a while but was more than ready for a change.
I originally purchased this oval mirror for our guest bathroom renovation but ended up going in a different direction in that space – this mirror had been in storage ever since, just waiting for its time to shine!
Adding in a plant and using some of LJ’s things as decor (I can’t even with the adorable piggy bank!) helped finish off this area and make it both cute and functional.
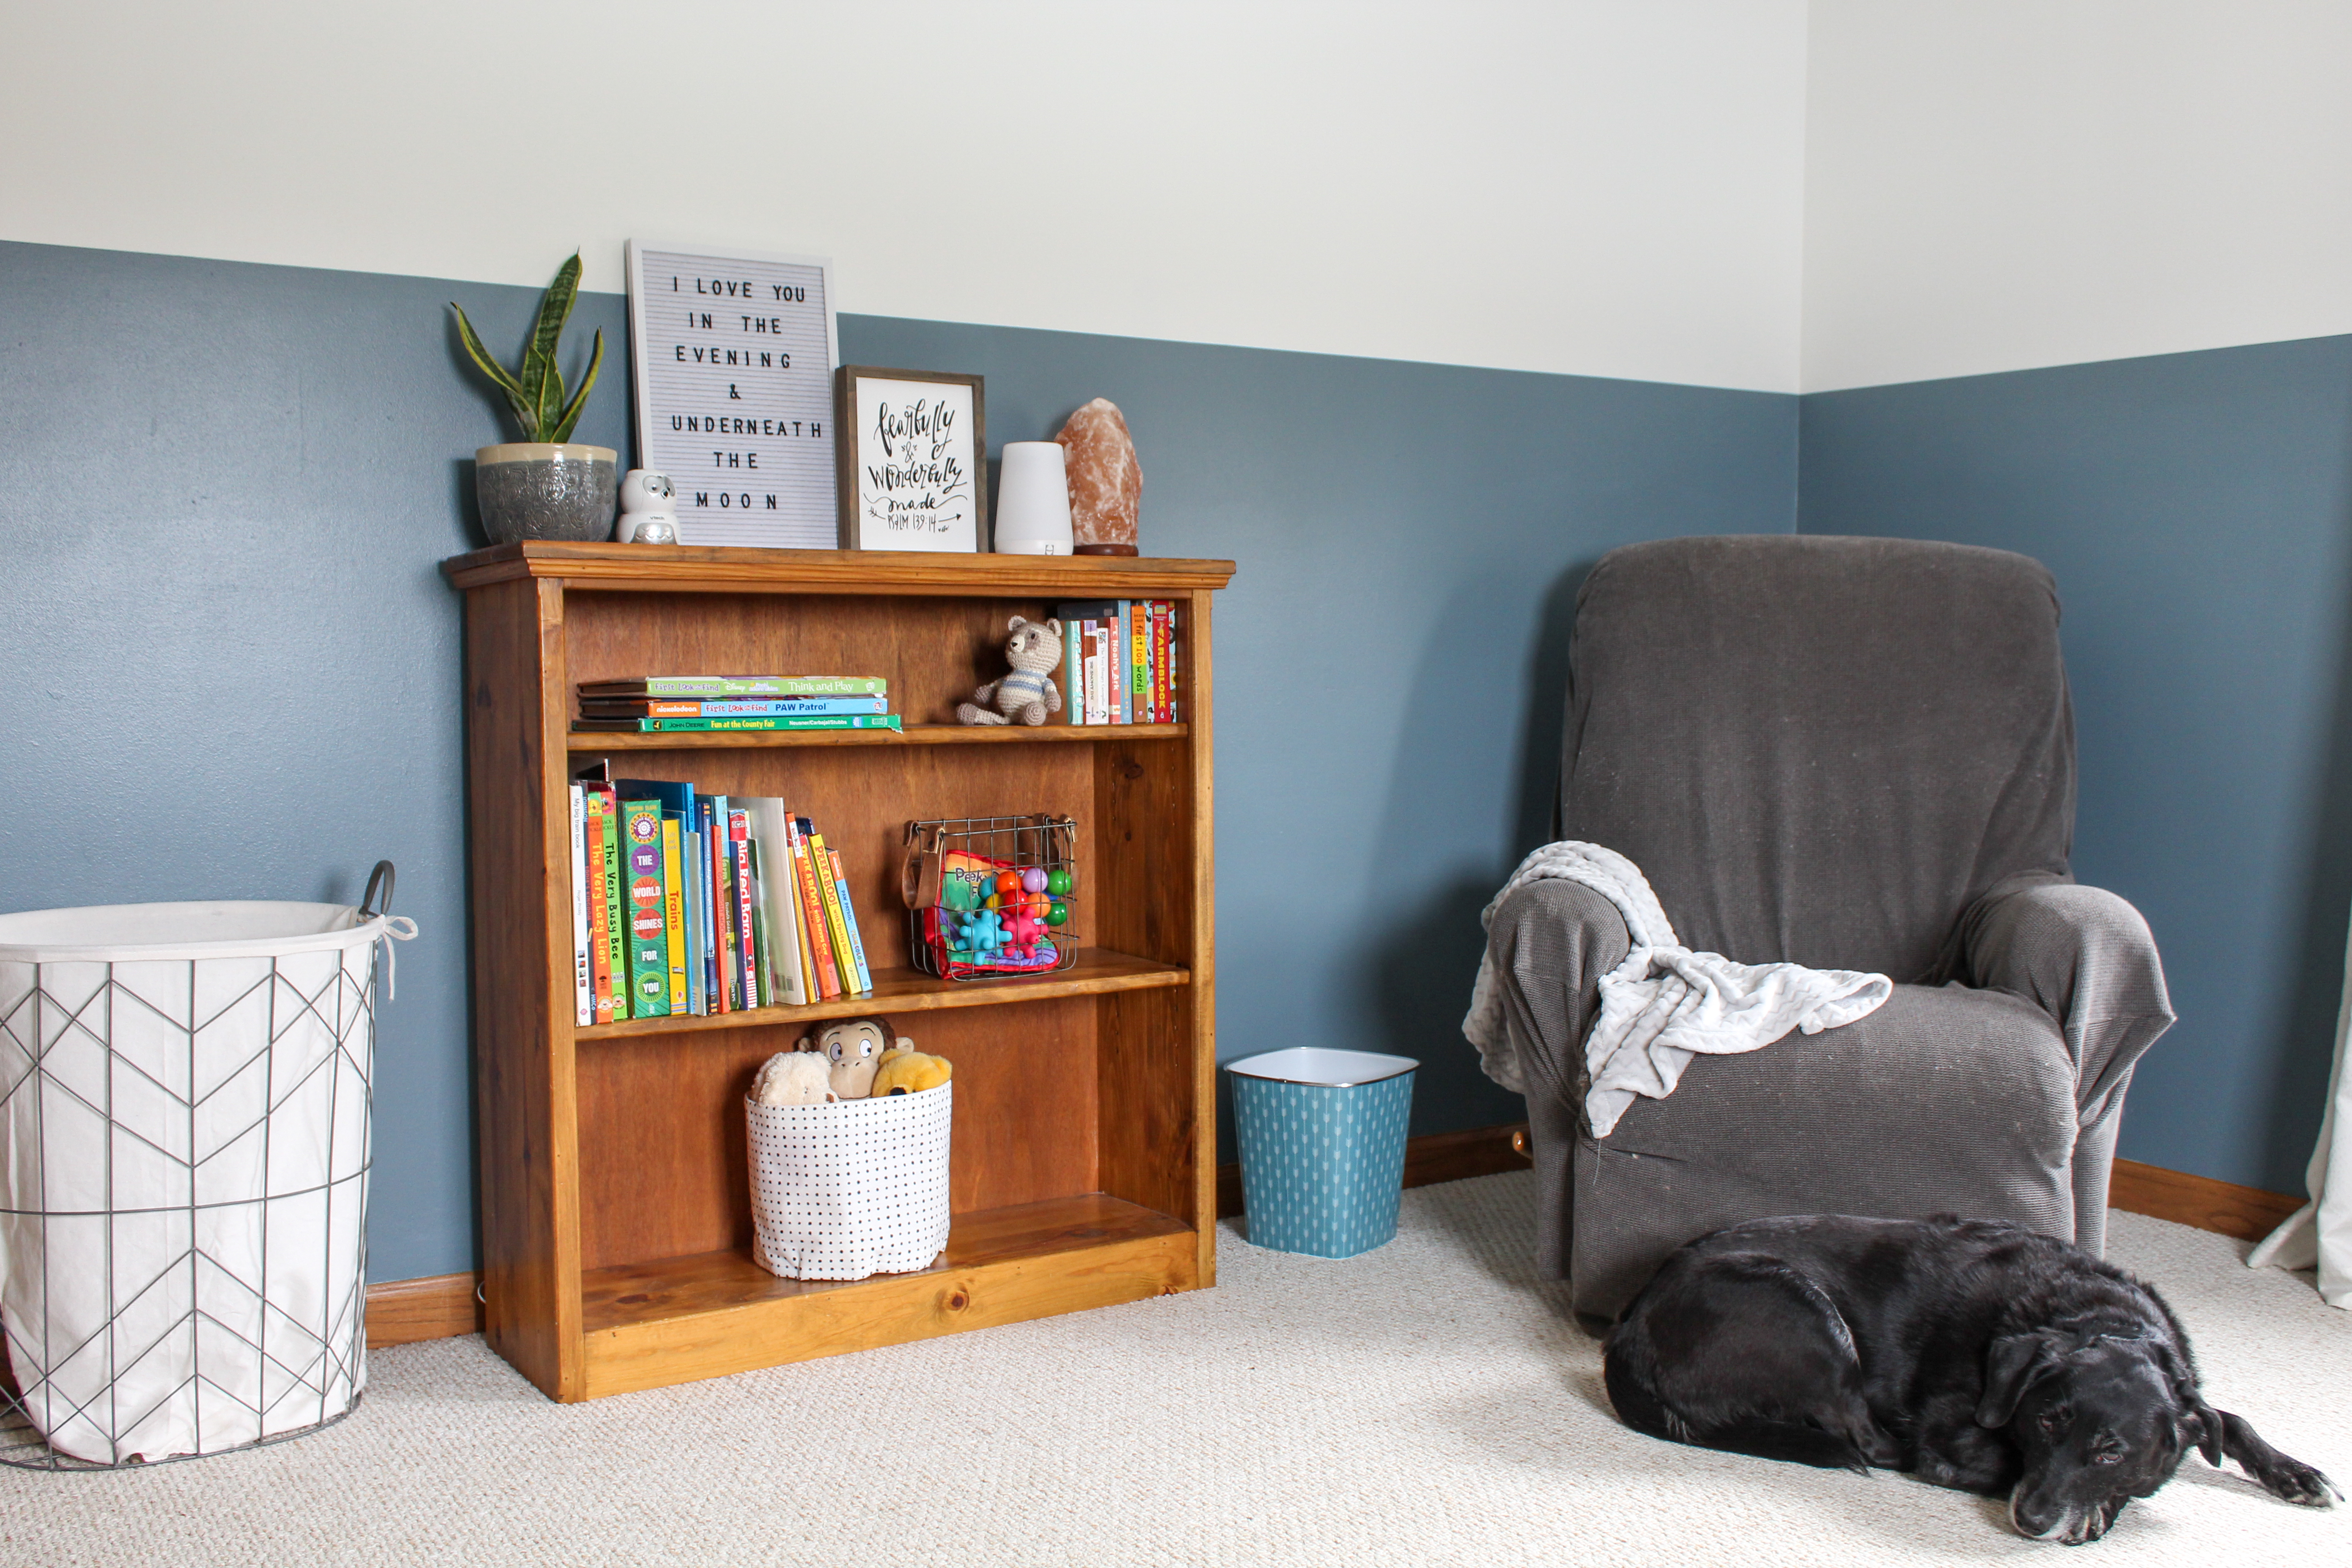
The rest of the room stayed pretty much as is, I just added a few little touches here and there to level it up a bit.
Someday, we’ll do more work in this room, but these changes are what made sense now. This is the bigger of two rooms for our kids, so if we ever do have a third child, this is the room we’ll have the two siblings of the same sex share (it could switch to a girl’s room someday!) Plus, we didn’t want to spend a lot of money or put in a ton of effort since LJ is three and doesn’t care anyways haha. Full-blown room renovations are fun and certainly more dramatic, but they’re not always realistic or the most practical choice. In this case, a new bed with fresh bedding, an updated mirror, and a few tiny touches with mostly functional decor was enough. It was simple, inexpensive, and will be easy to change as LJ grows and his needs change, and now the room feels just right for his current stage.
Even Macie approves of the space! 😉
Sources
Wall Color: Sherwin Williams Eider White and Nordic Bleu
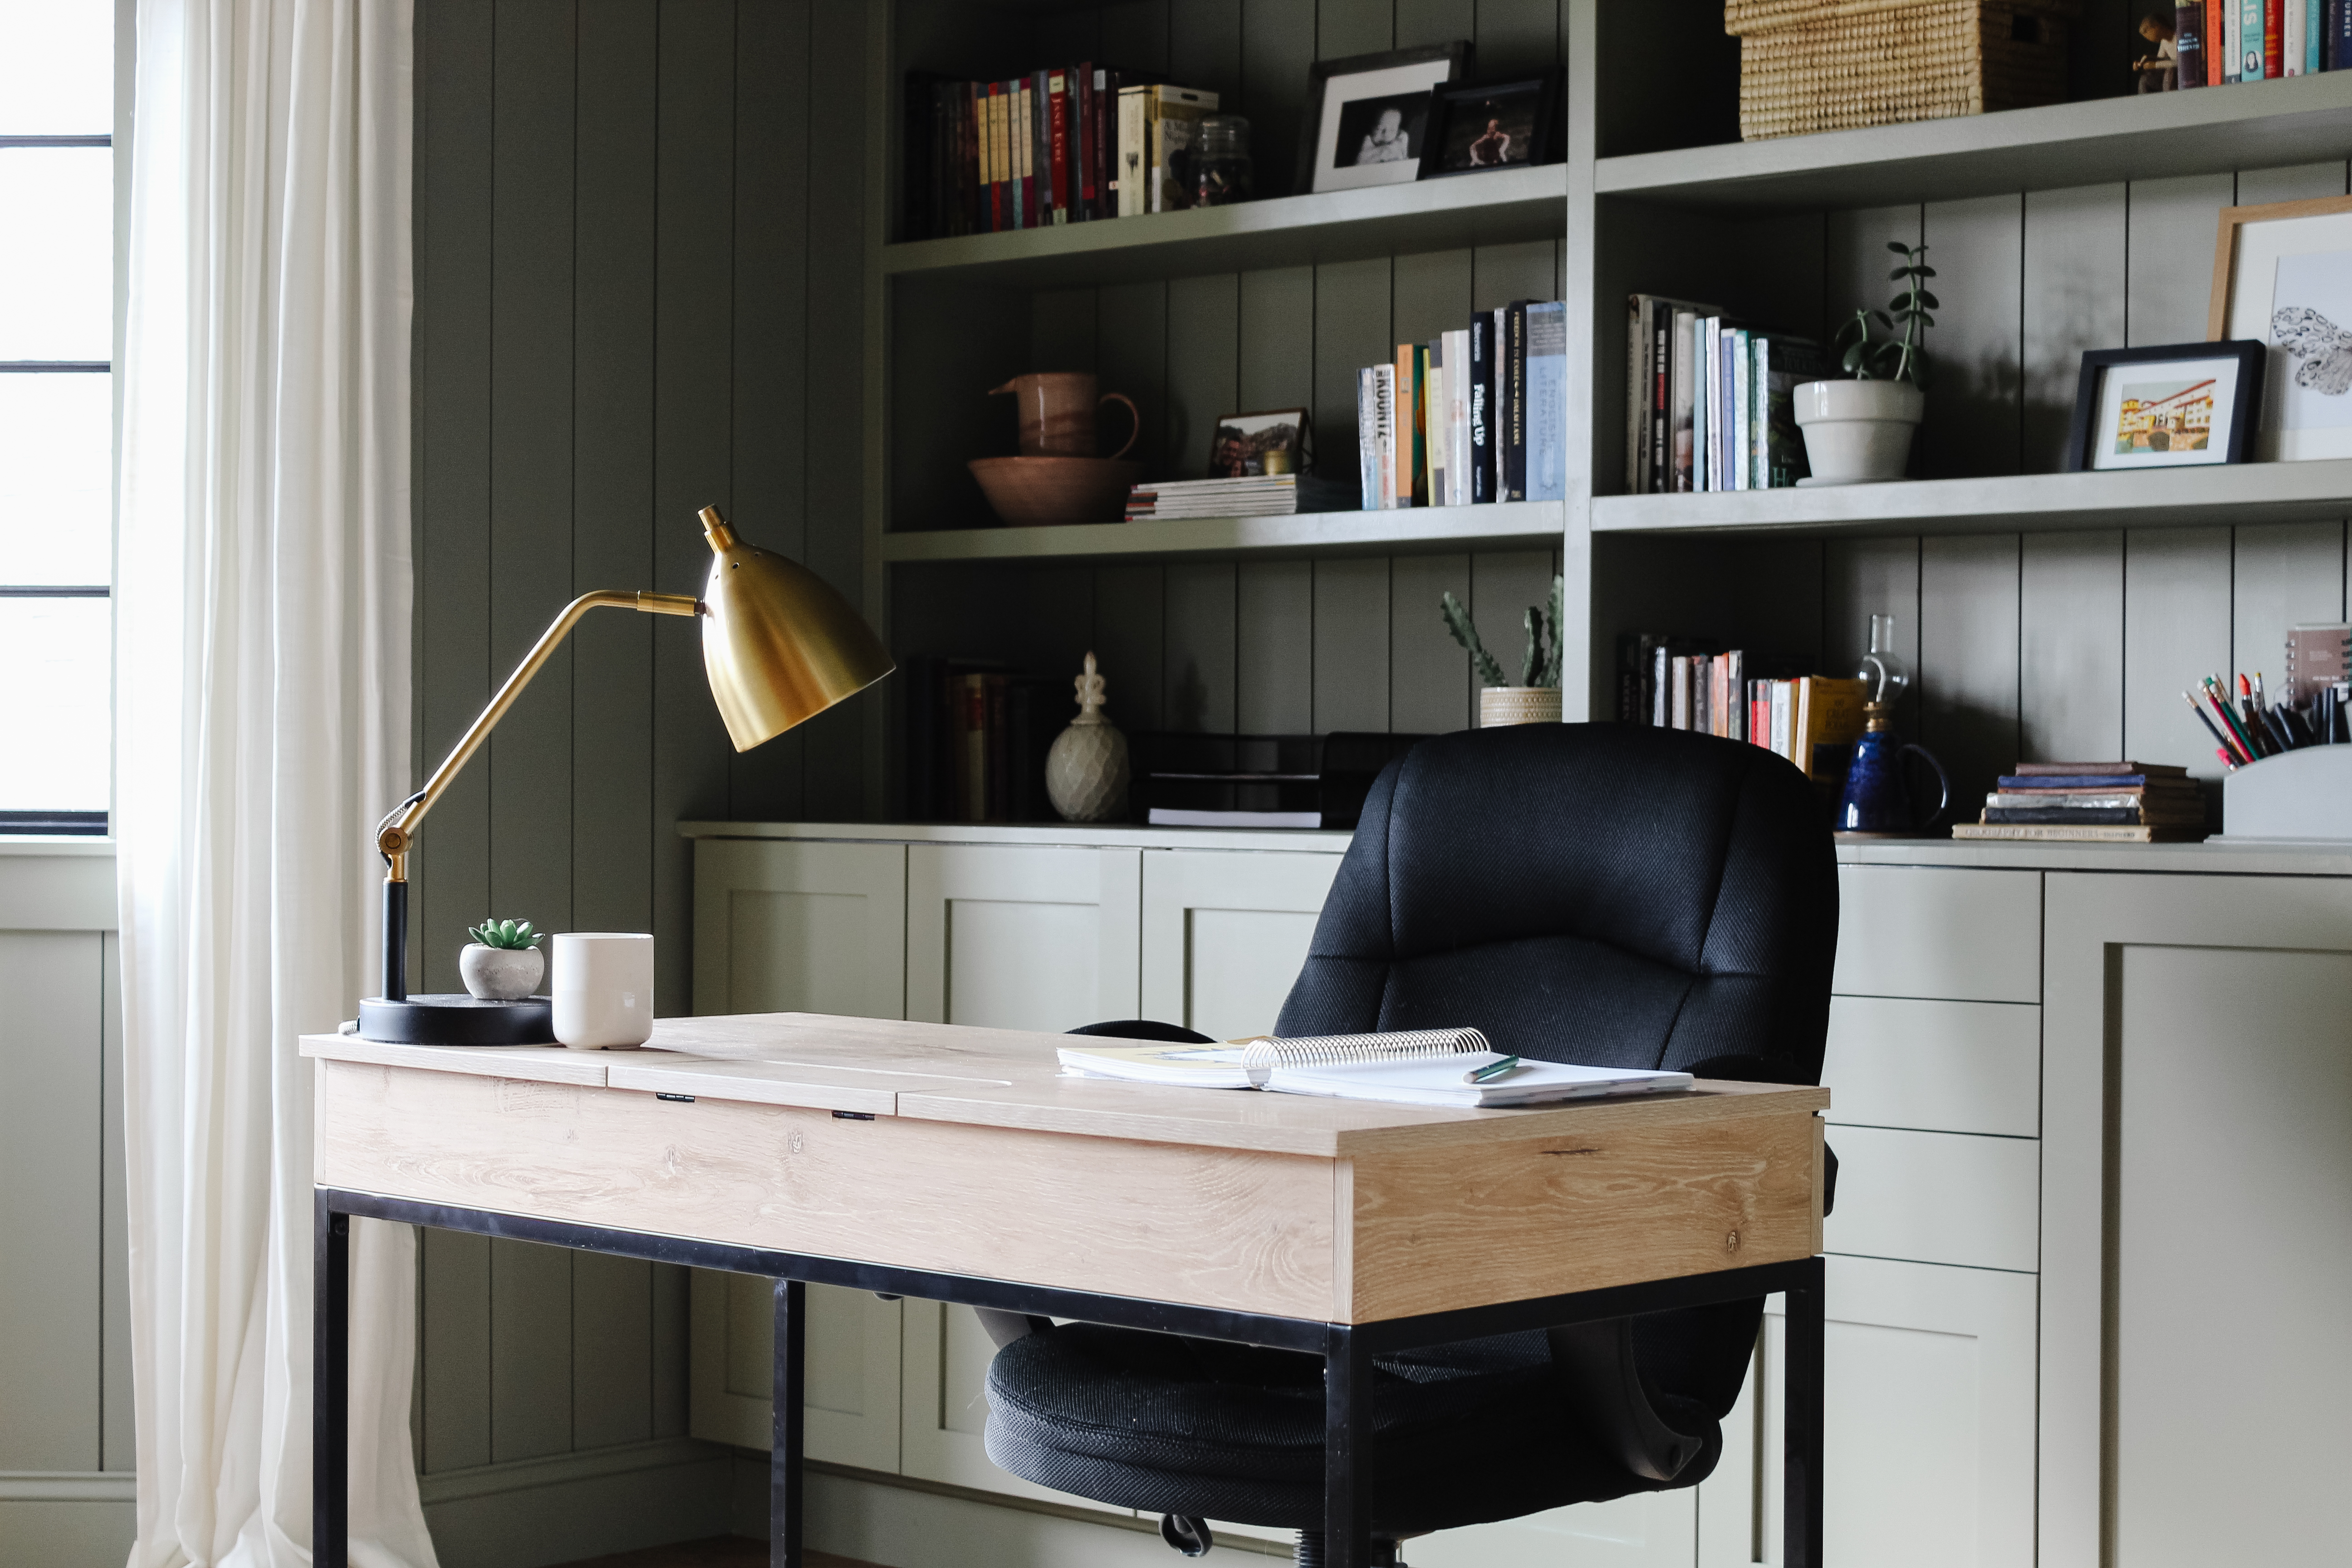
It’s the final week of the Fall 2020 One Room Challenge! We’ve been pouring our heart and soul into our home office and I’m so excited to show you how it turned out!
Let’s take a quick trip down memory lane, shall we? Two months ago, the room looked like this:
Fluorescent light, barely functional window shades, mismatched storage – yikes. It was a hot mess combination of storage/overflow/office/extra guest bedroom and unfortunately due to the French doors, we saw the room every. single. day. Since the day we moved in, I’ve been dreaming of this being a cozy home office + library and it makes me so happy to see this vision come to life!
After removing all the old trim and beadboard paneling, Justin and I took primed shiplap and ran the planks vertically all around the room and on the ceiling. We put extra effort into making sure the ceiling planks lined up with the wall planks, and I think that effort was definitely worth it! I chose the color Treron by Farrow and Ball and had it color-matched at Lowe’s for all the walls, ceiling, trim, and built-ins.
The olive green color strikes just the right balance for me – not too dark, not too light, not too brown, not too green. It’s a bit of a chameleon color and changes a little depending on the lighting but it’s just a nice warm that makes the room feel so cozy.
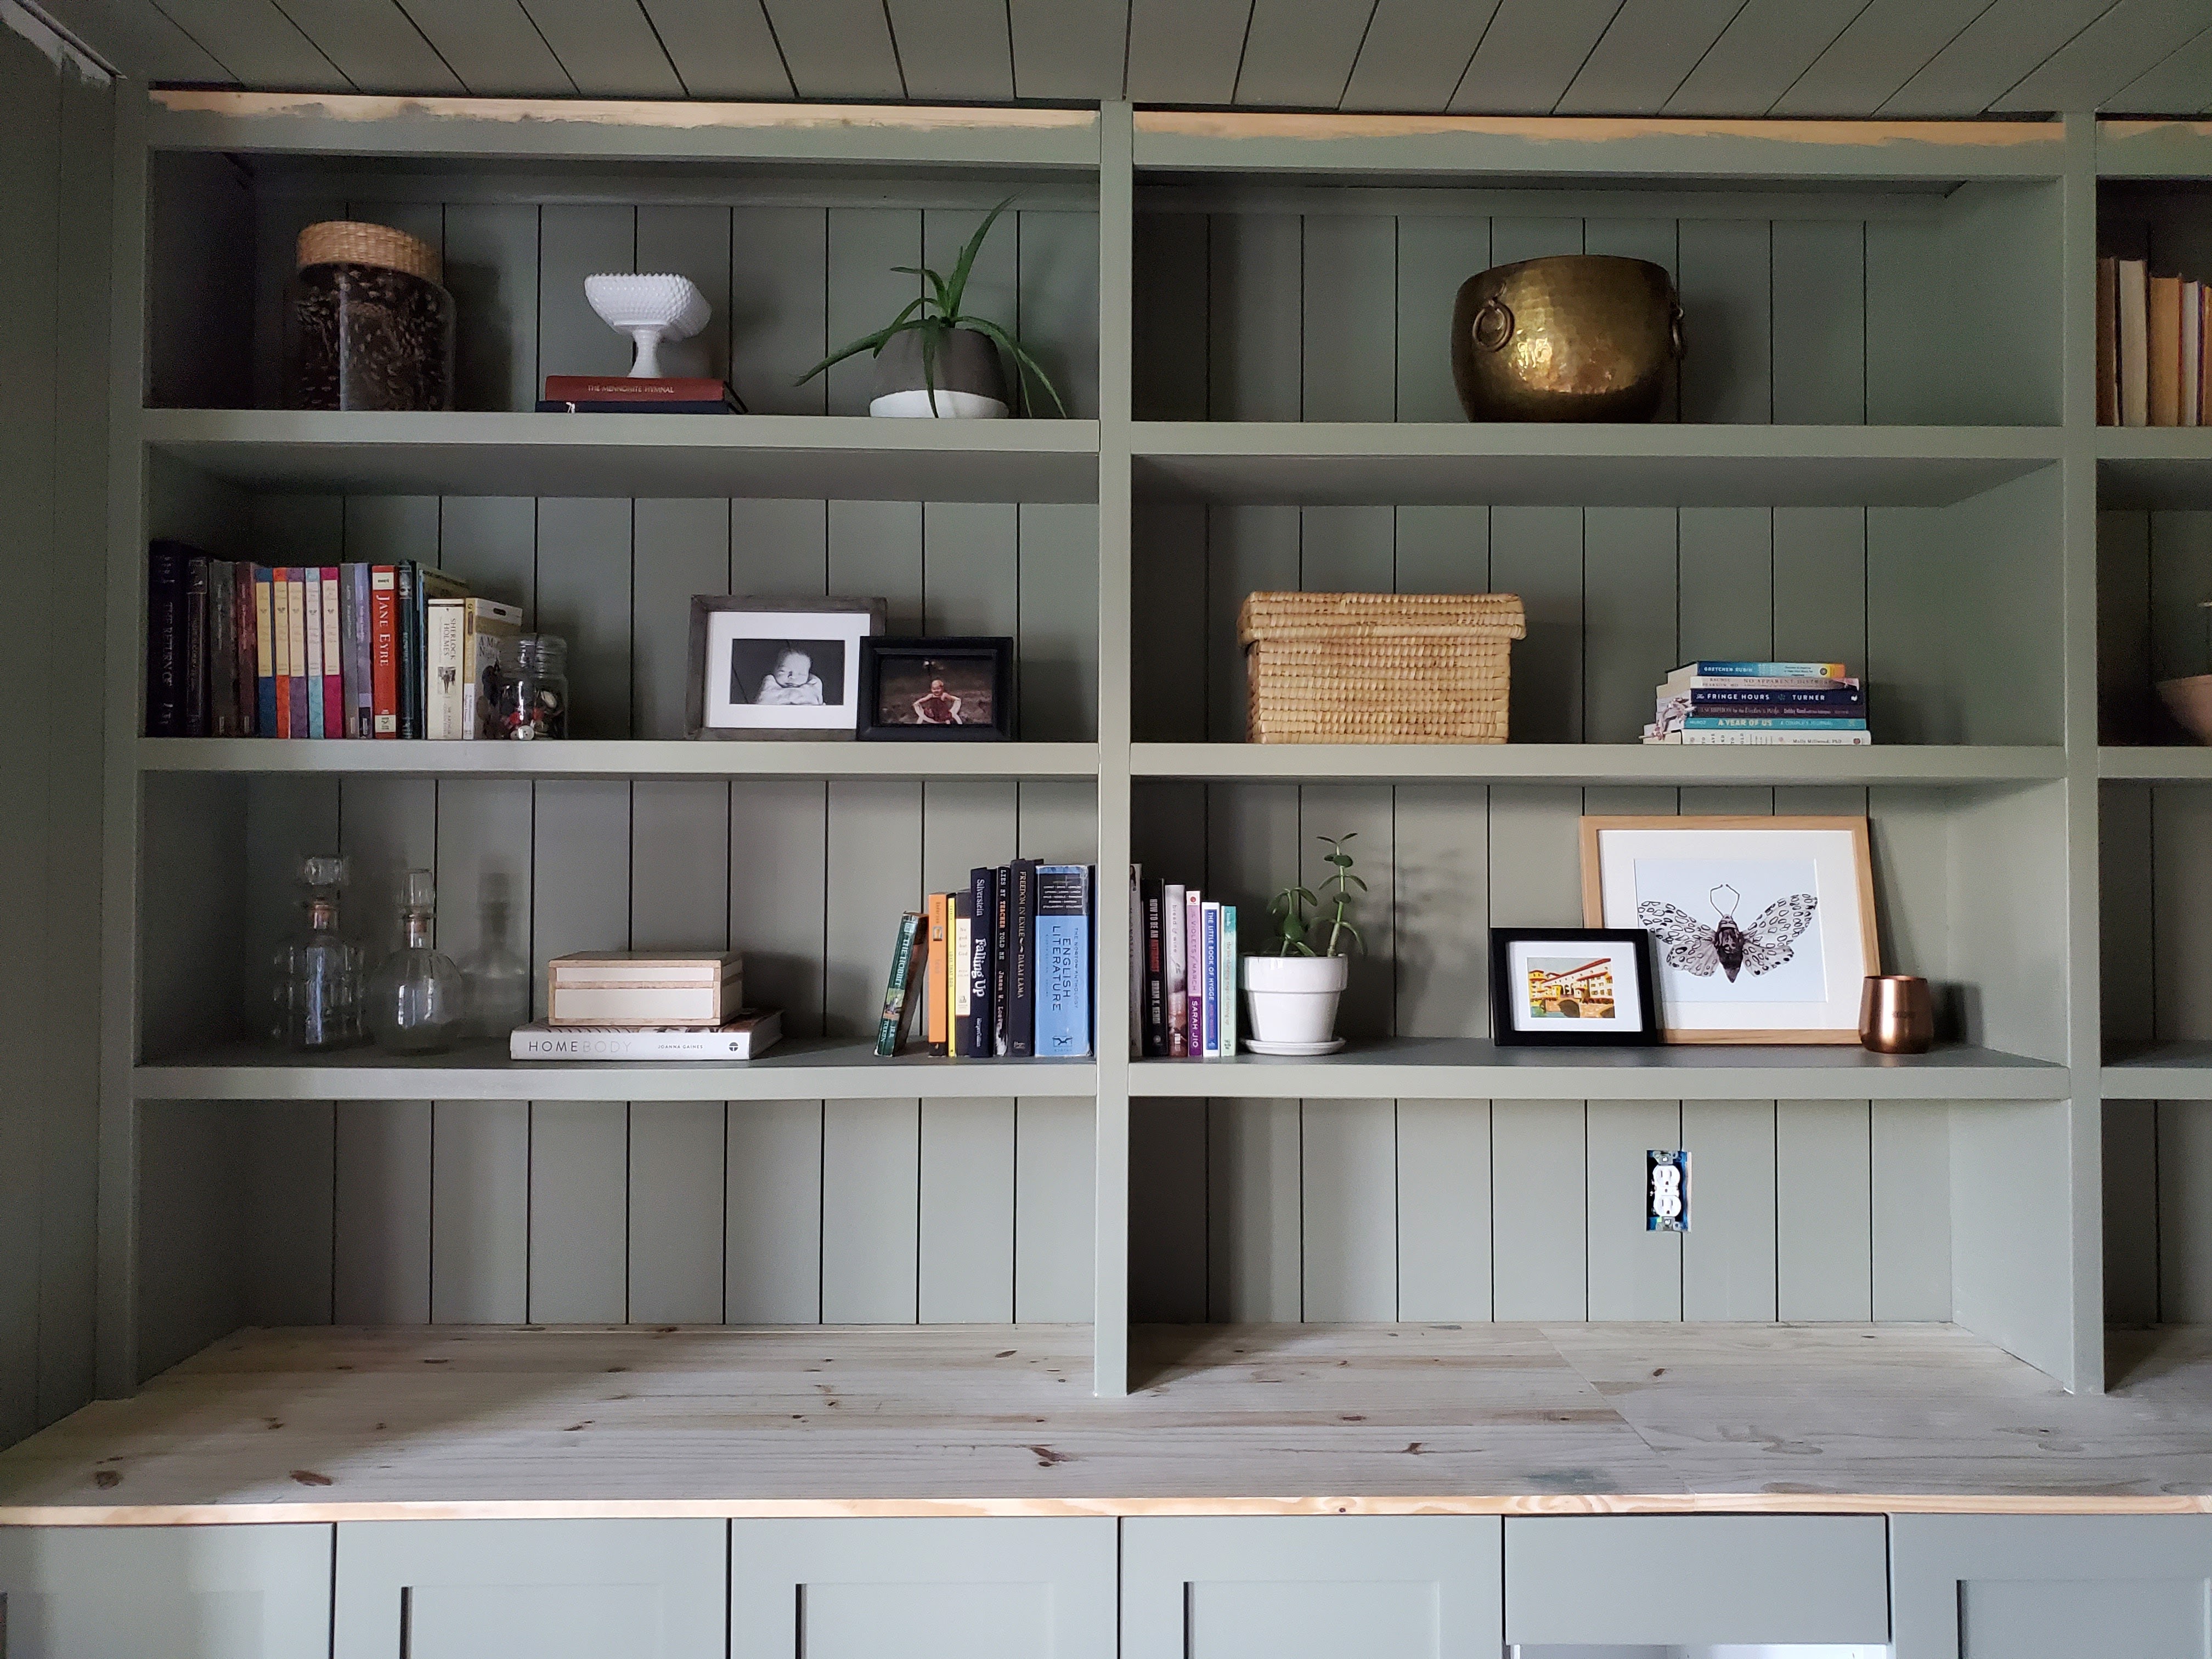
Without a doubt, the star of the room is the gorgeous built-in. This showstopper took the room from no storage to tons of storage. The bottom portion is Ikea cabinets with Semihandmade doors and I love them so much. They look custom-made but for a fraction of the price! If you’ve been following along in my Instagram stories, you know that I had two different options for hardware but didn’t feel like either was quite right so I ordered a third set. I’m still waiting on those cabinet pulls and knobs to arrive and I think they’ll be the perfect finishing touch. Stay tuned!
Back in the planning stages, I debated on whether to do a built-in desk or keep it freestanding, then whether to do all cabinet doors or have a section of drawers as well. I’m so happy with my decision to do a freestanding desk and include a section of drawers in the middle. It provides tons of easily accessible and functional storage and with the desk in the middle, the room actually feels perfectly proportioned.
Justin and I worked together to build the bookshelves from scratch and we are both thrilled with how well they turned out. I intentionally tried to pull in other colors and textures throughout the bookshelves, especially with light colors and natural fibers to break up all the olive green throughout the room. In addition to all our books, the shelves are filled with special mementos, heirlooms, family pictures, and artwork from travels, so it very much feels like us.
I also have functional items throughout – closed storage boxes holding office supplies, decorative jars filled with pens and pencils, trays for papers, etc. The shelves strike the perfect blend of meaningful, beautiful, and functional for us.
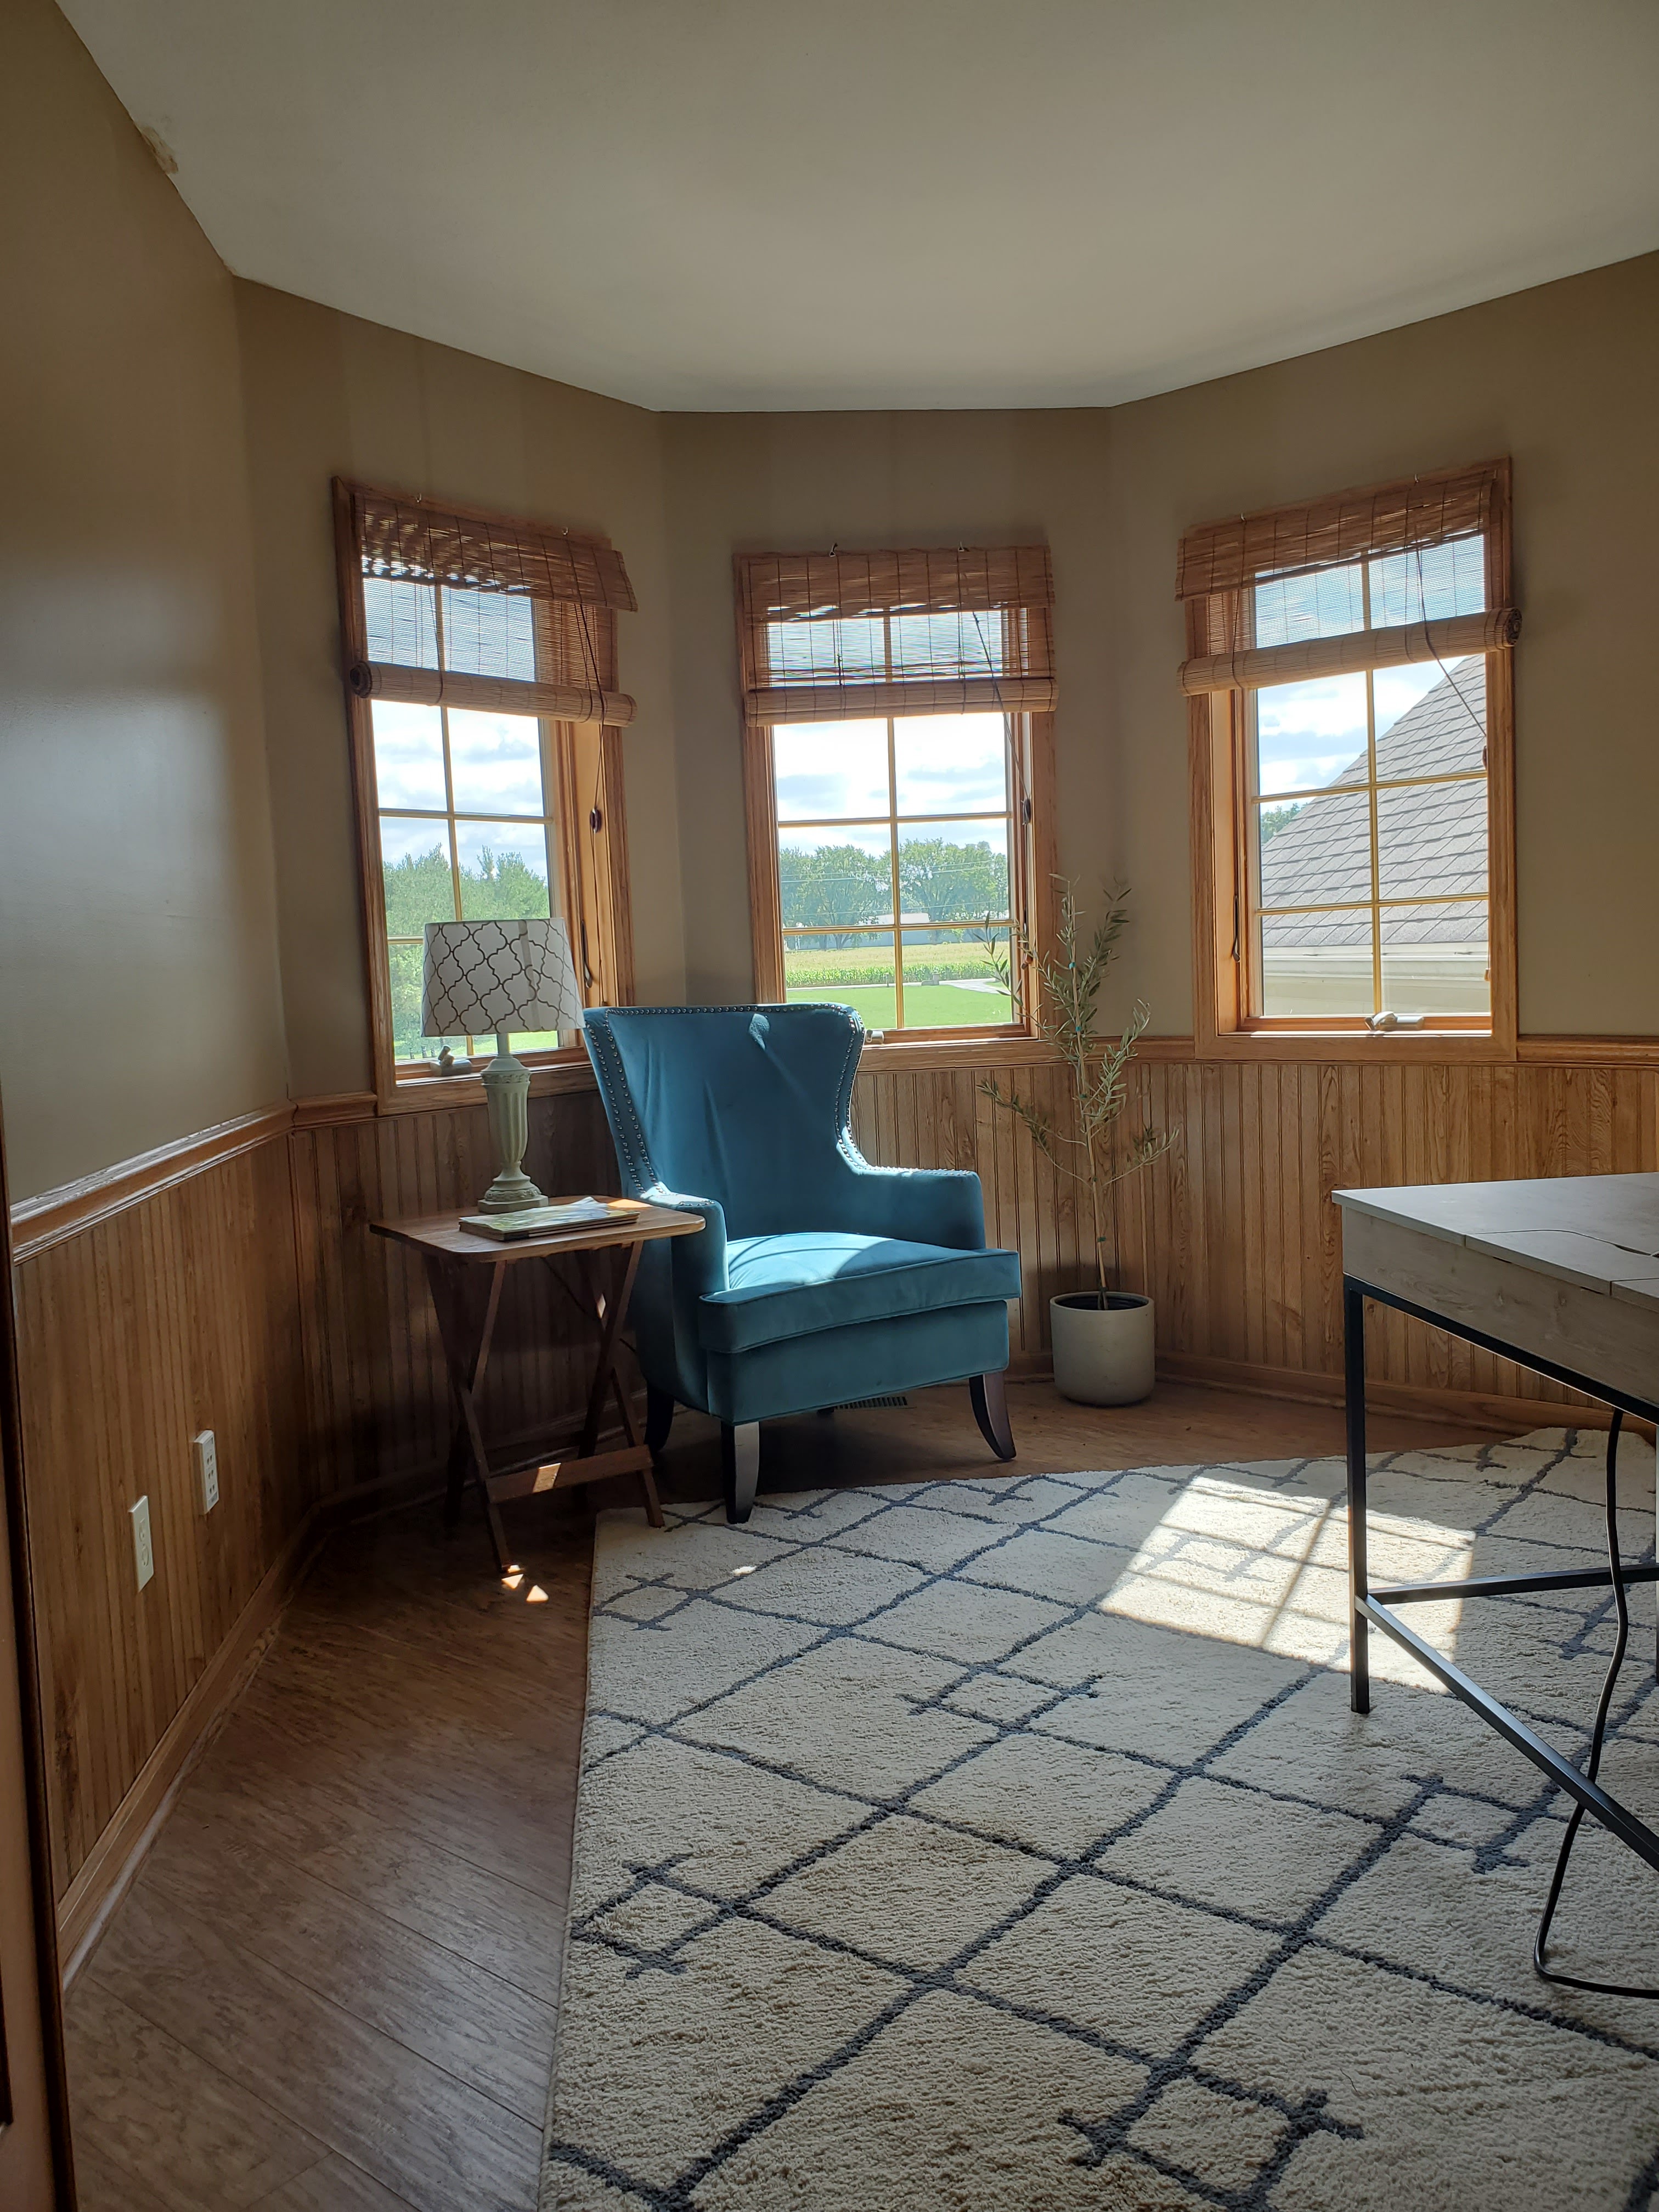
I think of this room as a home office and library all in one. As I imagined shelves full of books, I also imagined a cozy area to read them in. The bay window area provided the ideal place to add a comfy reading chair. I had been on the hunt for a reading chair in either yellow/gold, rust, burgundy, or something along those lines but everything I found was super expensive. Then a few weeks ago, I saw someone share a post from the thrift store in my hometown. One of the items pictured was a set of vintage yellow chairs circa 1970s (sold separately for $50 each) and my heart immediately leapt. I sent my mom on a mission to the thrift store to see if the chairs were comfortable and in good shape. They were, and I convinced her to buy one for me for Christmas. Score! Here’s the chair when it first arrived – my parents thought I was crazy, but I knew it had potential.
If you follow me on Instagram, you know I performed a little cosmetic surgery on the chair to remove the flap of fabric at the bottom and this made a huge impact in making it seem more modern.
I brought down the little side table from Vi’s room, but I eventually plan to replace it with something else (I’m feeling a little round table?) and I’ll also add a floor lamp at some point. For now, I’m happy with this space!
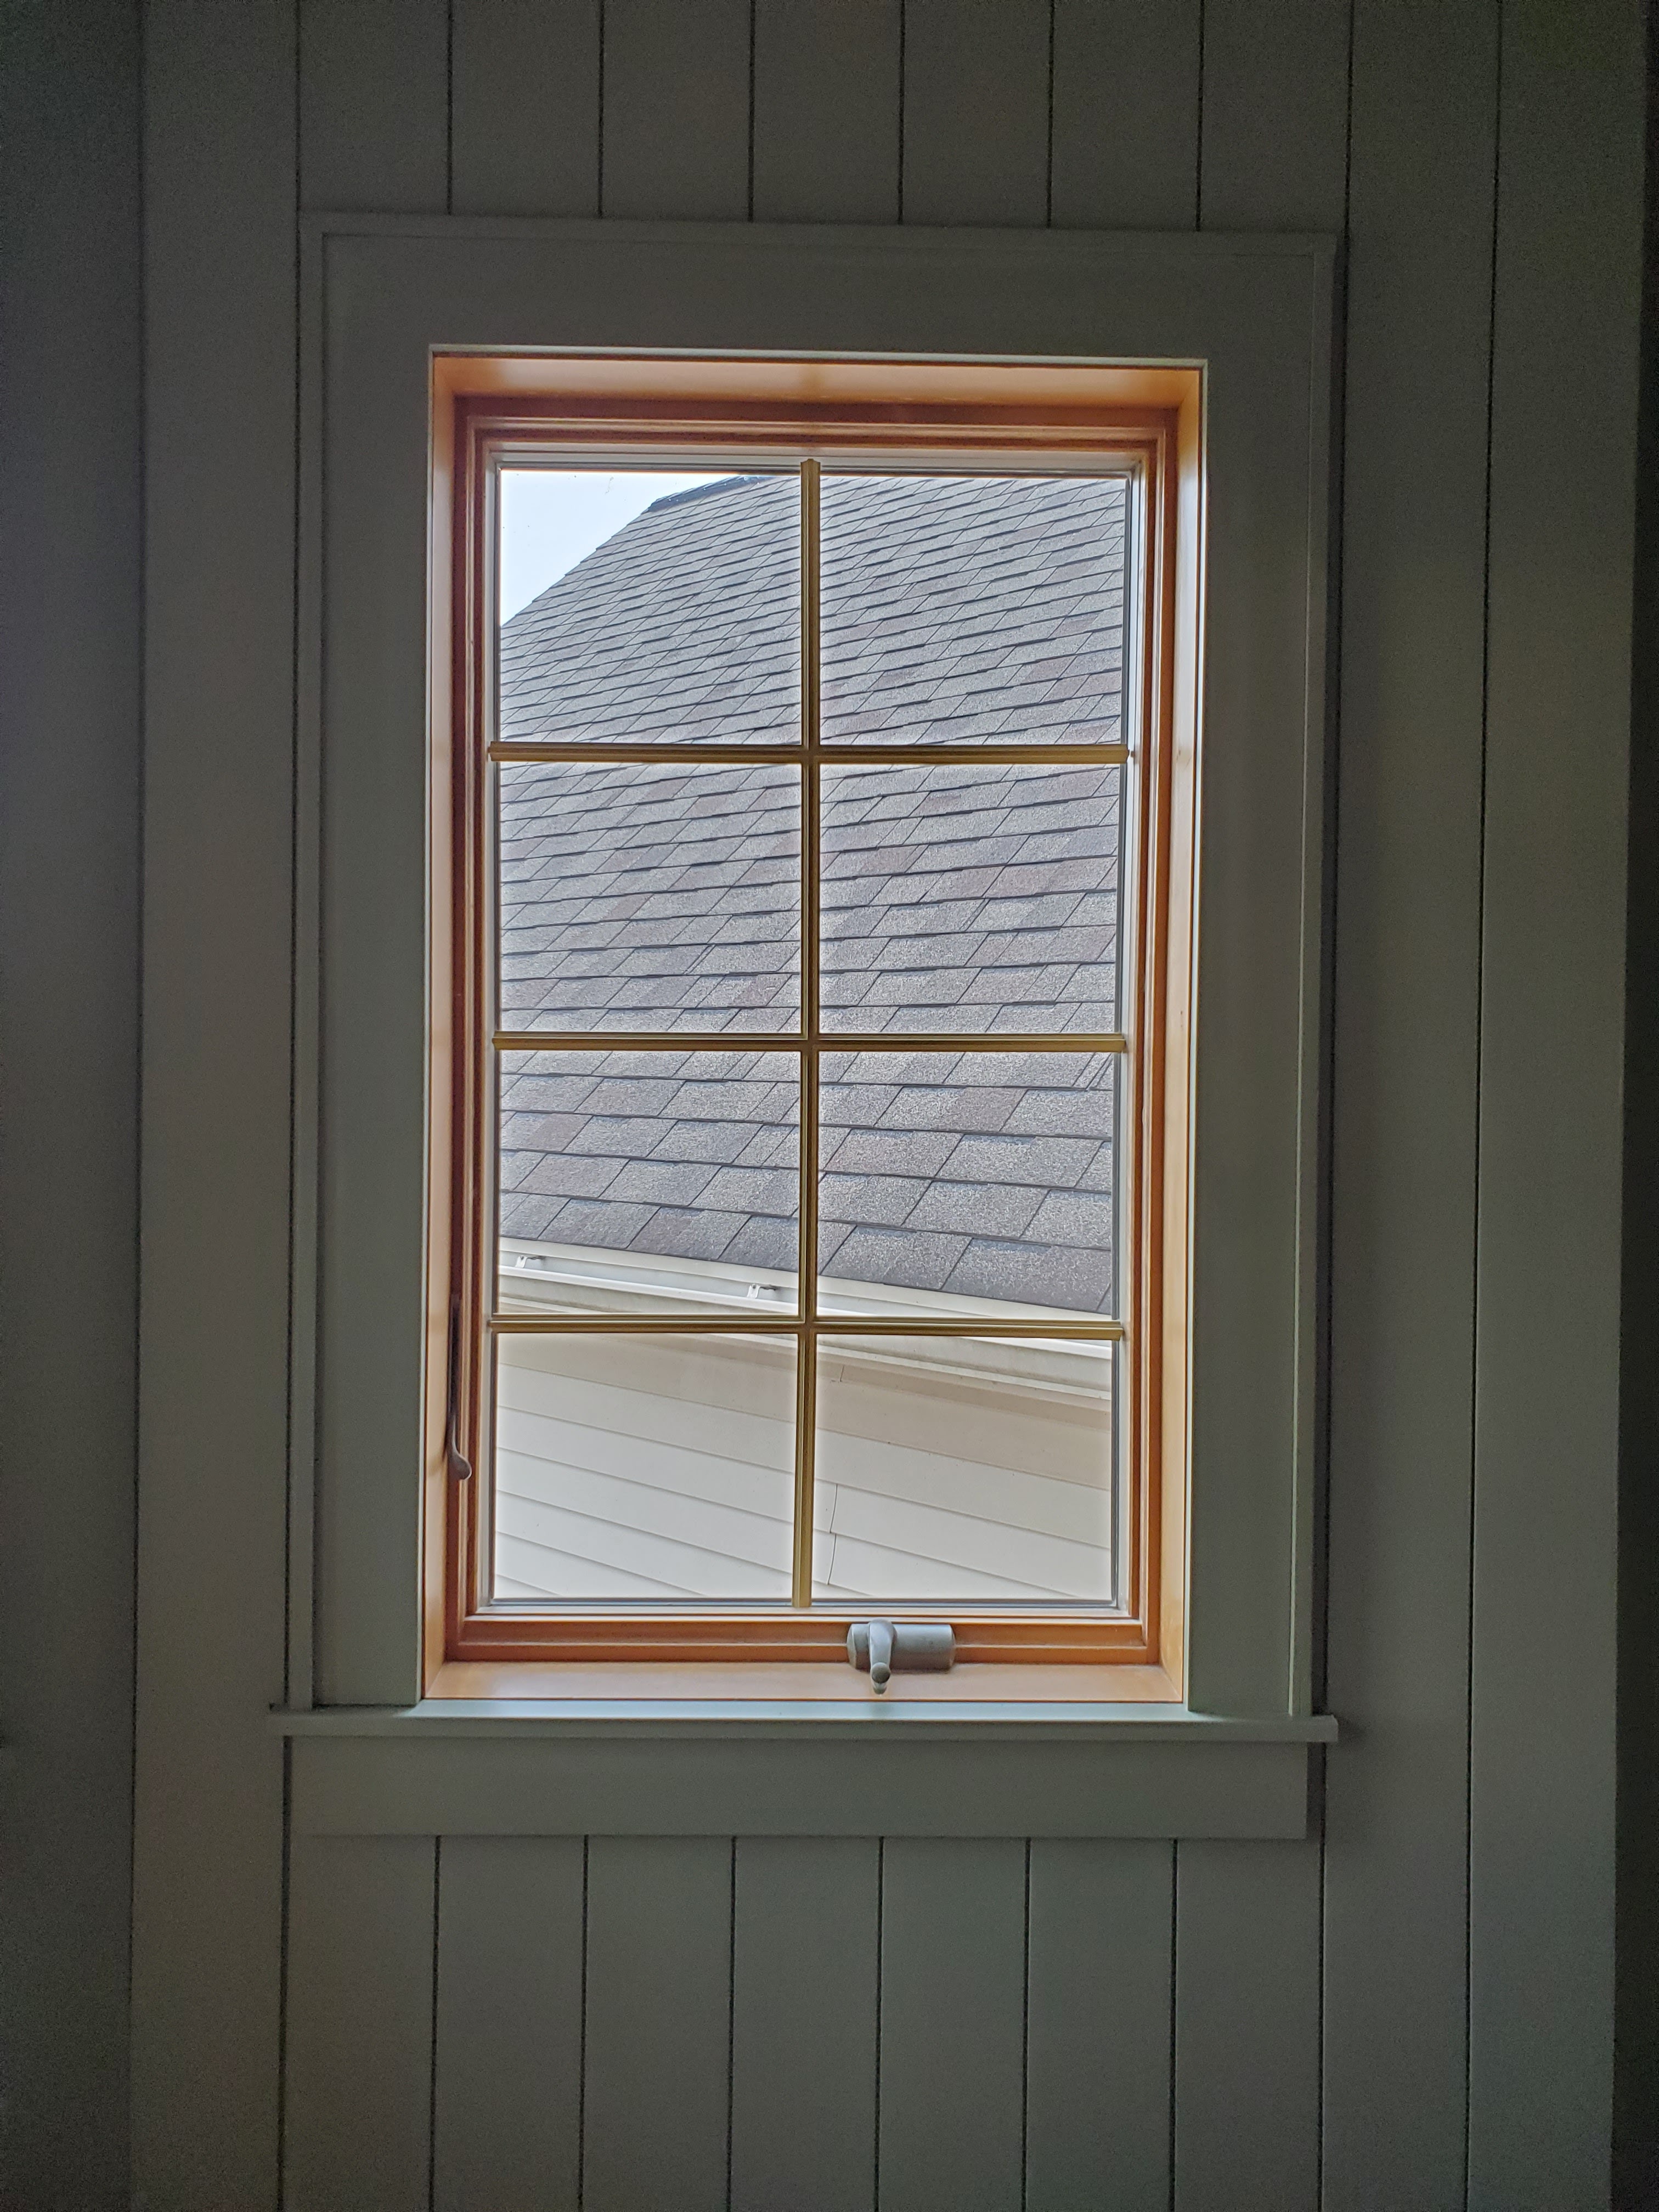
In addition to replacing the baseboards, we also tore off the old window casing and added new trim in a style inspired by Jenni Yolo at ISpyDIY. I also painted the existing window frames and grille inserts Tricorn Black by Sherwin Williams.
We had a slight fiasco with the bay window curtain rod because we didn’t realize that the side bars only extended 36″ max and we needed about 42″ but Justin came up with the brilliant idea to buy two cheap telescoping curtain rods and screw them into the angled attachment on the middle window’s curtain rod. This worked like a charm! The curtains are Ikea Ritva. I got them in 118″ length and then used hemming tape to shorten them a bit (I like a little pool at the bottom, but it was originally like 8″ too long). I hung them by attaching pleating hooks to the curtains and then hooking them through the eyelets of curtain rings. Rather than just putting the curtain rod through the loops of the curtain, this gave them a little extra oomph.
Another issue I ran into was rug size. Because of the bay window and angled doorway, the room is anything from square (don’t even get me started on how hard figuring out the crown molding was!). It left an awkward amount of floor space that I really needed a 6×9 rug for, but many of the rugs I loved only came in 5×7’6″ or 7’6″x9’6″. It was a frustrating search! Finally, I decided to try a layered rug look with a simple jute rug at the 6×9 size I needed and a patterned rug I loved in a 5×7’6″ size on top. This solution ended up working so well and I think it helps give the room a casual and cozy feel.
I am so so happy with how this room turned out! It is the room I was most excited about when we first moved in and it is now without question my favorite room in the house.
And it wouldn’t be a reveal without a few final before-and-afters, right?
I had so much fun participating in the Fall One Room Challenge! You can check out all the other fun projects that happened here.
And if you missed any of my previous posts on this challenge, you can check them out here:
Note: Some of these product links are to Amazon. As an Amazon Associate, I earn from qualifying purchases. This means if you purchase something through the Amazon link I provided, I may earn a small commission. None of my recommendations or decisions are based on any commission I might receive from your purchases, they are all things I actually bought for this renovation. The decision to buy something is yours, and whether or not you decide to buy one through the link I provide is completely up to you. Thank you!
Paint Color: Treron by Farrow and Ball (colormatched at Lowe’s) in Eggshell finish (walls + ceiling) and Satin finish (trim + built-ins).
Window Color: Tricorn Black by Sherwin Williams in Satin
It’s the second-to-last week of the One Room Challenge and now that all the shiplap is finished, things have really picked up!
One thing that got checked off the list this past week was the completion of the window trim. We had trimmed out each window with a 1×4 and Justin then ripped a board into 1/2 inch strips and nailed it around the edges. This helped hide any gaps left in between the shiplap and the 1×4 and gave everything a nice, finished look.
Other than that, the biggest change that has happened this week has been the addition of our cabinet doors!
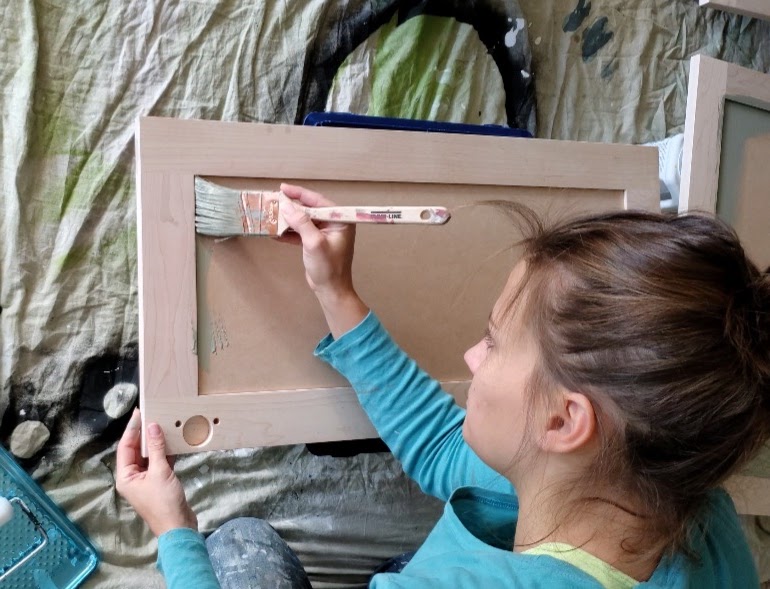
When we first started planning out the built-ins, we contemplated DIYing cabinet doors. I’m so glad that we ultimately decided to outsource that project because these Semihandmade door and drawer fronts are perfect and were a breeze to paint and install!
Semihandmade is a company that makes different styles of door and drawer fronts that are fit to the same specifications as an Ikea cabinet door. This means you can purchase the Ikea base cabinet, which is a very inexpensive, and then add different doors to create a more custom look. I’m really impressed with how it elevates the look of the cabinets without breaking the bank!
You can order doors in various colors but I went for the unpainted DIY version so I could paint them the exact same color as the rest of the built-in: Treron by Farrow and Ball that I color-matched at Lowe’s. Before painting, I did rub a fresh tack cloth over the fronts and backs of all the doors, because they shipped from the factory covered in a fine layer of sawdust.
I placed each door face down on top of paint cans (so they would be elevated off the ground) and started painting all the backs. I highly, highly recommend painting the backs first so that when you flip them to paint the other side, the back is the painted side that touches the paint cans – if one side is going to get nicked or scratched or stuck after painting, you definitely want it to be the side that rarely gets seen!
(Apologies for the quality and angles of these pictures – I didn’t take photos of this process so these are just screen grabs from the timelapse videos I posted on Instagram).
I used a paint + primer so I did not do a separate layer of primer. I used an angled brush to trim out the edges of each inset . . .
. . . and then I used this six inch foam roller on the rest of the doors to create a really smooth finish.
I painted all the backs of the doors, waited about 3 hours, and then painted a second coat. I let them dry overnight and then flipped them over to paint the fronts. I did the exact same process of two coats, this time also rolling the door sides, and let them dry again overnight. The next morning (probably about 18 hours later), we attached them to the cabinets using the hardware we bought from Ikea. They were very simple to install!
Yesterday, I spent time in the afternoon playing around with arranging the shelves. I’m definitely not done with them, but it was fun to get started with different placements. As you can see, we still need to finish assembling the drawers in the middle, but so far, I’m really pleased with the look!
Other things we need to accomplish this week:
-add the final trim pieces around the door frame
-add thin piece of trim between cabinets and the wall
-paint + install crown molding
-paint + install baseboards
-install cabinet hardware
-paint countertop (while I like the natural wood look, up close it looks silly because we had to use two boards to achieve the length and it’s just too obvious to leave natural)
-paint outlet covers and duct vent to match wall color
-paint the inside of the window frames
-install curtain rod + hang curtains
-move in the rugs, desk, chair, and finishing touches!
Can we get all this done in one week? We’ll see! In the meantime, you can check out all the other guest participants in the One Room Challenge here.
It’s been a while since I’ve had a non-One Room Challenge blog post and that’s because both on the blog and in real life, the month of October was dominated by work on our home office. It’s been such a fun room to design and work on (see our most recent progress here), but it has meant that I don’t have much free time to do things like reading. I only finished two books in the month of October, but I’m hoping that once the office is wrapped up, I’ll have lots of time to read in it!
Don’t the books look SO GOOD on our new home office bookshelves? 😉
Millie and her four best guy friends all need dates for an upcoming work event, so they decide to all create profiles for an online dating site. After a very unsuccessful first round of suitors, Millie tries her luck again with an alter ego, “Catherine.” This time, she gets matched up with her best friend Reid, and what started out as a joke to see if Reid would figure out who she was turns into a way for Millie to open up to Reid in a way that she never has been able to before. Add in the fact that Millie and Reid do have a bit of a friends-with-benefits thing going on in real life and . . . things get complicated.
I always go into Christina Lauren books with high hopes because the first book I ever read by these authors (it’s a writing duo – Christina and Lauren!) was The Unhoneymooners and I loved it. Unfortunately, so far that’s the one I’ve enjoyed the most and each book afterwards seems mediocre. I really liked all the characters individually (the friend group was so funny!) and loved that the authors did things like including their group chats – it was a fun way to see everyone’s unique personalities and make the reader feel like one of the group. I also liked the idea of Millie and Reid, but I got a little annoyed by parts of the plot and ended up skimming several sections. Overall, this one falls pretty middle-of-the-road for me. If you’re in the mood for a decent, fluffy read that you can skim and finish in a day, this is a good option.
This book was selected as a book club book for a podcast I listen too (HERself – highly recommend!) and while the title is definitely a little aggressive (I definitely do not hate Justin), this was a really interesting read. The author details the struggles of her marriage after becoming a parent – the feeling of carrying most of the weight of parenting and housework duties, the frustration of asking for help with chores only to be told an noncommittal “later,” the lack of romance and passion, and the intensity of arguments and fighting. She’s incredibly vulnerable and transparent about the struggles she and her husband faced and then details the information she learned from seeking the opinions of others: everyone from marriage therapists to credentialed researchers to FBI negotiation experts to her friends and family. She slowly starts to implement various strategies and notices how her marriage, her personal happiness, and her family life all improve afterward.
I really enjoyed this book. I was fascinated by her sessions with therapists and appreciated that she addressed the more obvious aspects of relationships (sex, money) and also some of the sneakier aspects as well (clutter, kid chores). There were a lot of little nuggets of wisdom that I gleaned from reading and I think this is a book I’ll come back to again someday. There’s just a lot of great takeaways that can benefit whether you’re a parent to one newborn baby or five teenagers or anything in between. I highly recommend it as a read for parents! And as a side note: I also really enjoyed the HERself podcast episode with this author and definitely recommend that as well!
The One Room Challenge finishes up in two weeks, and just in time because a bunch of my holds from the library recently came in. I’m excited to break in my cozy reading chair in the brand new office soon!


![My Favorite Half-Night Stand by [Christina Lauren]](https://m.media-amazon.com/images/I/51dnsu+ESAL.jpg)