After several weeks of work, our primary bedroom is . . . halfway done!
Yep, you read that right. I’m only finished with half of the room so far, but my oh my do I love this half!
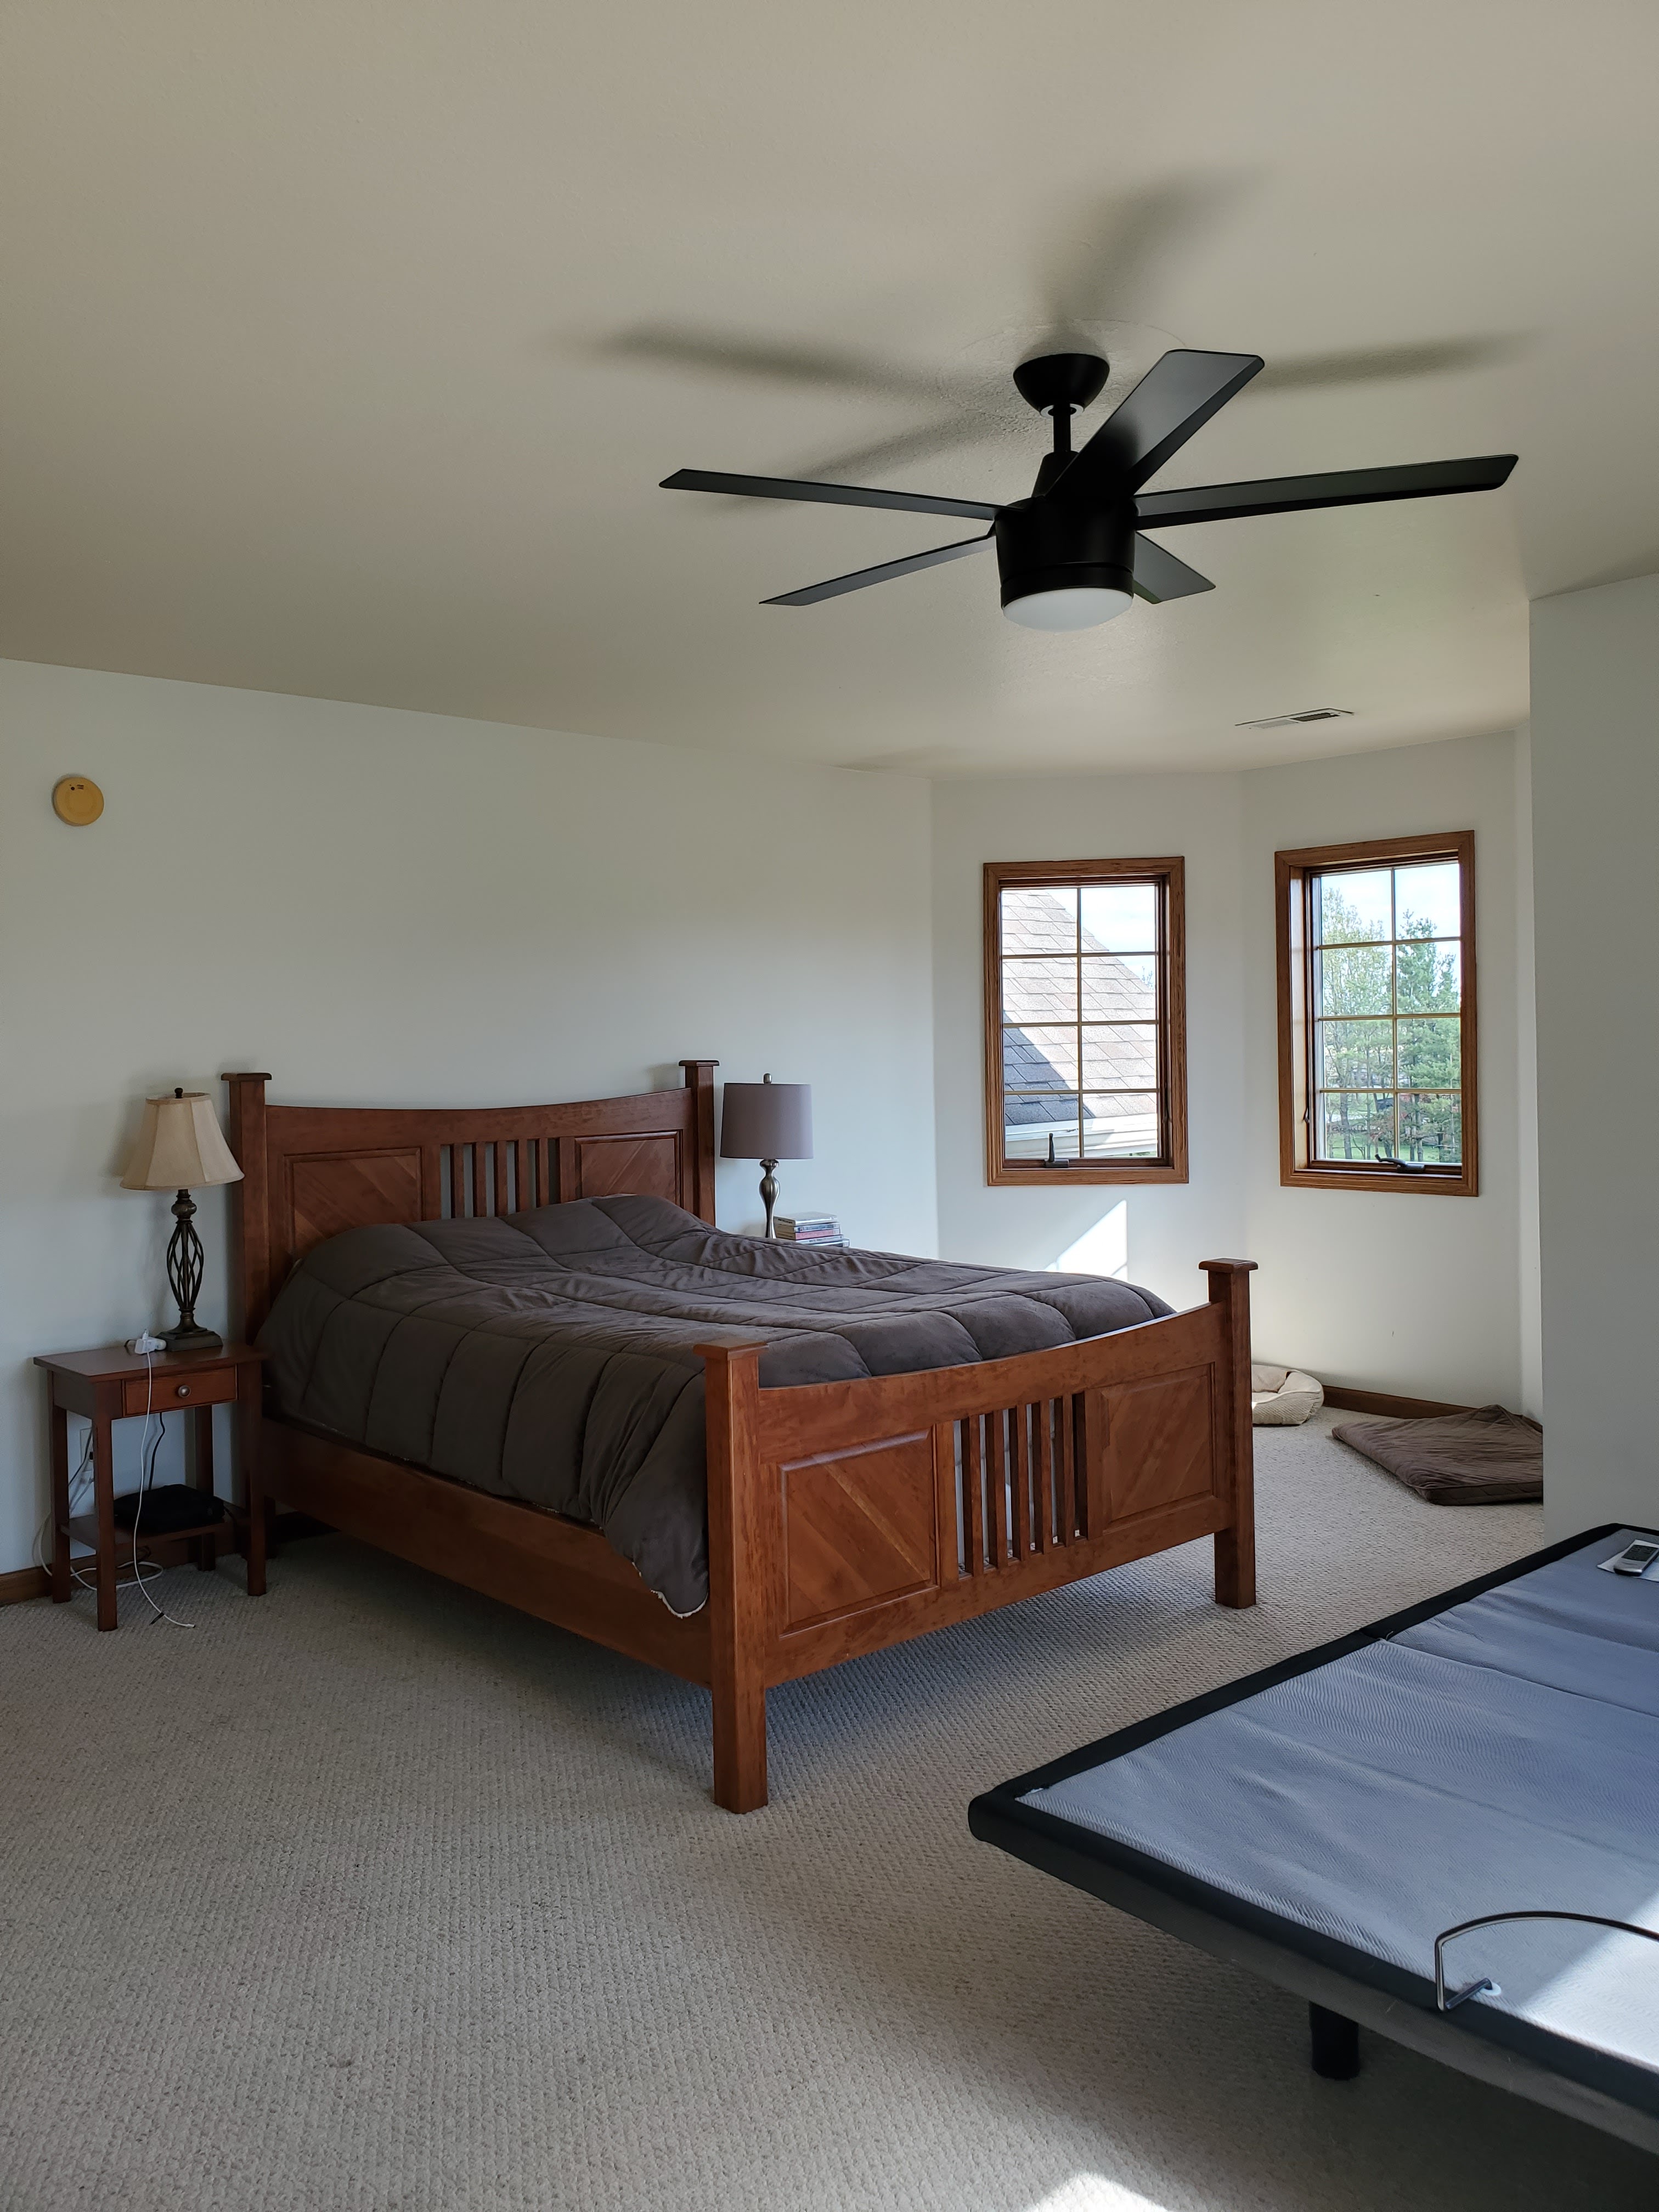
Here’s a reminder of where the space started at the beginning of the One Room Challenge:
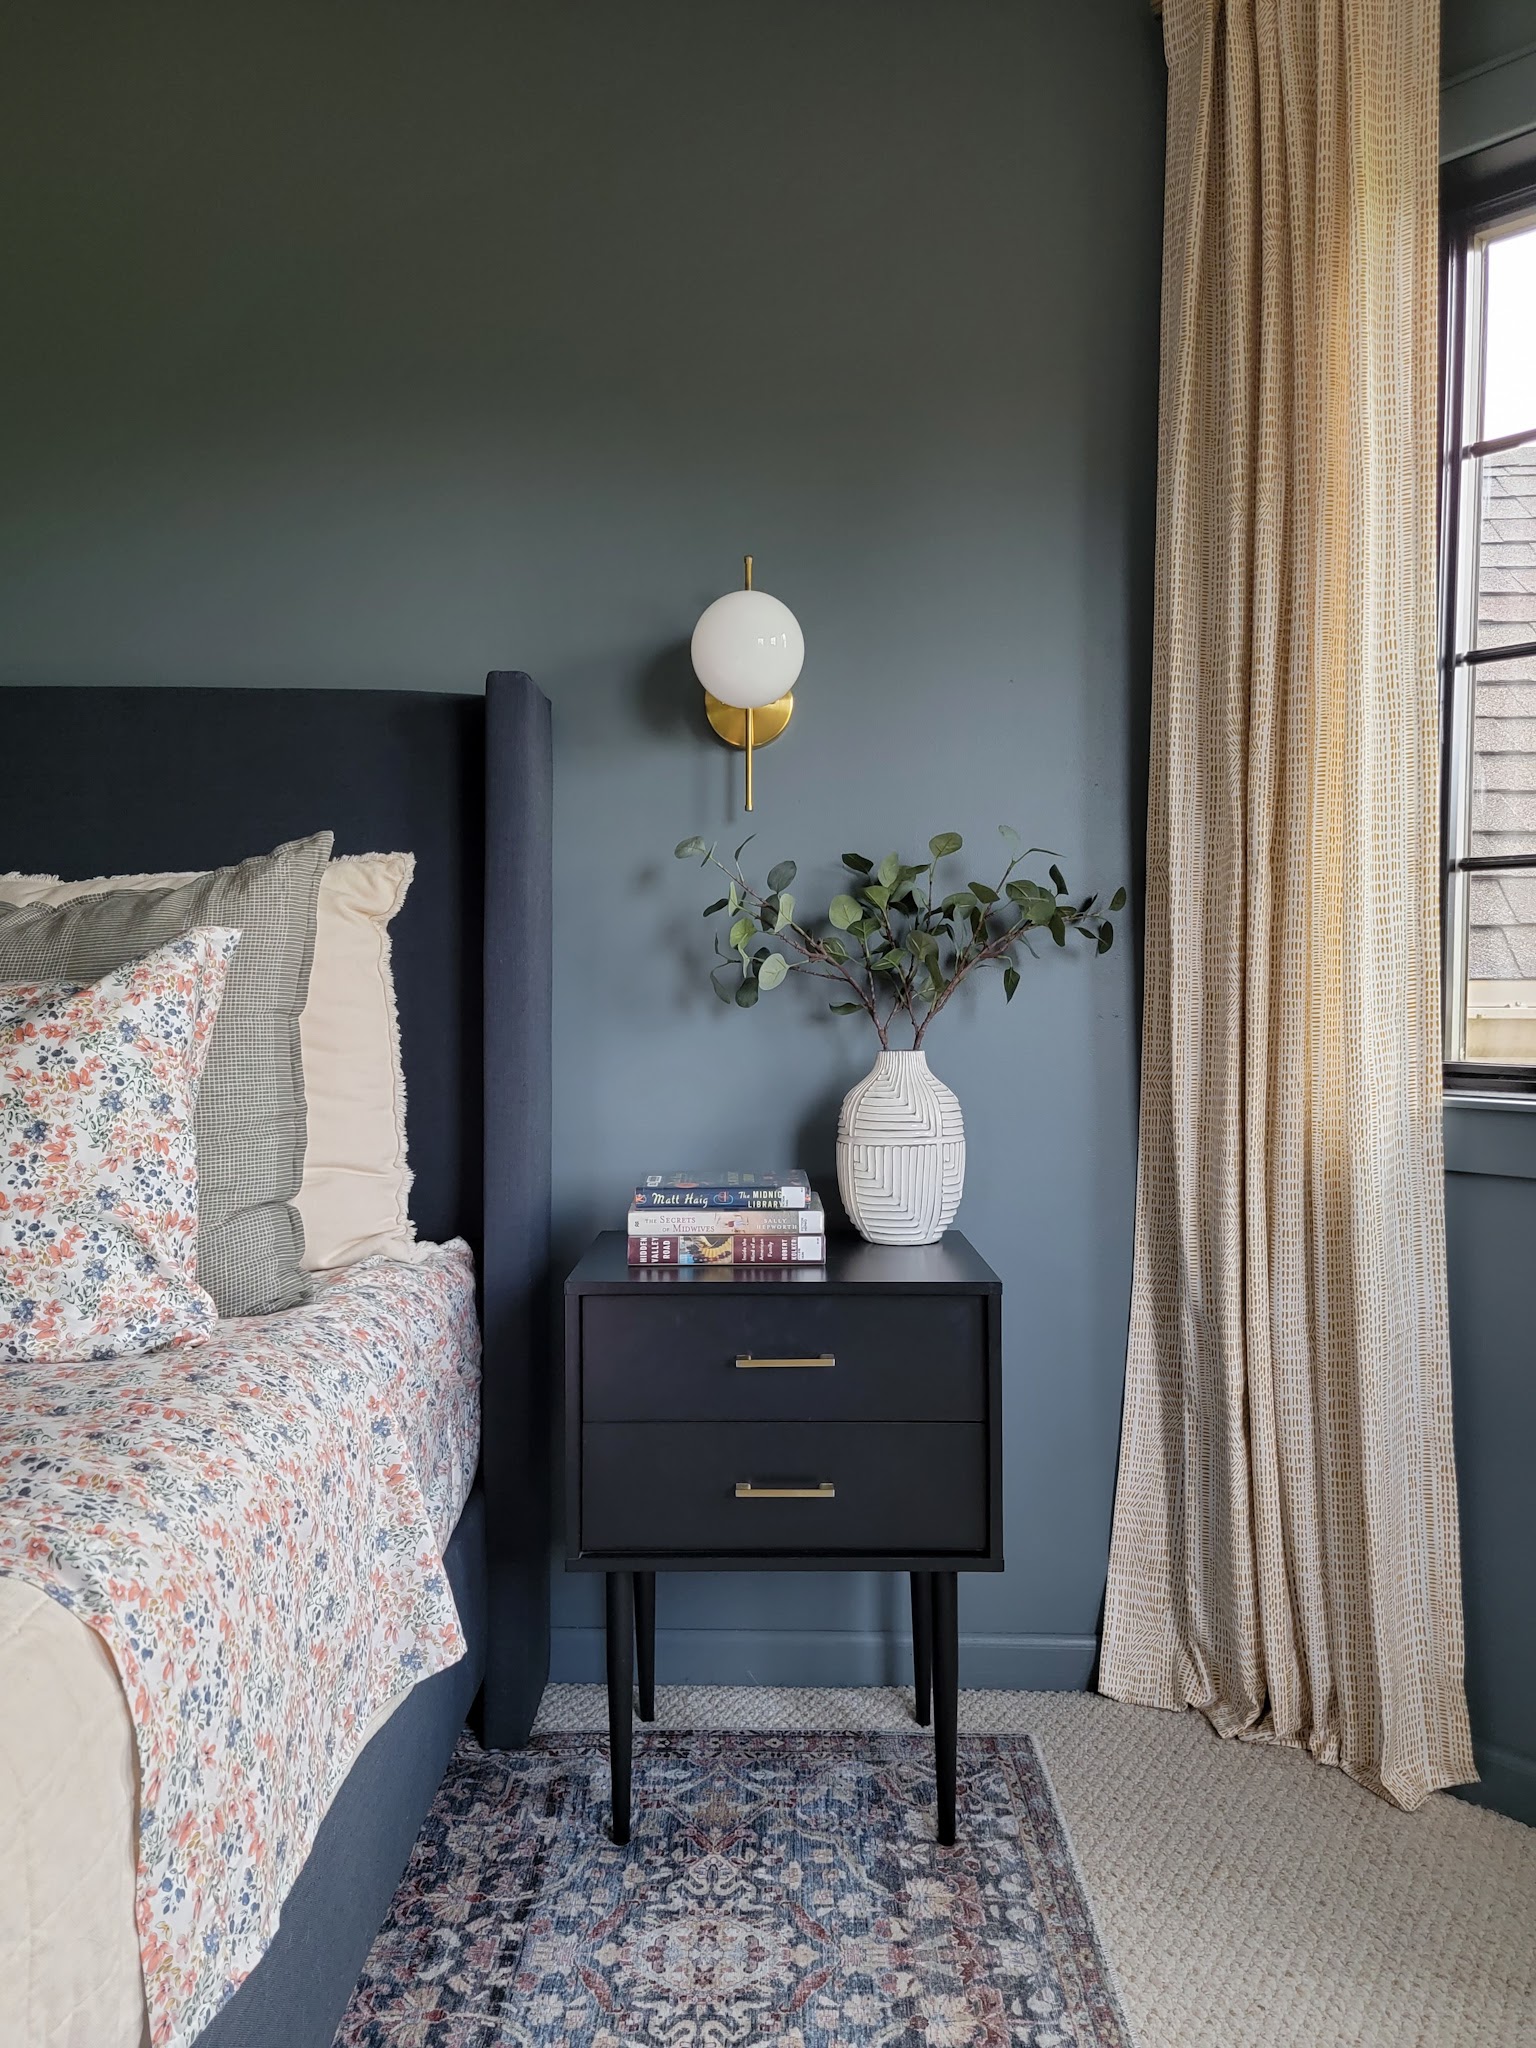
Throughout the past nine weeks, I painted the walls, baseboards, ceiling and windows. I also replaced the window casing with chunkier trim and updated the outlet and switch covers with wooden covers painted the same color as the wall. Justin and I hung new curtain rods and curtains, new smoke and carbon monoxide alarm, installed sconces, swapped our nightstands with the ones from our guest room, and of course, upgraded our bed, bedding, and rug.
I have realized something important about myself in this process. I understand the value of planning out a renovation ahead of time. The mood board I created at the beginning of the project was such a helpful guide for me in making decisions early on and to gather all my thoughts in one place. That being said, I realized that I also really like slow, thoughtful design decisions. I like to solidify a choice, see it in my space, and then finalize the next choice from there. This room started with the bed. I knew I wanted a platform bed in a deep, solid color. Once I had the bed in place, I could gather bedding ideas and a rug that would all coordinate well, and once I sat with those choices for a couple weeks, I found the curtains that worked perfectly to complete the look.
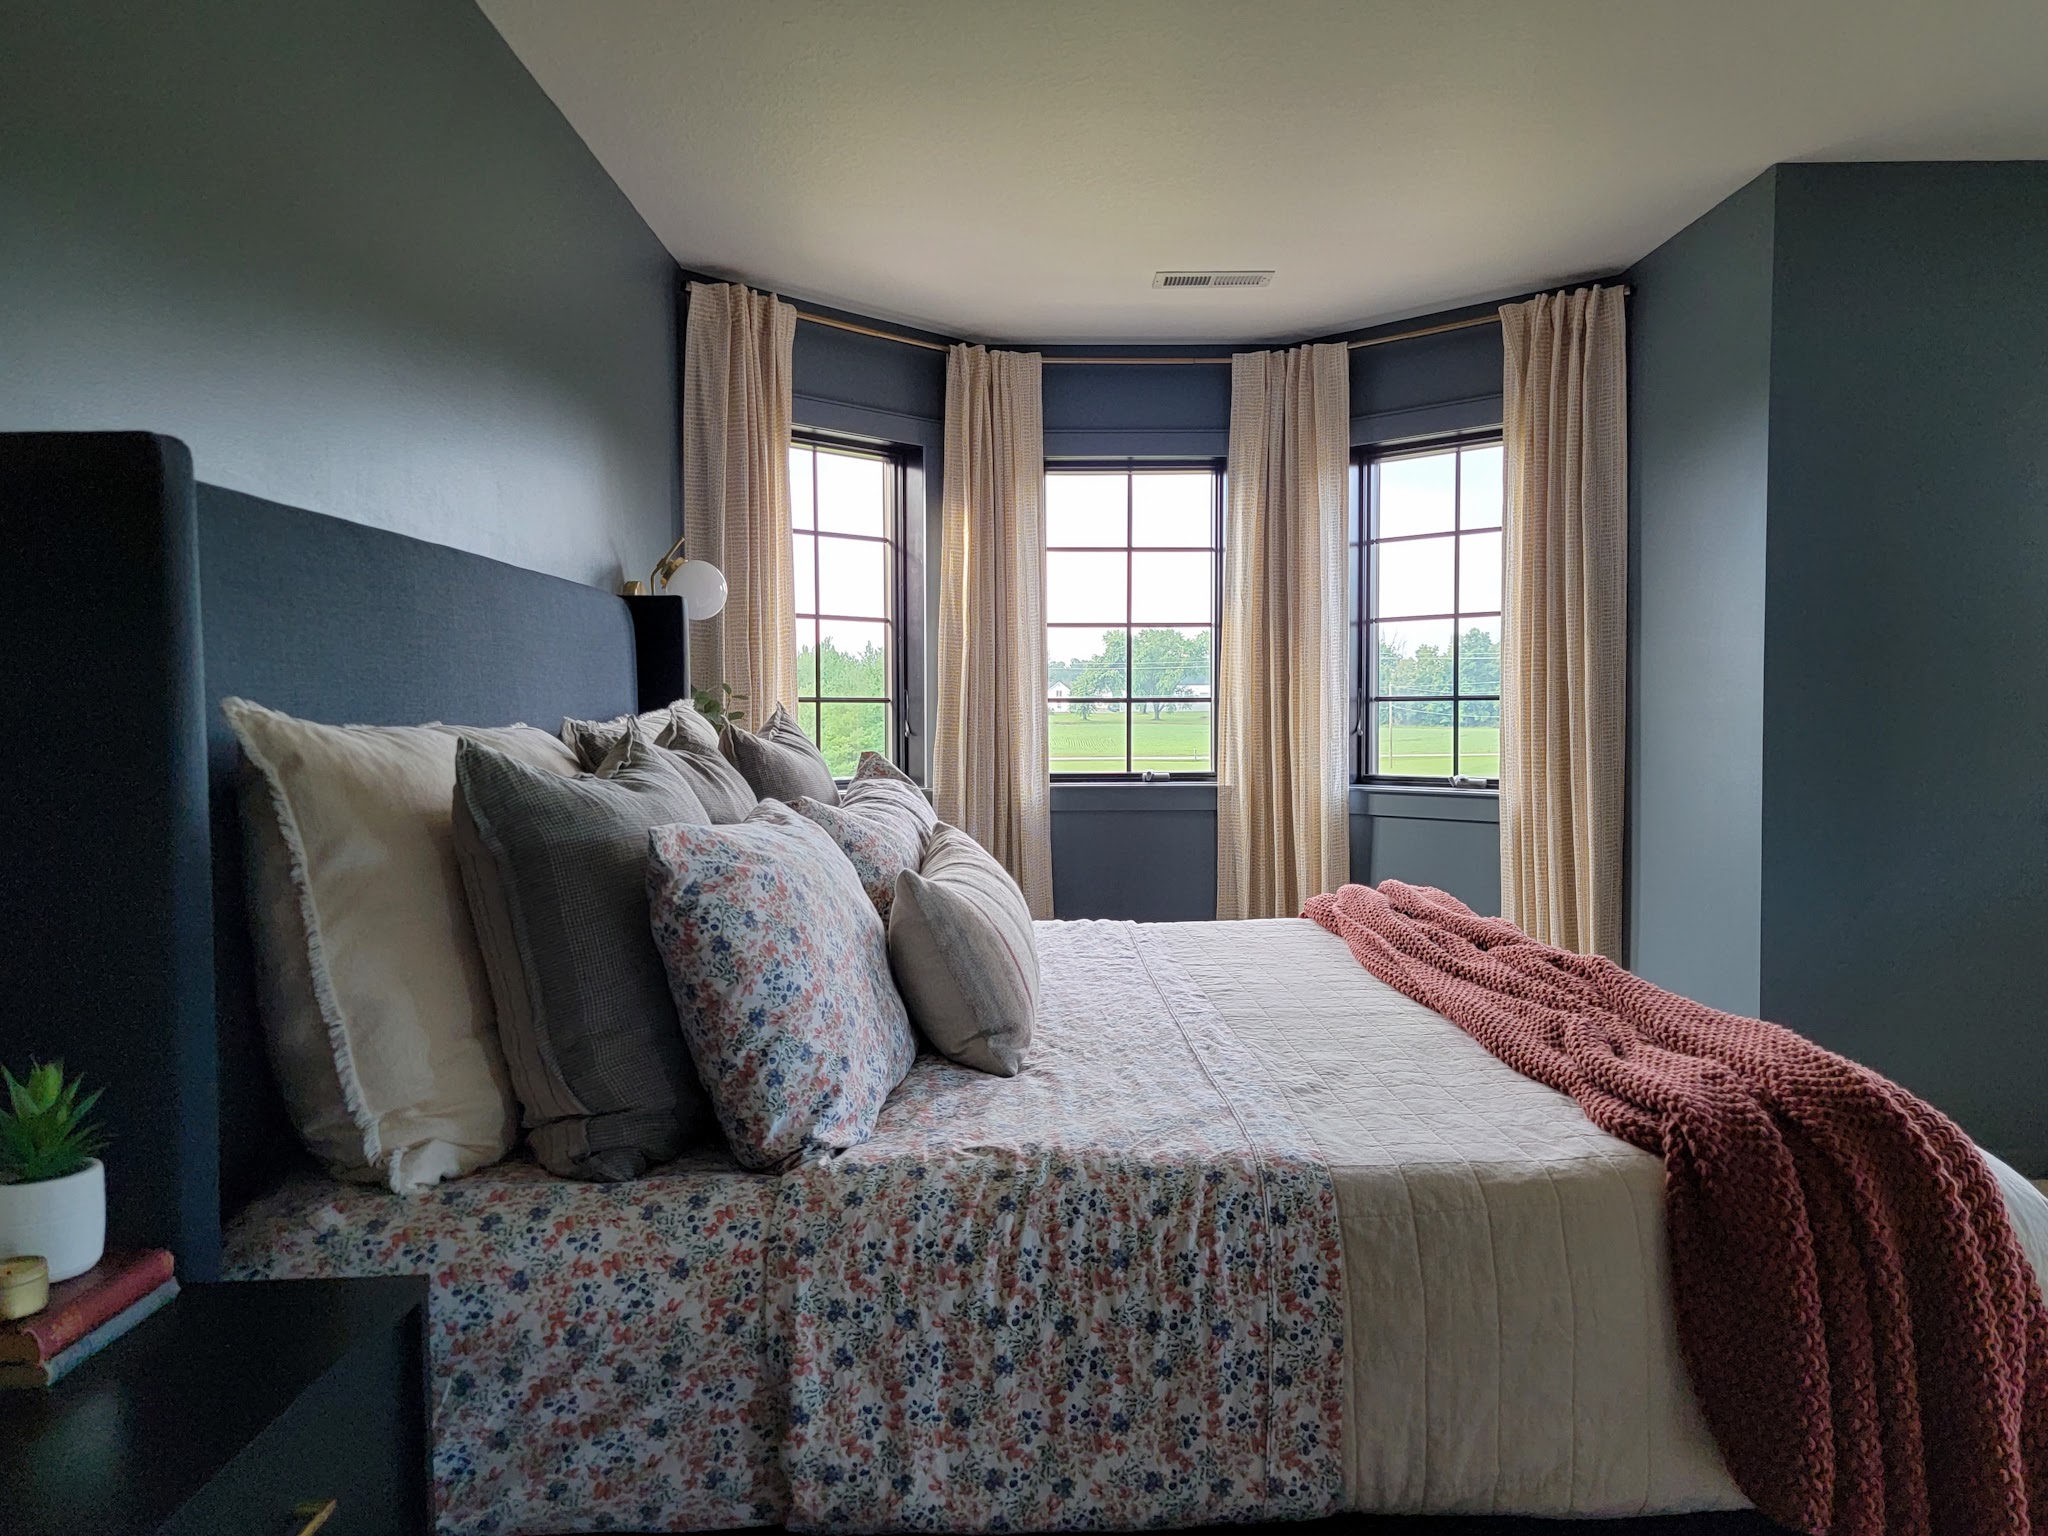
Looking back at my mood board, I stuck with a lot of materials and products that I first envisioned, but I’m glad I didn’t jump the gun and order everything at once in the beginning. Take the curtains for example – I originally envisioned a solid mustard color. As the renovation went on and everything came together, I realized with solid color walls (I did not do limewash as I originally planned), a solid color bedframe, and a solid color throw blanket, I needed more pattern! I wanted a subtle graphic pattern to balance out the bolder, more intricate pattern in the rug and I really wanted to stick with a mustard color. It was actually very hard to find affordable, in-stock, 96″ length curtains in a small, mustard-colored, graphic pattern that I actually liked, and I searched for weeks before finding these beauties (snagged on sale for under $50 a pair!)
I’m very glad I didn’t let the pressure of a “deadline” with the ORC rush my decision because I’m so so happy with the end result!
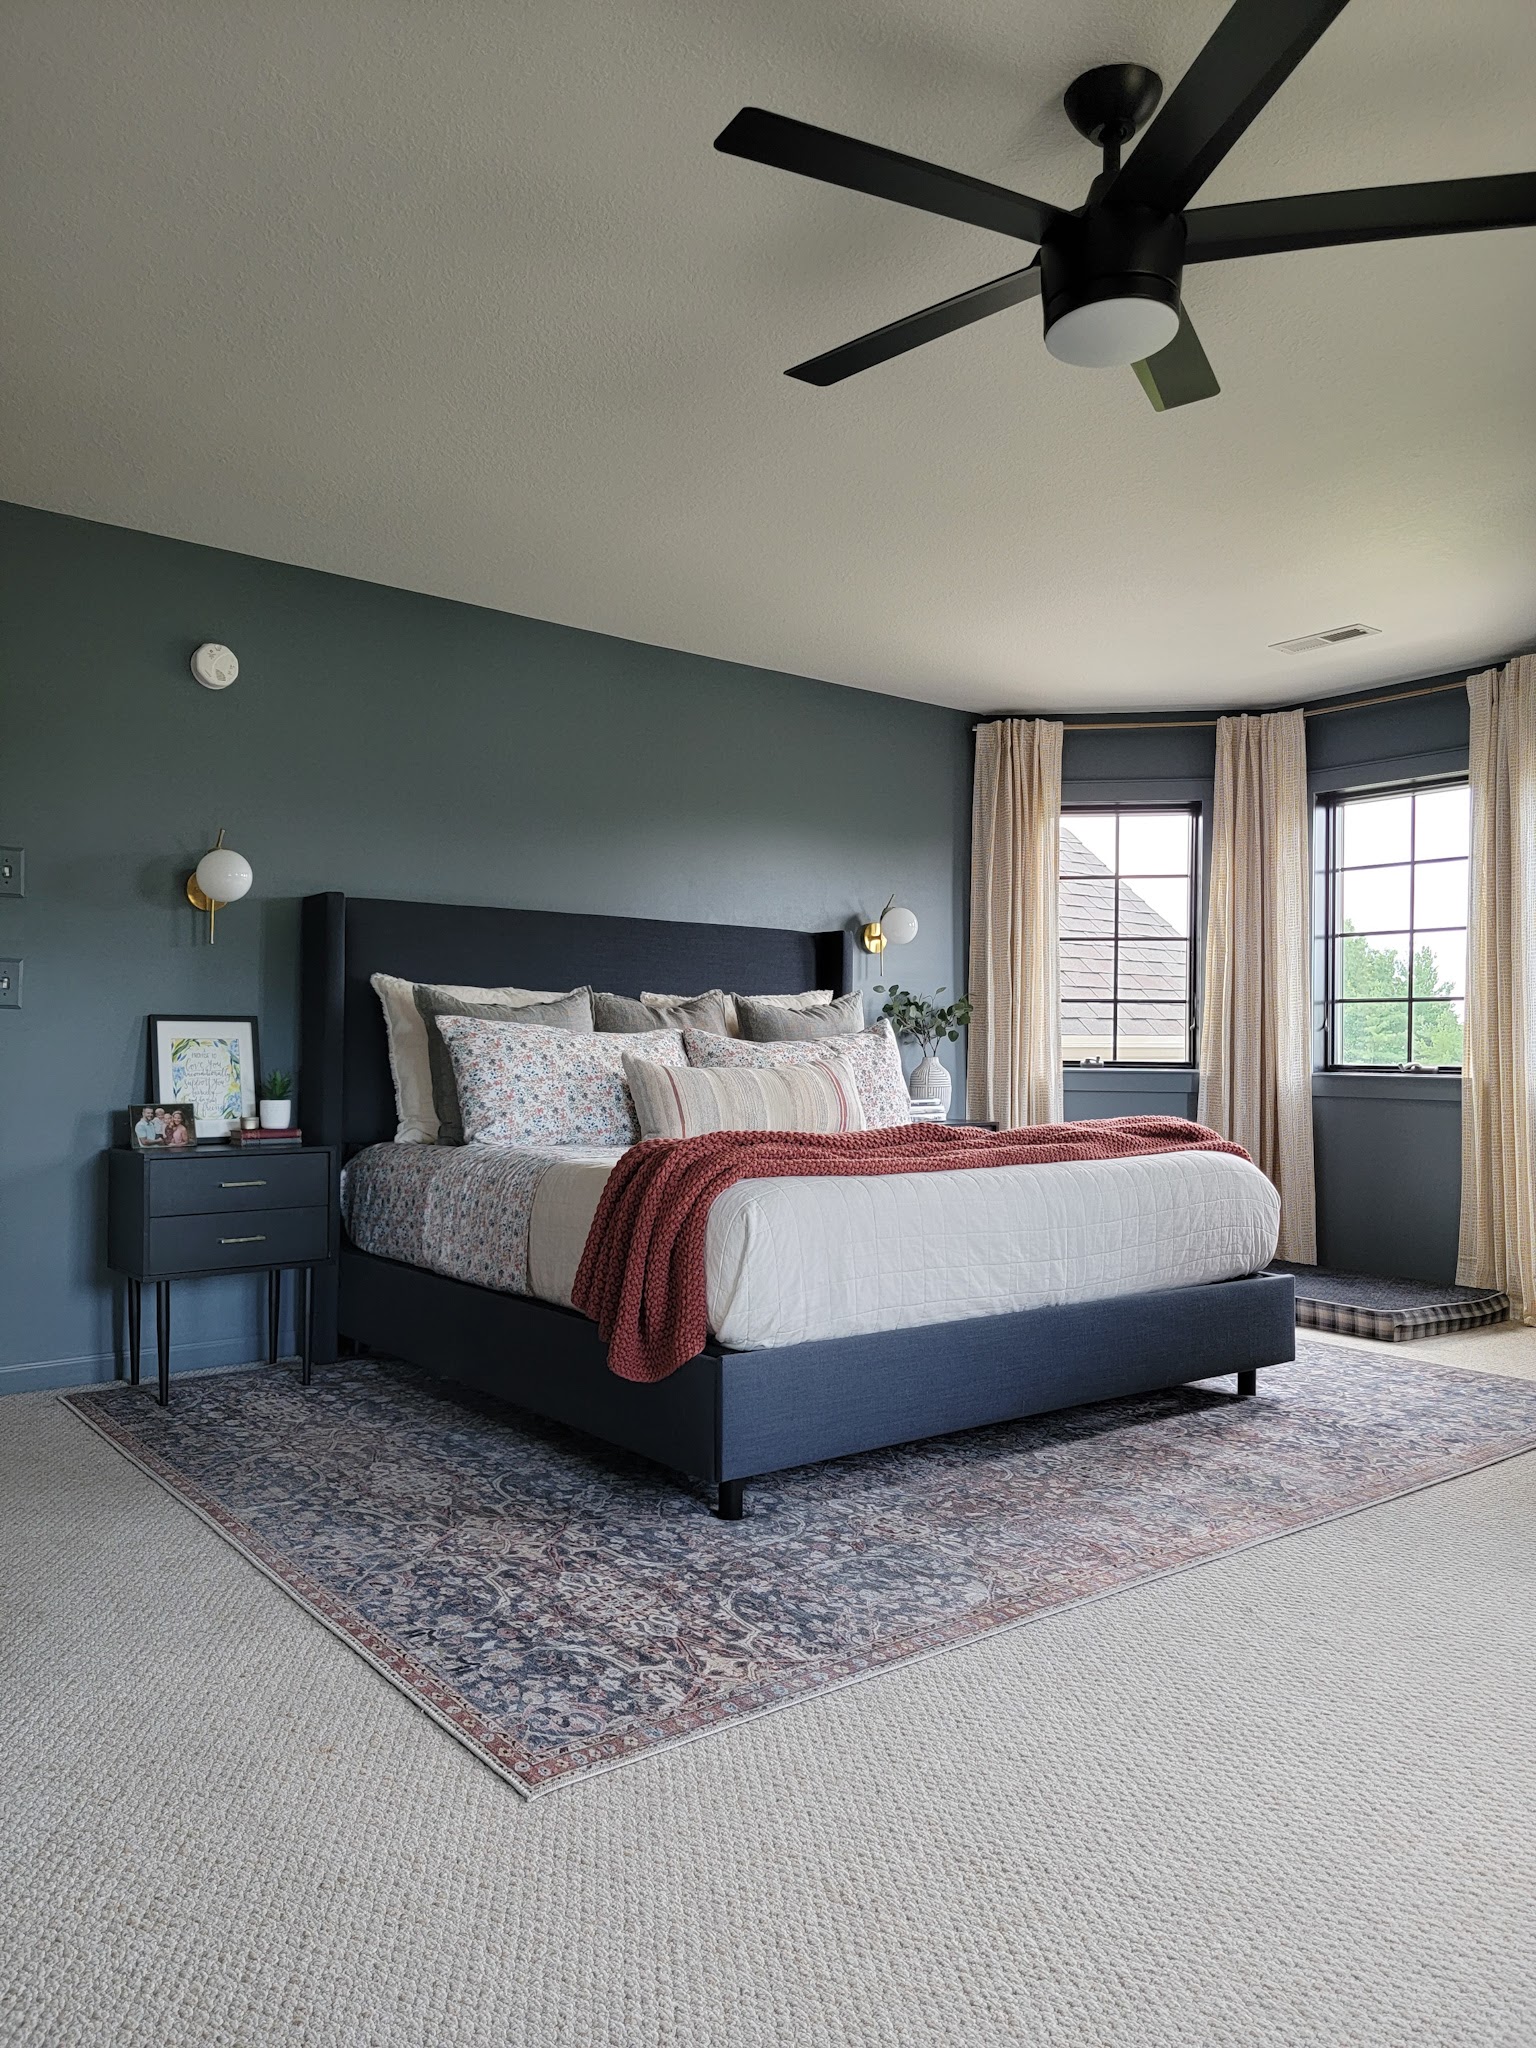
My goal when starting out with this space was to create a colorful, moody retreat. I wanted a place that felt relaxing for Justin and I – a little haven just for us away from the chaos of sharing a house with two toddlers and two dogs. The bedroom before was a functional, but boring blank slate. We are both so happy with how it feels now: a restful, soothing space just right for us.
Now that I’m finished with the “bed half,” I am ready to focus my energies on the other half of the room: the half that currently looks like this.
I have an Ikea dresser I plan to hack for this space, as well as add a little vanity table, more curtains, and possibly a different mirror. Again, I’m taking things a little slower and honing my vision one decision at a time! I can’t wait to see how it all comes together!
Another week of the One Room Challenge is complete and I’m very excited about the progress we’ve made!
Since last week, we’ve had a few elements added to the room that have made a big impact. First, our rug got delivered over the weekend and I am in LOVE.
This rug is from the new Chris Loves Julia x Loloi collection and I’m a big fan. The colors are amazing, the pattern is gorgeous, and the price cannot be beat (it’s pretty reasonable at full price but I managed to snag a 9 x 12 on sale for under $300 which was even better!)
Once I put the rug down, everything tied together instantly. The bedding and rug and bedframe just coordinate so well without feeling matchy-matchy. I love it so much!
The next big change was obviously the paint. I originally wanted to try out a limewash paint. Our bedroom is a very large room and I didn’t want to fill it with furniture and things on every wall, so the subtle interest that limewash brings to a space felt like the perfect way to create some movement throughout the room. I love this inspiration image!
I ordered some specialty paint chips and was narrowing down my color options when I realized that limewash is probably not going to be the right choice for right now. Justin and I plan to remodel the en suite bathroom in three years or so, and at that time we’ll be either expanding the bathroom or adding another closet which will cut into the bedroom. We’ll be adding a wall, which will change the shape of the room and likely lead to some shifting around of furniture. The problem with this is limewash doesn’t patch well. If we’re patching holes (likely moving sconces, etc) and adding walls, we’ll probably have to recoat the walls entirely. The paint is expensive and a little more labor-intensive so I’m going to wait until the room is reconfigured with the bathroom remodel and only limewash one time.
After debating and sampling nine different paint colors, I landed on Sherwin Williams Foggy Day in an eggshell finish. I love how it’s moody without making the room feel too dark and it gives a nice cozy let’s-stay-in-bed-all-day vibe. Perfect for a bedroom!
I also like that it plays off the colors in the bed frame, bedding, and rug. It feels like a monochromatic look with just enough contrast to stay interesting.
I will say it’s really hard to capture the color correctly on screen; the picture above makes it seem a little more vibrant blue with hints of teal where really it feels more like a blue gray in person. I’m going to play around with my camera settings to try to get a more accurate photo for next time.
I have a few more areas of the wall to paint and I also need to give the ceiling a fresh coat of white paint. Our sconces came in this past week so we need to hang them, and now that the paint is chosen I’m ready to pick curtains. Then it’ll be new baseboards and window trim and working on our dresser (if you’ve been following along in stories, you know I’m going to update an Ikea Hemnes dresser into my dream modern dresser). I’m not sure how much I’ll get done this next week because we’re actually leaving for vacation Sunday (looooooong-awaited!!!) but I still have three days left so hopefully we’ll make some more progress!
Be sure to check out all the other ORC participants here.
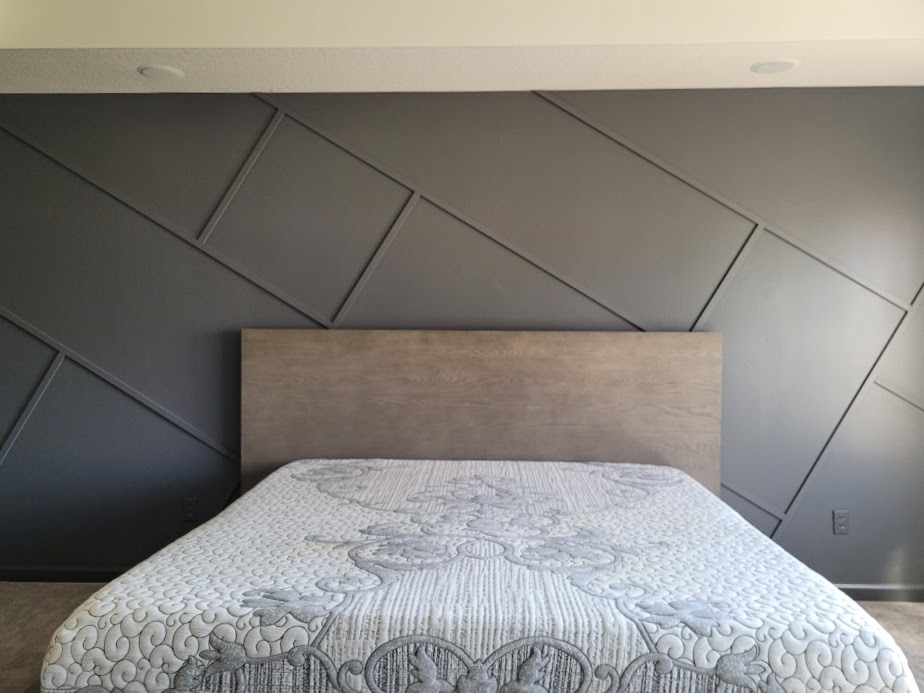
A friend of a friend reached out to me a couple weeks ago to ask if she could hire us to install a geometric accent wall in her main bedroom. They had already painted the walls in Sherwin Williams Peppercorn (a gorgeous moody gray!) but felt like the room needed a little something extra. She sent me an inspiration picture and after talking it over with Justin, we decided this sounded like a fun project to tackle together and agreed to do it.
This project took less than 24 hours, cost about $70 in materials, and was pretty easy to do. In other words, a quick, low-cost, relatively easy DIY project that was perfect for a Saturday!
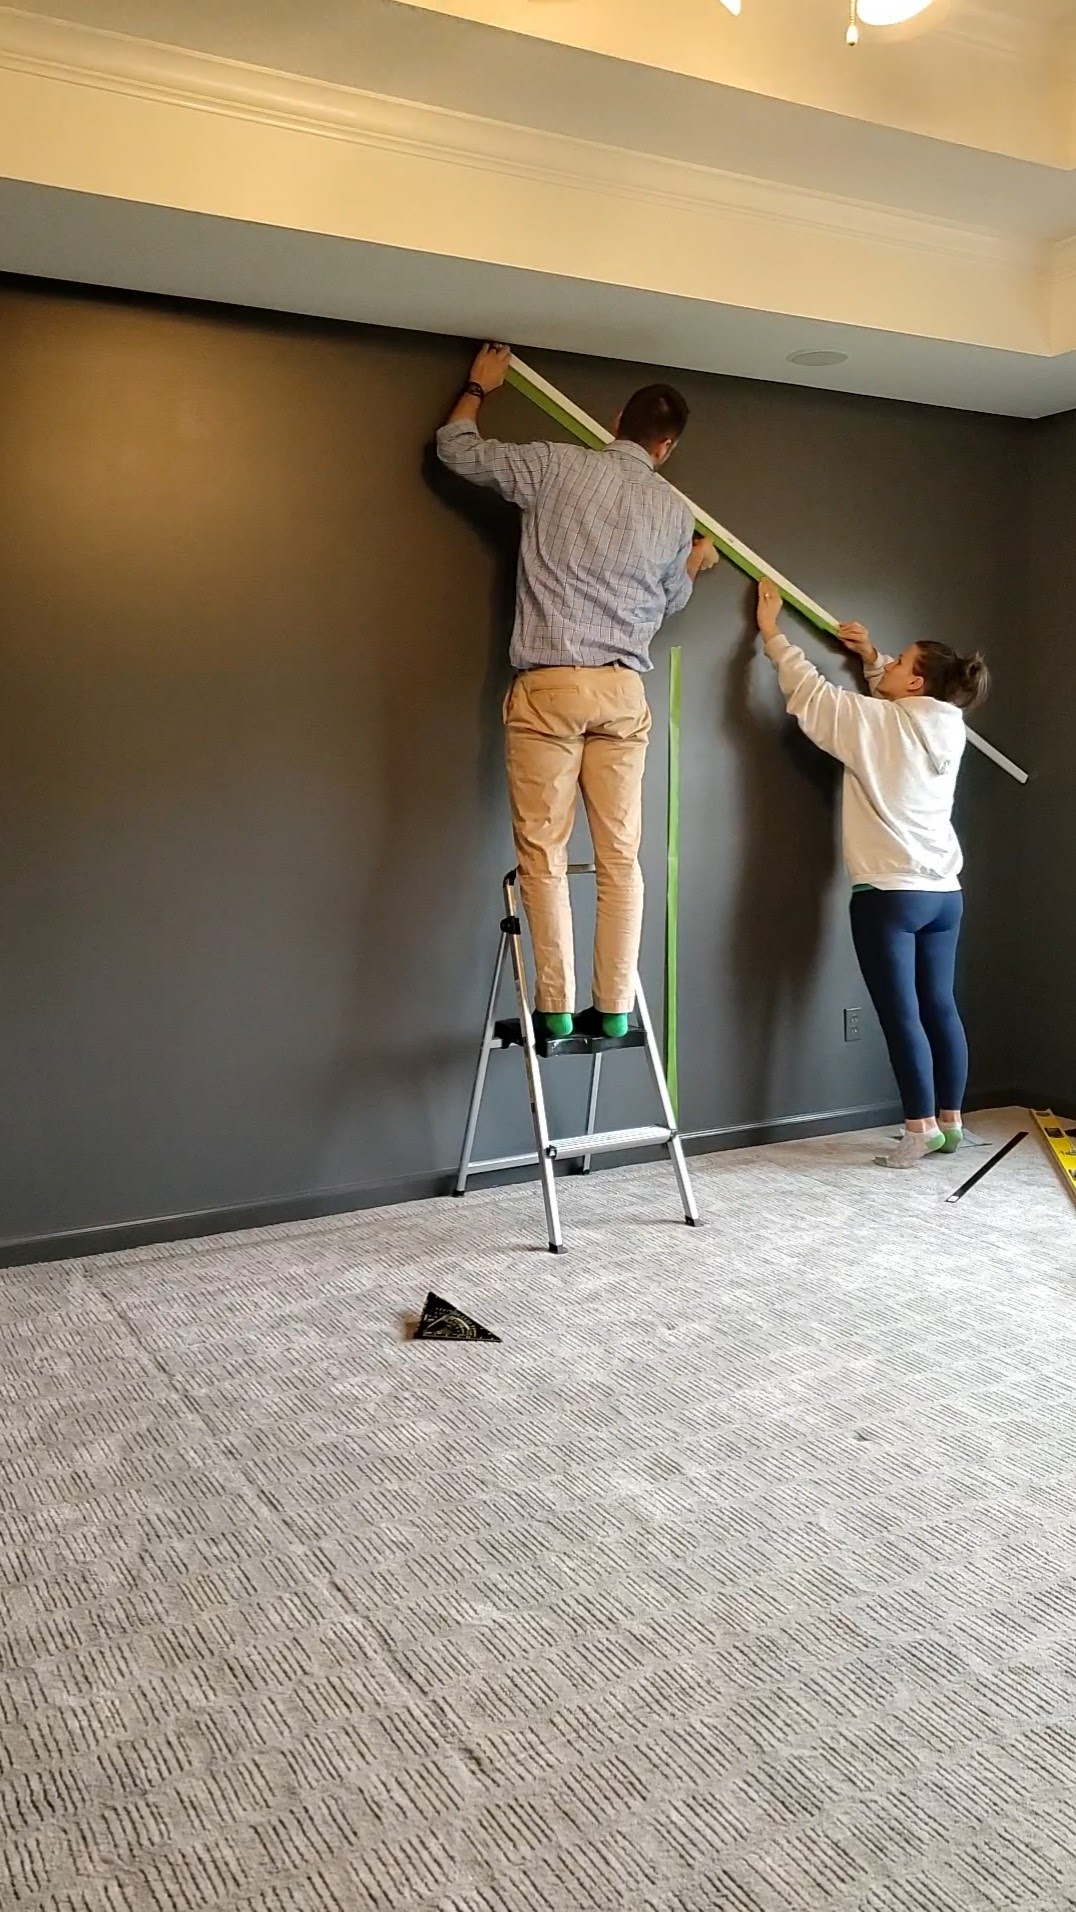
On Friday afternoon, Justin and I went over to map out the pattern using painters tape (I chose tape with a width of 1.41″ so it would closely mimic the size of the 1.5″ trim). This served two purposes: it gave the homeowners a chance to make sure they liked the pattern and also helped us know exactly how much trim we need to complete the project.
We chose to use this 1 1/2″ primed pine, which comes in 8 foot lengths, so we created the pattern in a way that ensured no section was longer than 8 feet. We wanted to keep things as simple as possible by sticking to 90, 60, and 30 degree angles and we used this square layout tool to help place the first few pieces. While this tool was helpful in giving us a starting point for placing trim at the correct angle, once the first few pieces were taped down we saved some time and effort and eyeballed the rest of the trim placement. If you want to make your pattern super precise you can absolutely measure the angles for each taped piece but since this was just a guideline for us, we weren’t worried about precision.
We used an 8 foot piece as a guide for figuring out where we wanted each piece of trim to go, then placed the tape right along the side of the board for a nice straight line.
We started on the far right side of the room and created a triangle using the top right corner of the wall as the 90 degree angle, then built out the pattern from there.
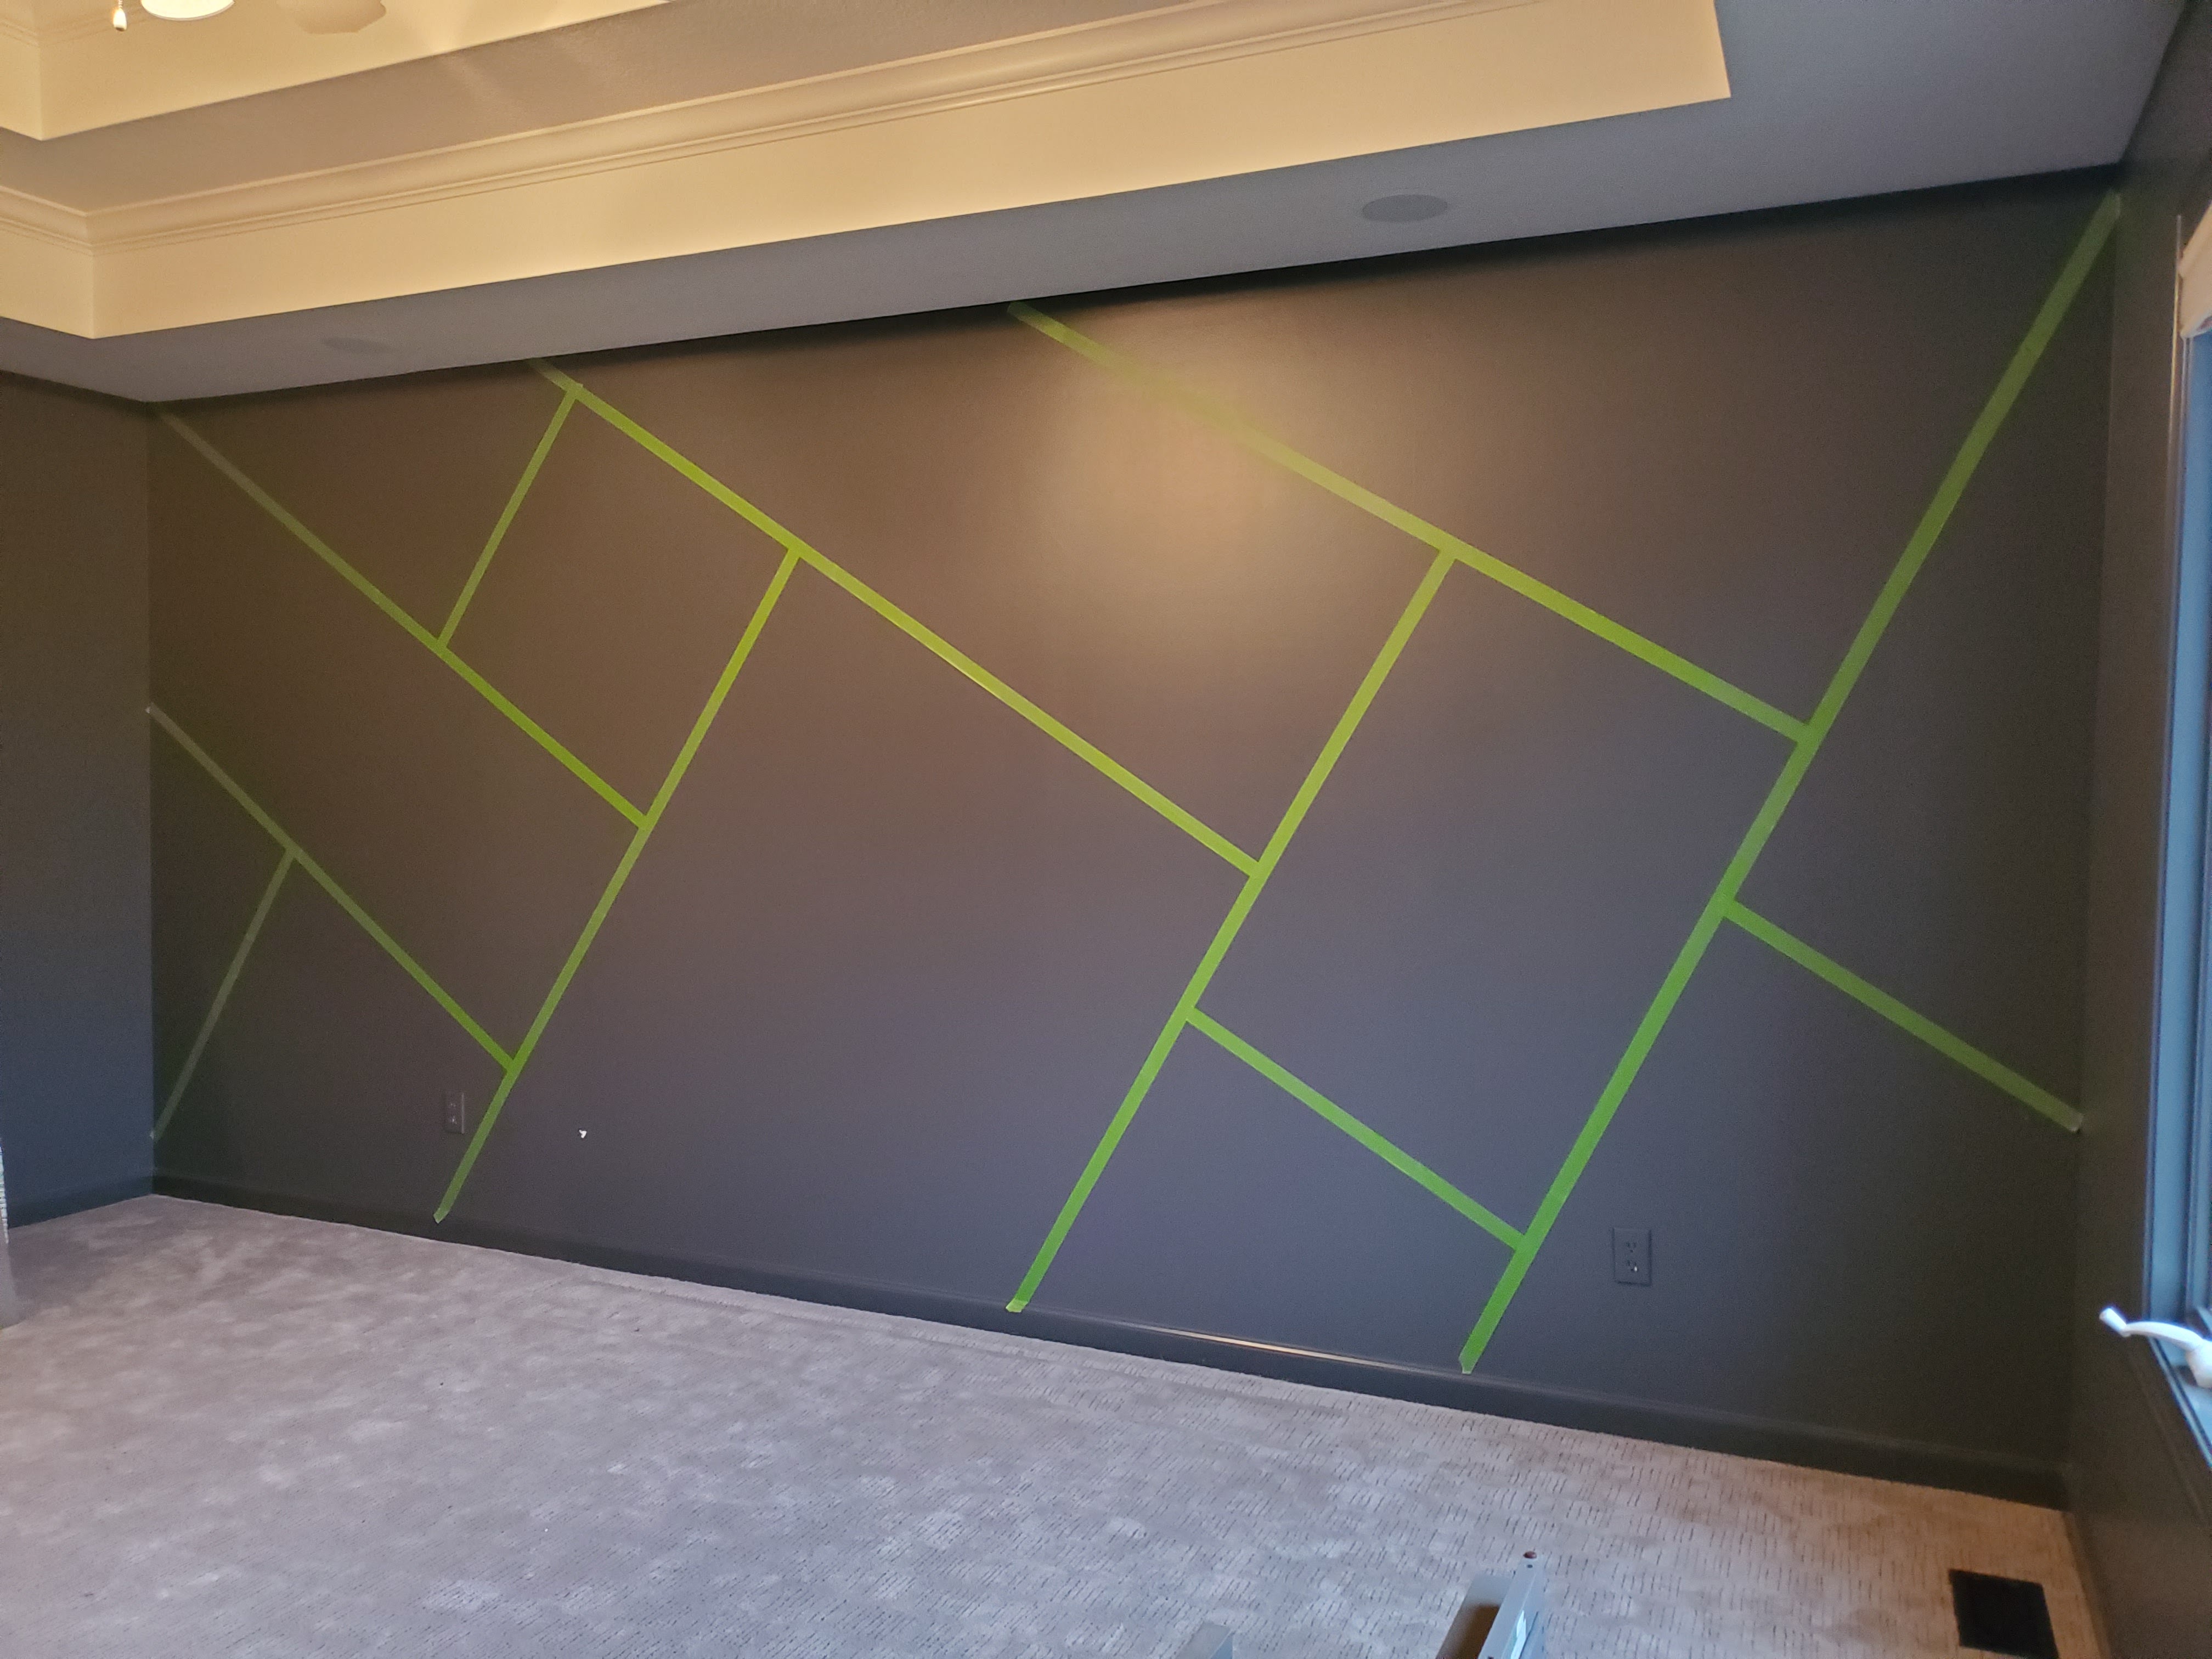
Once the whole pattern was up on the wall, we got the homeowners’ approval and made a couple changes at their request. I wanted them to sit with it overnight so they had a chance to make sure they were totally happy with the pattern before we started since tape is way easier to change than installed trim.
At home that night, I used a six inch foam roller to paint two coats of Sherwin Williams Peppercorn in eggshell finish on the trim pieces and let them cure overnight.
On Saturday morning we loaded everything up and headed over to their house to install. We began with the long piece of trim stretching from the right corner of the wall to the baseboards. We knew this piece of trim would create a right triangle with the right wall and baseboard which made figuring out the angles pretty easy. I made a lovely diagram to help you visualize what I’m talking about 😉
We knew the length of this trim was just shy of 8 feet, so Justin used his miter saw to trim what would be the “top” end at a 30 degree angle and the “bottom” end to a 60 degree angle, making sure the angles were pointed in the correct directions to line up with the wall and baseboard.
The tape was just a guideline so we were not stressed about lining things up exactly. Once both ends of the trim were cut to the correct angle, we just placed the trim flush against both the corner of the walls and the baseboard and Justin used his nail gun to attach it to the wall. It didn’t end up exactly where our taped line was, but it was pretty close!
We wanted as few nail holes as possible, so I used a stud finder to locate all the studs in the wall and placed a small piece of tape over each one so Justin could nail directly into studs for a secure hold with minimal nails.
We decided to install all the longest boards first and then go back and fill in with the shorter pieces of trim. We worked our way across the wall from right to left, building off of each board we installed. The picture below gives you a good idea of the “in progress” part – we removed the corresponding piece of tape prior to installing each piece of trim and rolled back the intersecting pieces so that they wouldn’t get in the way of install.
Installation wasn’t hard once you understood the general math we were working with. I’ll walk you through our process as we installed trim where the far right green tape is marking in the picture below.
We had already installed the longer trim it would intersect with, and that installed trim made a triangle with the wall and taped line as shown in my lovely drawing below.
We knew we had cut the top angle of the long trim at 30 degrees. We wanted the short trim piece to intersect with the long trim piece at a 90 degree angle. That left one angle, “x”, to figure out. The sum of the angles of a triangle is 180 degrees. 90+30=120, meaning the last angle would be 60 degrees. (It’s worth noting that we didn’t actually do calculations every time – we used 30, 60, and 90 degree angles for the entire wall so determining angles was easy!)
Justin used his miter saw to cut one end of a piece of trim to 60 degrees, intentionally keeping it longer than we needed.
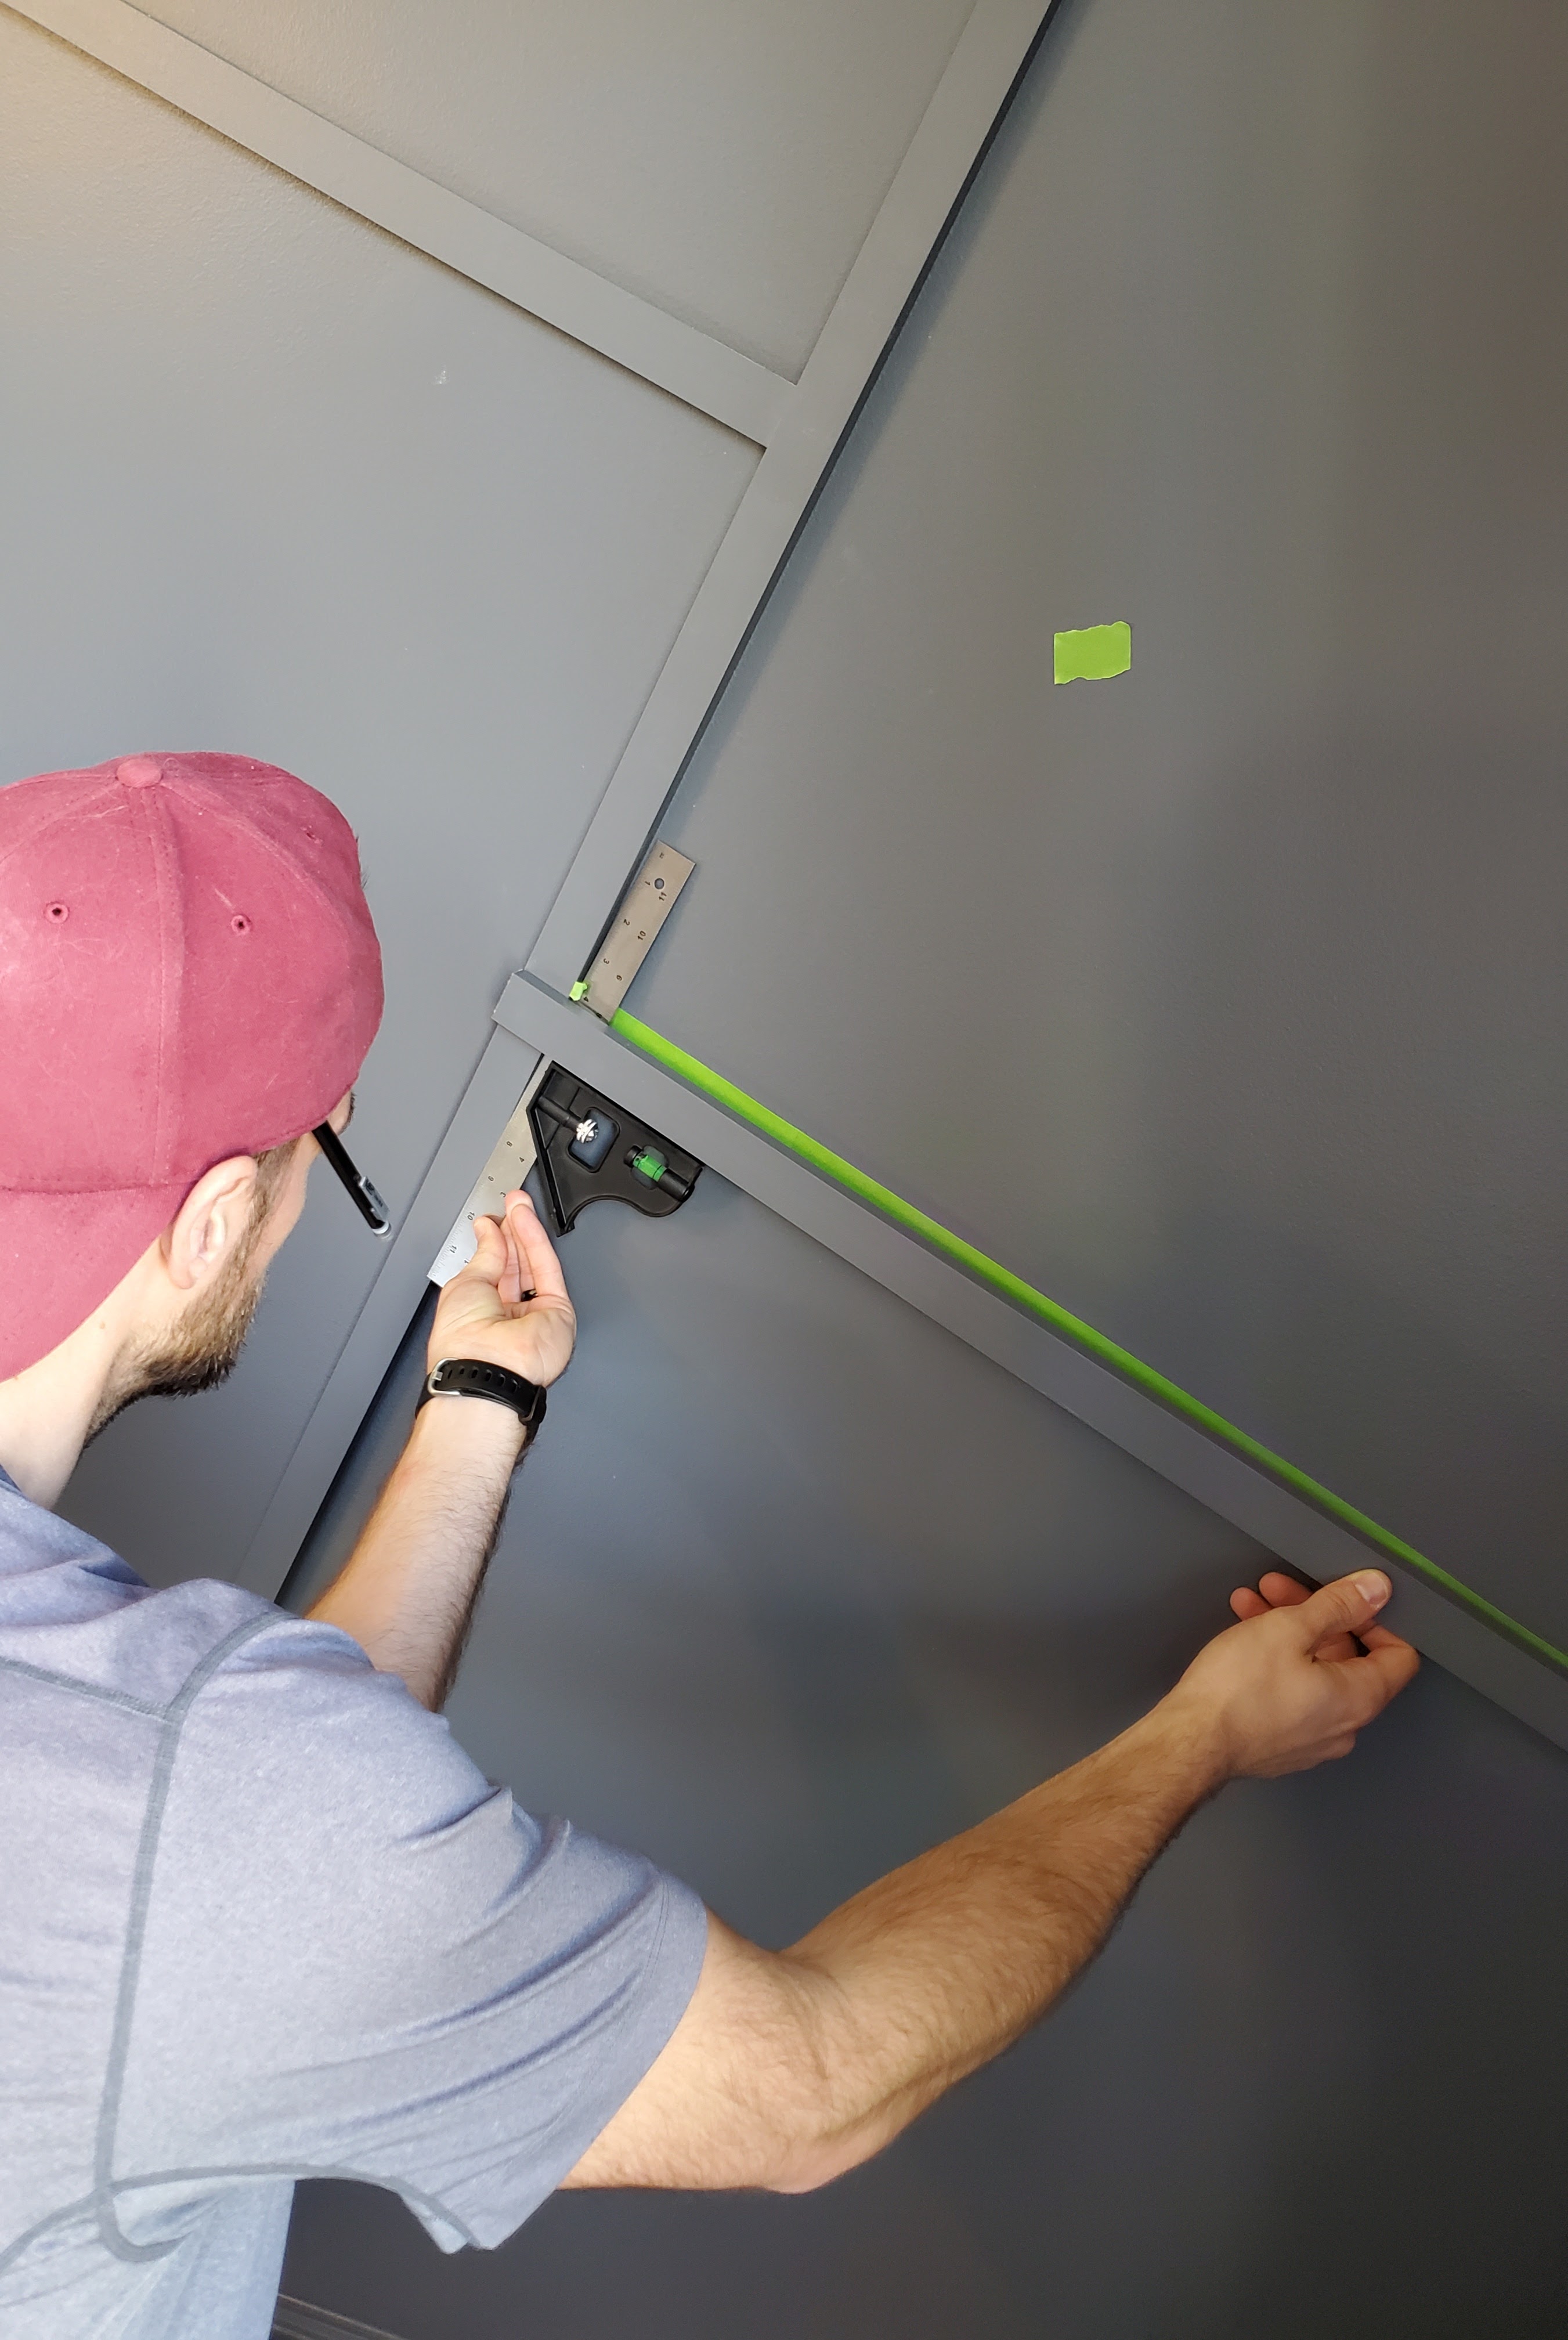
He brought the trim back inside, placed the angled cut flush against the wall, and then used the combination square to ensure the new trim was intersecting the installed trim at a perfect 90 degree angle.
Once the trim was at the correct angle, he marked it right where it intersected the installed trim and cut it right on that line.
Once the length was cut at a straight angle, it fit perfectly in the intended space and Justin nailed it into the wall. That’s the general process we used with each piece of trim, although sometimes instead of a wall being one side of the ‘triangle,’ it was the ceiling or baseboard or another piece of trim.
While Justin focused on cutting down and installing the trim pieces, I visually checked each piece prior to install to make sure the pattern continued to look uniform.
I also followed behind him to fill in all the nail holes using this spackling.
I like using this product because it goes on pink and turns white as it dries. Usually I’ll just lightly sand it with my finger, but this time I put the spackling on a little thicker than normal. I waited until it was completely dry, then lightly sanded it smooth, first with a 220 grit sandpaper and then with a 440 grit sandpaper. I used a little piece of painters tape to create a shelf underneath each patched hole prior to sanding so the tape would catch a good amount of the dust from sanding.
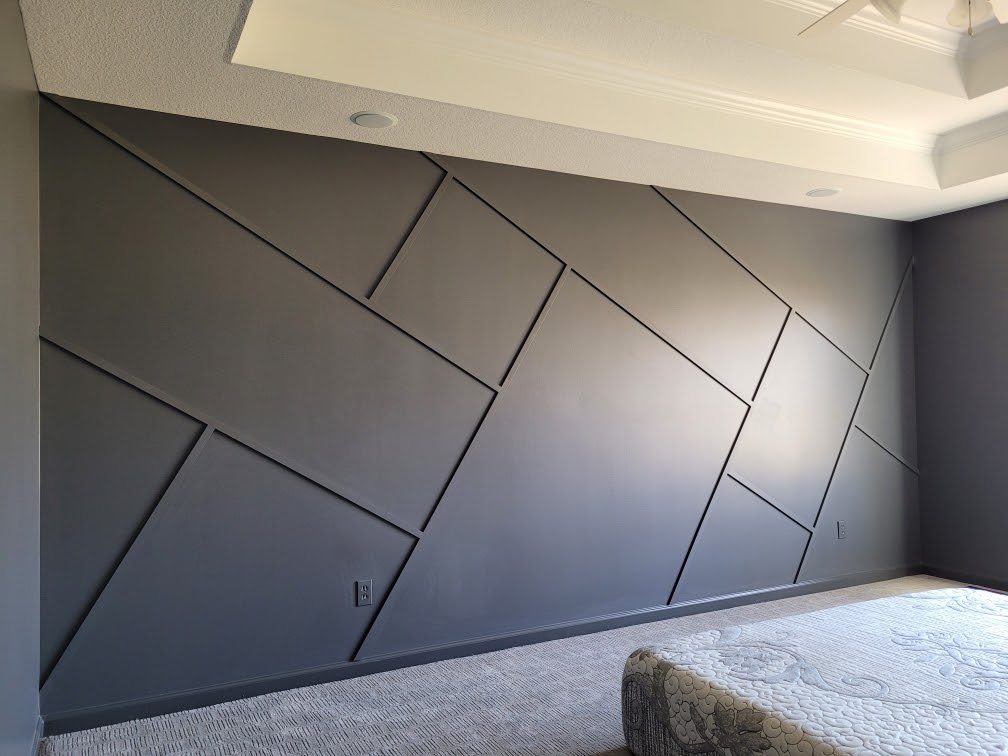
I had thought we’d need to caulk each piece, but we ended up really liking the crisp lines that the trim created on the wall. Plus, the fact that Justin was nailing into studs as often as possible meant there was a nice tight fit with almost no gaps. I did caulk a couple places between the trim and the far walls where there was a little bit more of a gap. After all the holes were sanded and the caulk dried, I used my foam roller to do a quick once over on the whole thing.
And with that – we were done!
The new bed the homeowners chose was really heavy, so we offered to help them put it together before we left. It looks so awesome up against the wall!
We started taping out the pattern around 5:00 pm on Friday, and we were totally finished with the wall by 2:30 pm on Saturday. Quick, easy, low-cost, but big impact – I’m so glad we decided to take on this project!