Plans to Refresh our Outdoor Space

Justin and I have always loved to entertain, and having a home that worked for hosting friends and family was a big priority for us when we were house shopping. A big part of the reason we fell in love with our current home was the large entertaining space in our basement, which leads to a walk-out patio and pond – our main hangout spot in the summer! It’s been so fun to host friends and family all throughout the year, but we especially love the warm weather months and taking advantage of our outdoor space.

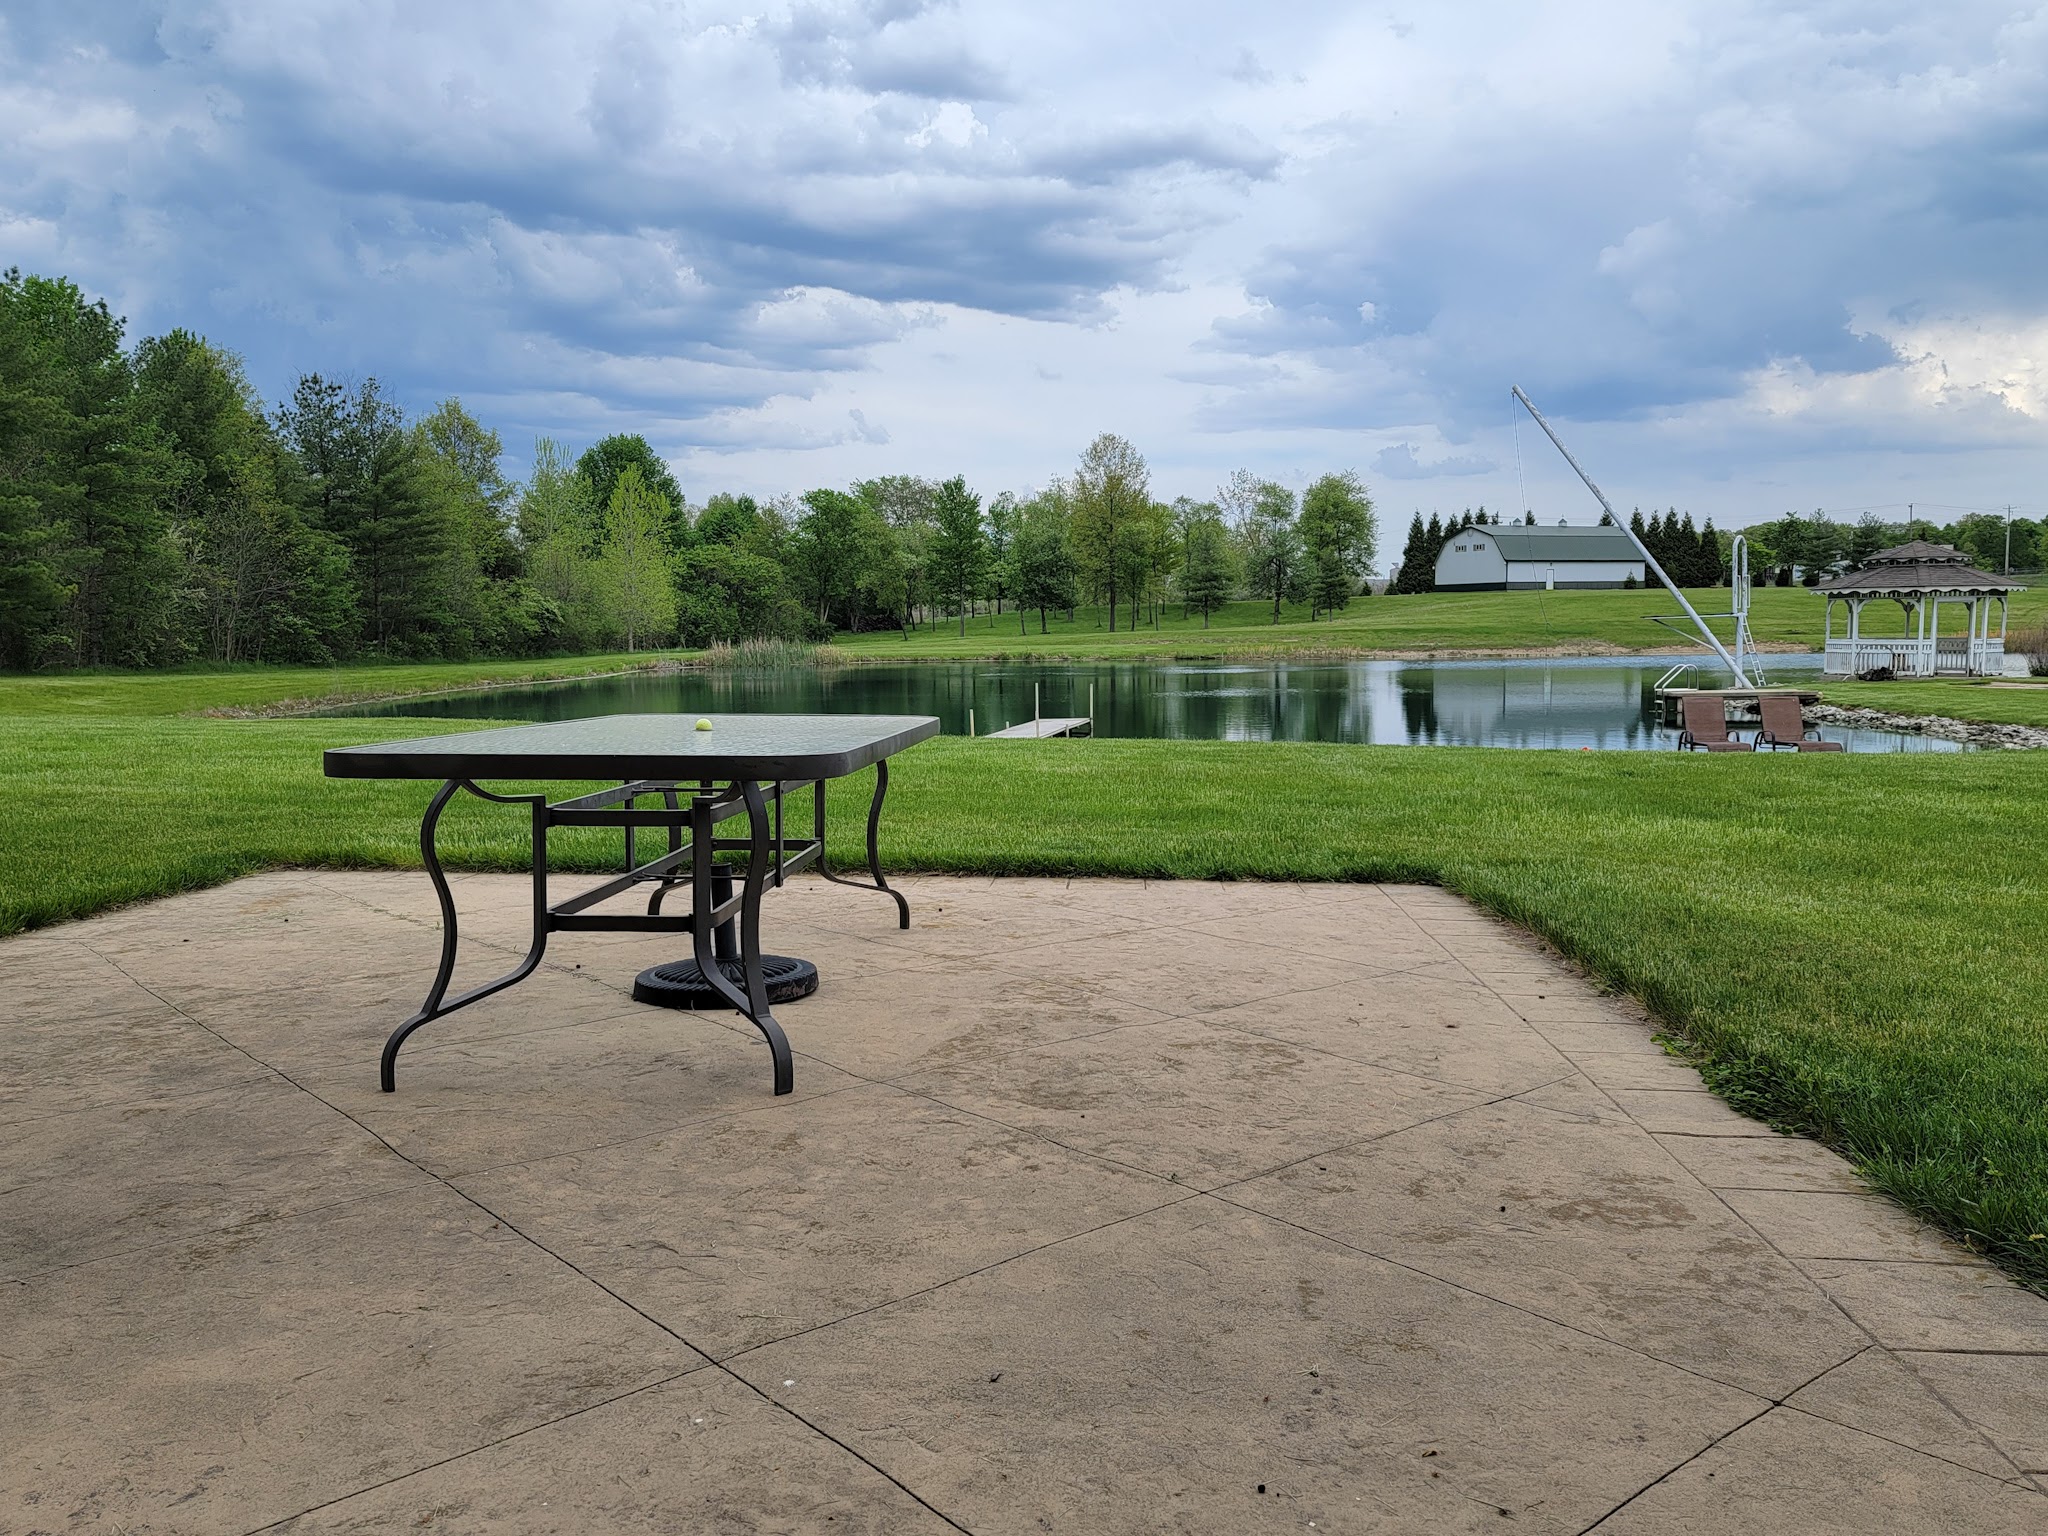
This year, we’ve been slow to get our patio set up but this weekend we finally have some time and I’m itching to start getting things set up. In the past, we’ve just set up a patio table and chairs (which we snagged off Craigslist six years ago) and a small sectional. There is also a small wooden deck down by the pond where we have two lounge chairs next to the sandy beach area. We have plans for a full revamp of our outdoor space in the future, but for this year we’re focused on small, manageable steps to refresh things and make it feel a little more special.

I think it’s important to note that we don’t subscribe to the notion that things have to be perfect to host. We’ve had countless gatherings at our house prior to this – things haven’t looked perfect and our patio hasn’t been 100% the way we’ve wanted but we still invited people over and made some amazing memories. We even just had people over last night despite the fact that our sectional is still not even set up. While we’re excited to make some changes to the space, we’ve also enjoyed this area every step along the way!

That being said, here are some things we hope to do as soon as possible:

Add sand to beach area

Our beach area was looking pretty washed out, so Justin already spent a Saturday getting a couple truckloads of new sand for the beach area.

We were both impressed with how much that improved both the feel of the beach and our kids’ overall enjoyment of it. We also didn’t realize how inexpensive sand is, particularly if you are willing to pick it up and haul it yourself. We’re likely going to get another truckload or two to add a bit more to the beach and the shallowest end of the pond.

DIY an Umbrella Stand for the Deck

There’s a small wooden deck right next to the beach where we have two lounge chairs. There are a few warped boards on the edge I’d like to fix if we can, and I’d also like to add some shade.

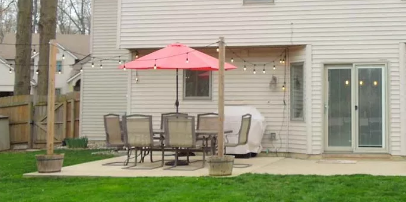
I don’t want a permanent canopy, because sometimes we want sun, but I want the option for shade when needed. I bought an umbrella a few days ago and Justin dug out an old umbrella stand the previous owners left behind in our shed. It was SO nice to have shade – Vi even fell asleep two days in a row in the shade while LJ kept swimming and playing! – but the umbrella stand was not sturdy enough to withstand the wind. As you can see in the corner of the picture, we had to weigh it down with some rocks and even then, I had to hold on to it when the wind picked up.

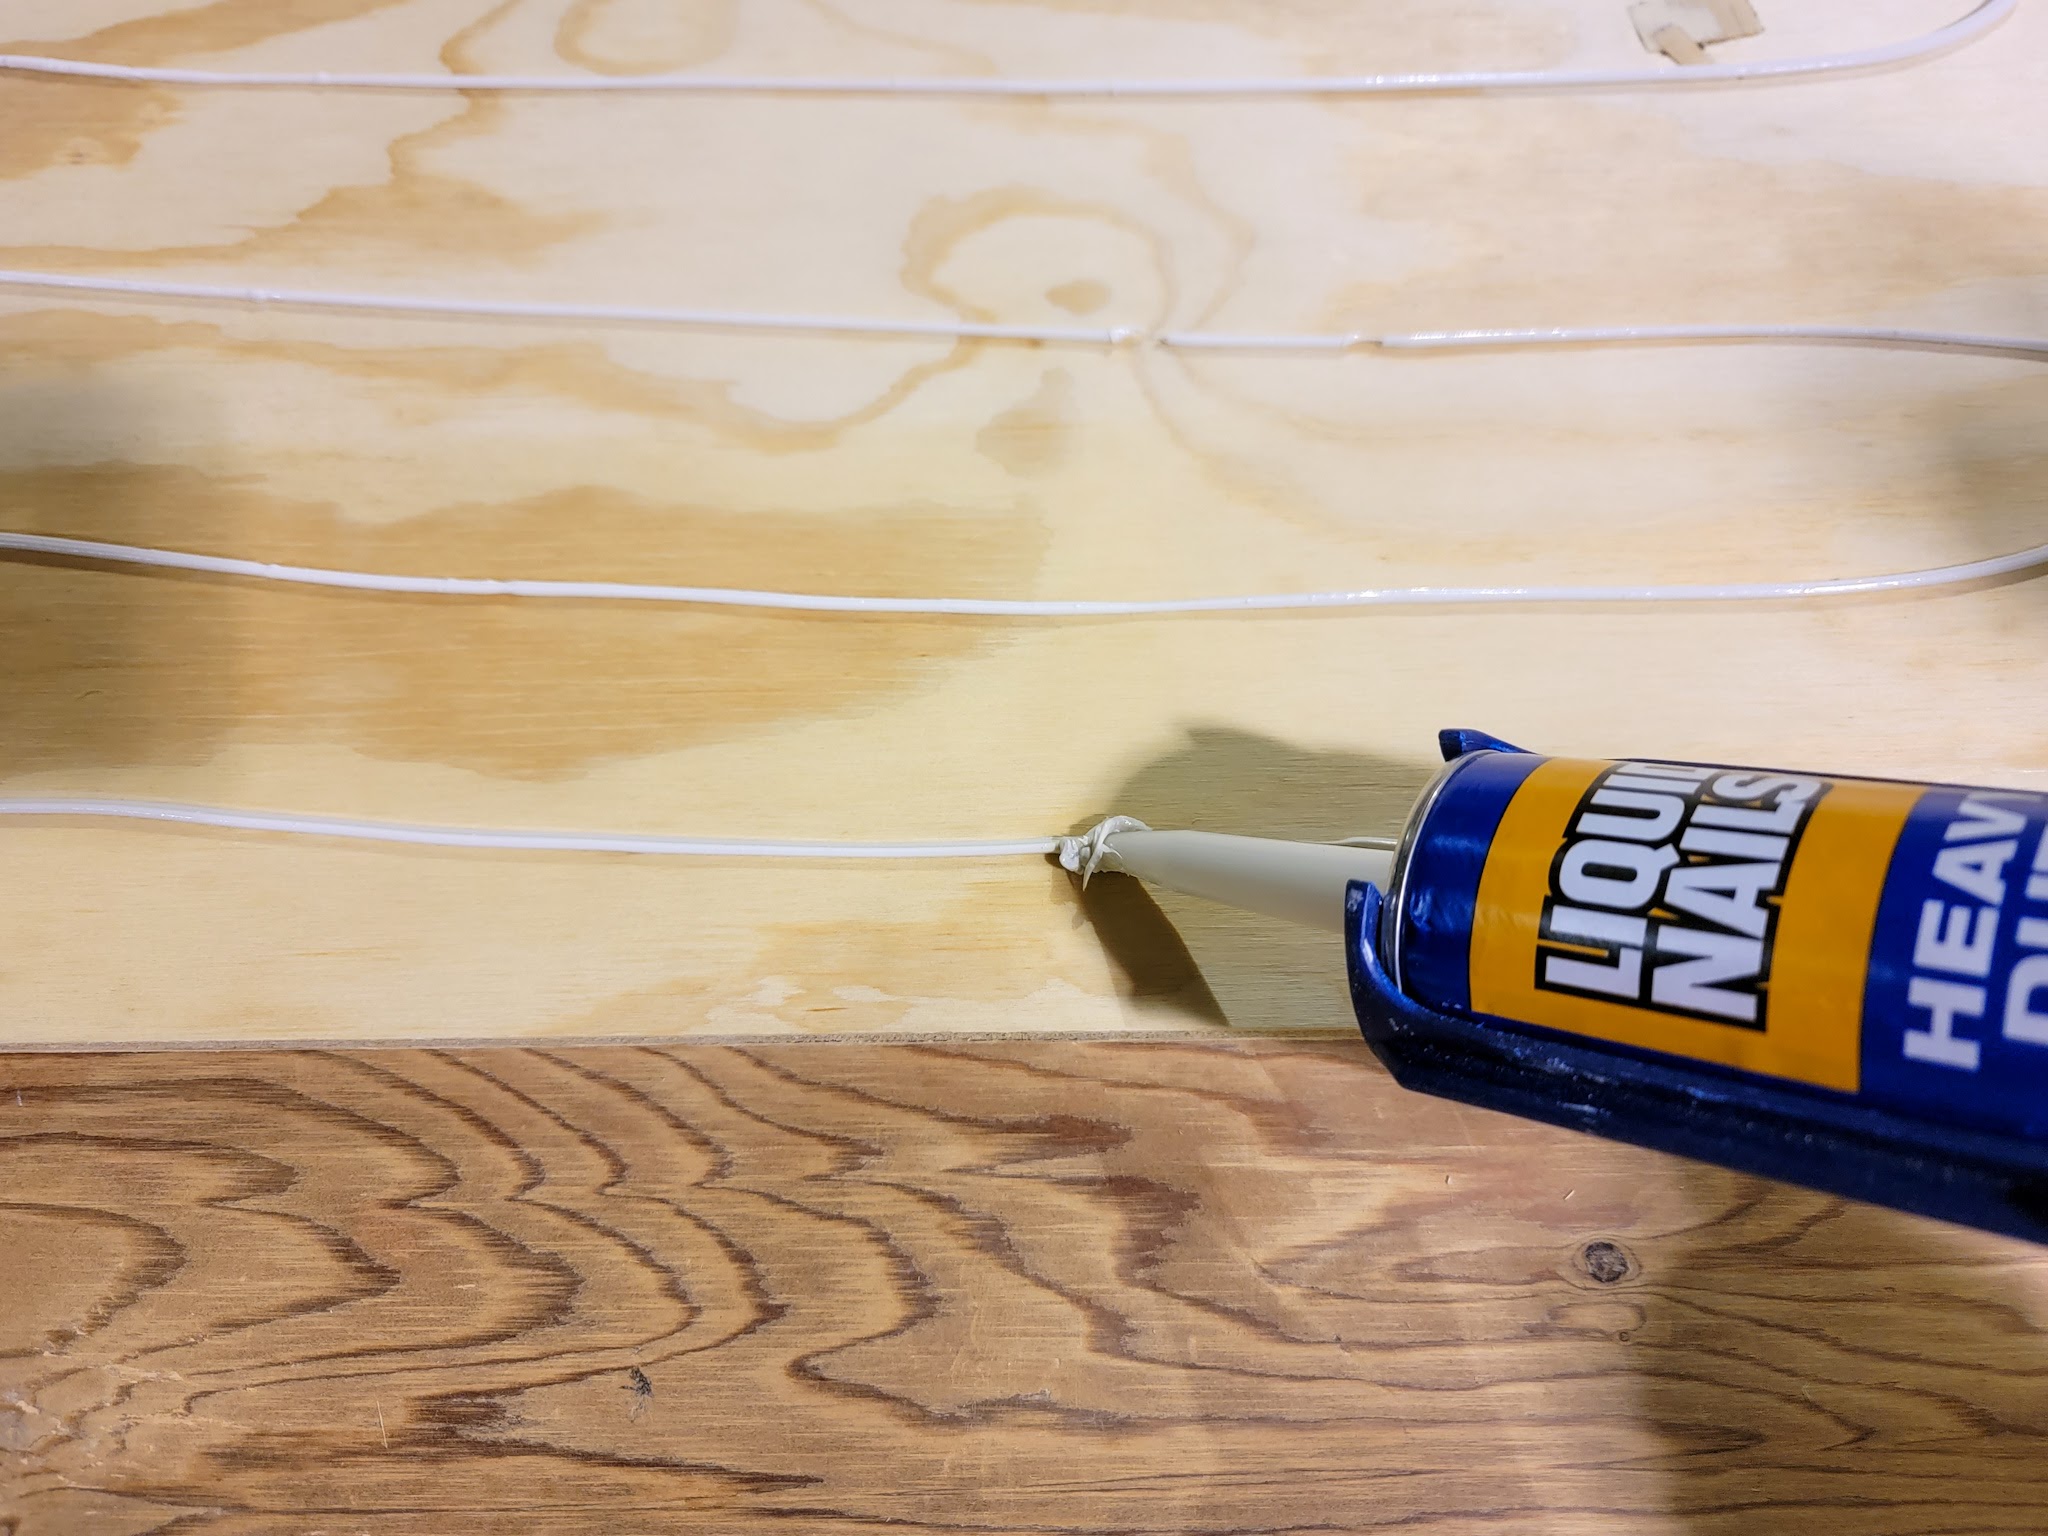
We could spend $400-500 dollars on a large umbrella and stand that would work better against the wind, or I could DIY a solution using the old umbrella stand and $89 umbrella I already bought. It’s probably not shocking to you that I’m going with the DIY version! My plan is to build a planter large enough to fit the base of the umbrella stand, use some concrete mix in the bottom to secure the stand and provide sufficient weight, and then fill the top with soil and plant some flowers around the umbrella. I think it will work – finger’s crossed!

Set up Patio Furniture (with new touches)

We have our table and chairs set up, but we haven’t spend time setting up our sectional yet. This normally tucks into the little corner of our house shown below, and this year, I want to add in an outdoor rug and some small end tables to make it a little cozier and more functional. One thing we already did was have the house powerwashed, which made a huge difference already!

Paint the Porch Ceiling?

I’m debating painting the porch ceiling this year (thinking of going with black!) but that might be a bigger project to save for sometime in the future. We’ll see!

Planter Boxes + String Lights

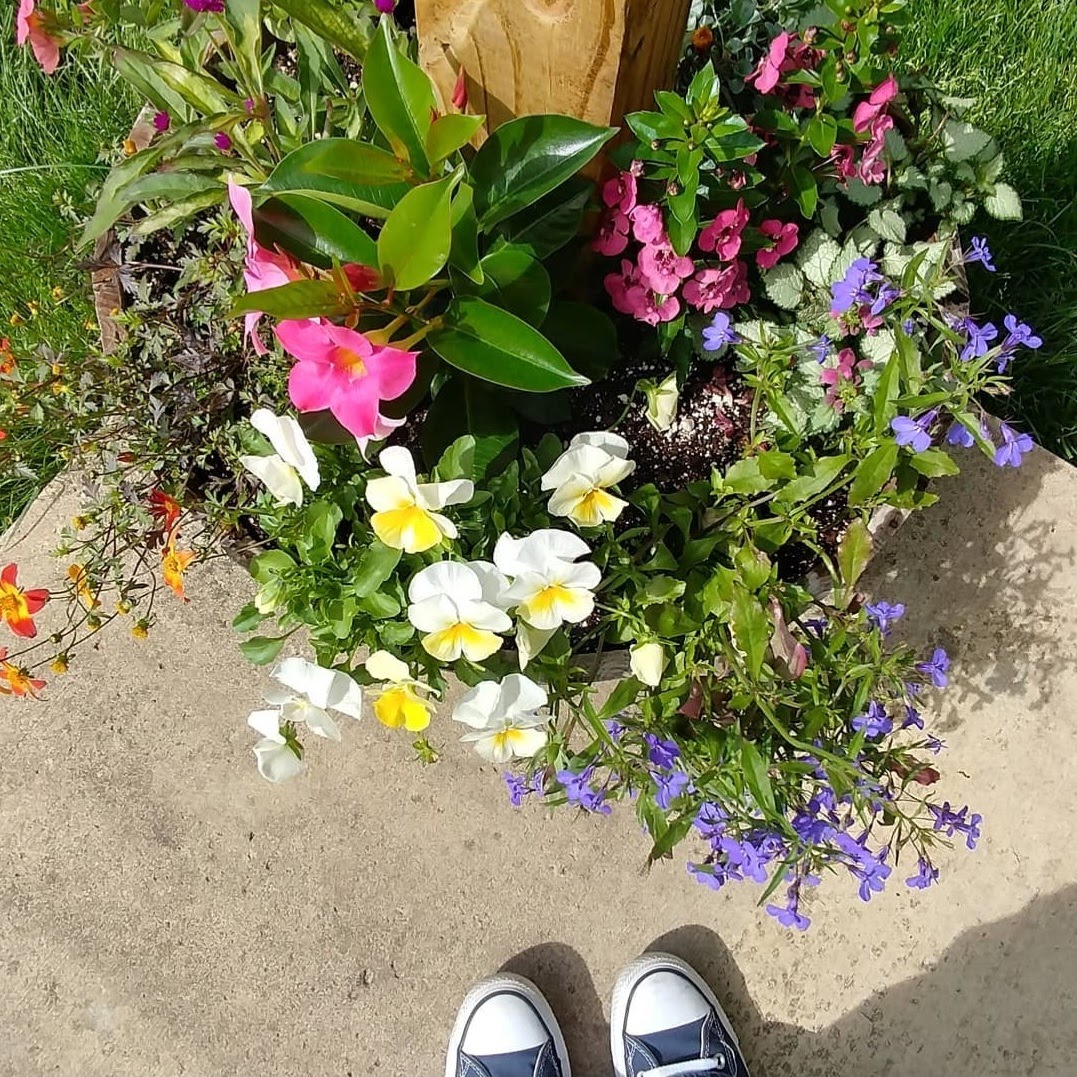
In our last house, we used barrels with concrete mix in the bottom to secure large posts to hang string lights. I could only find one picture of how we set this up, but we loved how cozy it made the space and want to do something similar at this house.

I’m thinking we might try to DIY the actual planter boxes this time instead of buy barrels. On top of the concrete, we’ll fill with soil and plant flowers like we did at the last house – it adds such a special little touch!

I kind of expect this project to be an “if you give Sarah a paintbrush” situation where I get started and things spiral haha, but this is the list I’m starting out with. We have a lot of plans for hosting this summer so I’m excited to get this patio ready!

One Year Later: How has the kitchen held up?

It’s been just over one year since I finished up our kitchen renovation so today I wanted to chat a little bit about how everything has held up, where I need some touch-ups, and what small detail I still need to address.

The kitchen is truly the heart of our home, but when we first moved in, it didn’t really reflect our family well. I still dream of a full kitchen remodel, complete with a different layout, but a relatively inexpensive Phase One renovation (coming in right around $1000, not counting the new fridge we had to buy when our old one died) has made a HUGE difference in the meantime.

I still absolutely love so many things about this kitchen. I love the barstools – the wood brings in warmth to the space, they’re comfortable, and easy for the kids to climb up and down. I love the light fixture above the island – it’s about 100x better than the fluorescent light that was there previously! I recently took all the globes off and cleaned the whole fixture since it does collect some dust and it’s looking particularly shiny and new again.

I still love the color of the cabinets and how the blue-green-gray chameleon color plays off the warm tones in the black quartz countertops (which I didn’t originally like but now I think they work well with the other changes in the space!) I love the repurposed bead board backsplash, the warm white walls, the updated can lighting – this room still makes me smile everyday! Even though I know a different layout will work better for our family and we will change things up in the future, this kitchen fits us right now and I know I’ll even be a bit sad to eventually see it go.

So now that it’s been over a year, how has this renovation held up? Let’s chat!

Cabinets

You might notice that every photo makes the cabinet color look slightly different – that’s not an editing trick! This is a true chameleon color and it changes depending on lighting, time of day, and angle of your view. I still love the color (SW Link Gray) and it has mostly held up well on the cabinets. I think choosing a higher-quality paint really made a big difference in this space that gets a ton of traffic and use.

That being said, there are a few cabinets that need touching up around the knobs. These are the most-frequently used cabinets (trash can, silverware, plates and bowls) and over time, the constant friction of fingers and/or nails around the knobs has worn away the paint. Our trash can and silverware drawers (pictured below) are particularly bad because our kids also use these two cabinets and they’re not especially gentle users, ha!

Luckily, this is a super easy fix. Today, I’m going to go through and quick touch up these spots with a roller and they’ll look good as new! The rest of the cabinets have held up well and still look great.

Backsplash

One of my favorite updates to this space was removing the old tile backsplash and replacing it with the bead board paneling that we ripped out of our office. We painted it SW Agreeable Gray and it looks so great in its new home. Bonus that it was free! 😉

There are just a few little spots that need touching up, and again, it’s in the most frequently used space: behind the sink and drying rack. Since this spot is a major player in our daily kitchen use, it obviously gets a ton of use and over time, small nicks in the paint have occurred. Again, it’s an easy fix and today I’ll be going over those spots with a roller and get it back to looking fresh.

Also with the backsplash, I’m going to run another bead of clear acrylic latex caulk along the seam between the bead board and the counter to reinforce the waterproofing behind the sink. We have had no issues over the past year, but I want to keep it that way so I plan to just re-caulk once a year or so in this spot to keep things waterproof.

The Vent

This kitchen may look finished, but it’s actually part of the 95% club. In other words, I got 95% of the way done, hit a point of exhaustion, and didn’t finish the last thing I needed to do to actually make it finished. And that thing is…the vent.

Above the kids’ craft area is a vent that had been painted the same brown color as the walls. I meant to paint this the same color as the white walls (SW Alabaster) but it just . . . never happened. And now it’s been over a year and I am sick and tired of staring at it and thinking “I really need to get that painted” so today is the day! I am going to check this off the list and get this kitchen DONE!

A few other small things I’m going to do in the kitchen today:

  1. Paint a second coat underneath the cabinet in the kids’ craft area. I was running low on paint when I first did the cabinets, and this was the very last one I painted. I went sparingly on the underside to conserve paint but I have a small sample jar now and I’m going to give it a good second coat so it looks nicer.
  2. Do some thrifting for a different utensil crock. The orange has been fun, but it’s time for something that works better in the space. I might not find one today, but if not it’s going to be on my list of top things to look for in future thrifting trips.
  3. Remove the bits of black paint that got on the window while painting. Another small detail that I didn’t take time to address the first time – when I painted the window sashes black, a small bit got on the sides of the window. Since it’s latex paint, it’s easy to take a baby wipe and just scrape it off but I haven’t taken the time to do it. Today is the day to get it done!
  4. Tighten up the screws on the barstools. These counter stools were a great find and overall I’ve been pleased with them. They clean easily, still look great, and were a really great price point. That being said, over time, the screws do loosen a bit and the chairs can get wobbly. Probably once every 2-3 months I go through and just re-tighten any loose screws and they’re sturdy once again. It’s not ideal, but it only takes 10-15 minutes and it was honestly worth it to have no other complaints about the chairs and be happy with the price point.

Sources

Wall Color: Sherwin Williams Alabaster

Trim + Backsplash Color: Sherwin Williams Agreeable Gray

Window Color: Sherwin Williams Tricorn Black

Cabinet Color: Sherwin Williams Link Gray

Light Fixture

Counter Stools 

LED Recessed Lights 

Kitchen Rug (similar here)

ORC Week Four: Curtains, Artwork, and a $0 DIY frame!

Another week of the Spring 2022 One Room Challenge is complete and I made some more progress in the nursery!

First, I updated the window by ripping off the old window trim, painting the window itself Sherwin Williams Tricorn Black, and installing a chunkier window trim like we’re slowly doing to all the windows in the house. I painted the window trim Sherwin Williams Evergreen Fog to match the walls for a monochromatic look. and installed a new curtain rod and room darkening curtains.

I love the curtains so much! They’re not marketed as blackout but they work as blackout so I decided to nix blinds for this room. It’s a double win because the room only has one window and doesn’t get direct sunlight so this helps maximize the natural light!

I also started adding in some artwork. I downloaded this gorgeous print as a digital download from Juniper Print Shop – the colors are absolutely perfect for the nursery and I thought it would being a nice organic feel to balance the grid print of the curtains. I like that it doesn’t feel like a traditional nursery print – it elevates the room from feeling too baby-ish and then in the future it will translate well to another part of the house when it’s no longer needed in the nursery. I had it printed through Mpix; the quality is awesome and you have to look really closely to tell it’s a print!

I wanted a substantial size and chose to have it printed in 18″ x 24″. Getting a large size in a quality paper and finish meant the print itself was a splurge so I wanted to save on the frame. Large frames can be pricey so I challenged myself to create a really simple DIY frame by only using materials I already had on hand.

Materials

digital download print

-large piece of cardboard (flat, no creases)

spray adhesive

gorilla glue

gold spray paint

Drydex nail hole filler

-scrap pieces of window trim

-tools used: scissors, miter saw; clamps

I cut the cardboard down so there was about 2″ overhang on all four sides of the print (my cardboard piece wasn’t quite wide enough to accommodate the full width of trim all the way around, so there was a little trim overhang, which you can’t see in the finished product). I used the spray adhesive to spray all over the back of the print and pressed it down onto the cardboard, making sure the print was pressed flat and smooth and there were no air bubbles.

As we update all the window trim in our house, we save the old trim and remove the nails so we can use the trim as scrap wood. I took four pieces of old window trim and used the miter saw to cut them down to size for each side of the frame (what length you cut to depends on how much you want the frame to cover the edge of the print). I cut each end to a 45 degree angle and did a dry fit of the pieces to make sure it looked good. I used nail hole filler to fill in any nail holes showing.

Then I sprayed a few light coats of my favorite gold spray paint on each piece of trim.

Once the pieces had dried, I used the spray adhesive again to attach the trim to each side of the cardboard around the print.

There were two trim pieces that had a slight warp, so I added a few daps of gorilla glue on the back for an extra strong hold and that worked well!

There was one small corner that didn’t quite come together flush, so I used the nail hole filler to close the gap, taped off the print with another piece of cardboard, and spray painted over the dried nail hole filler.

I used picture hanging strips to attach the back of the frame to the wall and voila – a beautiful frame that cost me $0!

We’re halfway through the ORC and I have several things left to do: update the nursery dresser/changing table, install book shelves, install thicker baseboards, and possibly add planking to the ceiling. We also are going to be installing new carpet, although I don’t anticipate that will happen before the challenge is over since it’s about a 6-8 week timeframe right now. The room is coming together slowly but surely!

Be sure to check out all the other ORC projects happening here!

ORC Week Three: Curtain Choices + Plans for the Window

I took a complete break from projects over the weekend, which was a wonderful time of gathering with my family and celebrating Easter (my favorite holiday!) I didn’t make any progress on the nursery but I did get some deliveries over the past week that have me excited to dive back in!

Curtains

The blackout curtains I ordered have arrived! I ordered them in two colors because I wanted to see them both in the space before deciding. They’re the same pattern and color palette, but the use of the colors in each makes one panel lighter and one panel darker. I wanted to incorporate some warm earthy browns in the room and I think this will be a great way to do it!

In addition to the curtains, the curtain rod arrived. It’s the same rod I’ve used in the our primary bedroom and kids’ shared bedroom – I got it in gold this time which I think will look great against the green wall color.

Artwork

I ordered two digital download prints from Juniper Print Shop and had them printed at MPix – they just arrived two days ago and I’m in love! I think the bunny print is so darling for a little boy’s nursery and the landscape print is what originally inspired the color palette for the whole room! I had it printed at an 18″ x 24″ size which feels so substantial and will really help elevate the room. It was worth the investment because even when this room is no longer a nursery, I know it’s a print that I’ll use in my home for years to come.

What’s Next

It’s time to address the window. I will be painting the window itself black (specifically, Sherwin Williams Tricorn Black) and removing the old window trim. I’ll update the trim just like we’ve done in other rooms (click here for the tutorial) and then hang the curtain rod, choose a curtain, and install the blackout blind as well. It’s going to totally change the feel of the room!

I actually also have a plan for the old window trim too. Hint: it involves the artwork prints I just got . . .

Be sure to follow along on Instagram for real-time updates, and you can also check out all other One Room Challenge participants here.

ORC Week Two: The Nursery Paint Color

We’re officially finished with one week of the Spring 2022 One Room Challenge and I’ve finished one simple but very impactful step: painting the walls!

After choosing Sherwin Williams Evergreen Fog for the dresser I painted for my sister, I fell in love with the color and knew it would be perfect in the nursery. I chose a velvet finish and could not love the result more.

No matter how many rooms I paint, I’m always reminded of the power or paint. With no other changes made, fresh paint single-handedly altered the feel of the entire room. What once felt like an airy, albeit plain nursery now feels like a calm and moody retreat. Here’s a little look back at the room’s evolution:

There is only one window in the room and thanks to the position of the house and the path of the sun, it never really gets direct sunlight. The darker color embraces that and creates a cozy little space that I think will be perfect for soothing a little baby.

I did not paint the baseboards because we are looking into replacing the carpet now (it is 20+ years old and in rough shape). Once the new carpet is installed, I plan to replace the baseboards with a thicker option and paint them the same color as the walls.

Looking ahead at this week, my next task is addressing the windows! I plan to paint the windows black, update the window trim, and hopefully install the curtains which are set to arrive Monday!

In the meantime, be sure to check out all the other One Room Challenge projects happening here.

How to Upgrade a Frameless Mirror with a DIY Frame

A couple weeks ago, I shared the $20 goodwill dresser that I fixed up for my sister’s baby’s nursery. While I am so proud of that DIY transformation, I’m equally proud of another DIY transformation: the mirror that hangs above it!

Way back in 2019 when we renovated our guest bathroom, we took out the 2′ x 3′ frameless builder-grade mirror the previous owners had hanging. (Also, enjoy this little flashback of the deer-themed wallpaper!)

I originally tried to donate it to our local ReStore, but they don’t accept frameless glass for safety reasons so it’s just been sitting in our garage ever since. Once I saw Tiffany’s awesome upgrade to her mirror, inspiration immediately struck and I knew it would be the perfect surprise to gift my sister along with her nursery dresser.

This ended up being a fairly simple DIY project, so I wrote up a tutorial for anyone who wants to give this a try. We added a few extra things from Tiffany’s original inspiration video and that’s one of the great things about creating a frame from scratch – it allows you to customize to fit your exact needs!

Materials

-Sheet of 1/2″ thick plywood

-1″ x 2″ boards

-1/4″ x 3/4″ trim (optional; only needed if you’re doing the inner piece of trim)

heavy duty liquid nails adhesive

caulk gun

wood glue

-clamps; various sizes

-nail gun + 1 1/2″ inch nails

-circular saw

-miter saw

-long level (optional)

-table saw (optional; only needed if you’re doing the inner piece of trim)

gorilla glue (optional; only needed if you’re doing the inner piece of trim)

-foam brush

-paint or stain

picture hanging kit (if hanging the mirror)

Step One: Trace the mirror onto plywood

We laid the mirror on top of the sheet of plywood, lining up two sides with the edges of the plywood, and traced the outline of the other two sides with a pencil.

Step Two: Cut the plywood on the traced lines

I used a circular saw to cut on the lines we marked.

Optional Step: For an extra precise straight cut, we clamped a long level to the plywood to use as a guide. This did require careful checking and re-checking before starting the cut to make sure that the placement of the level would correctly align the blade of the saw with the line we had traced, but it was worth the effort. I held the saw in place against the level while running the saw and it ensured that the cut was perfectly straight all the way across.

Step Three: Attach the mirror to the plywood

Once the plywood was cut to the same size as the mirror, I used the caulk gun to apply the heavy duty liquid nails adhesive all over one side of the plywood.

We set the mirror down on top of the glue and made sure all the edges were lined up with the plywood.

Our plywood was old and slightly warped, so we used some scrap wood and clamps to tightly seal the mirror to the plywood and let it set overnight.

Step Four: Cut the wood for the frame

Once the mirror was fastened to the plywood, Justin used the miter saw to cut the 1″ x 2″ boards to size for each side of the frame. We considered two options for fit: straight cut corners or 45 degree corners.

We chose to cut each corner at a 45 degree angle rather than straight cuts. It did require a little extra thinking through and measuring before cutting, but again, it was worth for us to get the look we wanted.

It was very important to make sure the corner of the each cut was exactly lined up with the corner of the plywood. If it was a little too long, there would be a gap between the wood and the mirror. If it was a little too short, there would be a gap where the frame corners didn’t quite meet. In the picture below, the wood was cut a little too long – see how there is a small overhang of the side piece? We marked where the end of the plywood hit the side and Justin cut to that line to make sure the corner exactly lined up.

Step Five: Paint or Stain the Wood

Before securing any of the wood in place, I used a foam brush to apply everything with a light coat of stain to the wood. I decided to stain instead of paint because my sister chose a natural wood crib so I knew it would tie in nicely, plus the light wood color coordinated well with the color I chose for the leather dresser drawer handles.

Note: This step could definitely happen after all the wood is installed. I chose to do it in this step to avoid having to try to stain in corners and potentially have uneven coverage or get it on the glass. Just my personal preference!

Step Six: Attach the sides of the frame to the plywood

We did a dry fit to make sure the sides all lined up perfectly (they did!) and then applied a small bead of wood glue to the bottom of each piece where it would meet the plywood.

We fit each piece in place, then used the nail gun to add a couple 1 1/2″ inch nails to each side, making sure to aim low enough to hit plywood and not glass. I did not want a lot of nail holes, but we also wanted to make sure things were super secure, so the combination of wood glue + nails worked for us.

We used clamps to keep things in place while the wood glue dried (this was probably unnecessary but it gave us peace of mind that things would dry tightly in place).

(Optional) Step Seven: Cut wood for inner trim

We could have stopped at this point and probably would have under normal circumstances. This looked great! Except for one thing . . . our mirror had sustained a bit of damage in the garage and was missing a small corner. We decided to fix this by adding one more trim piece directly on top of the glass to hide the damage.

We bought 1/4″ x 3/4″ strips of wood. They were originally a little wider than I wanted (right one in the picture below), so we used the table saw to rip each piece down to 1/2″ wide (left one in the picture below).

Justin used the miter saw to cut each side to size (with 45 degree angles on each end) and after checking placement with a dry fit all around, we used a bead of gorilla glue on the back to secure each piece directly onto the glass.

(Optional) Step Eight: Attach hanging hardware

We gave everything time to dry and then Justin used heavy duty wire and d-hooks from a picture-hanging kit we have (here is a similar kit). We used an online reference guide to help us decide exactly where to place the d-hooks for best hanging. If you choose to hang your mirror, it is very important to weigh the mirror first and make sure the hanging materials you’re using can support the weight of the mirror safely!

I absolutely love how this mirror turned out. I was so excited to surprise my sister with it – it’s the perfect complement to the nursery dresser and fits the room so well. She loved it!

The cost of this project will vary depending on the type of wood you use and how many materials you have to buy vs. what you already have on hand. I used oak boards, which are a little more expensive than other types, but I already had the plywood and all other materials, so that kept cost down for me. Large mirrors can be expensive, and I’m so glad I was able to take a mirror I already had and give it a completely fresh look that was considerably less than the cost of a brand new mirror.

What do you think? Are you ready to try this DIY yourself?

Spring 2022 One Room Challenge Week One: Baby Boy Nursery Plans!

Today marks the start of another round of the One Room Challenge and I am excited to join in the fun once again! I’ll be honest, up until yesterday, I didn’t think I’d be participating this time around. But I have been feeling a growing nesting urge to start in on the nursery for baby boy and I decided this would give me a great opportunity to focus in on his room while I’m still in my second trimester sweet spot of having the energy and drive to tackle it!

I’m currently 21 weeks pregnant, and in this post a few weeks ago, I revealed that we’re having a boy and shared my initial thoughts of what to do with the nursery now that Vi has moved over to a shared room with LJ. At first, I just planned to do a few minimal updates, but the more I thought about it, the more I wanted to go a little bigger. Justin and I feel confident that this will be our final pregnancy, and it’s the first time we’ve found out the baby’s sex before birth. Since it’s the first (and only) time I’ve had the opportunity to plan out all the nursery details in advance, I decided why not have some fun with it?

Here’s what the room looks like right at this very moment:

An absolute hot mess.

As Vi shifted over to LJ’s room, we had to move some furniture around and this room basically just became a catch-all storage spot until we can decide what we want to keep for the nursery and what we want to get rid of. Here’s what it looked like when it functioned as Vi’s nursery:

I have a feeling that this renovation is going to be one of those times where things slowly come together piece by piece, but I threw together a simple mood board with some of the initial ideas I have for the space. This just gives me an sense of the direction I want to head: lots of earth tones and graphic prints, with plants to bring in an organic feel and soften things up.

First things first, the pink scalloped wall needs to go. While it is super cute, it was really done as a simple solution to update the room and move it away from feeling like a sterile white box for Vi. This week, my plan is to prep and paint all the walls (99% sure I’m going to go with Sherwin Williams Evergreen Fog). I’m also strongly considering adding a ceiling treatment in the same color – perhaps something similar to the planking we did on the ceiling in the office? We’ll see!

I’ll be sharing my real time progress over on Instagram, so be sure to follow along there if you want more frequent updates. You can also check out all the other ORC participants here – lots of fun projects happening this time around!

New Sconces for the Kids (and a wallpaper mishap)

On Friday, I posted that my weekend plans were to wallpaper in the kids’ shared bedroom. Unfortunately, that didn’t happen quite like I expected.

We got one strip up and in place and then realized . . . we only have half the pattern. After checking in with customer service, we found out that there was a glitch in their system that caused the pattern to print twice as large so we only got half of it. We’re sorting out the issue with customer service and figuring out a solution but for now, what we have is unusable and the wallpaper project is on hold.

To say I was disappointed is an understatement, but there was nothing else I could do about it so I decided to pivot our weekend project to a simpler one. I purchased these sconces for the kids’ room a few weeks ago and had been waiting to hang them above the beds until the curtains were in place. With an unexpectedly free weekend, it felt like the perfect time to knock this project out!

I have talked before about the asymmetrical struggle of this room. The window between the kids bed is not centered on the wall and Vi’s side has four more inches of wall space than LJ’s side. Curtains have helped give the illusion of symmetry – I cheated Vi’s curtain out just a little bit farther so that now the same amount of wall space shows on each side. The dilemma now was: hang the sconces in the middle of the wall space (off-centered above the bed) or hang them above the center of the bed (off-centered on the wall)? Ideally, I would have been able to have perfect symmetry and hang them in the middle of the bed AND the middle of the wall, but that’s just not possible here.

After going back and forth for a long time and weighing pros and cons, I settled on hanging them centered above the beds. In order to balance the off-centered feeling on the wall, I hung small art (a yarn rainbow for Vi, small picture frames for LJ) on the opposite sides of the sconce from the curtains. I think this solution worked well and keeps things feeling visually balanced. Side note: I have to give Justin a huge shoutout for not only putting up with my indecisiveness and patiently holding sconces in various places again and again so I could visualize, but also for getting these installed and working!

The kids both love having lights above their bed. I specifically chose these sconces for a few reasons: I loved the modern black look and subtle gold detail paired with the traditional look of the wooden bed frames. I also wanted plug-in sconces rather than hardwired for ease of install and removal in case we decide to move around the room’s layout someday (they do have the option to be hardwired if we want). I also wanted lights that the kids could easily turn on and off themselves, and these are operated by a dial on the wall plate that is easy for them both to turn. Plus, at just under $100 for the set of two, the price was hard to beat!

It may not have been the progress I had hoped to make this weekend, but I’m glad I was able to check one more thing off the list of things to do before this phase of the kids’ room renovation is complete. Mishaps are just a part of renovations and when they come up, the only thing you can really do is roll with the punches and aim for slow and steady progress. I have just one or two more small things to do right now, then I plan to shift my attention over to the nursery until the wallpaper comes in.

Sources

Wall Color: Sherwin Williams Eider White and Nordic Bleu

Bedframes: Vintage

Windowpane Curtains

Blackout Blinds

Curtain Rods

Sconces

Vi’s Sheet Set

LJ’s Sheet Set

Yellow Quilts

Striped Throw Blanket

The First Look at the Wallpaper for the Kids’ Room!

A couple weeks ago, I started a little mini renovation on the bedroom that LJ and Vi recently started sharing. It all started with thrifting matching headboards for their twin beds, which naturally led to upgrading bedding. I also put together a new shelving unit in between beds to double as a nightstand and bookshelf and switched up their artwork. I then installed some blackout blinds and new curtains, and this side of the room is feeling very different now!

I’m ready to turn my attention to the other side of the room now. This side has the entrance to the room and the closet door, so it’s mostly a walkway area. It does have the dresser along the wall but I’ve wanted to add some more visual interest to this area.

I previously shared that I was wanting to put up wallpaper and after some internal debating back and forth, I decided to go with my gut and ordered a pattern. It just arrived this week! And I’ll be honest, my selection might surprise you. It was not an obvious yes for me, and at first it wasn’t even in my top three. But the more I thought about it, the more I loved the idea so I went for it!

I chose . . .

party whales!

Since we’re only doing one wall, which will essentially have two doors (the closet door and the entrance door when left open) and the dresser and mirror, it’s really not that much wall space. I think a large, bold pattern will bring much needed fun and whimsy without being too overwhelming and this pattern is just so unique and charming!

Here’s a peek at the large pattern on the wall as shown on the Spoonflower website. I will note that the colors, particularly the orange, feel more muted in person than they do on screen, which I expected based on the sample I received.

Image from Spoonflower

I know this is not a forever type of wallpaper pattern. LJ and Vi are going to share this room for at least three years, then when he’s ready, baby boy will transition over and Vi will go back to her own room. At some point my boys will more than likely want a change – I think of this phase that I’m creating now as their “kid” bedroom. It’ll last for maybe a 6-8 year period and then we’ll move the room into their tween/teen phase with their input and preferences. Kids rooms are always evolving because their needs are ever changing. For just one small accent wall, I still feel like it’s totally worth the investment of wallpaper for this phase!

When I was talking about my options on Instagram, I received a lot of input on the various options but one comment stuck out to me with regards to the whales: “…the design is so distinct that it will stick in their minds as they grow. When they are much older, they will still remember their whale room!” I love that idea and honestly, it’s what tipped me over the edge to team whales. To think that someday our kids will feel nostalgic for the little whale room of their childhood – the place where they got snuggles and bedtime stories from mom and dad, the place where they whispered the secrets of their young minds to one another long after the lights went out, the place where they laughed and played and felt safe from the worries of the world – well, that just makes my heart feel all sorts of soft and happy. May the whale room be a place of childhood memory making for many years!

I’ll be sharing real-time progress on my Instagram this weekend so be sure to follow along there for how the installation is going!

Upgrading a $20 dresser for my sister’s nursery!

Over the weekend, I finished up and delivered a special DIY project I’ve been working on: a dresser and mirror for my sister’s baby nursery!

I’ve thrifted and upgraded dressers to use as changing tables in the nurseries for both my kids and also my brother’s daughter, so when my sister announced she was pregnant and asked me to do the same for her child, I of course said yes! My aunt actually spotted this dresser for sale in a local Goodwill and sent me a picture. It had nicks, scratches, patches of missing veneer, very gooey sticker residue on one side, and a wobbly leg – it was perfect. It was discounted down to $20 and just begging for new life!

The first thing I needed to do was clean up the roughest parts to get it ready for paint. I worked hard using a combination of Goo Gone, a multitool with a flat blade, and a lot of scraping to remove the sticker residue on one side. I used an orbital sander to smooth out most of the nicks and dings on the dresser top, sides, and drawer fronts. I also took a piece of 80 grit sandpaper and sanded the little detailed edge around the drawers and other areas that the sander couldn’t reach.

I turned the dresser on its side and used a wrench to tighten up the bolt underneath supporting the wobbly back leg, and then turned my focus to the side of the dresser with chipped off veneer.

Kwik Wood is a product I learned to use when I worked on an old dresser for my brother and sister-in-law. You just mold the putty to soften it up, press it onto the space where veneer is missing, and let it harden. It looks terrible at first, but that’s okay!

Once it’s hardened, it’s totally sandable and paintable. So I sanded it down super smooth with the orbital sander and then was able to paint it just like the rest of the dresser!

Using a brush for the detailed sections and a foam roller for the sides, top, and drawer fronts, I applied one coat of primer and two coats of paint (I chose Sherwin Williams Evergreen Fog in Satin). Then it was time for the hardware.

My sister’s style is a unique combination of artistic, eclectic, and boho so leather drawer pulls felt like the perfect touch for this midcentury dresser. I bought a set of these leather drawer pulls and they were just right for the project.

One of the best purchases I’ve made for myself with regards to DIYing things is this cabinet knob/pull template. It is SO HELPFUL to use when you need to drill holes for hardware, whether on doors or drawers and is well worth the $10 investment. Once I determined the amount of curve I wanted the leather pulls to have, I used the template to mark out exactly where to drill holes to fasten them in place and it allowed me to keep everything perfectly lined up from drawer front to drawer front. It gave me the confidence to drill into the drawer front, which is good because there’s really no room for error – one hole being off will throw off the look of the whole dresser.

Justin and I also made a mirror to go with the dresser (a tutorial will be coming soon!) and we surprised my sister by driving them out to her and setting everything up with the help of her husband while she was out of the house. It was so fun to see her reaction when she came home!

The color of the dresser is only a couple shades darker than the nursery walls (Austere Gray at 75% saturation), which gives a cool monochromatic feel to the space. Jenni plans to incorporate a lot of color through bedding, artwork, and other decor so it feels right for this dresser to be a more subtle feature of the room.

Jenni wanted to be able to use the dresser as a changing table as well so we set it up with a changing pad and cute little basket with diapers and wipes. She plans to add diaper cream, lotion, and anything else she might need to be able to access easily during a diaper change to the basket as well.

Even her cat, Simba, approves of the space! Although we’ll see how he feels once his little brother or sister arrives and takes the spotlight. Ha!

Total Cost of Dresser Upgrade:

Dresser: $20

Quart of Paint: $22.45

Drawer Handles: $20.32

Total: $62.77

Note: I already had all the tools needed, as well as primer, brushes, rollers, sandpaper, cabinet template, and Kwik Wood, which definitely kept the cost of this particular project down.

Overall I’m so happy with how this turned out, and my sister is thrilled with it too. It’s such an honor to help her prepare for this next stage of her life and use my skills and interests to gift her a dresser/changing table. I can’t wait to see my niece or nephew get to use it in just a few months!