With three weeks to go until Christmas, I’m about 90% done with my shopping and ready for the next phase: wrapping. I love a beautifully wrapped present and truly enjoy wrapping gifts for friends and loved ones. The biggest downfall for me is it always feels pretty wasteful to see the beautiful paper get ripped up and thrown in the trash. This year I decided to try something new – it’s inexpensive, sustainable, and pretty which is a win win win in my book!
A few months ago, I was wandered down the fabric aisle of my local thrift store. A large piece of fabric caught my eye – a plaid pattern with greens, reds, and golds that felt so festive without being obvious. I immediately was inspired and thought what if I used this for wrapping presents? Sure it’s not actually wrapping paper, but it could work, right? I bought the fabric for a couple bucks and started to look through the fabric sections every time I went thrifting, picking up a 1/2 yard here, a yard there, etc. Fabric scraps can be found in all sizes for just a dollar or two and soon I had a little collection of fabric for wrapping.
None of the patterns are actually Christmas-y. There’s no reindeer or Santa or holly or candy canes or anything like that, but I chose a variety of textures and patterns that together have an overall festive feel. I also got out my collection of ribbons – a couple rolls were new but I’ve also saved bits of twine and ribbons from gifts I’ve received over the years and thrifted some rolls as well (I thrifted that red and green plaid ribbon over 10 years ago!)
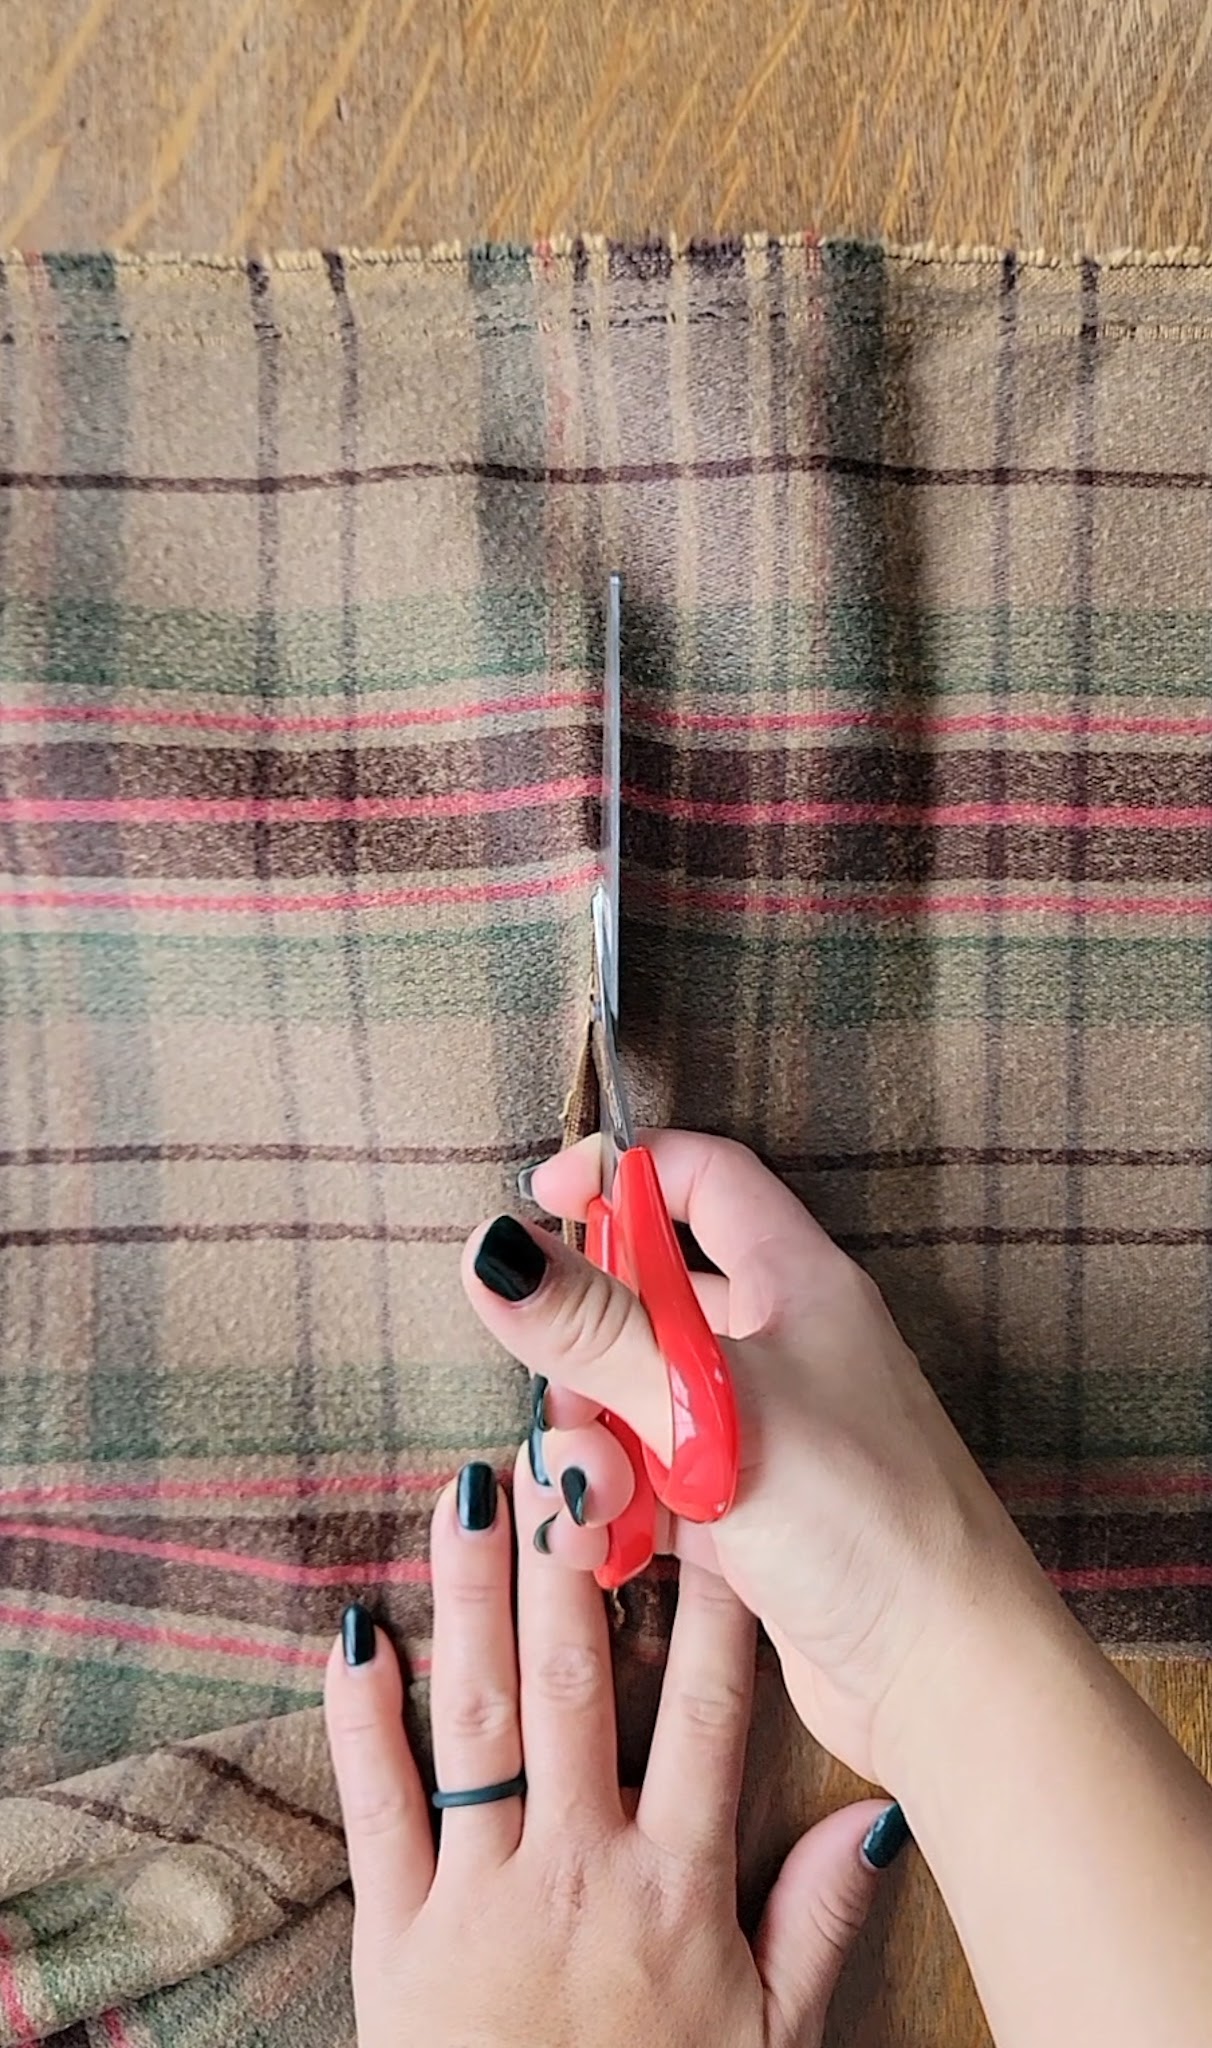
When it came to wrapping, it was basically the same process as with paper. I measured how much I needed for each present and cut the fabric to size.
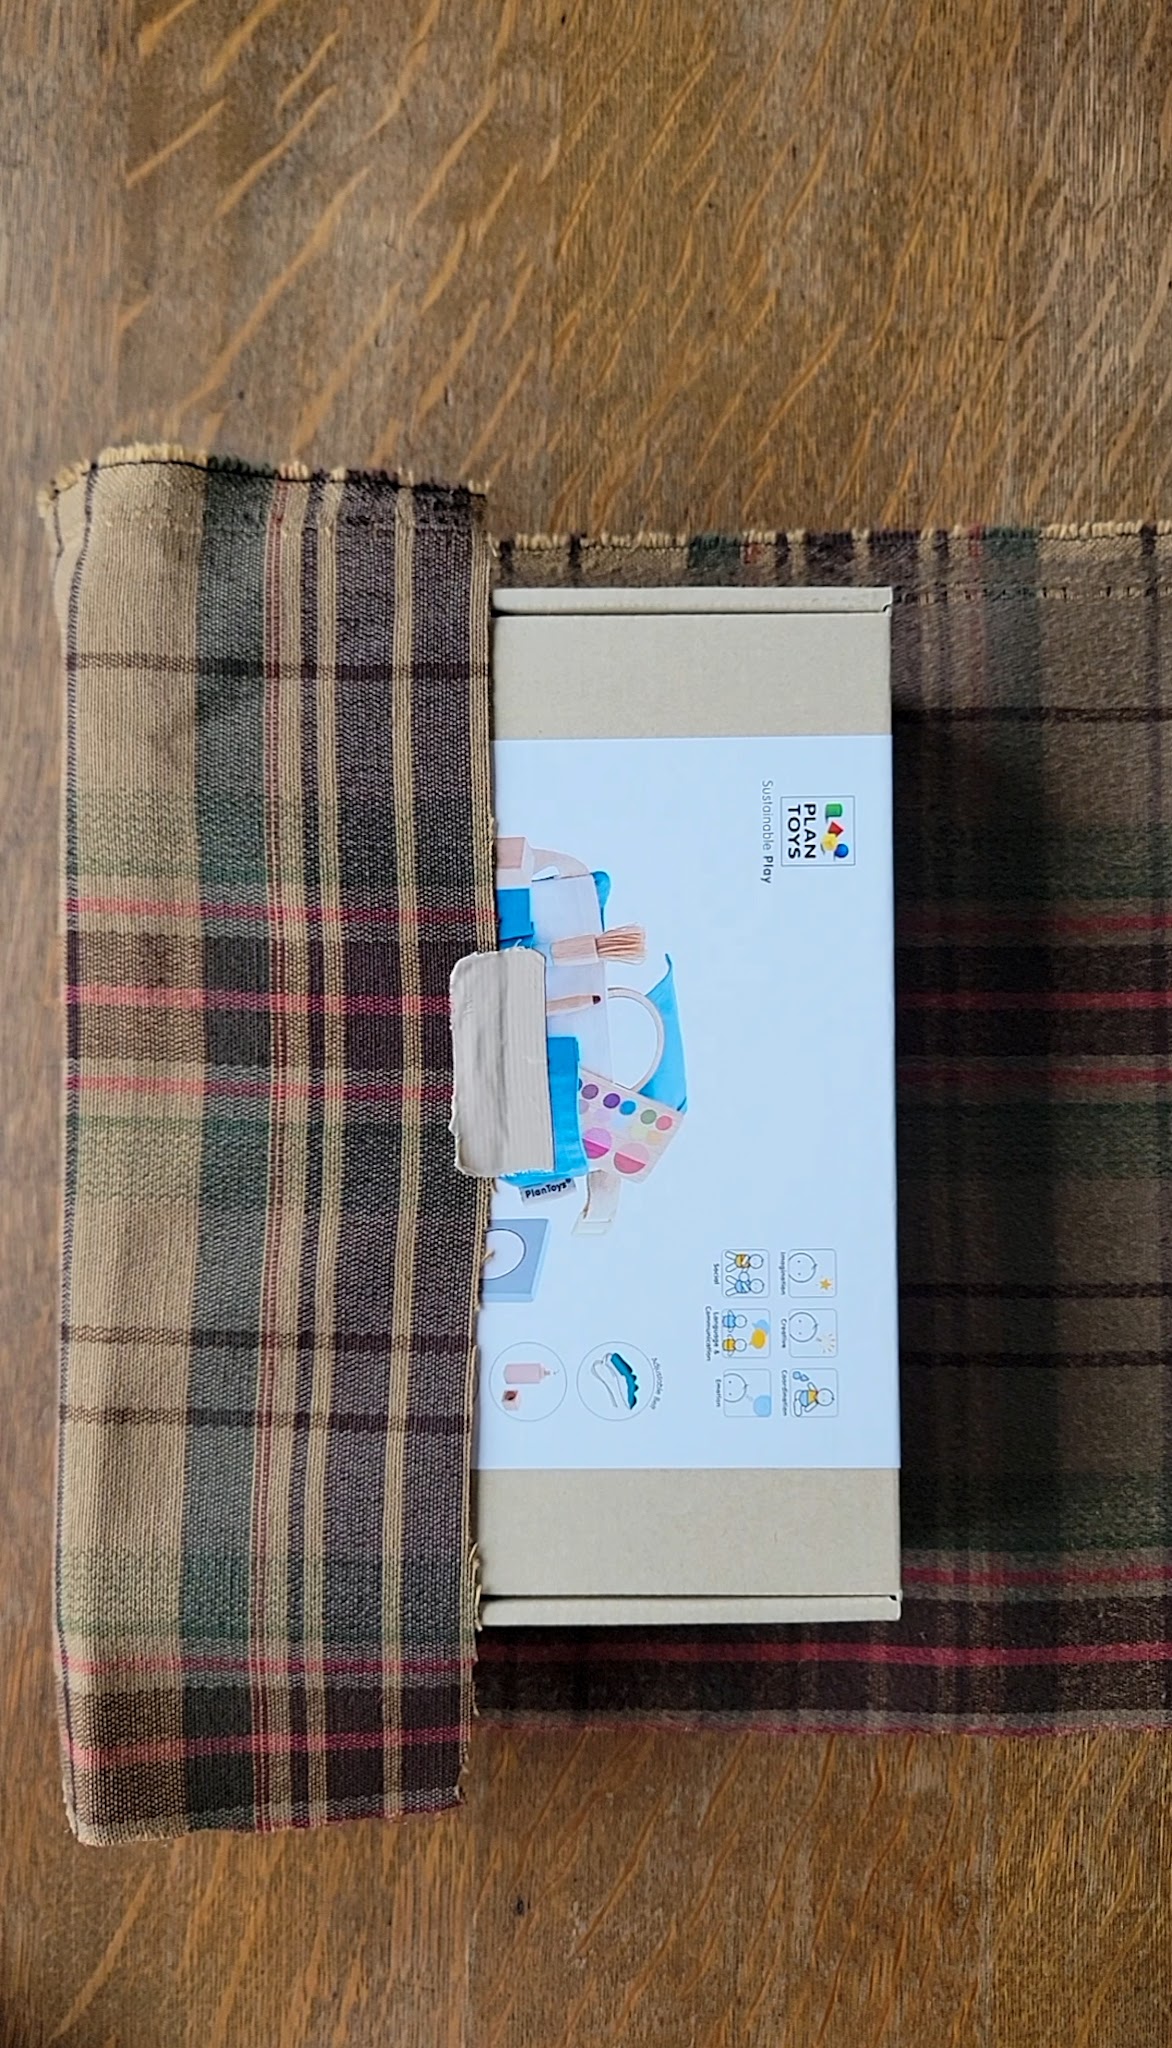
I tested a few tapes and found that duct tape actually worked the best for fabric. I taped the initial edges directly to the box like I would with traditional wrapping paper and Scotch tape.
To hide the tape, I rolled it to tuck behind the final fold on each side.
I tied each package up with a ribbon, making sure to have the ribbon hold down the sides where I folded the fabric to keep everything securely wrapped.
That’s it! It’s super easy and basically the same process as with traditional paper. I love how all of the presents turned out! The collection of gifts looks unique and fun and I can’t wait to give them out this Christmas. It also makes me so happy to know this is very low waste – all of this wrapping material will be saved and used again for years to come.
I’ve enjoyed taking a slow and steady approach to decorating for Christmas this year and have added bits and pieces to our home over the last week and a half. As of last night, I think I’m pretty much done (at least with all the major decorations), so today I thought I’d give you a little tour of our home decked out for Christmas!
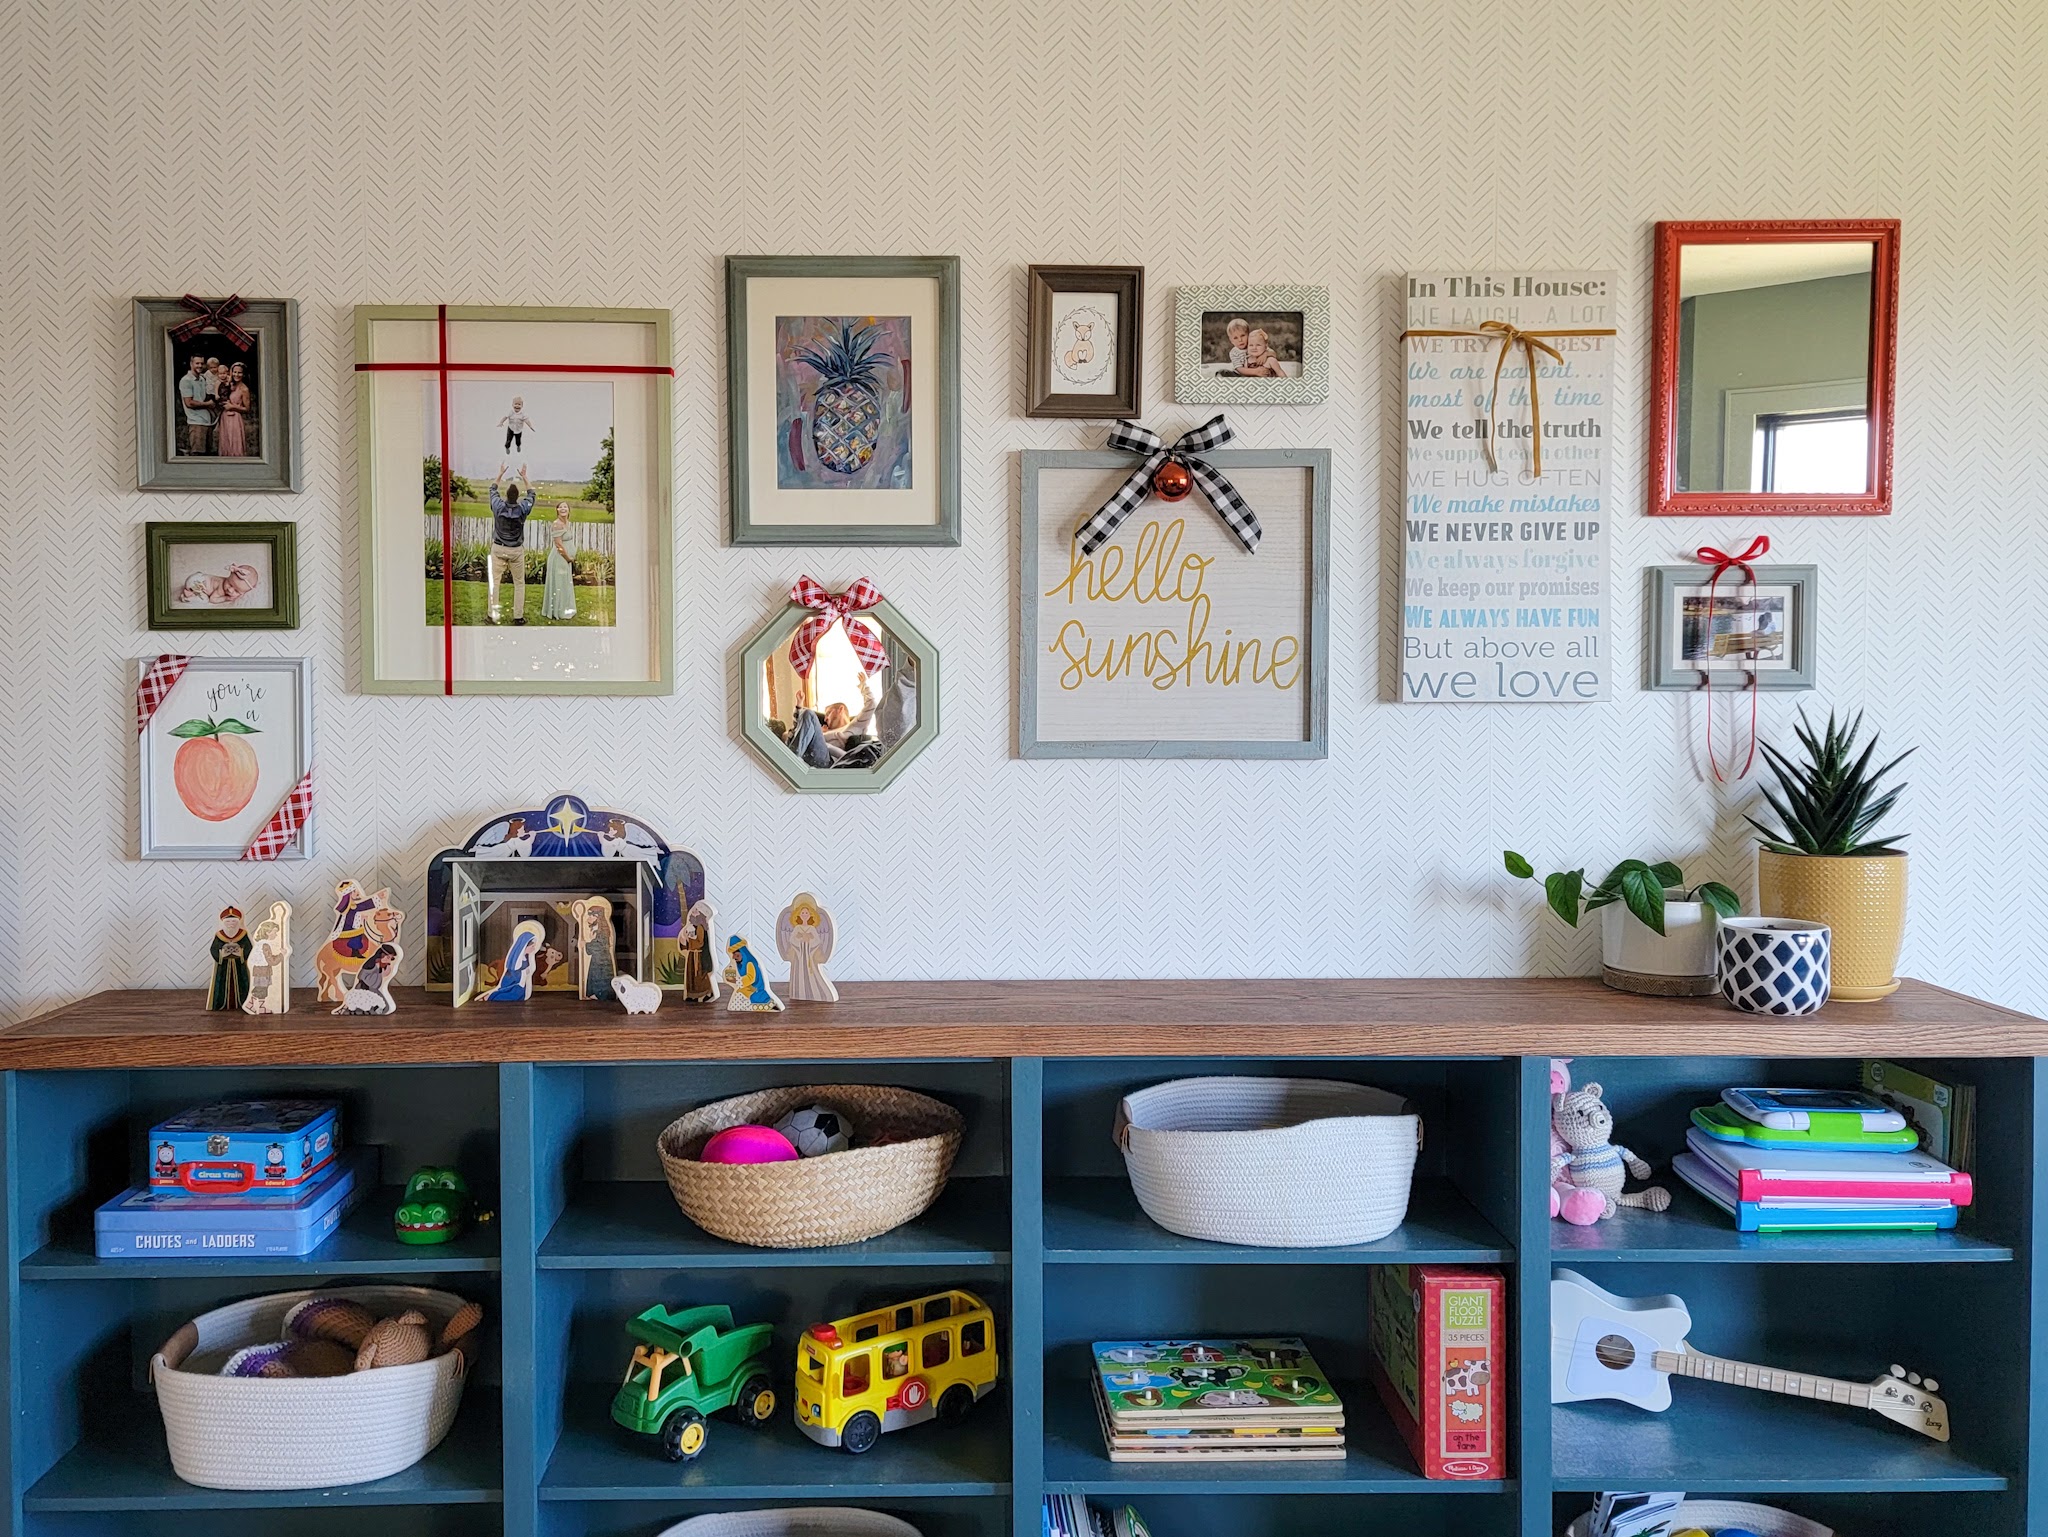
I want my kids’ memories of Christmas in our home to feel magical so I definitely upped my game this year and concentrated on a few areas where I felt we’d get the most bang for our buck. I didn’t add things to every room. I didn’t add a single Christmas item in our basement. I specifically focused on the areas our family, particularly the kids, use the most. One of the biggest things I did was add ribbons and ornaments to existing decor – it was such a fun way to make things feel extra special without actually swapping out everything and since it’s higher than they can reach, it’s very kid-friendly.
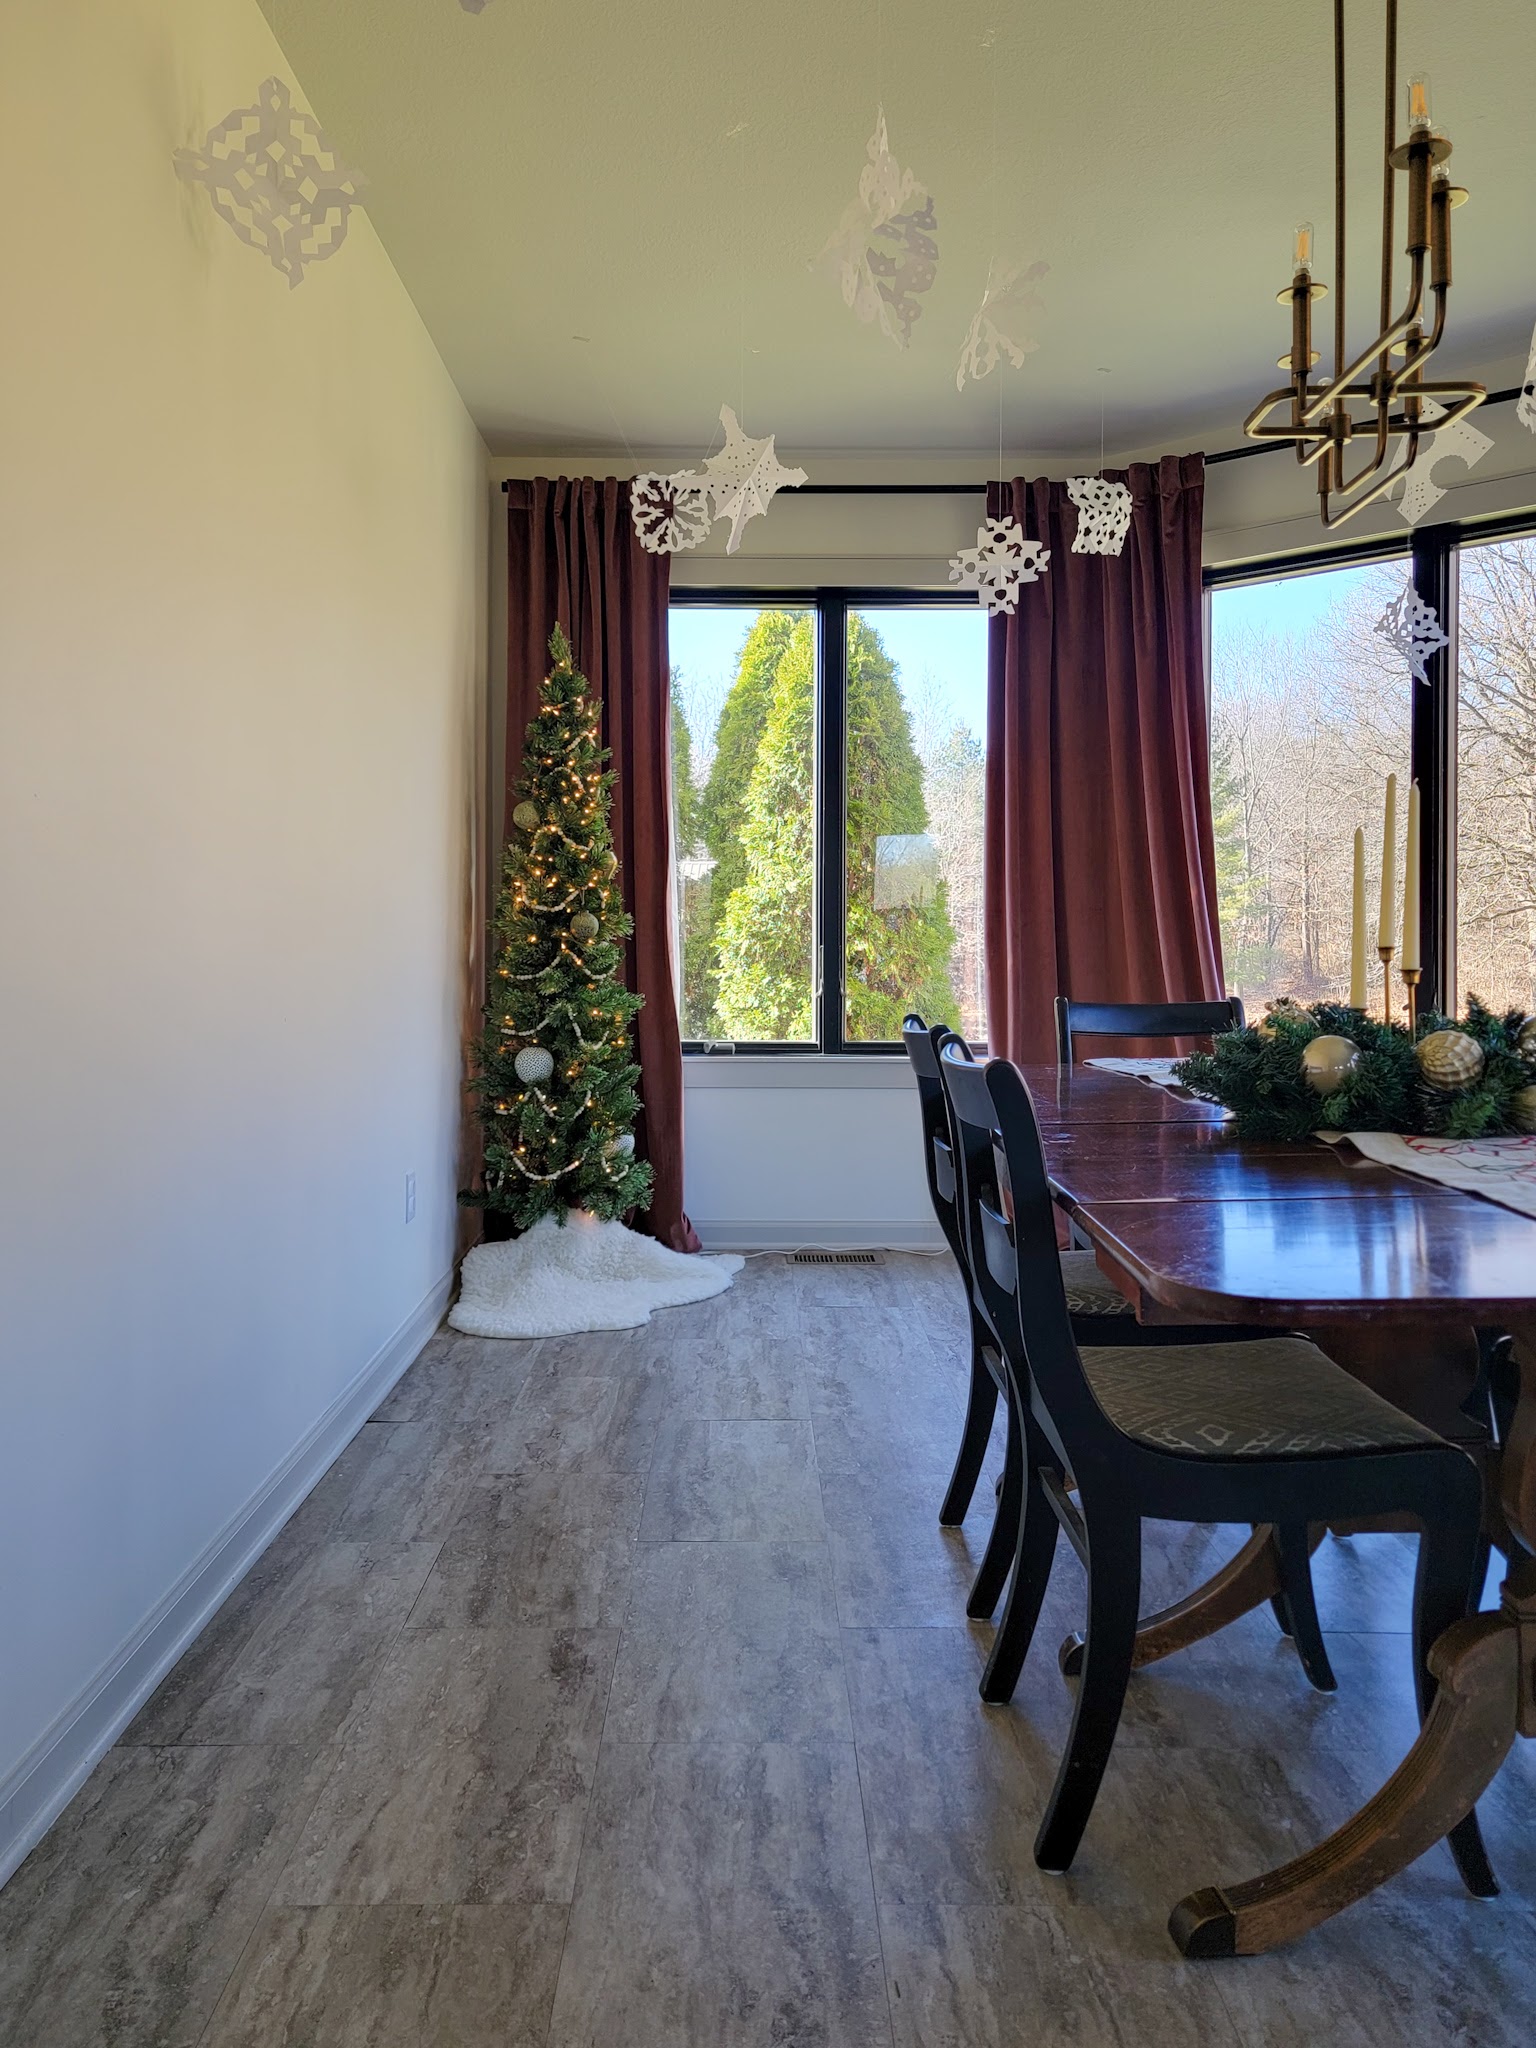
This year my kids wanted to contribute a lot, especially with decorating the tree and dining room – it’s not perfect, but this house is our home and it feels festive and magical to us, which is the entire point. 🙂 I didn’t take a picture of every single Christmas item in my house, but this will give you a very good glimpse at our home this season. Enjoy!
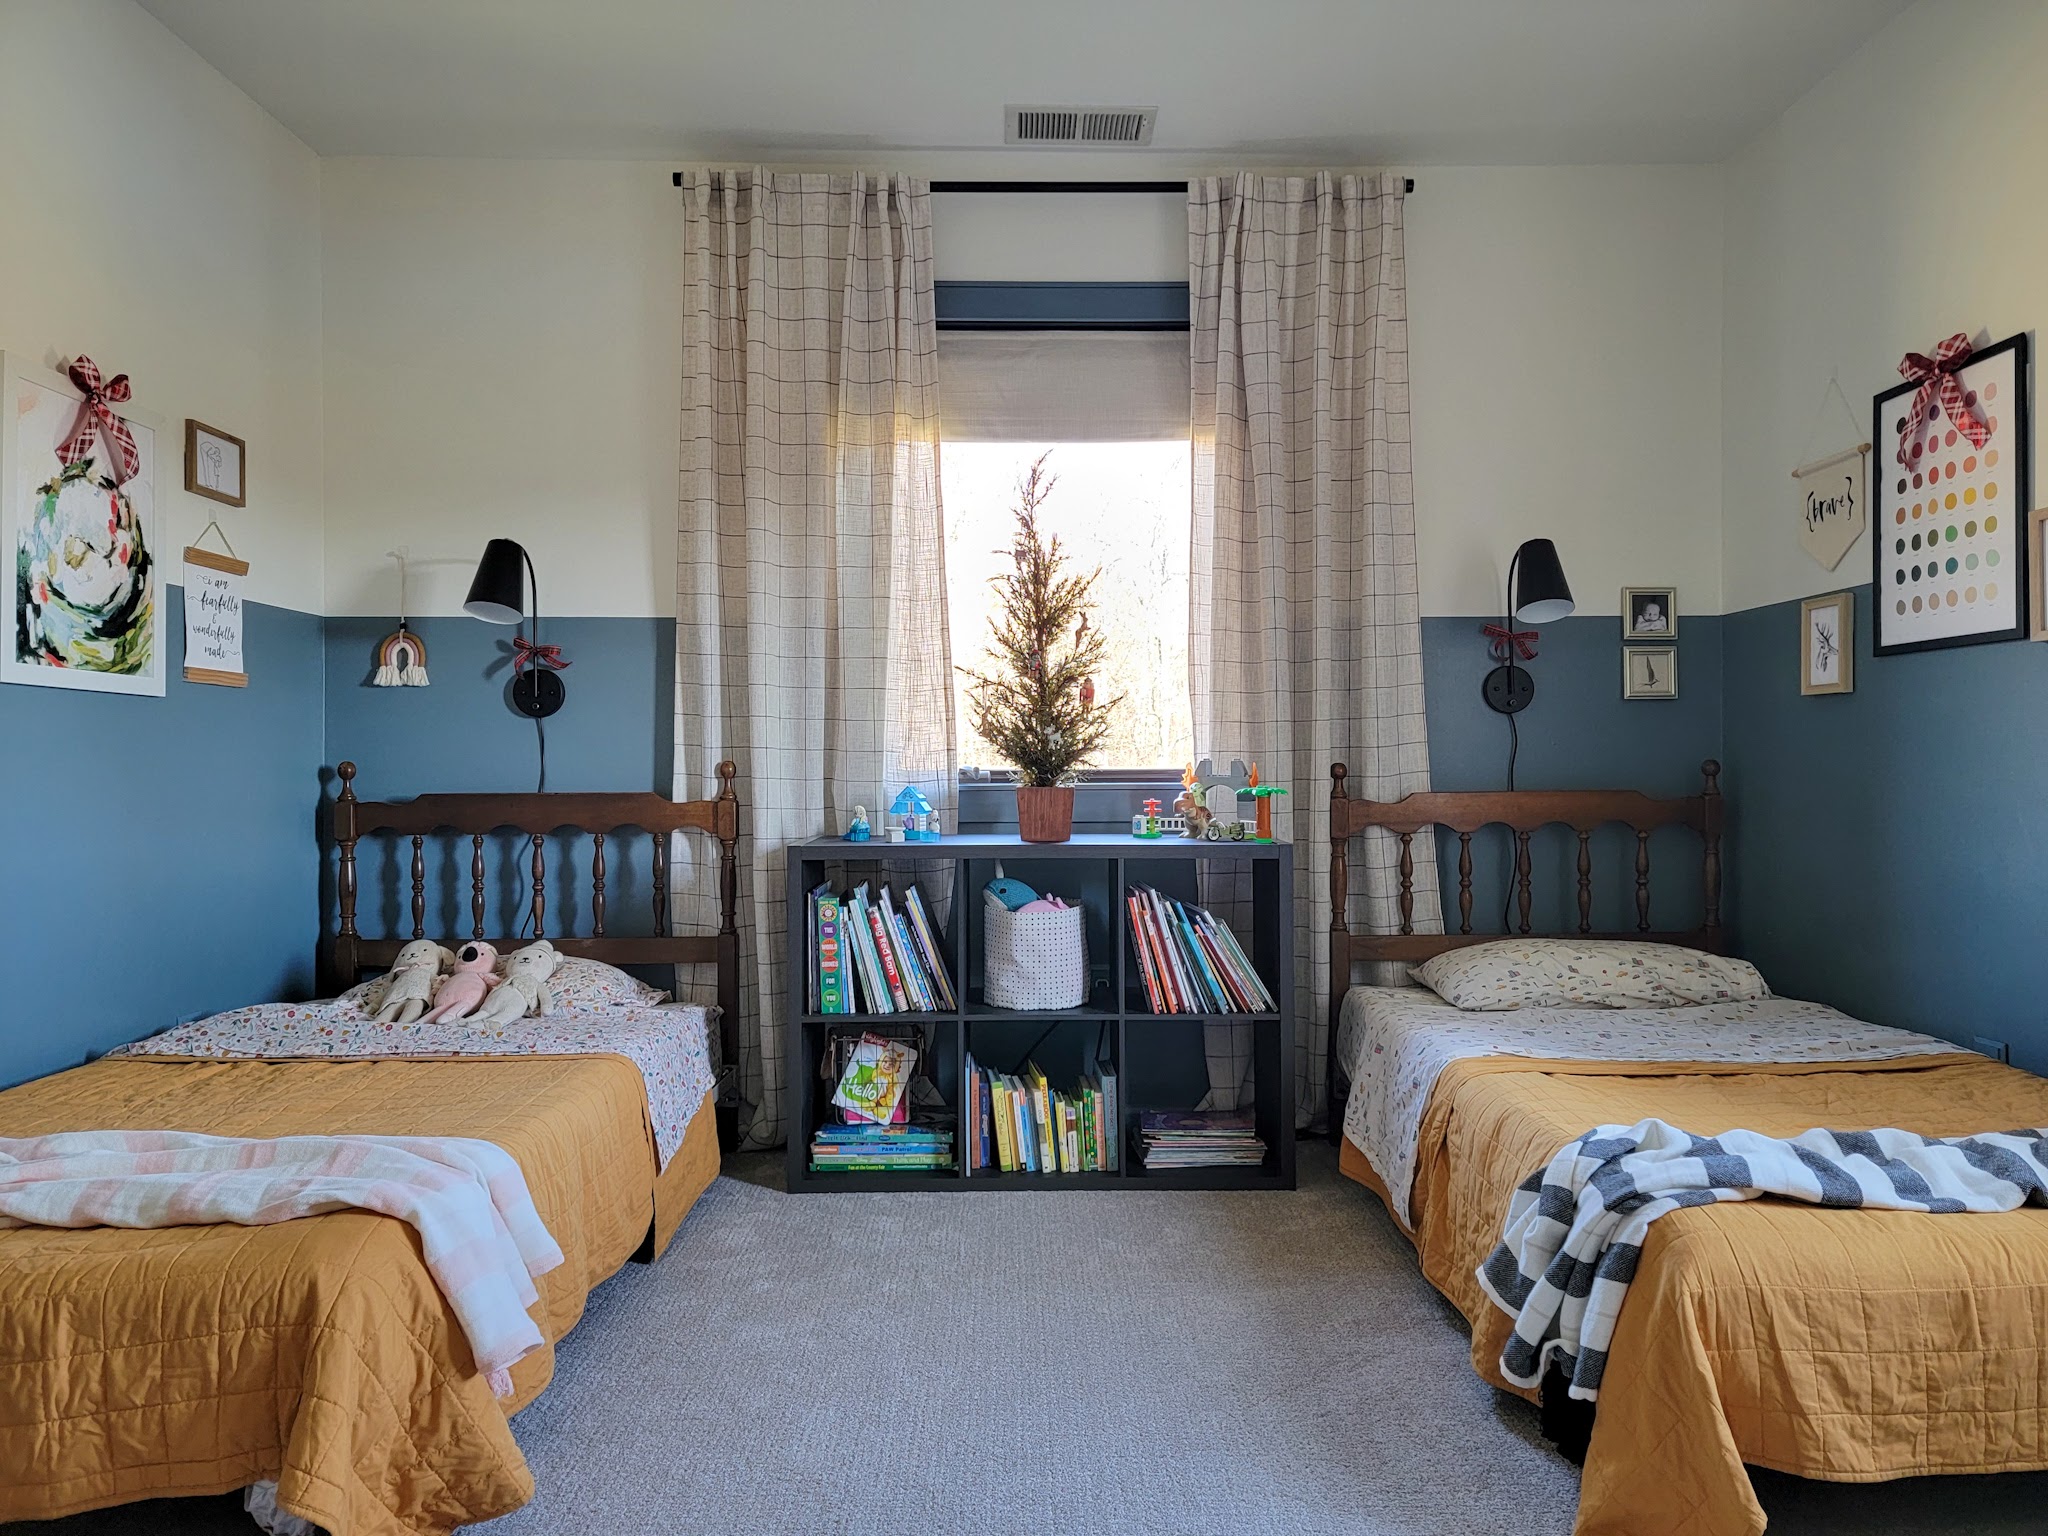
Kids’ Bedroom
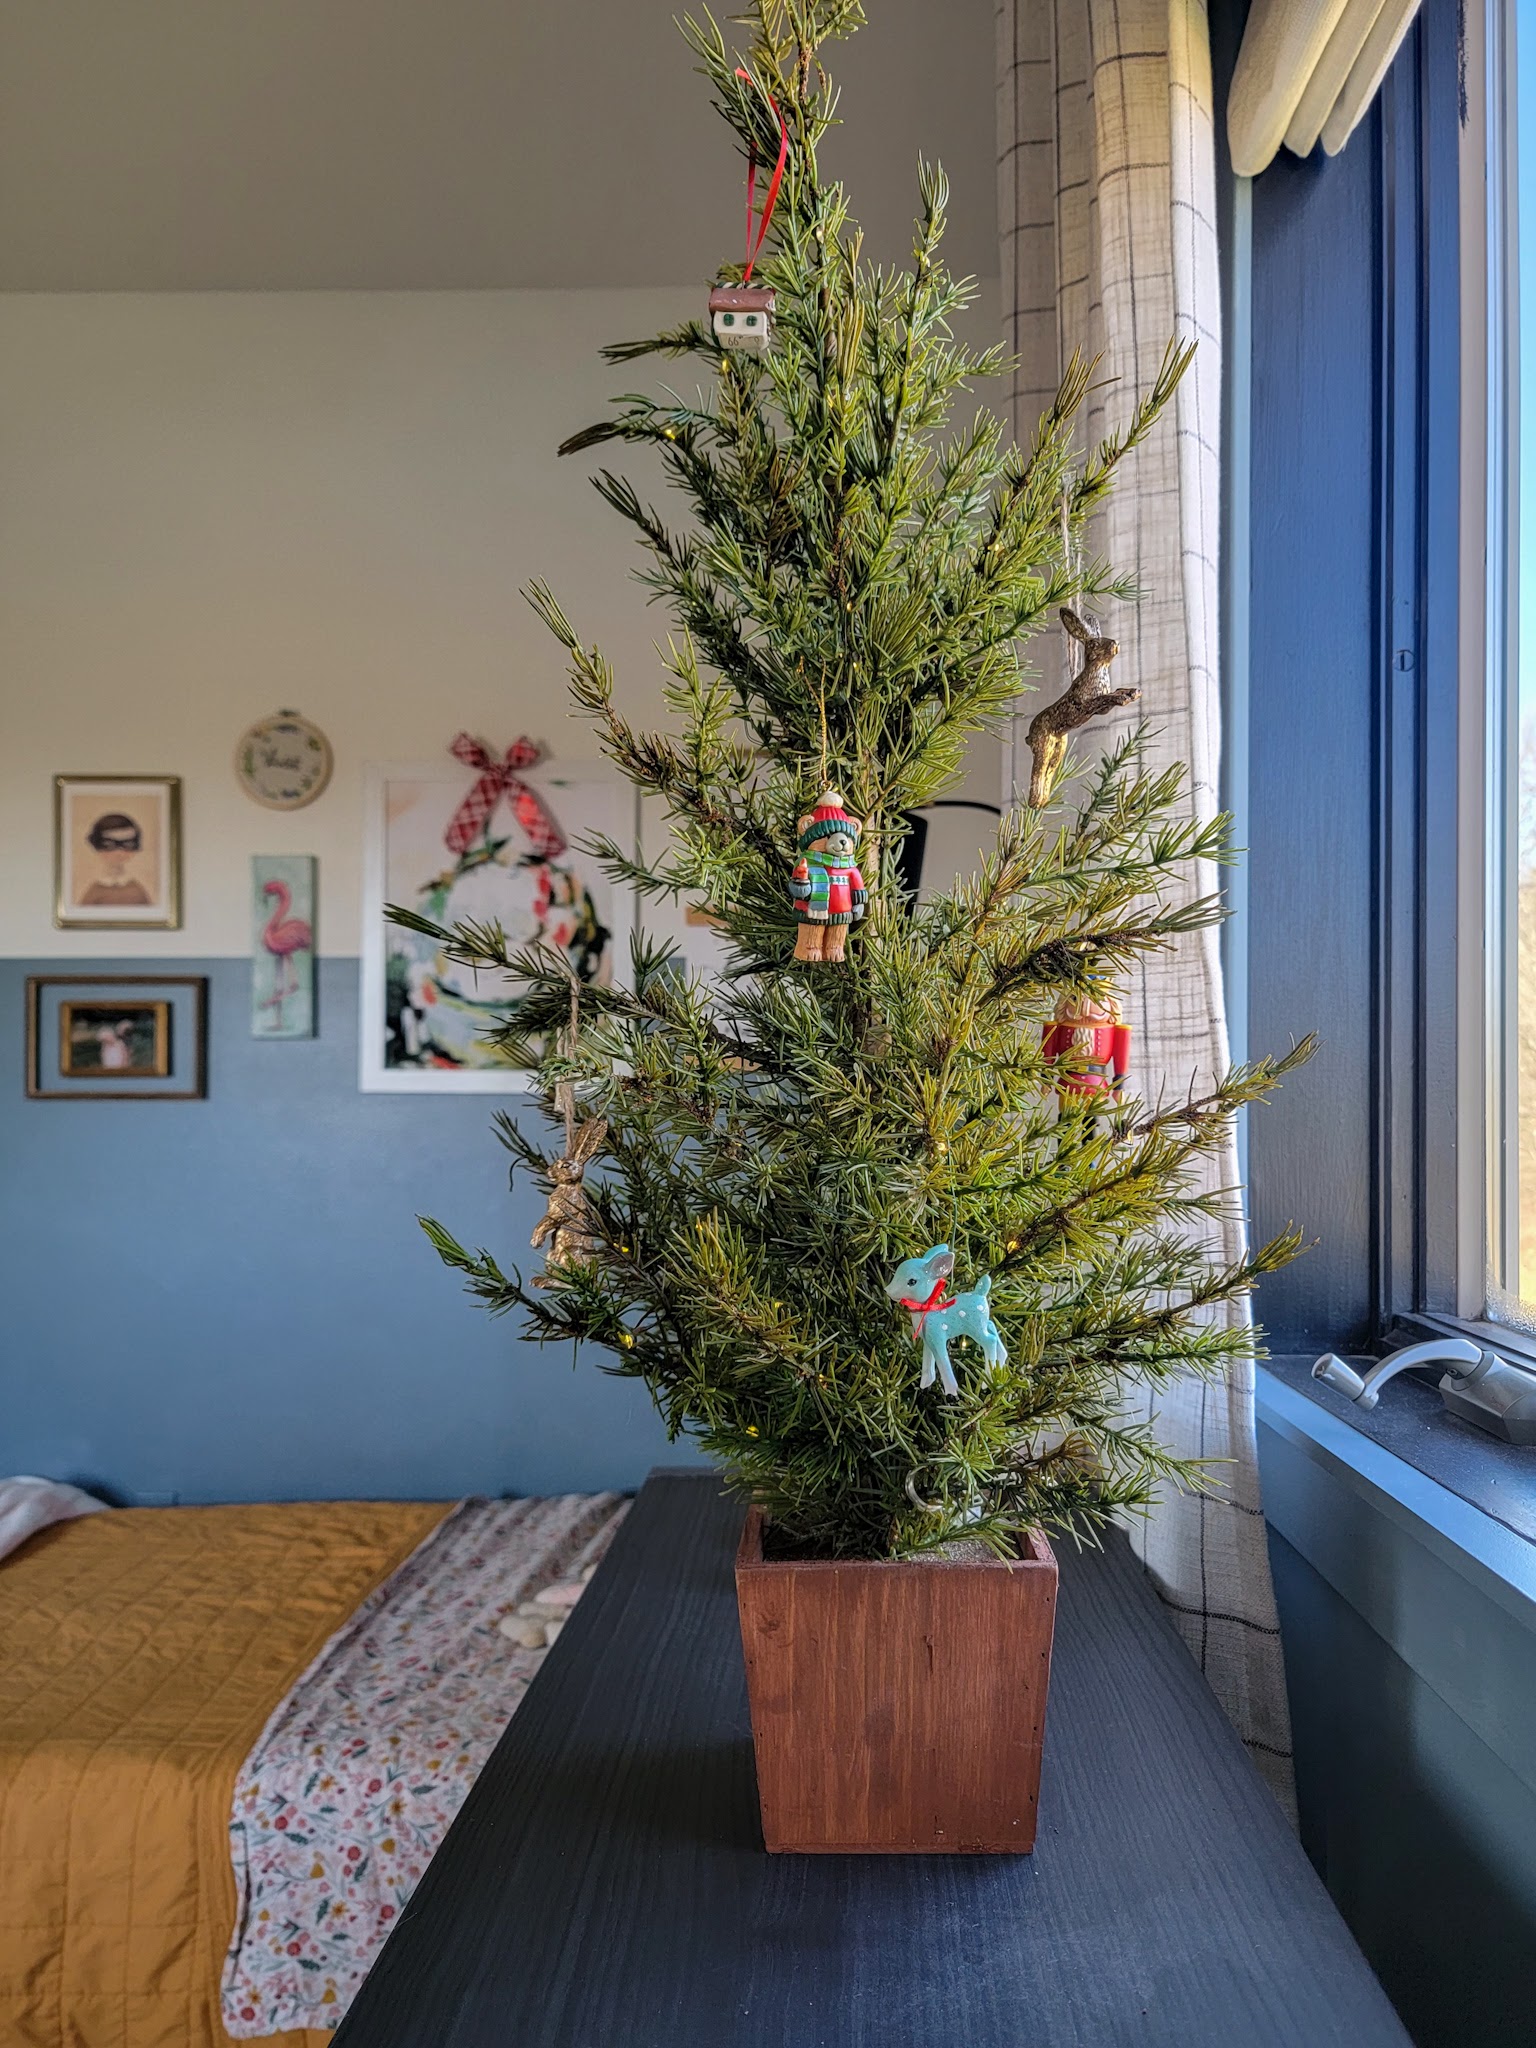
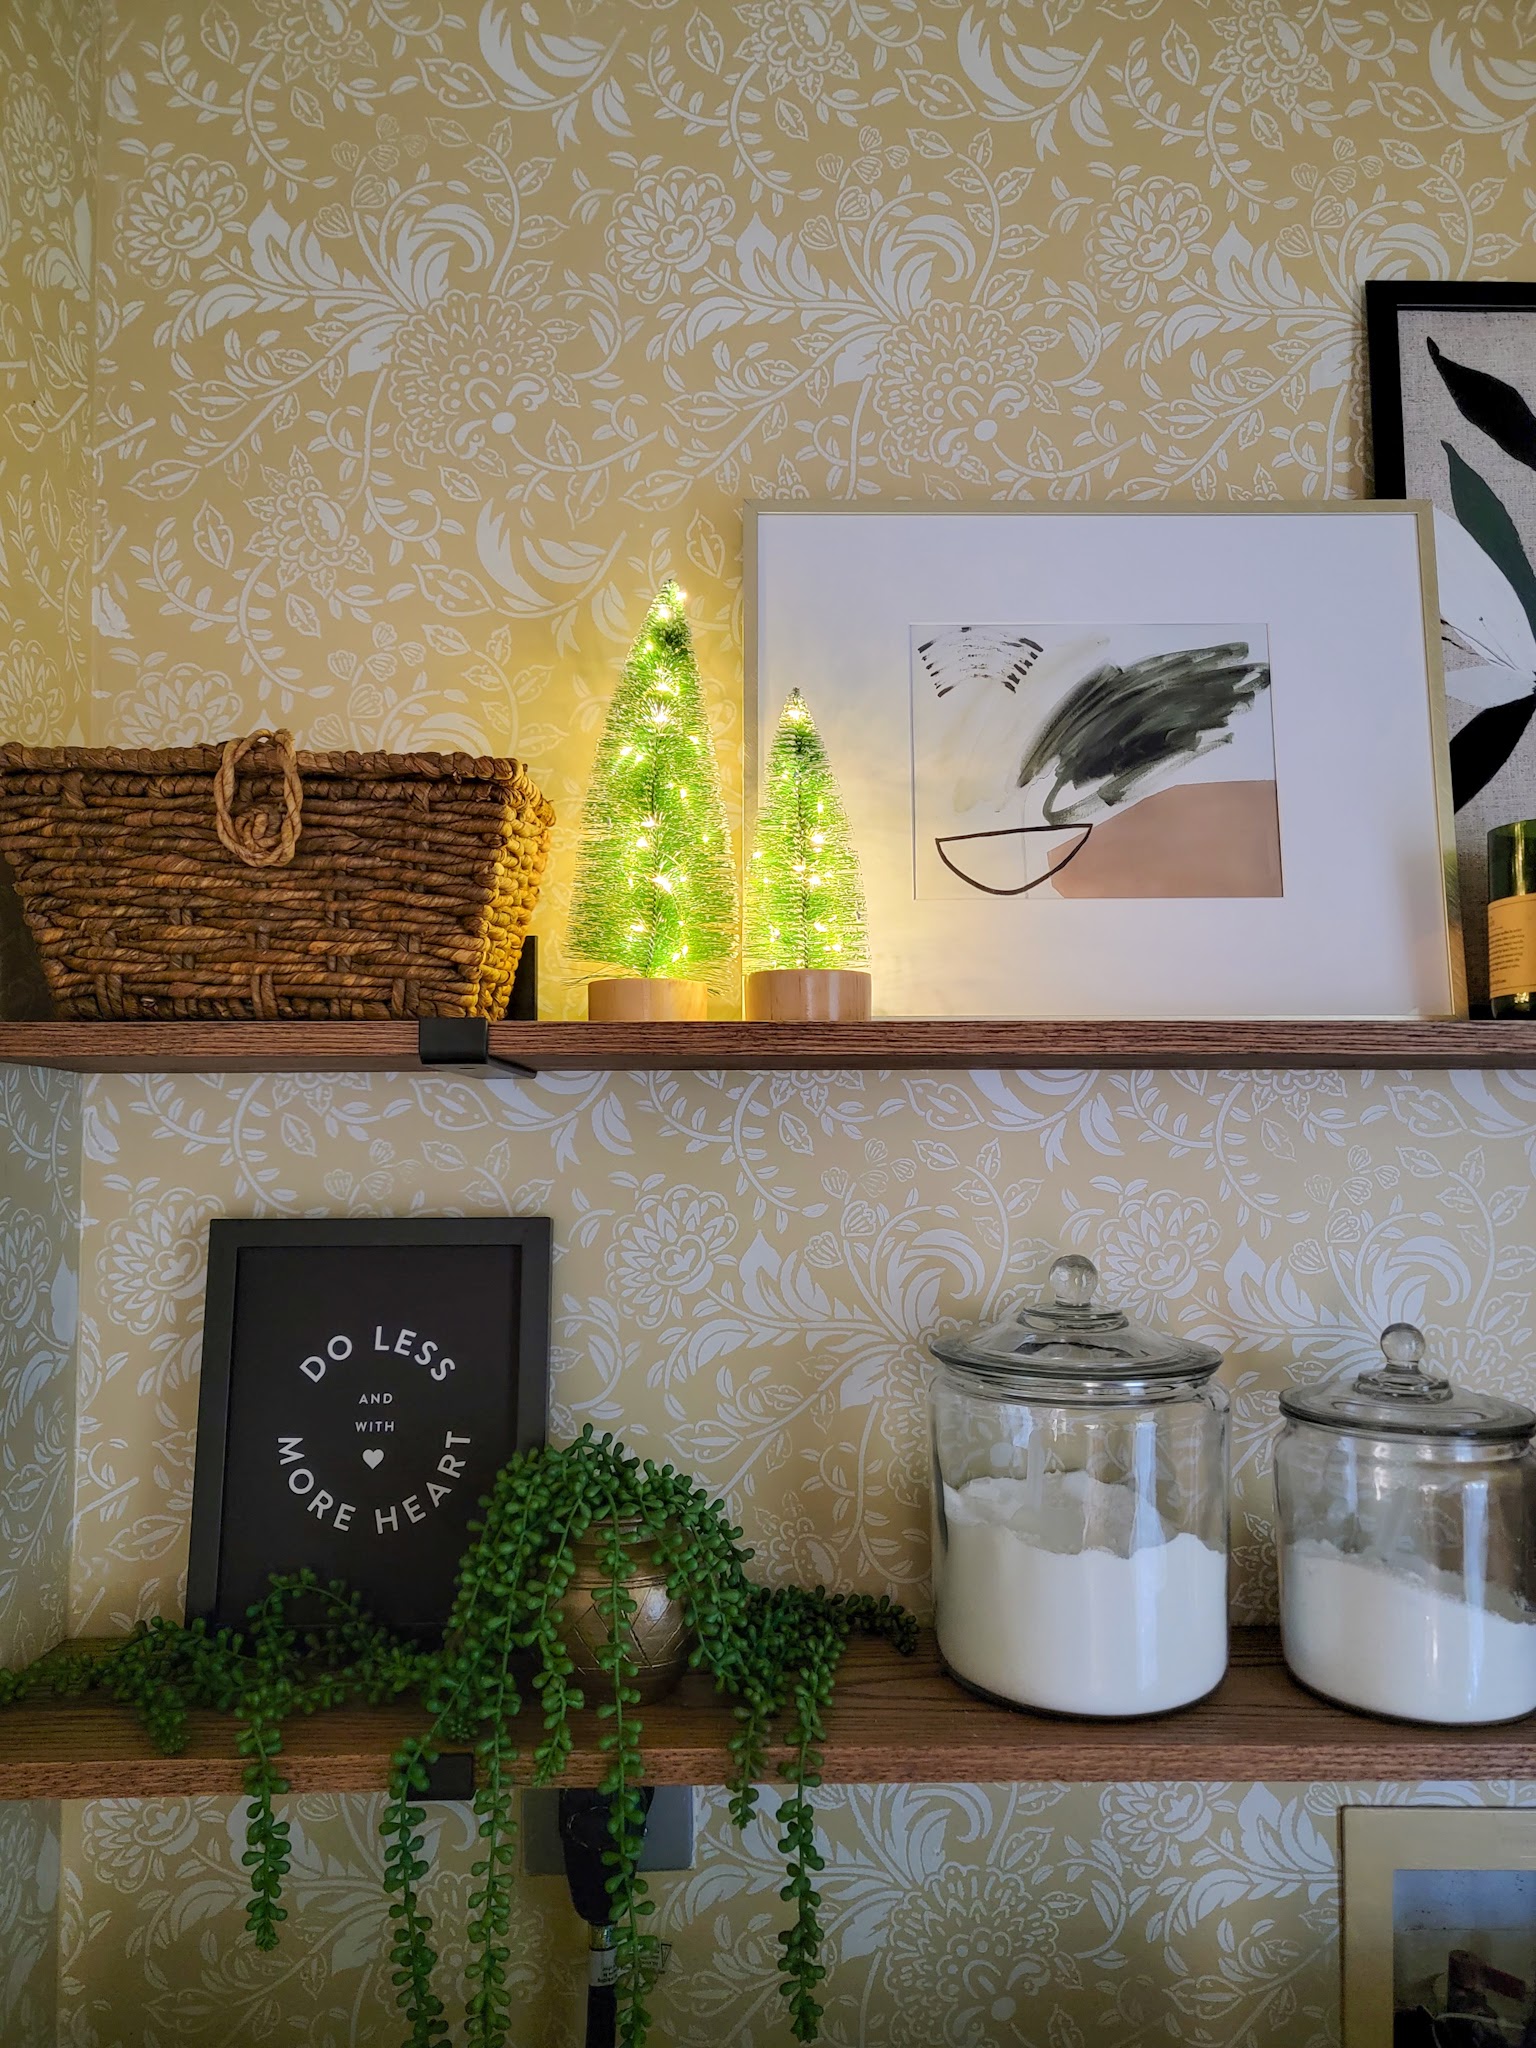
I really wanted LJ and Vi’s shared bedroom to have some Christmas magic and one of the top things I wanted was a small tree with twinkle lights. I was pretty particular about size/looks (and I wanted to try to find one secondhand rather than buy new) so I started my search early and scoured thrift stores for a couple weeks. I eventually scored this cute little tabletop tree at a local vintage shop and is so perfect! I had fun thrifting cute kid-friendly ornaments and also bought a few new ones at a local small business.
LJ and Vi came with me to a local vintage sale and one of them spotted this little set of bottlebrush trees. They both insisted we get them and honestly, it was not hard to convince me! I think they look so cute on the dresser and the kids really love them.
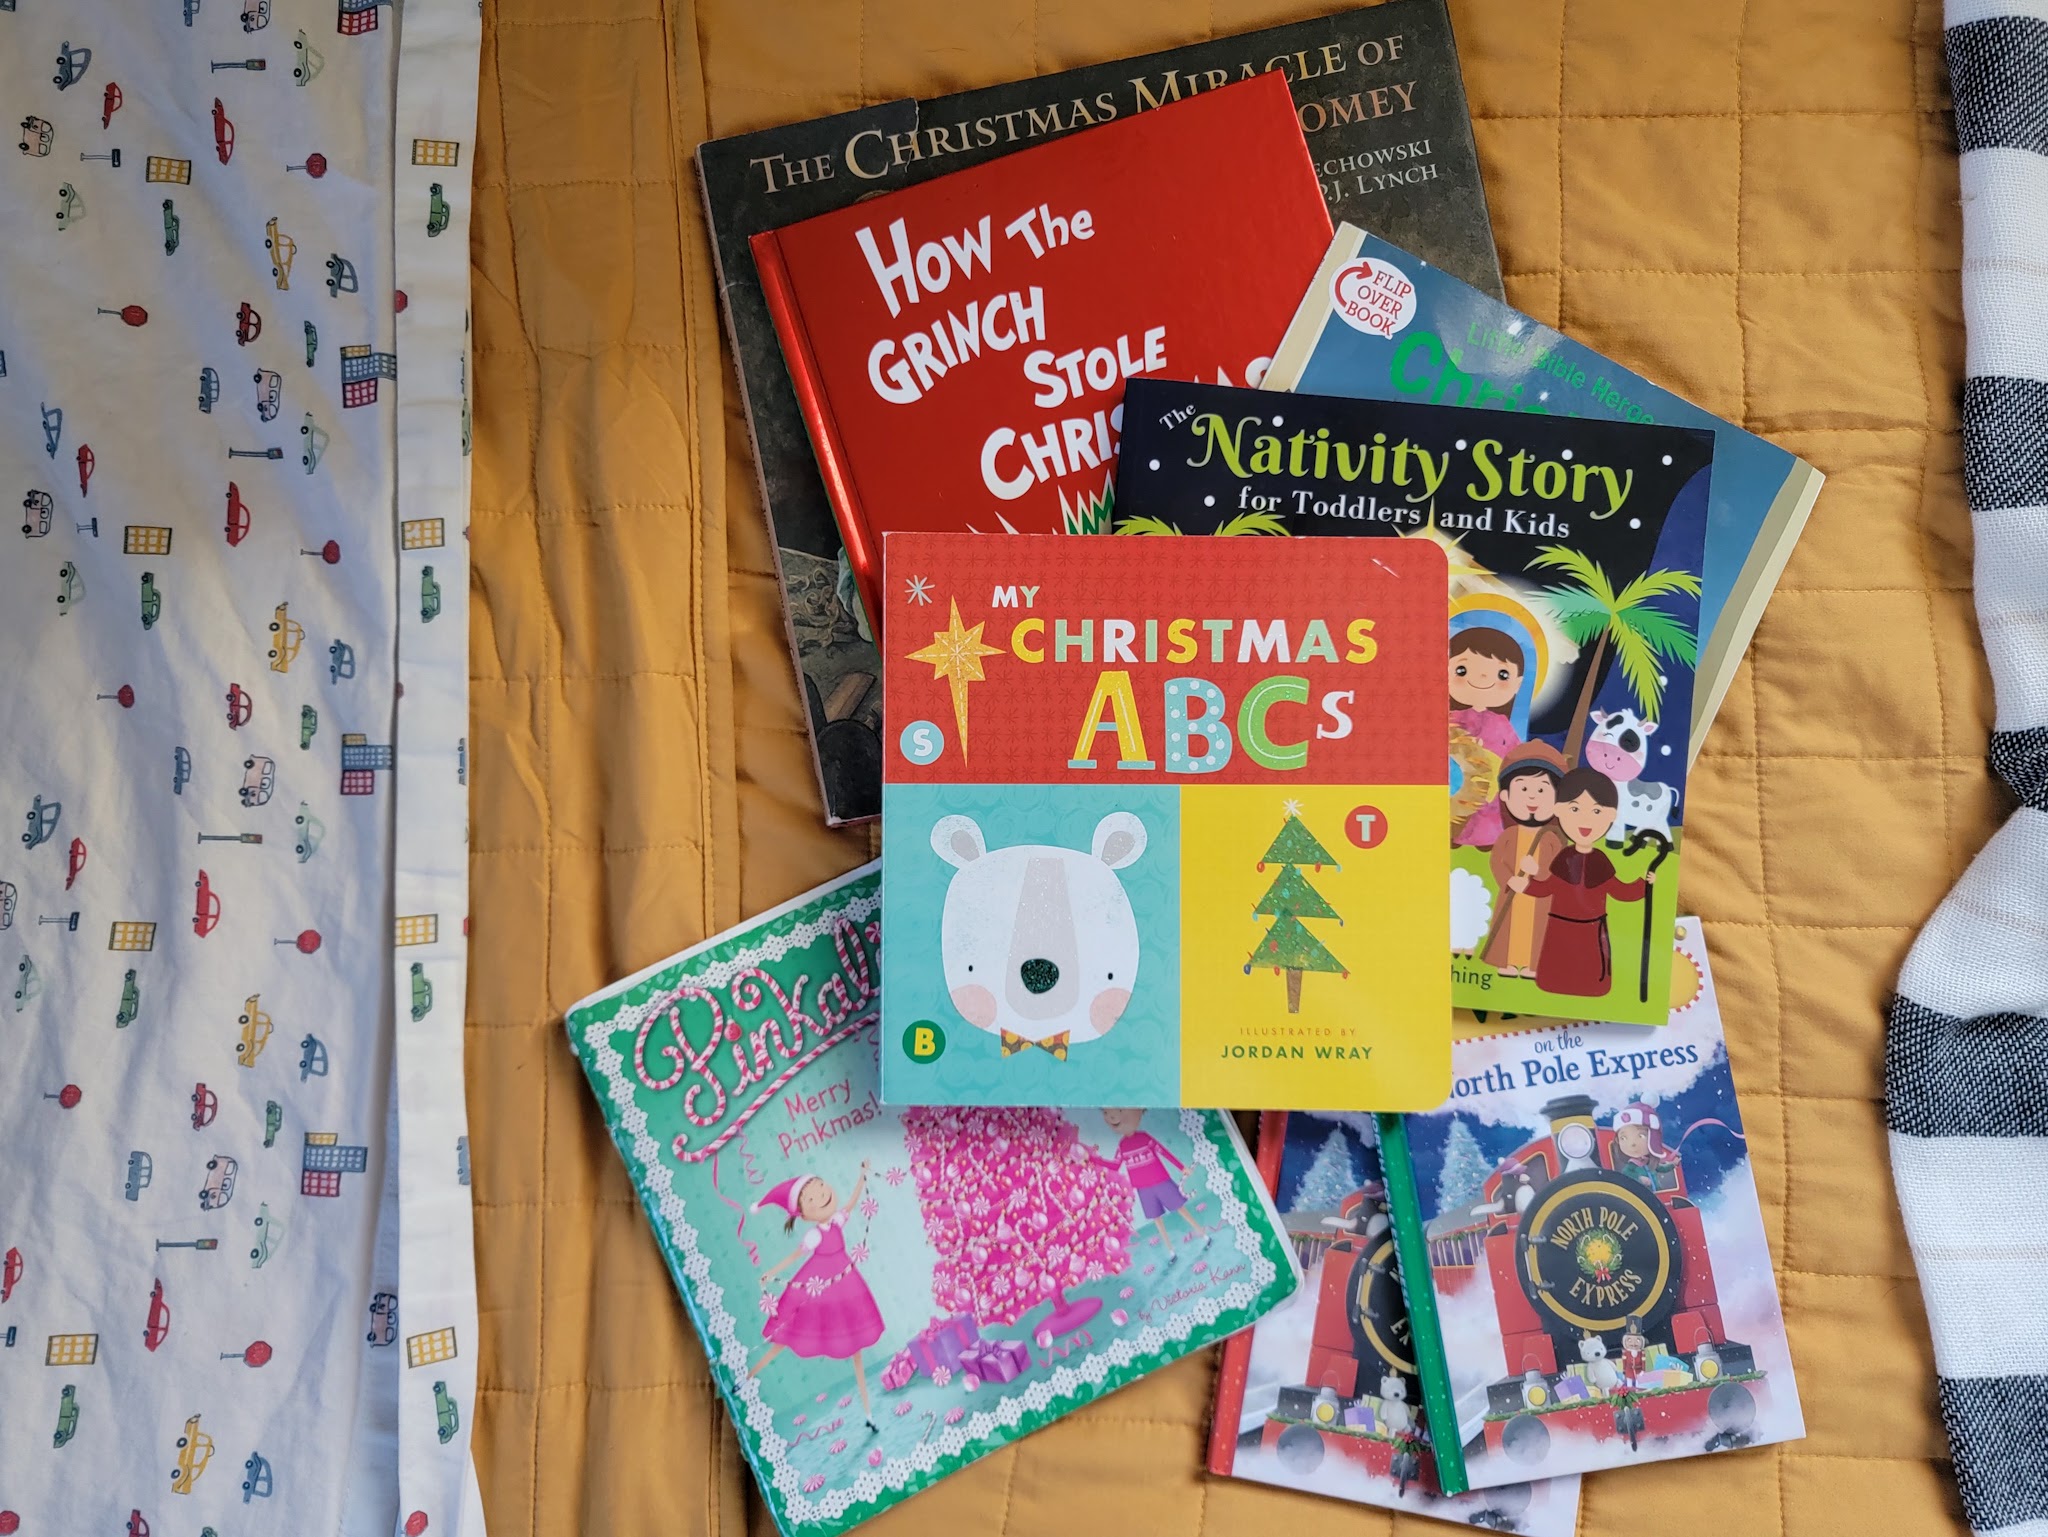
We also have several Christmas-themed books that I always pull out in December and this year I’m keeping them all in the kids’ room for bedtime stories.
Main Floor
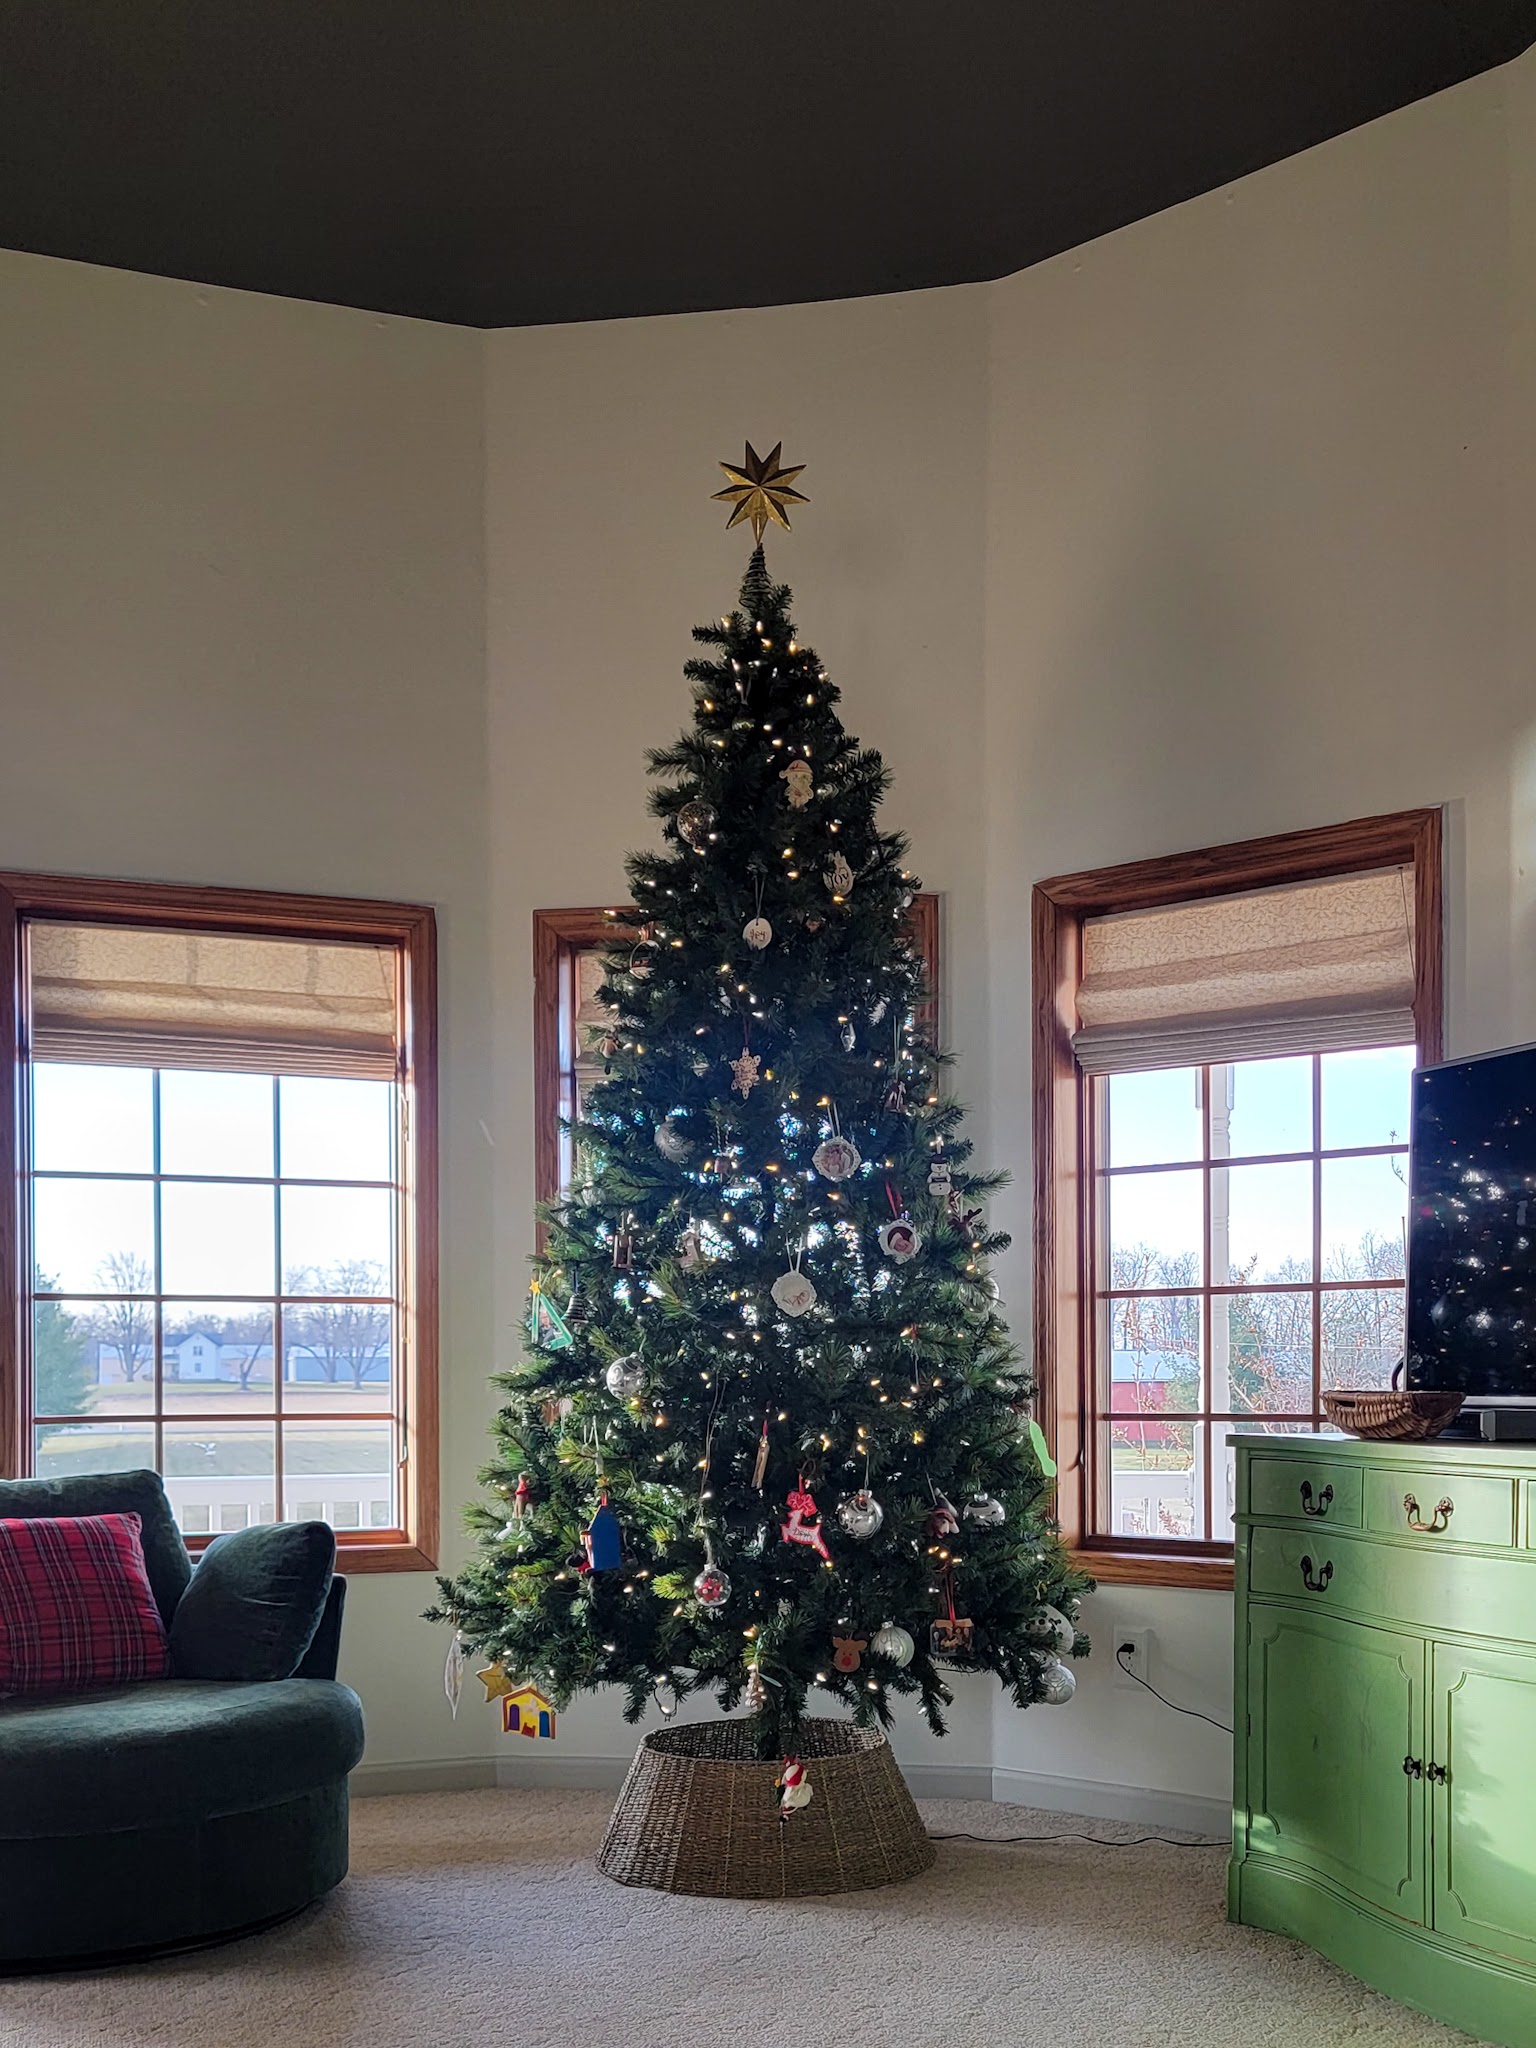
This year’s tree is very bottom-heavy with ornaments, but the kids had a blast hanging up as much as they could! Our big tree is always filled with sentimental ornaments and I love it.
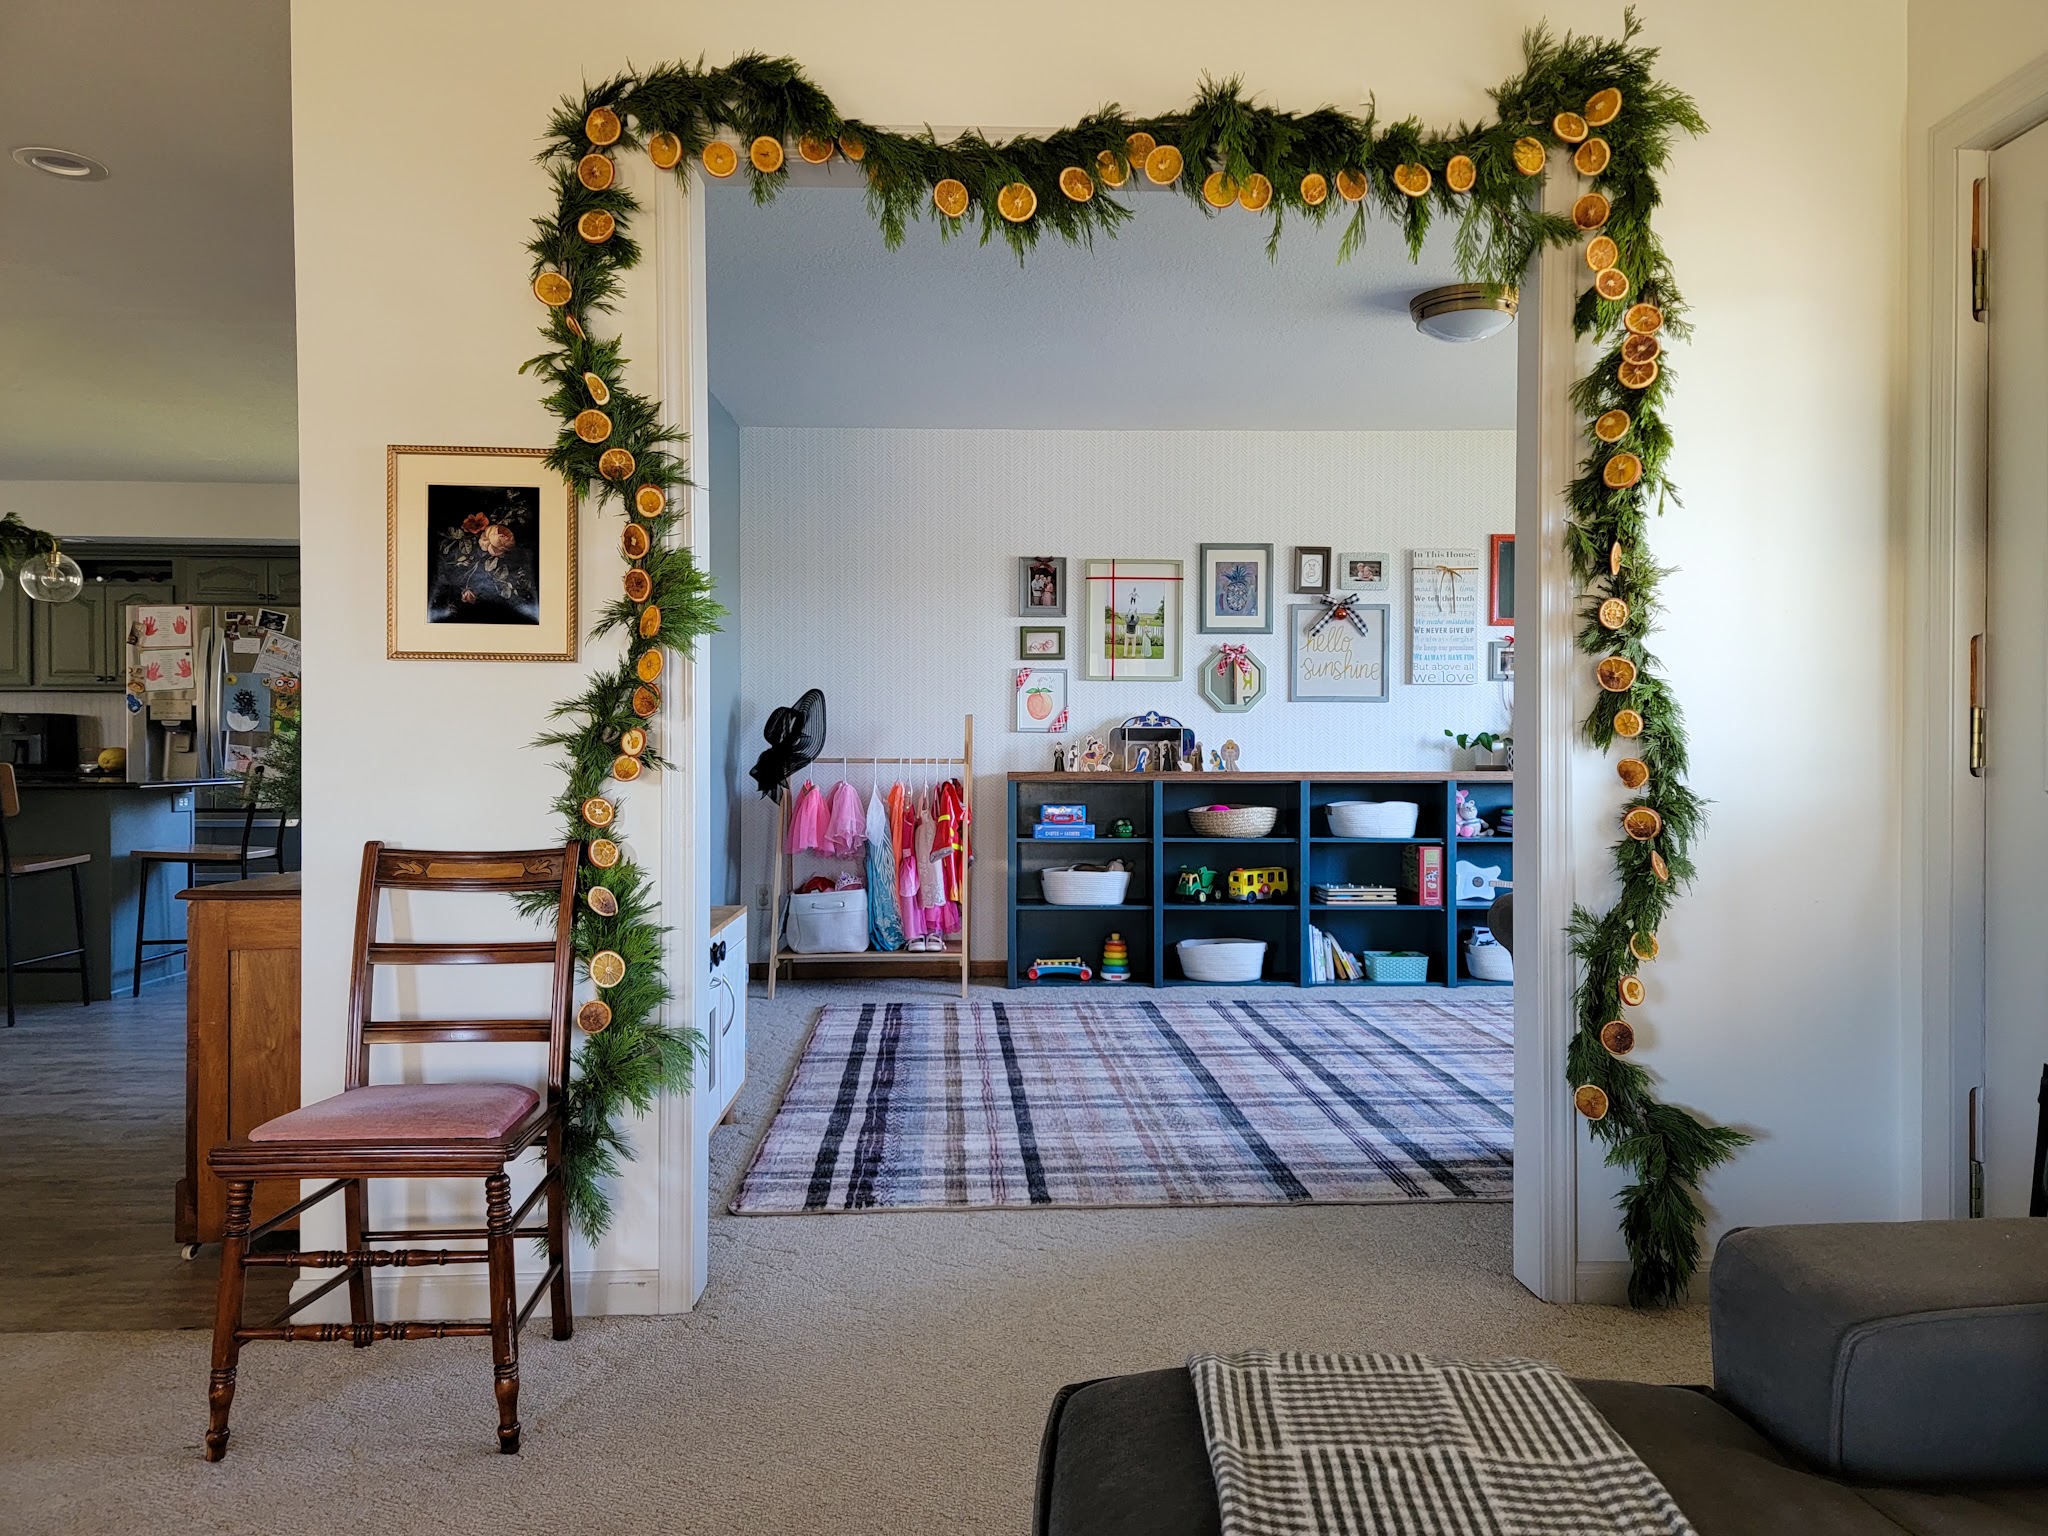
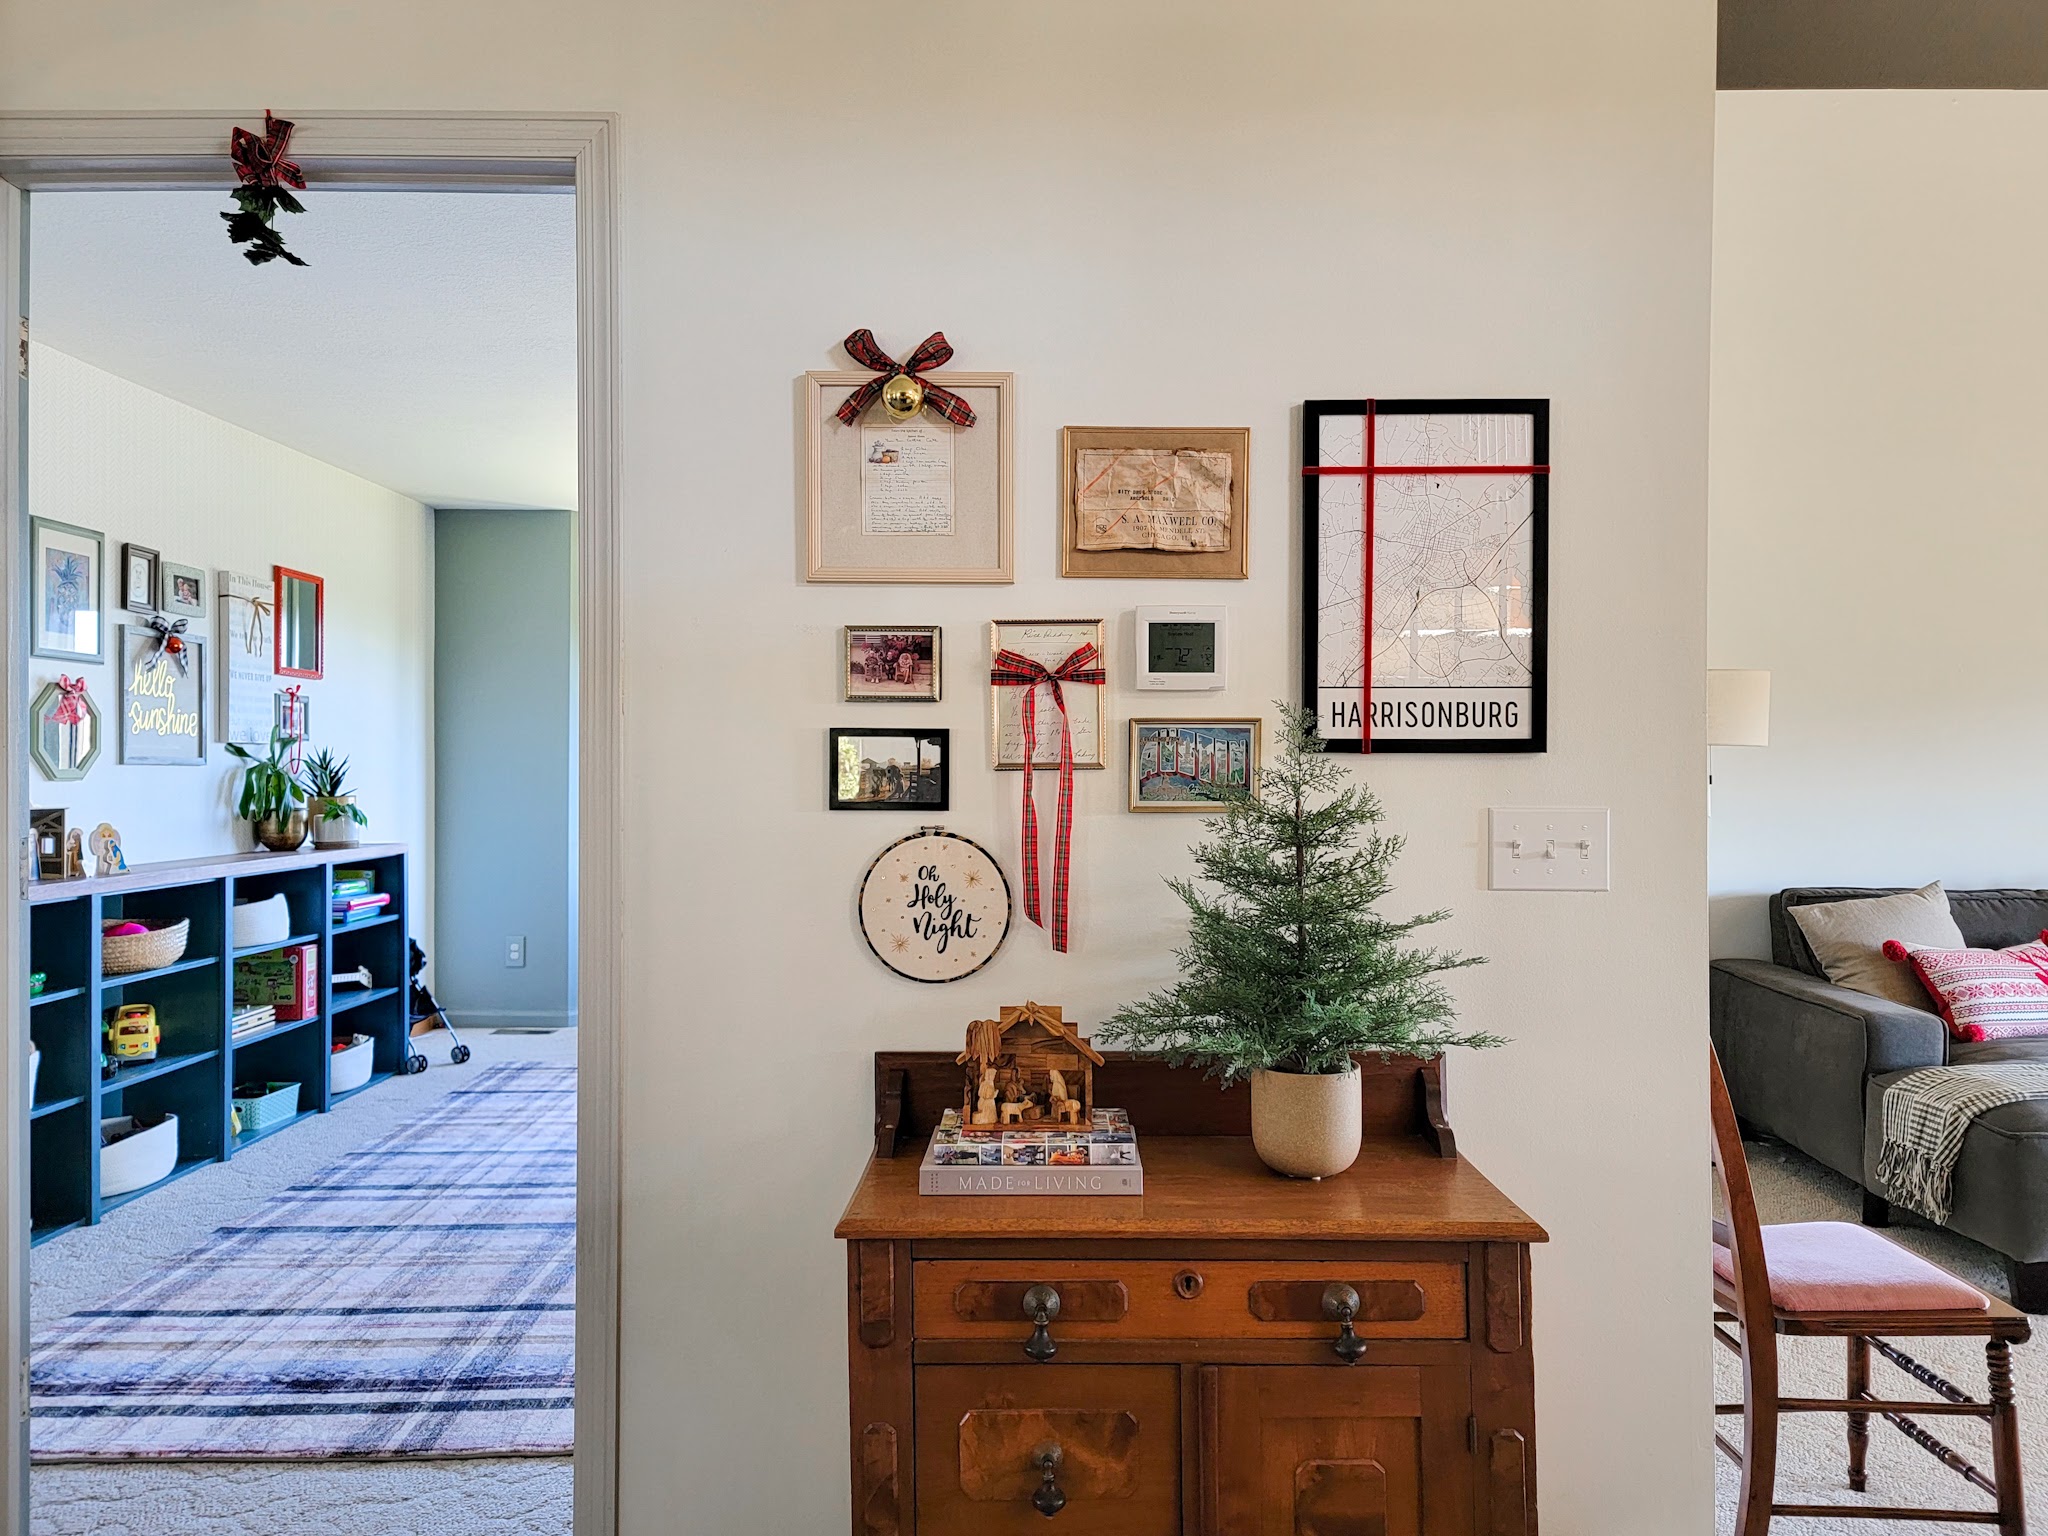
I’ve never had a real tree or real garland before but I spotted some fresh cut cedar garland for sale at Costco and decided to give it a try. We made a dried orange garland as a family (well kind of – the kids did help for a few minutes ha!) and I hung it up around the cased opening between the living room and playroom. I LOVE it! Safe to say this will not be the last time I do this.
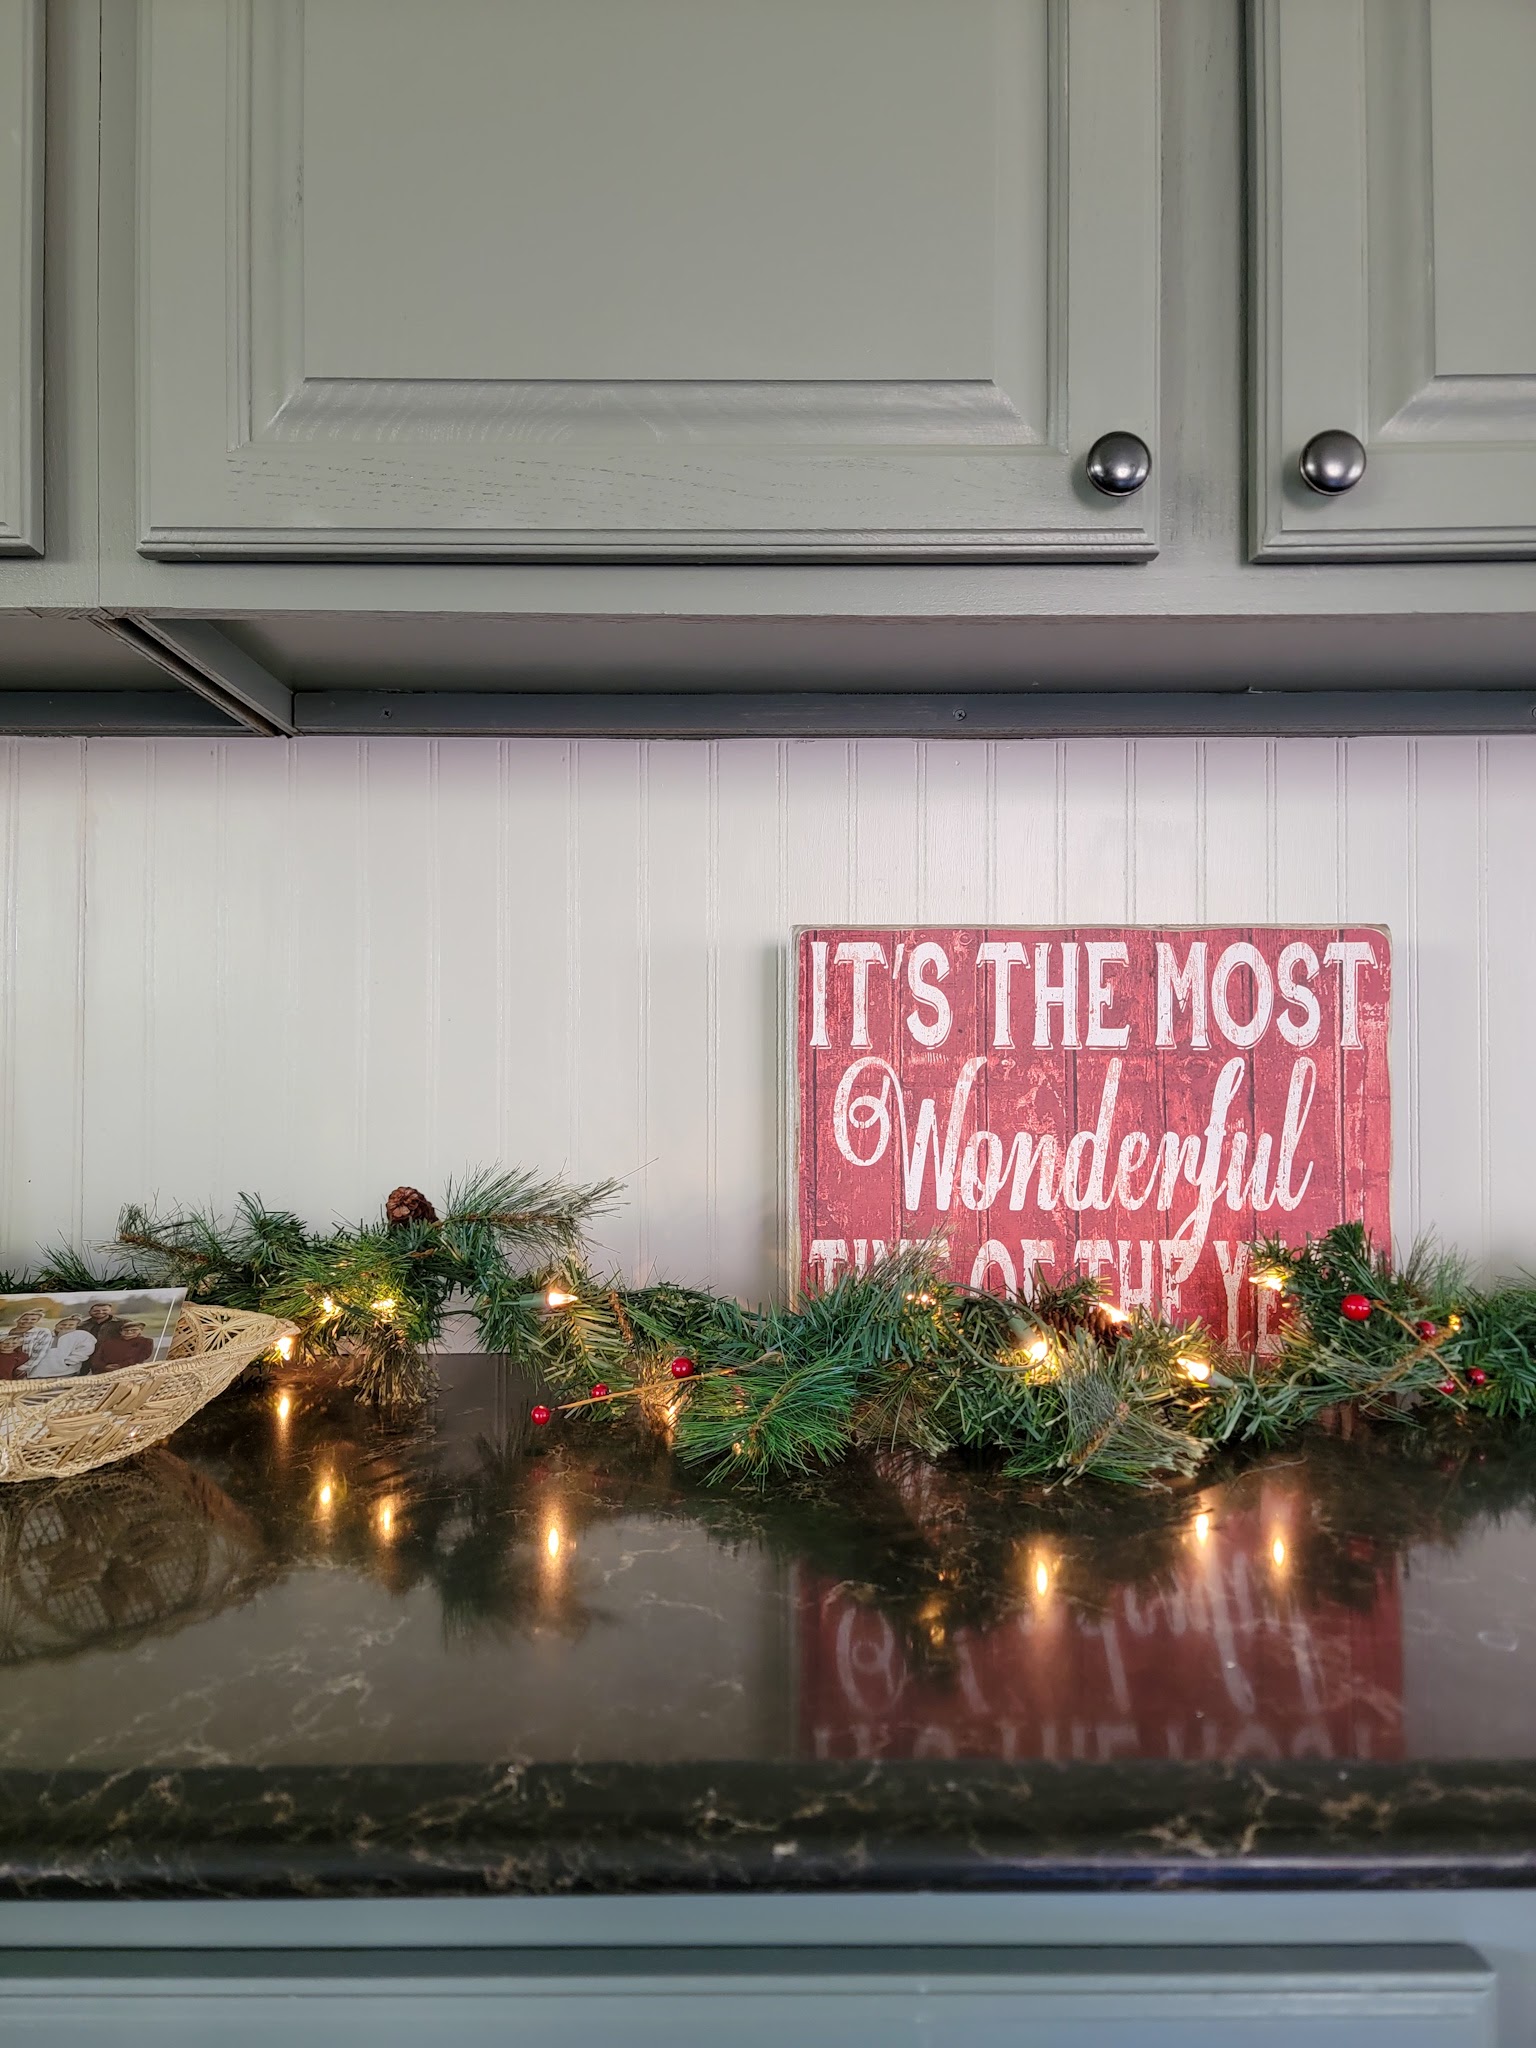
Normally I display the Christmas cards we receive but this year I’m keeping it simple with a vintage basket on our kitchen counter to collect cards and flip through them at our leisure.
On the first night of December we spent time as a family making paper snowflakes. It was so fun! I thought we’d hang them up on the windows but LJ was adamant that they should hang down from the ceiling and eventually he won me over. I’ll admit, there is something magical about the overall effect in person! I also love how perfectly imperfect the snowflakes are. The kids were so proud of their work and every snowflake, regardless of how it turned out, got hung up. It might not look picture-perfect but it makes us all feel warm and fuzzy so it’s just right for us.
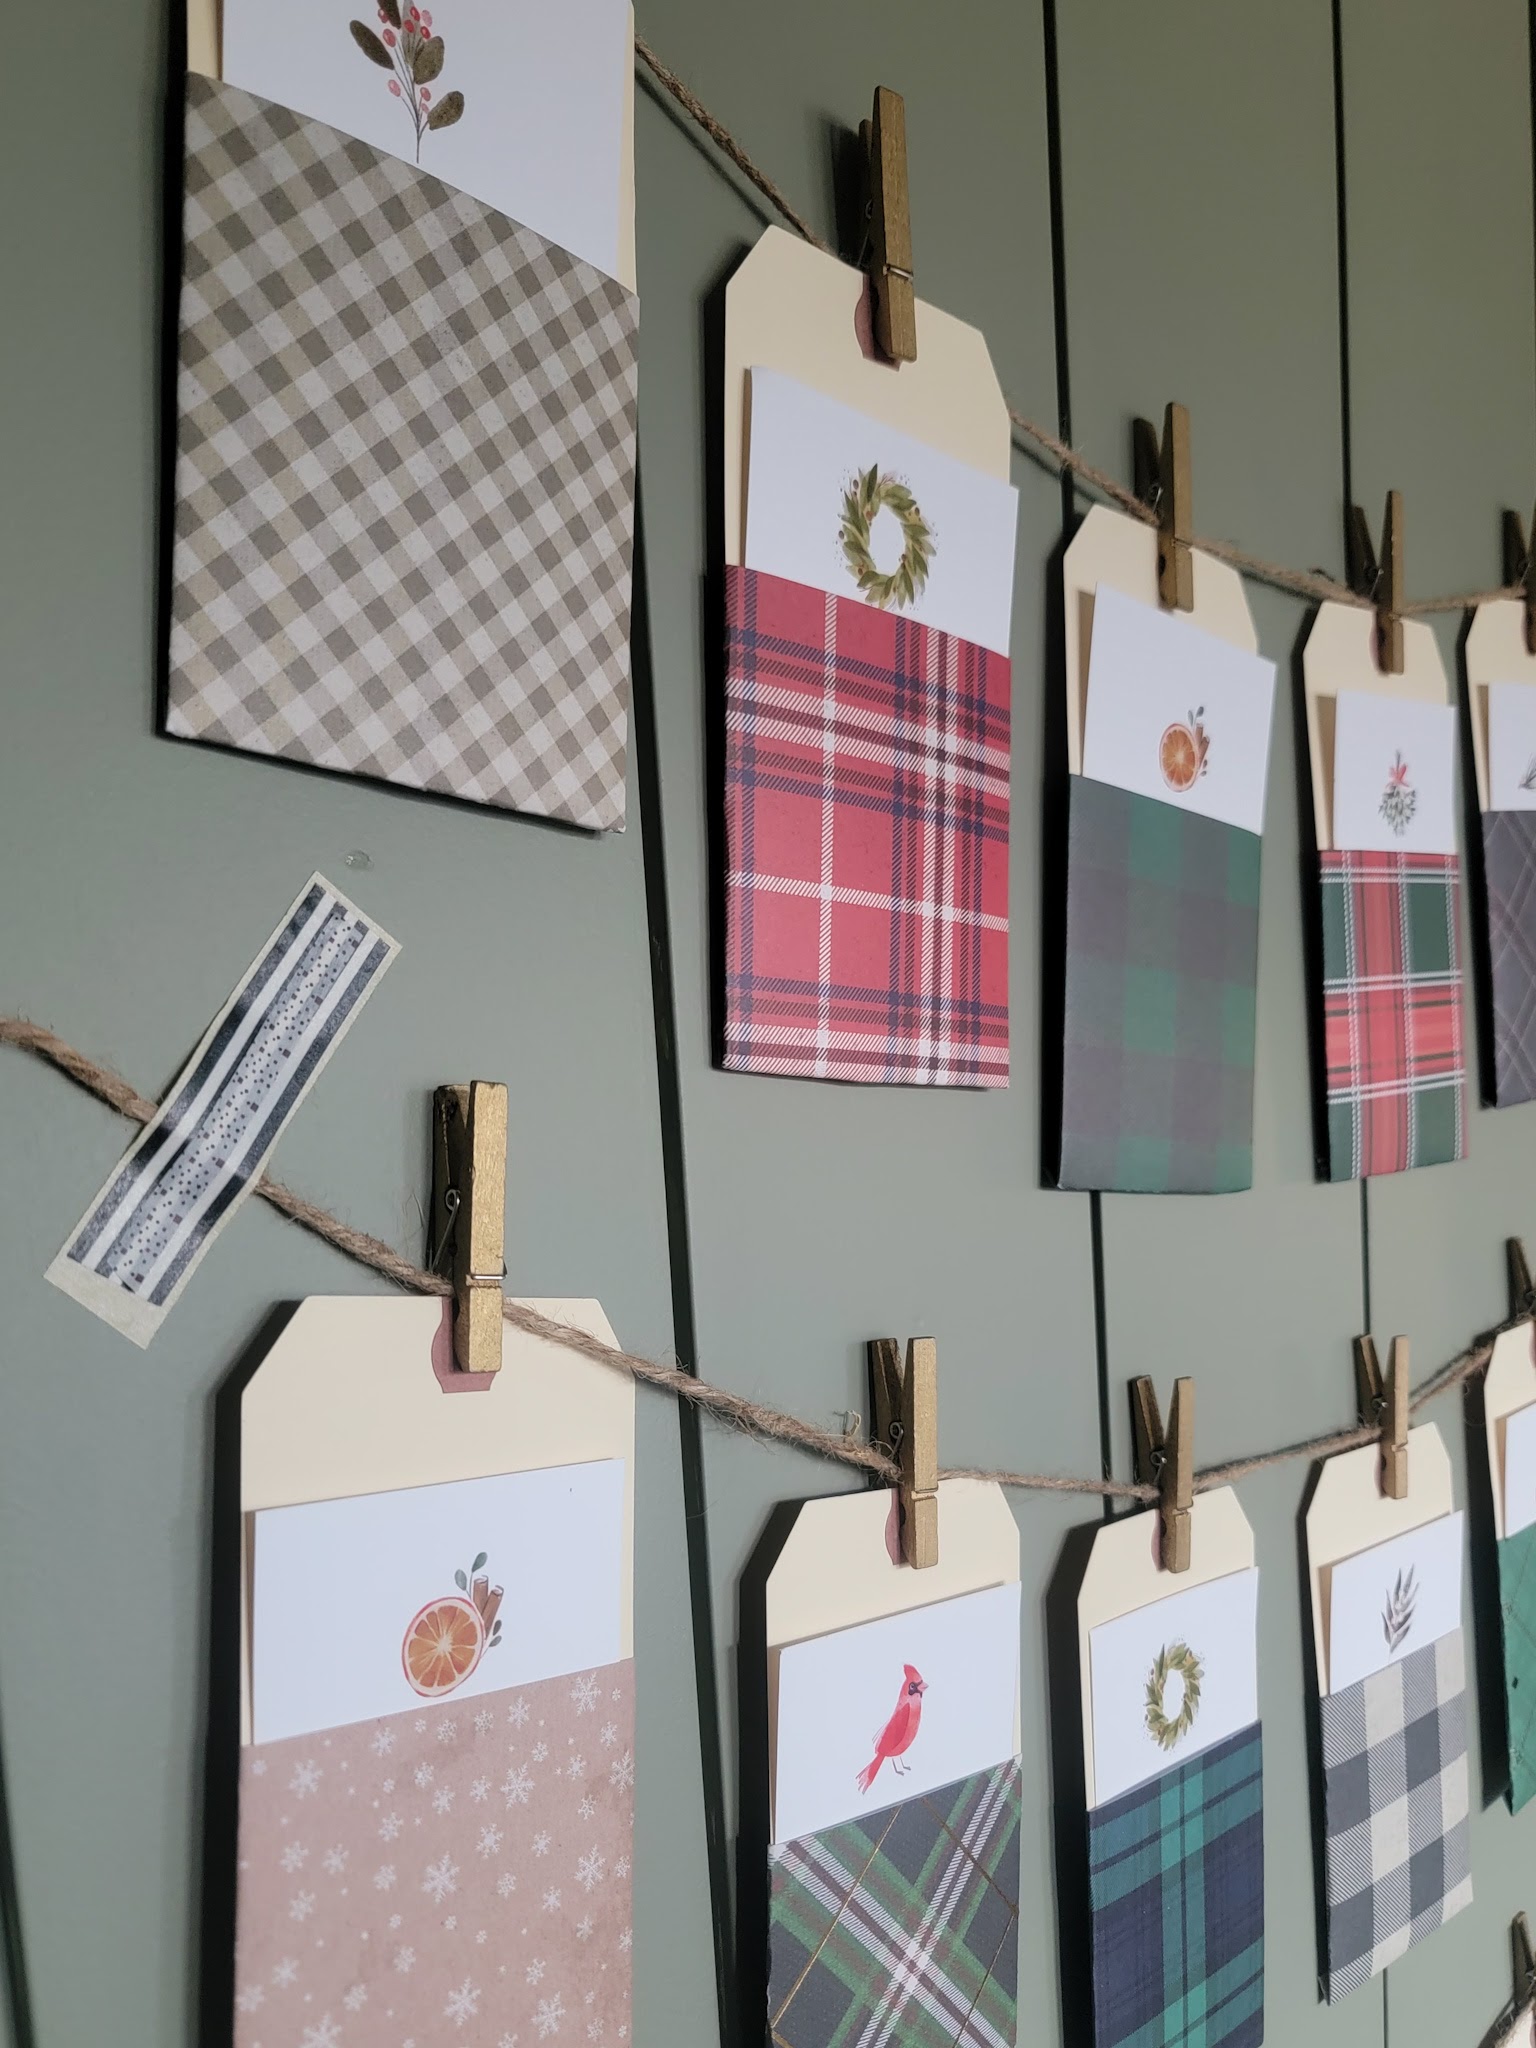
I put together an advent activity calendar for our family thanks to some free printables I found and it’s hanging in our office. It’s been so fun to do!
And of course, Macie enjoys snuggling up with our Christmas-y blankets and pillows.
Now I’m off to sneak upstairs and try to start wrapping presents without getting caught!
I recently went to a local vintage sale and scored two different sets of three bells as well as a larger, wall-mounted dinner bell. Typically with vintage pieces, I like to keep the patina (the green or brown tarnished look that happens over time), as I think it adds character and charm. For some of the bells, however, the thing I loved most was the intricate etching and I felt like the high level of patina actually hid a lot of the beautiful detail. Much as I loved the warmth of age, I made the decision to polish them so they could (literally and figuratively) shine again.
I first learned about Brasso last year when I installed raw brass sconces in our primary bedroom. It’s a polish that can clean stainless steel, chrome, aluminum, pewter, bronze, copper, and of course, brass. A quick side note: I have been slowly switching my cleaning products over to nontoxic options when possible, and there are ways to clean brass more naturally (this article has a variety of ideas). That being said, in the past, I have attempted to clean thrifted metal items like brass and copper with things like lemon or ketchup – with mixed results. Since my bedroom sconces were new, raw, and not exactly inexpensive, I chose to forgo a homemade paste and follow the manufacturer’s recommendation to use Brasso instead. I was pleased with the result and am personally fine keeping it in my cleaning product stash, particularly given its infrequent use, so that’s what I chose to stick with here.
The process of polishing is actually very easy, so today I thought I’d share what I did in case anyone else has a piece they want to try shining up!
-newspaper (or something to protect your work surface)
-latex gloves
-two clean cloths
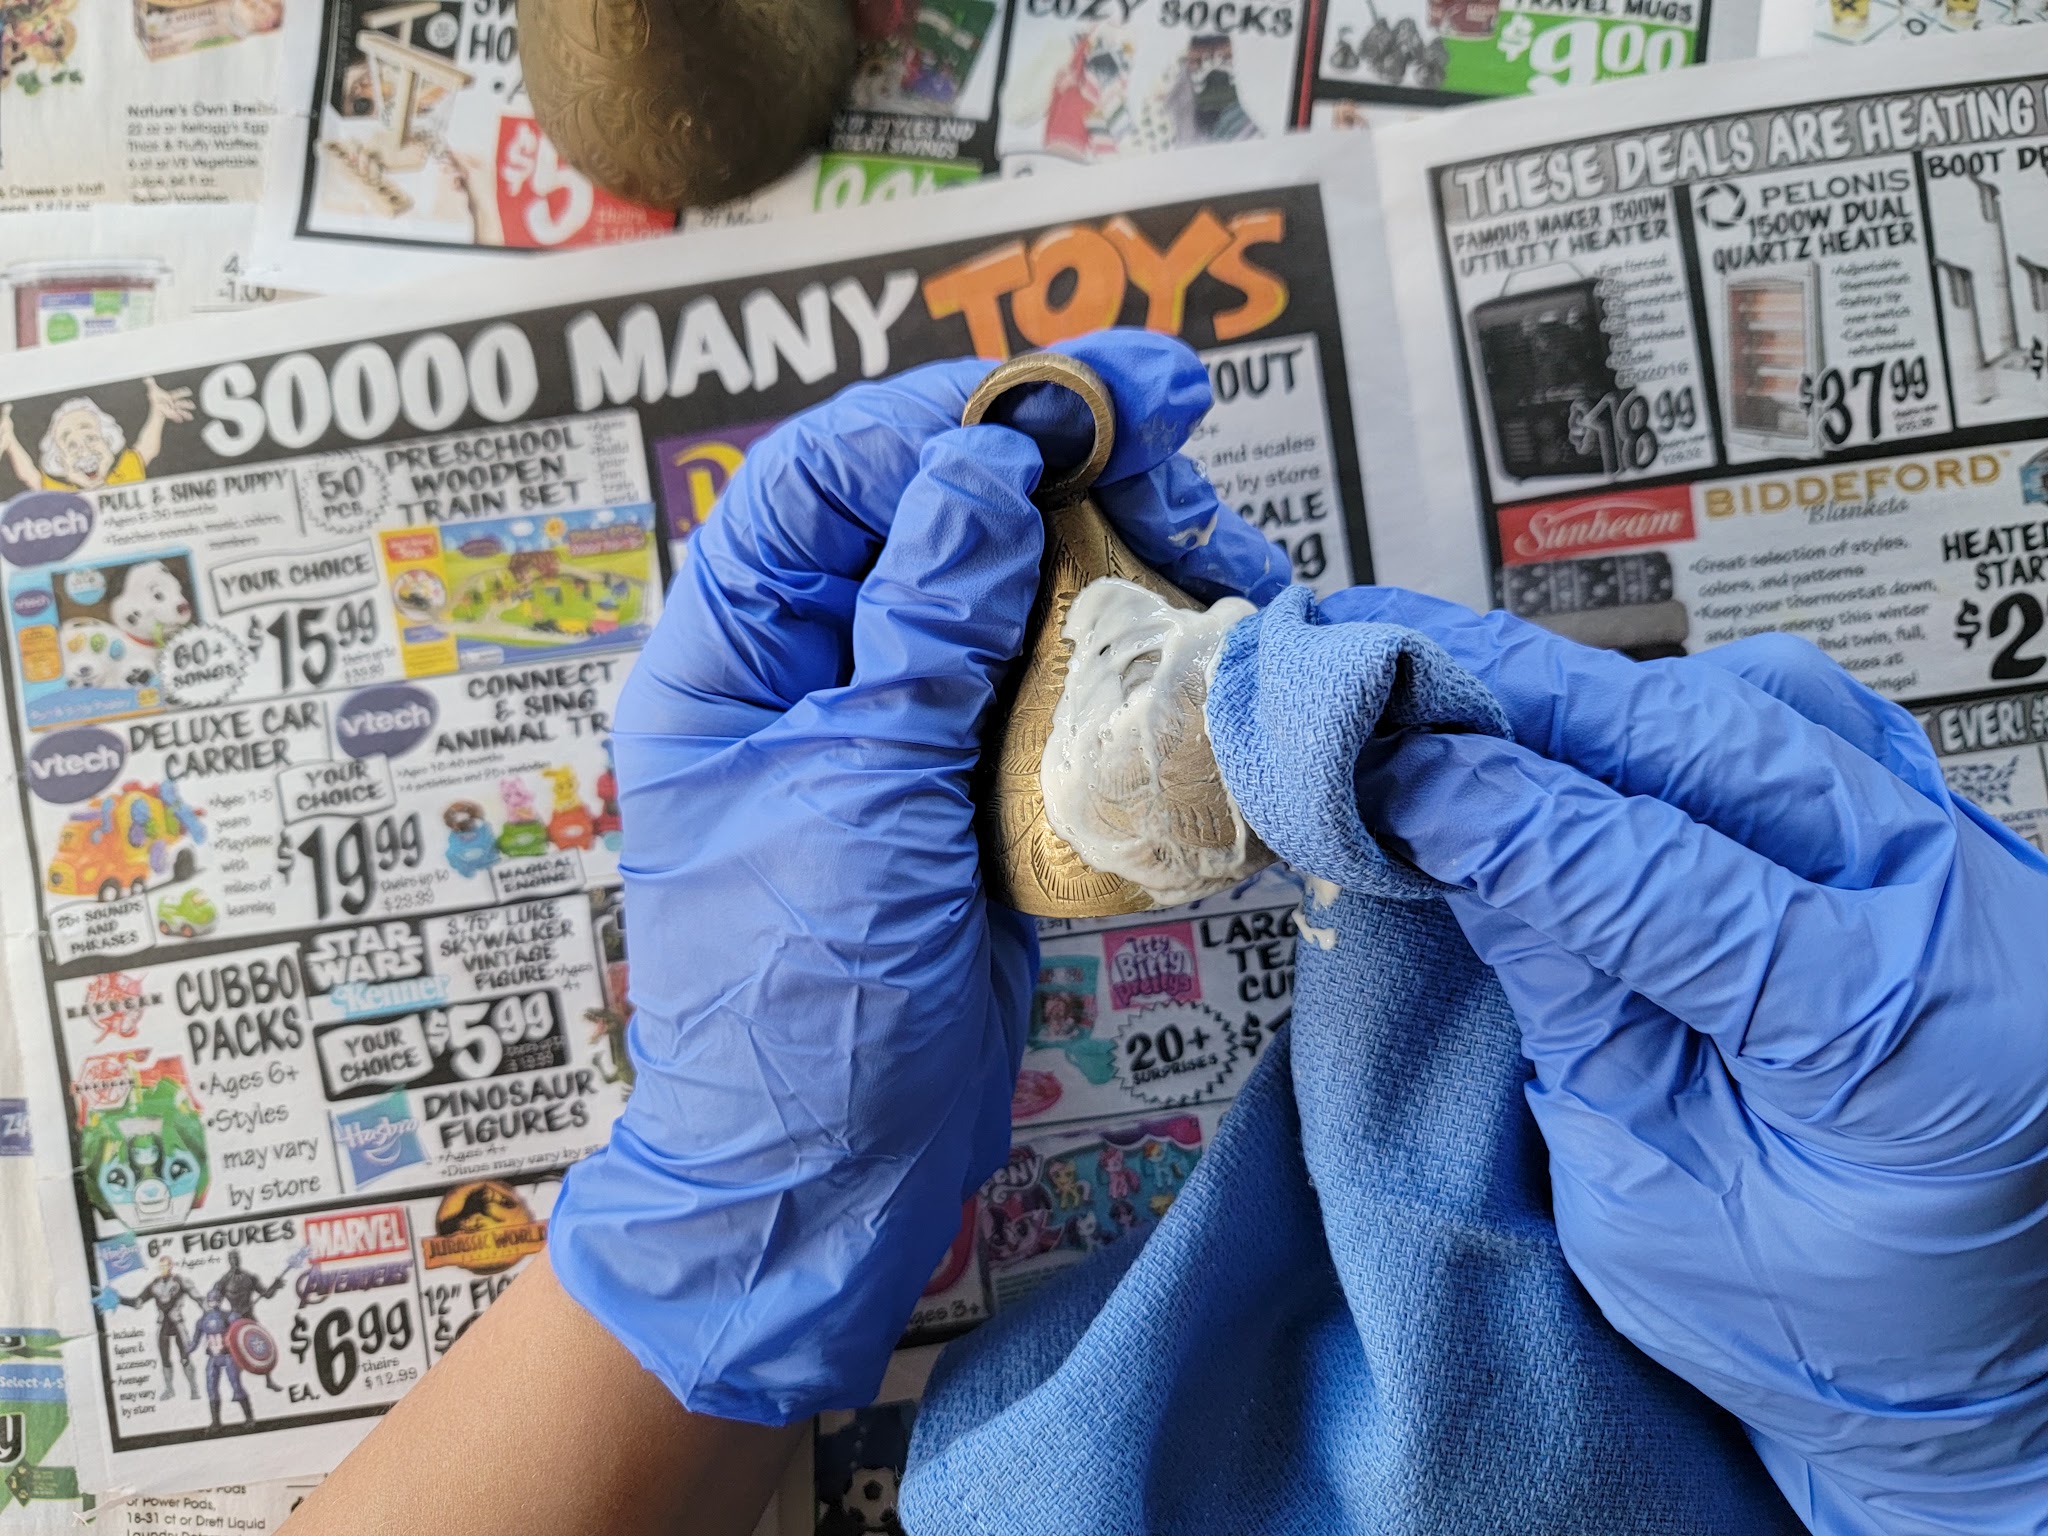
First up, make sure your workspace is prepped with a few layers of newspaper or something else to protect the surface. You’ll want to be in a well-ventilated area and make sure to wear gloves!
Shake the Brasso and squeeze a dollop out onto a clean cloth.
Using a circular motion, rub the Brasso all over the surface of the item, applying more as needed.
I suggest starting with a light pressure until you see how the metal is shining up, and then adjust as needed depending on how much patina you want to keep. For these bells, I didn’t want them to end up too shiny and new-looking, so I kept a light pressure the entire time.
Once you have applied cleaner all over your item, use a clean, soft cloth to buff the surface.
That’s it! Easy Peasy. It only took me about five minutes to polish each bell and reveal the unique, beautiful details.
I’m sure there are people who would argue that all vintage pieces should be left alone and might feel I made the wrong decision here. As I said earlier, I’m usually on Team Patina = Character! But I do think there’s a time and a place to work on a piece and I honestly have no regrets about polishing these. I’m all about cultivating a home that feels collected, cozy, and comfortable, with items that make me and my family happy. The details on these bells are now so vivid and eye-catching in person and I know I will appreciate them for years to come. And as the years go by, I’ll get to enjoy watching the slow process of the patina coming back 🙂
Now I’m curious – are you team polish or team leave as-is?
Last weekend, Justin and I rented a scaffold for 24 hours and painted our living room ceiling Urbane Bronze. It was such a dramatic way to make a high-impact change in our living room in just one weekend – it got me thinking about other weekend projects we’ve done over the years that have had a high impact on our home.
I started digging through my DIY archives and it turns out, in addition to painting our living room ceiling a bold color, many of the projects we’ve done in the past few years are true weekend projects. They’re not elaborate, time consuming projects like our DIY home office, but they’re a step above smaller changes like hanging artwork or swapping out a light fixture. I decided to round them up and put them in a post together in case anyone out there is looking to make a change in their house in a short amount of time – all these projects can get done in the timespan of Friday evening to Sunday afternoon (or less!)
I included a little blurb about each project but to read more about each of these DIYs, including the tutorials and sources, you can click on the project title hyperlink text to go to the original blog posts.
The very first DIY we did in this house was creating a shelving system for the playroom. We essentially screwed four inexpensive, ready-to-assemble bookcases together, added trim to the front to cover the seams, attached a long oak board to the top, and used stained 1x2s along the edges to make the wood look chunkier. It required some paint touch ups at first but I got smart and covered the shelves with clear contact paper which helped a TON and it has held up so well over 3.5 years of play!
We opted to be surprised in my first two pregnancies and did not find out the sex in advance. After Vi was born, her all-white nursery felt super plain, boring, and sterile. I wanted to do something but didn’t want to go too big in case we had a third child (good thing, huh?) so I chose to do a pink scalloped wall. It made such a big impact and while it only lasted two years before Ollie came along, it was 100% worth it.
Justin and I first made these shelves on a DIY date night using scraps from our garage – it was a fun, simple project to do together and we installed them in the little nook under the stairs. I loved them so much that I asked him to make a couple more for Ollie’s nursery. I think it’s such a cute and functional way to display books and make them double as artwork in your room.
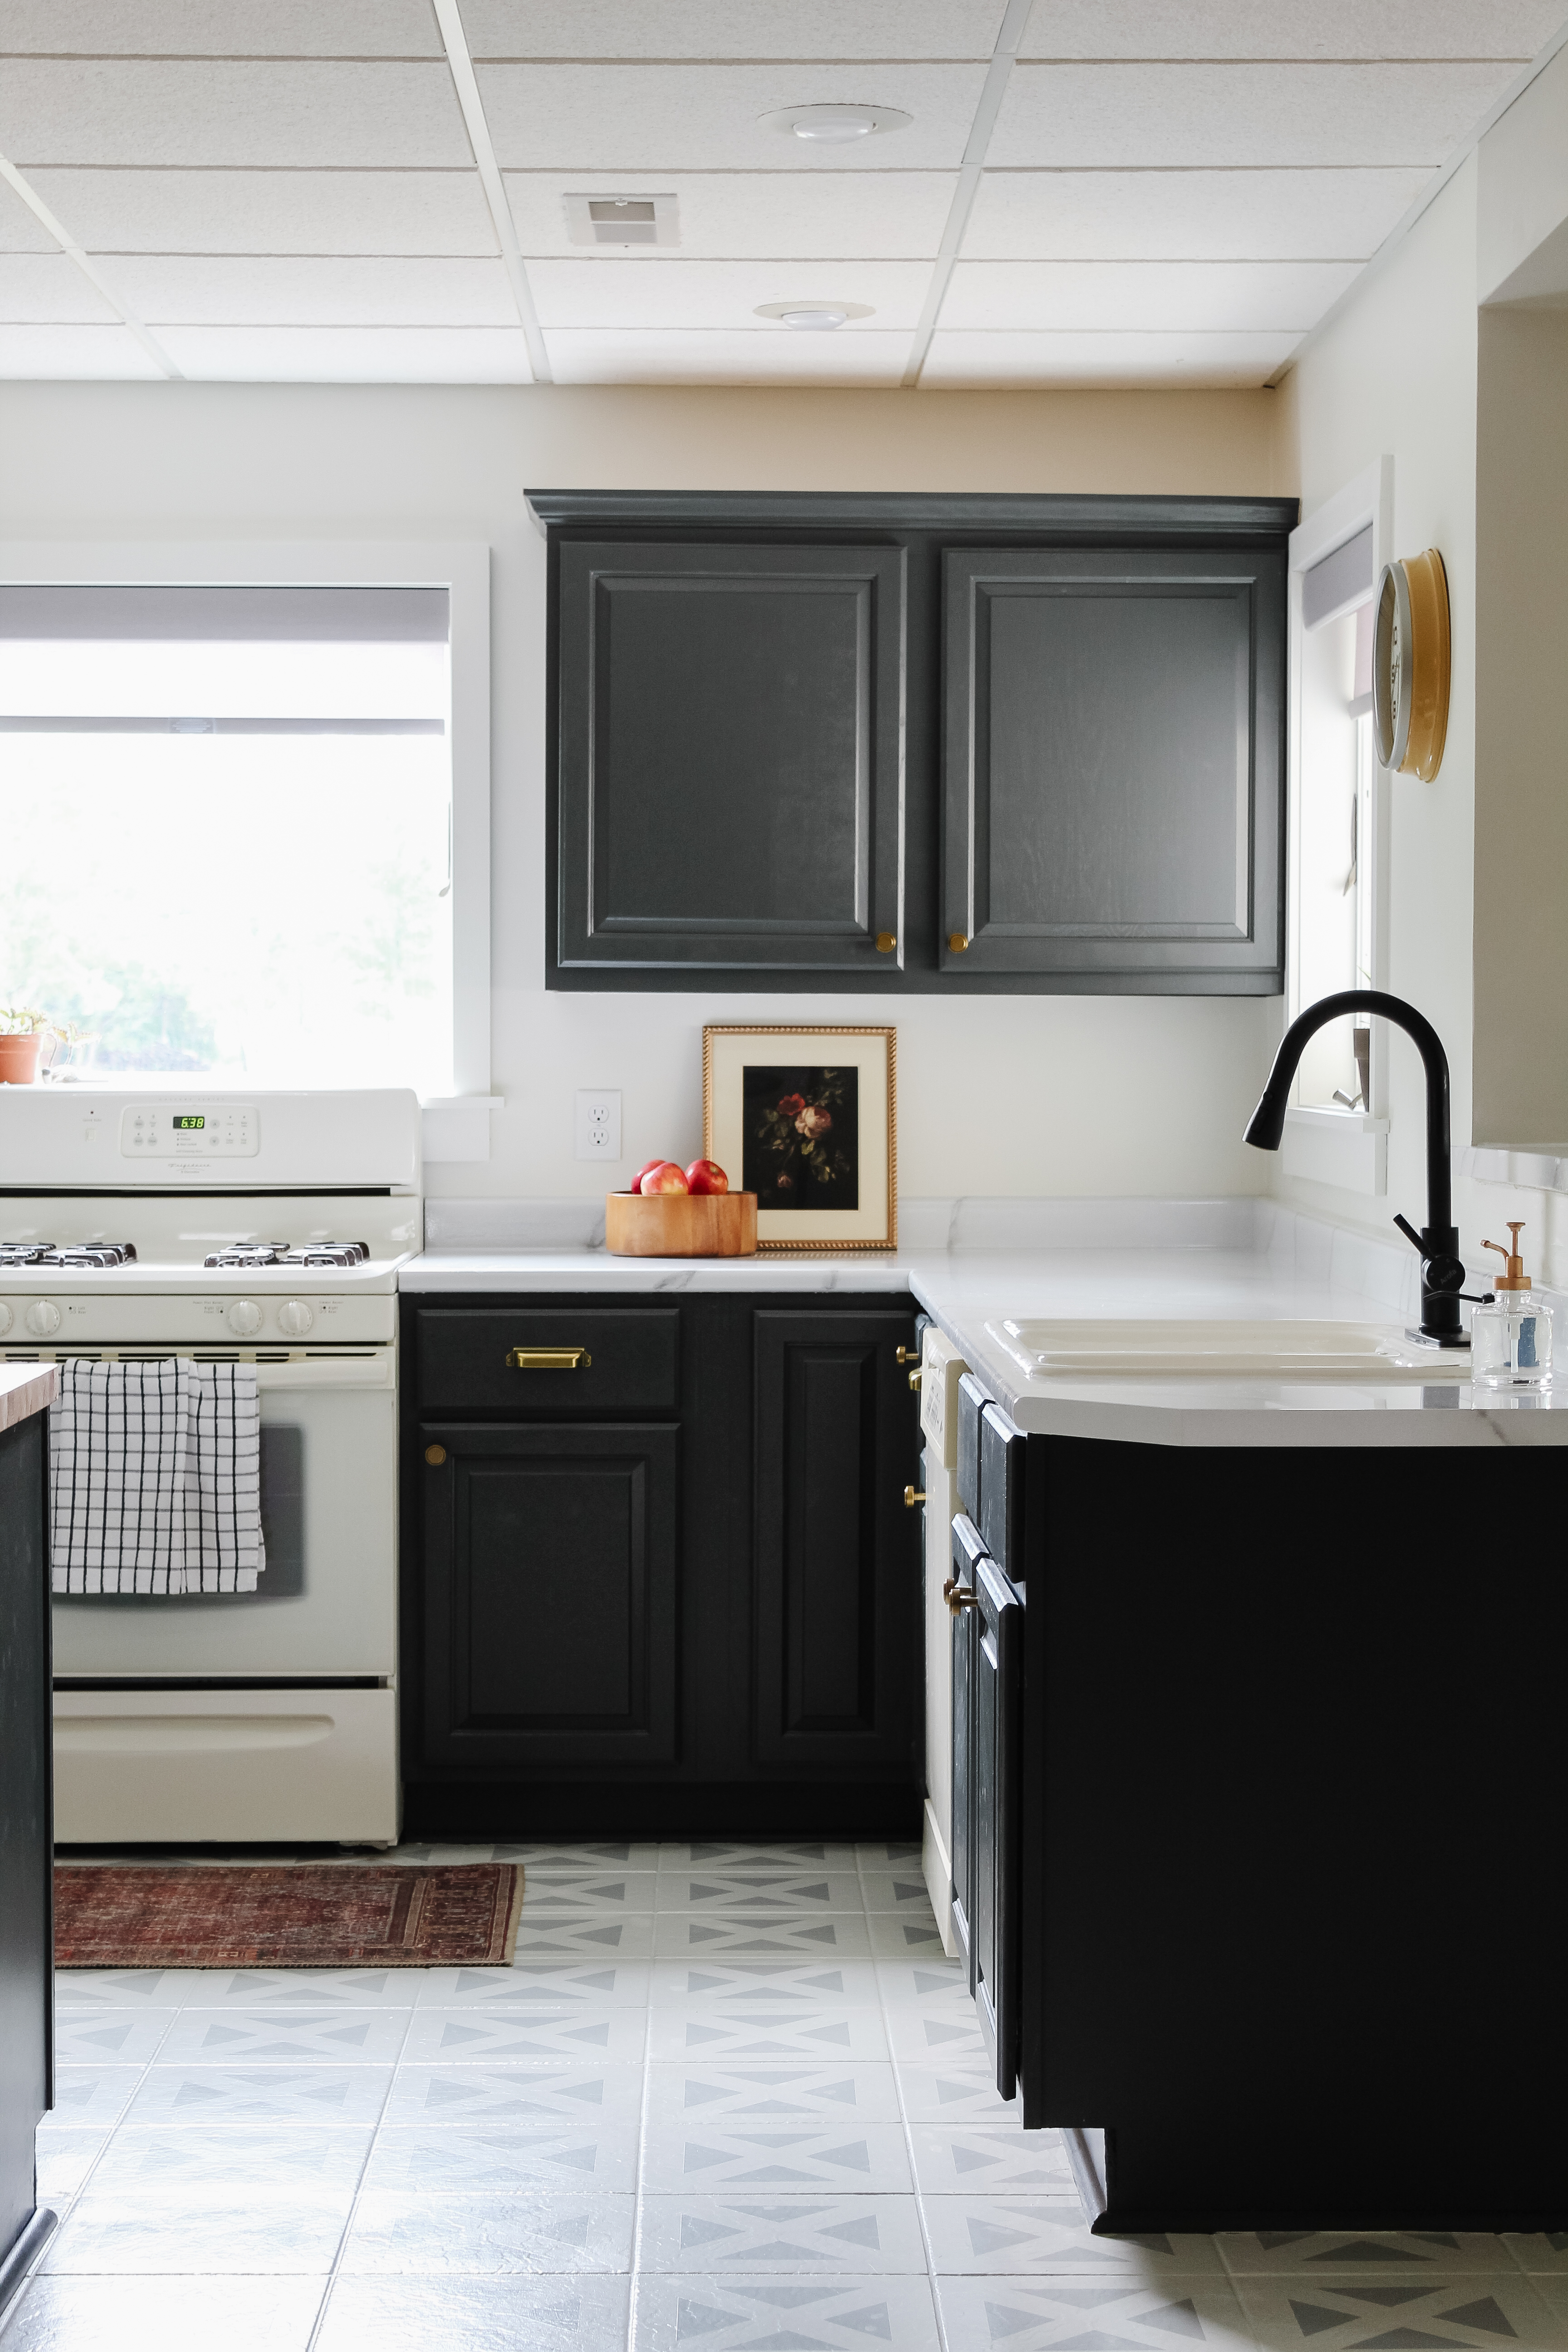
I have now painted three kitchens (this one, this one, and this one!) and I will say it absolutely can be done in a weekend, but it will take the full weekend! In terms of cost-to-impact ratio though, it just doesn’t get much higher than painted cabinets. You can totally transform the look of your kitchen for about $150 or less in paint + supplies.
A smaller scale project is to paint a bathroom cabinet – this makes a big impact in a fraction of the cost and time!
One of my favorite projects in our basement kitchen renovation was painting the laminate counters to look like marble. It turned out so well and thanks to this kit that had everything I needed, it was pretty easy to create! This could also easily be done in a bathroom to change the look of the counters.
This wasn’t a project from our house, but we created this geometric accent wall for a friend-of-a-friend’s bedroom using inexpensive 1×2’s. It took under 24 hours and cost less than $70 in supplies – a quick and easy way to create visual interest on their large bedroom wall.
When it came time to update Justin’s office, we used large pieces of plywood to create the look of one giant shelving unit from three individual Ikea Vittsjo shelves. I’d say plan for a full weekend for this project, as it did require some tedious measuring and cutting, but for us, each shelf went a little quicker than the last as we got our process down and we love the end result.
It doesn’t get much simpler than this shelving option: cut a 1×8 board to size, stain + polyurethane, install a few brackets into the wall, and place the board on top. Granted, we had previously taken down the cabinet that hung there and painted + stenciled the wall, but cabinet removal + a simple patch and paint job + DIY shelves could definitely be done in one weekend.
You know those plain builder-grade mirrors that have no frames and bring no personality to a space? Turns out, it’s pretty easy to upgrade them with a frame! We did one for my nephew’s nursery one weekend and it made the mirror look so much more elevated! For what it’s worth, that dresser is also one of many that I’ve upgraded – painting a piece of furniture can definitely be another great weekend project!
Last week I shared that I painted our living room and while I loved the warm, inviting white, the vastness of the room made it feel a little empty. The cathedral ceiling reaches a height of nearly 15 feet at its peak and it just felt too open and boring up there. I decided to make the ceiling a dramatic feature by painting it a rich, dark color and I have to say, I LOVE how it turned out!
I chose a color I have used several times in the past: Sherwin Williams Urbane Bronze. I’ve seen this color described as a warm gray, a deep taupe, and a greige, among other things. It’s a bit of a chameleon color that can change drastically depending on the lighting. It somehow feels dramatic and bold, yet is neutral enough to go with anything. When I started thinking about what color to paint the ceiling, I knew I wanted something show-stopping that would continue to look good over the years as I tweak things in the living room. Urbane Bronze was the perfect choice – I know it will continue to work in the space no matter what updates I make to the lower portion of the room.
In addition to using the 6-foot scaffold we own, we had to rent a scaffold to paint the highest points of the ceiling. There is a large oak beam in the center of the ceiling that I did not want to paint, so Justin and I split the work of cutting in around it. Since we had the scaffold for 24 hours, we also had the chance to take down the light-less ceiling fan and install a new fixture. I chose this round chandelier with globes and I absolutely love it! The dark iron + white globes + warm bronze paint + stained oak combo is just the dramatic vibe I was going for and Justin and I love that we finally have overhead lighting in this room!
Renting a scaffold ended up being a super cost-effective solution. Instead of hiring a painter for the ceiling and an electrician for the light fixture, we were able to rent a scaffold from Home Depot (a 24-hour rental was about $70) and take care of painting and hanging the new light fixture ourselves. I want to add: this is definitely not a beginner DIY. Being on a scaffold is unnerving no matter what you’re doing; you want to be really confident in the task so you can focus more on balance. At this point in our marriage, Justin has swapped out approximately 10 different light fixtures. We would never have attempted this project if he wasn’t experienced and confident with switching things out – even with his skill and experience, the scale of this one still made it a challenging DIY for us. Similarly, the painting was obviously more challenging than painting a room with an 8 to 10 foot ceiling, but I’ve done countless rooms over the years and that helped me feel confident enough to attempt painting a large room using a scaffold. I think with DIY it’s good to push yourself to try new things but it’s also very important to know your limits. Even with the experience we just gained, we will be hiring out the painting of our foyer – scaffolding + stairs is not something we feel confident enough in so hiring out the work to professionals is 100% worth it!
While paint has made a huge impact already, there are many things left to address in this room. I have sconces to replace the floor lamps as soon as we can get an electrician out here to hardwire them, art to hang on the wall, I need to paint the windows and replace the window trim, and I need to figure out the situation with the TV + stand. Oh! And did you see that fun round green chair? We’re going to get a second one – and I need to figure out a side table as well. It’s slow and steady but we’ll get there!
Back in September, I went on a home and garden tour in my favorite neighborhood in our city. I loved getting to see so many beautiful historic homes and had many takeaways from the experience. Two things that stood out to me on the tour were artwork and attention to details. These homeowners were all appreciators of art and it showed! I loved seeing how their choices reflected their unique personalities and especially enjoyed seeing original art on the walls. I also found myself drawn to the small things that were clearly so intentional -art placed in a thoughtful or surprising location, a little nook made into a special moment, etc. These little details made the homes feel so consciously cared for and it left me feeling inspired to make our home feel this way too.
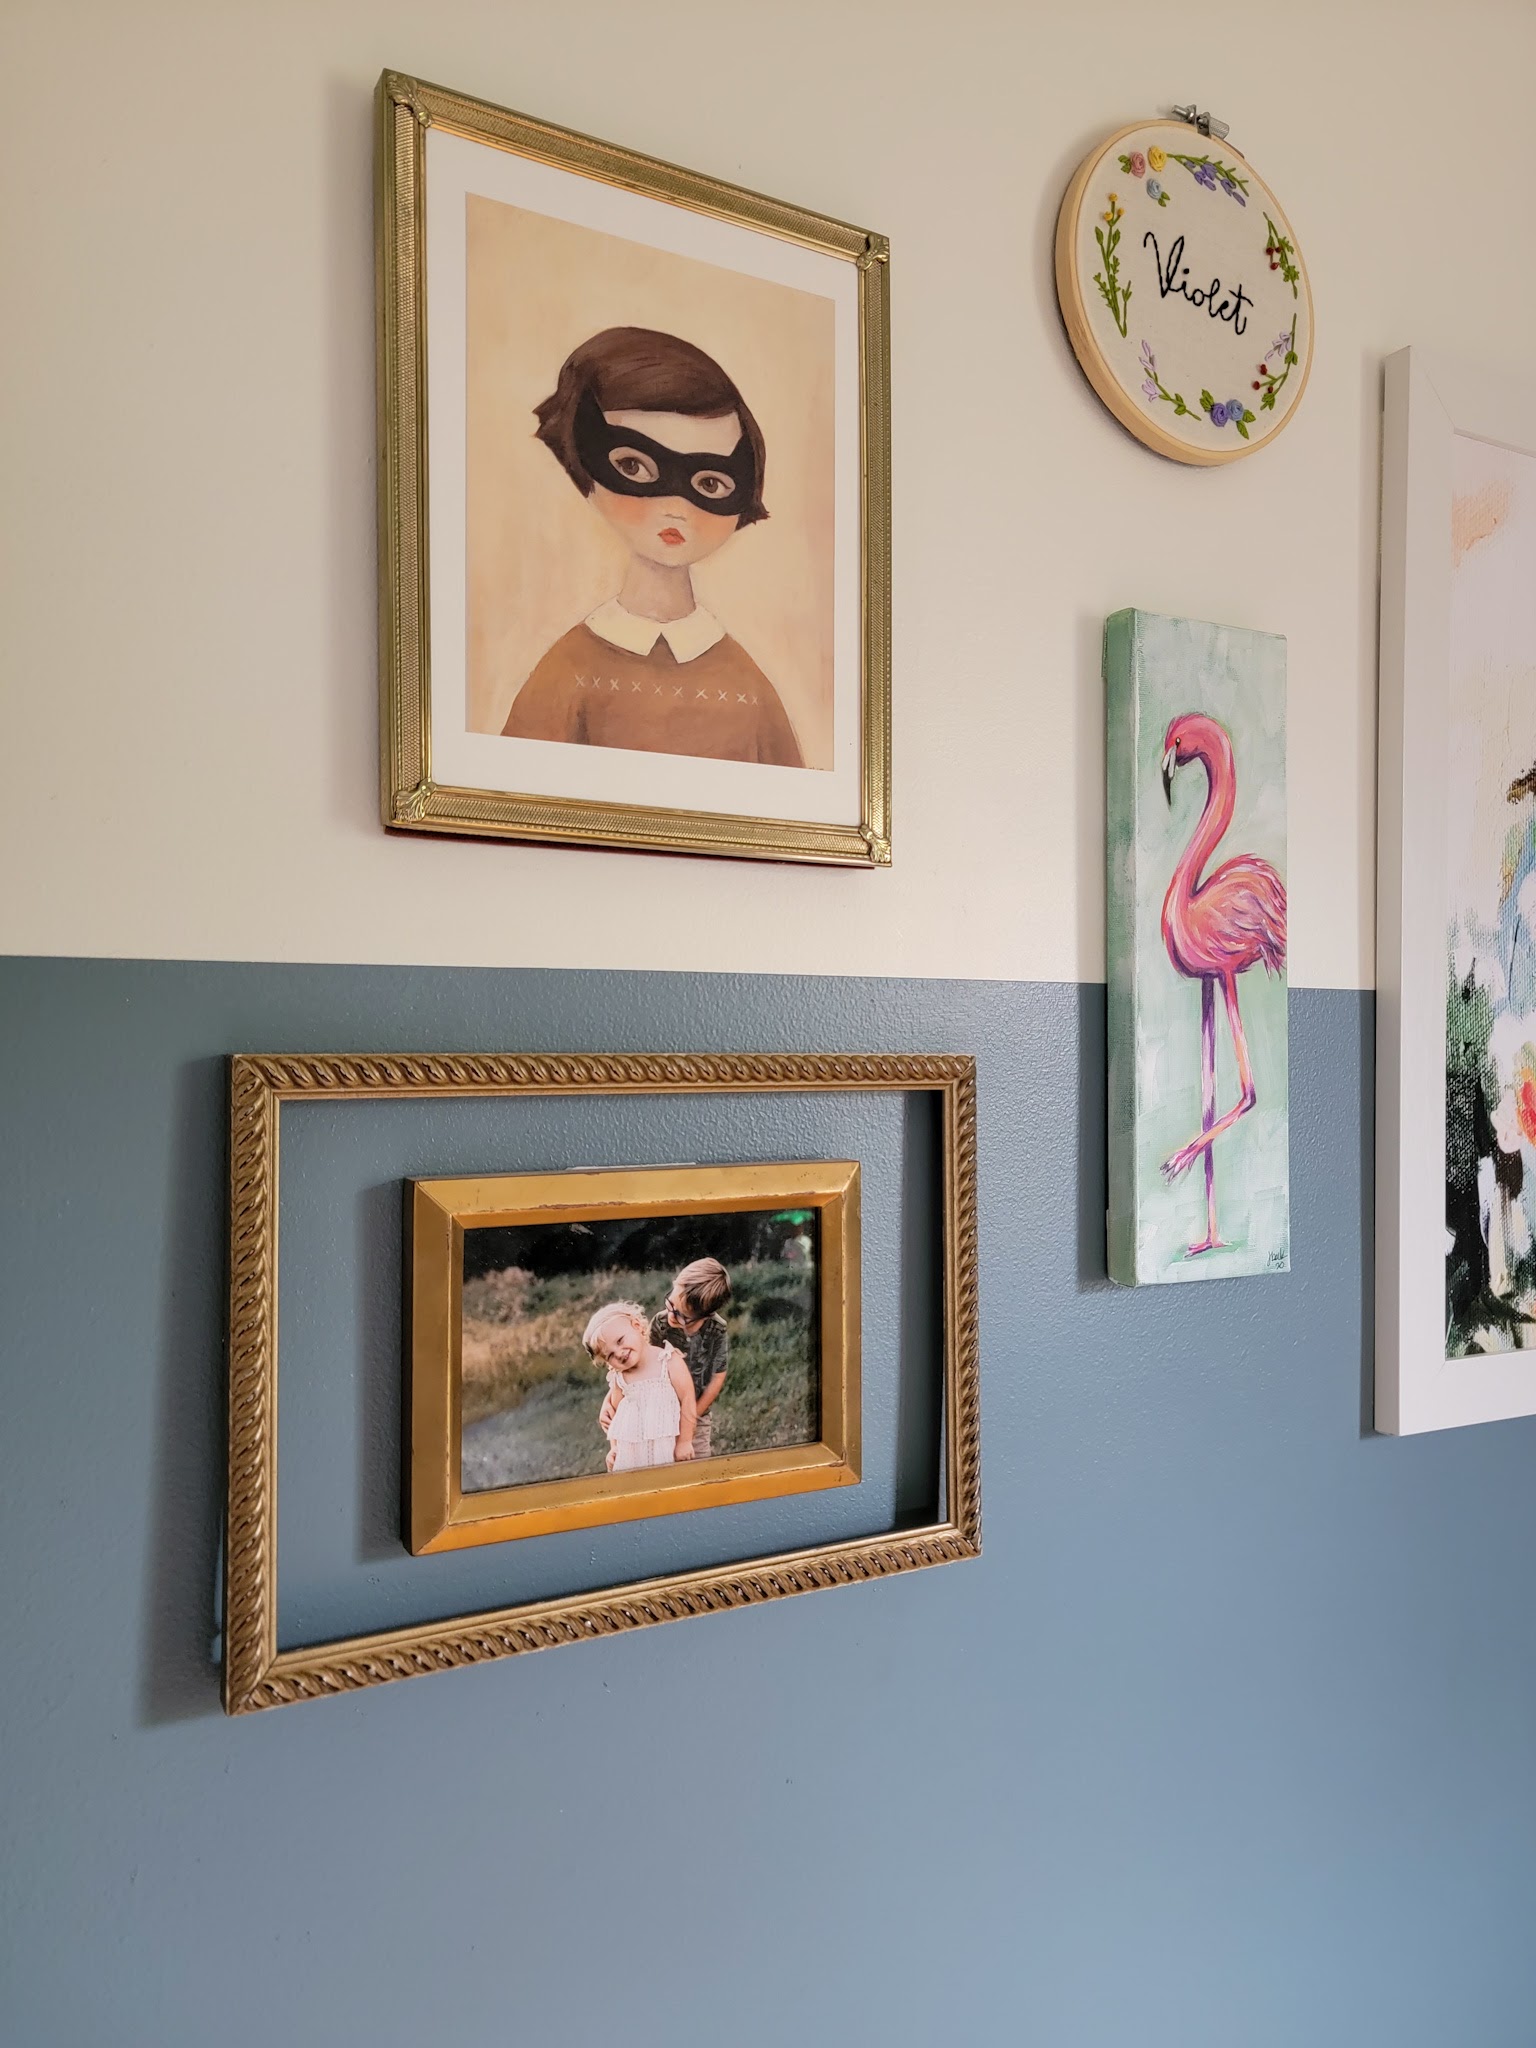
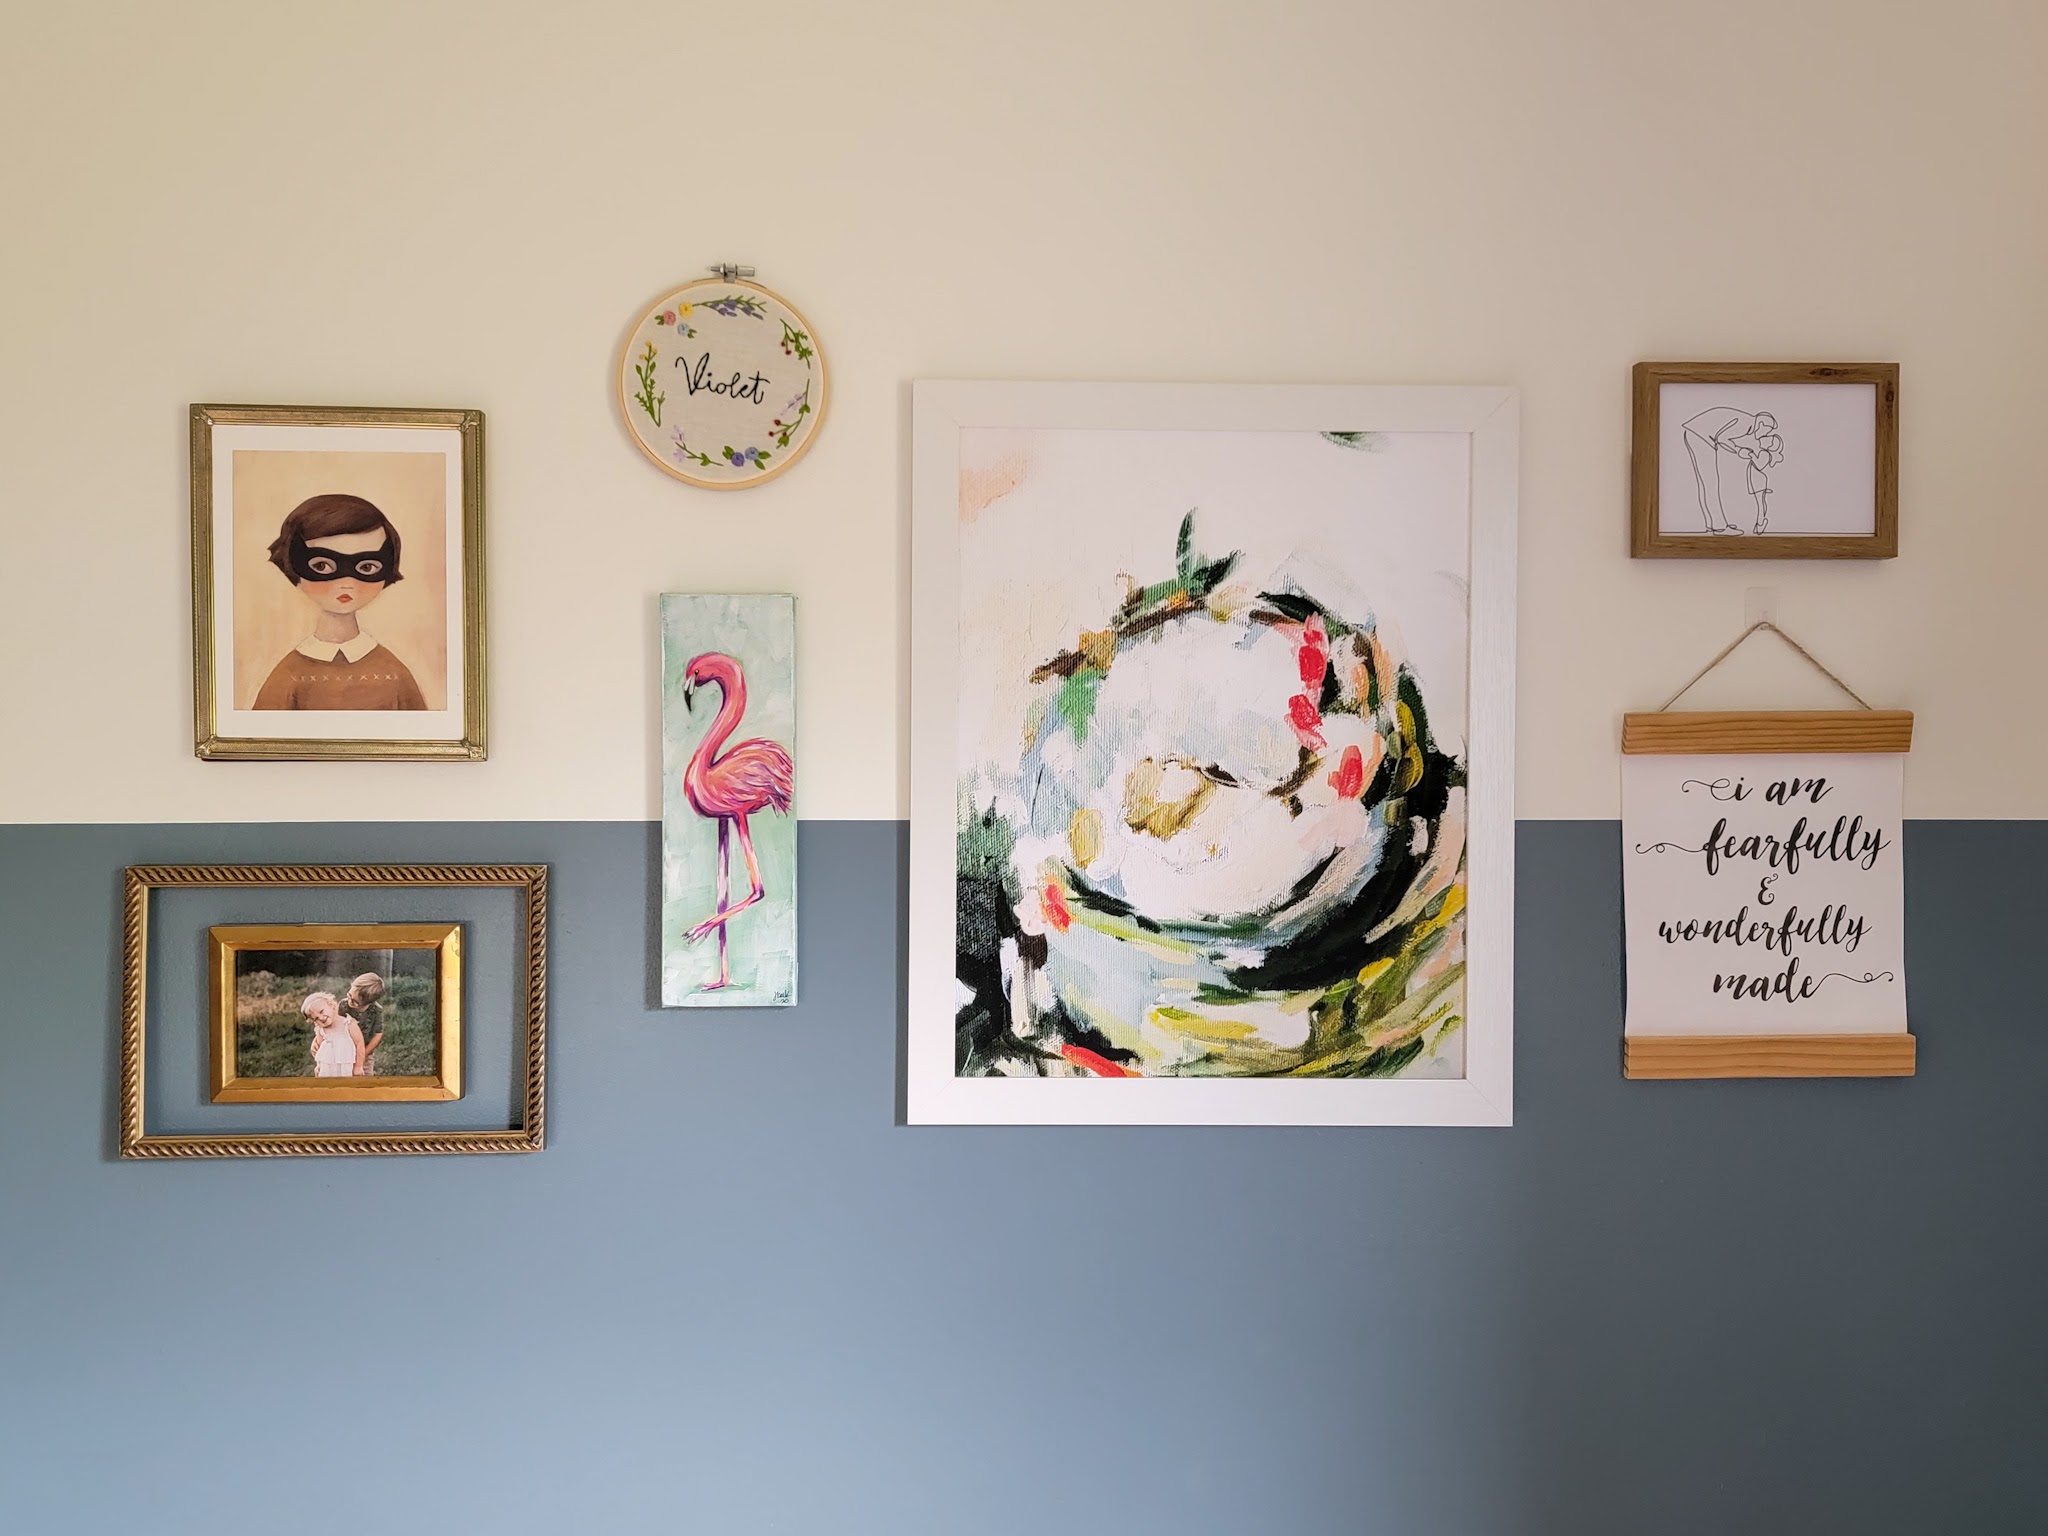
I’ve been making small strides around here to curate more art that speaks to me and reflects our family well, all while trying to be intentional with the details too. If you follow me on Instagram, you may have seen my recent changes to the far left side of Vi’s gallery wall:
Previously, I had a little print on the top left that I received as a free gift with purchase of one of her dolls. It was fine, but I used it because I had it and not because I chose it. When I saw this girl in a mask print, I immediately felt drawn to it. If you know Vi, you know this print fits her personality so well! I placed it in a thrifted frame and it immediately made the wall feel more like her. I also had the idea to take a thrifted frame of an unusual size, remove the print that came in it, and use it to create a double-framed look around the picture of her and LJ. It’s a simple little detail but I love that it brings some fun and whimsy to the wall!
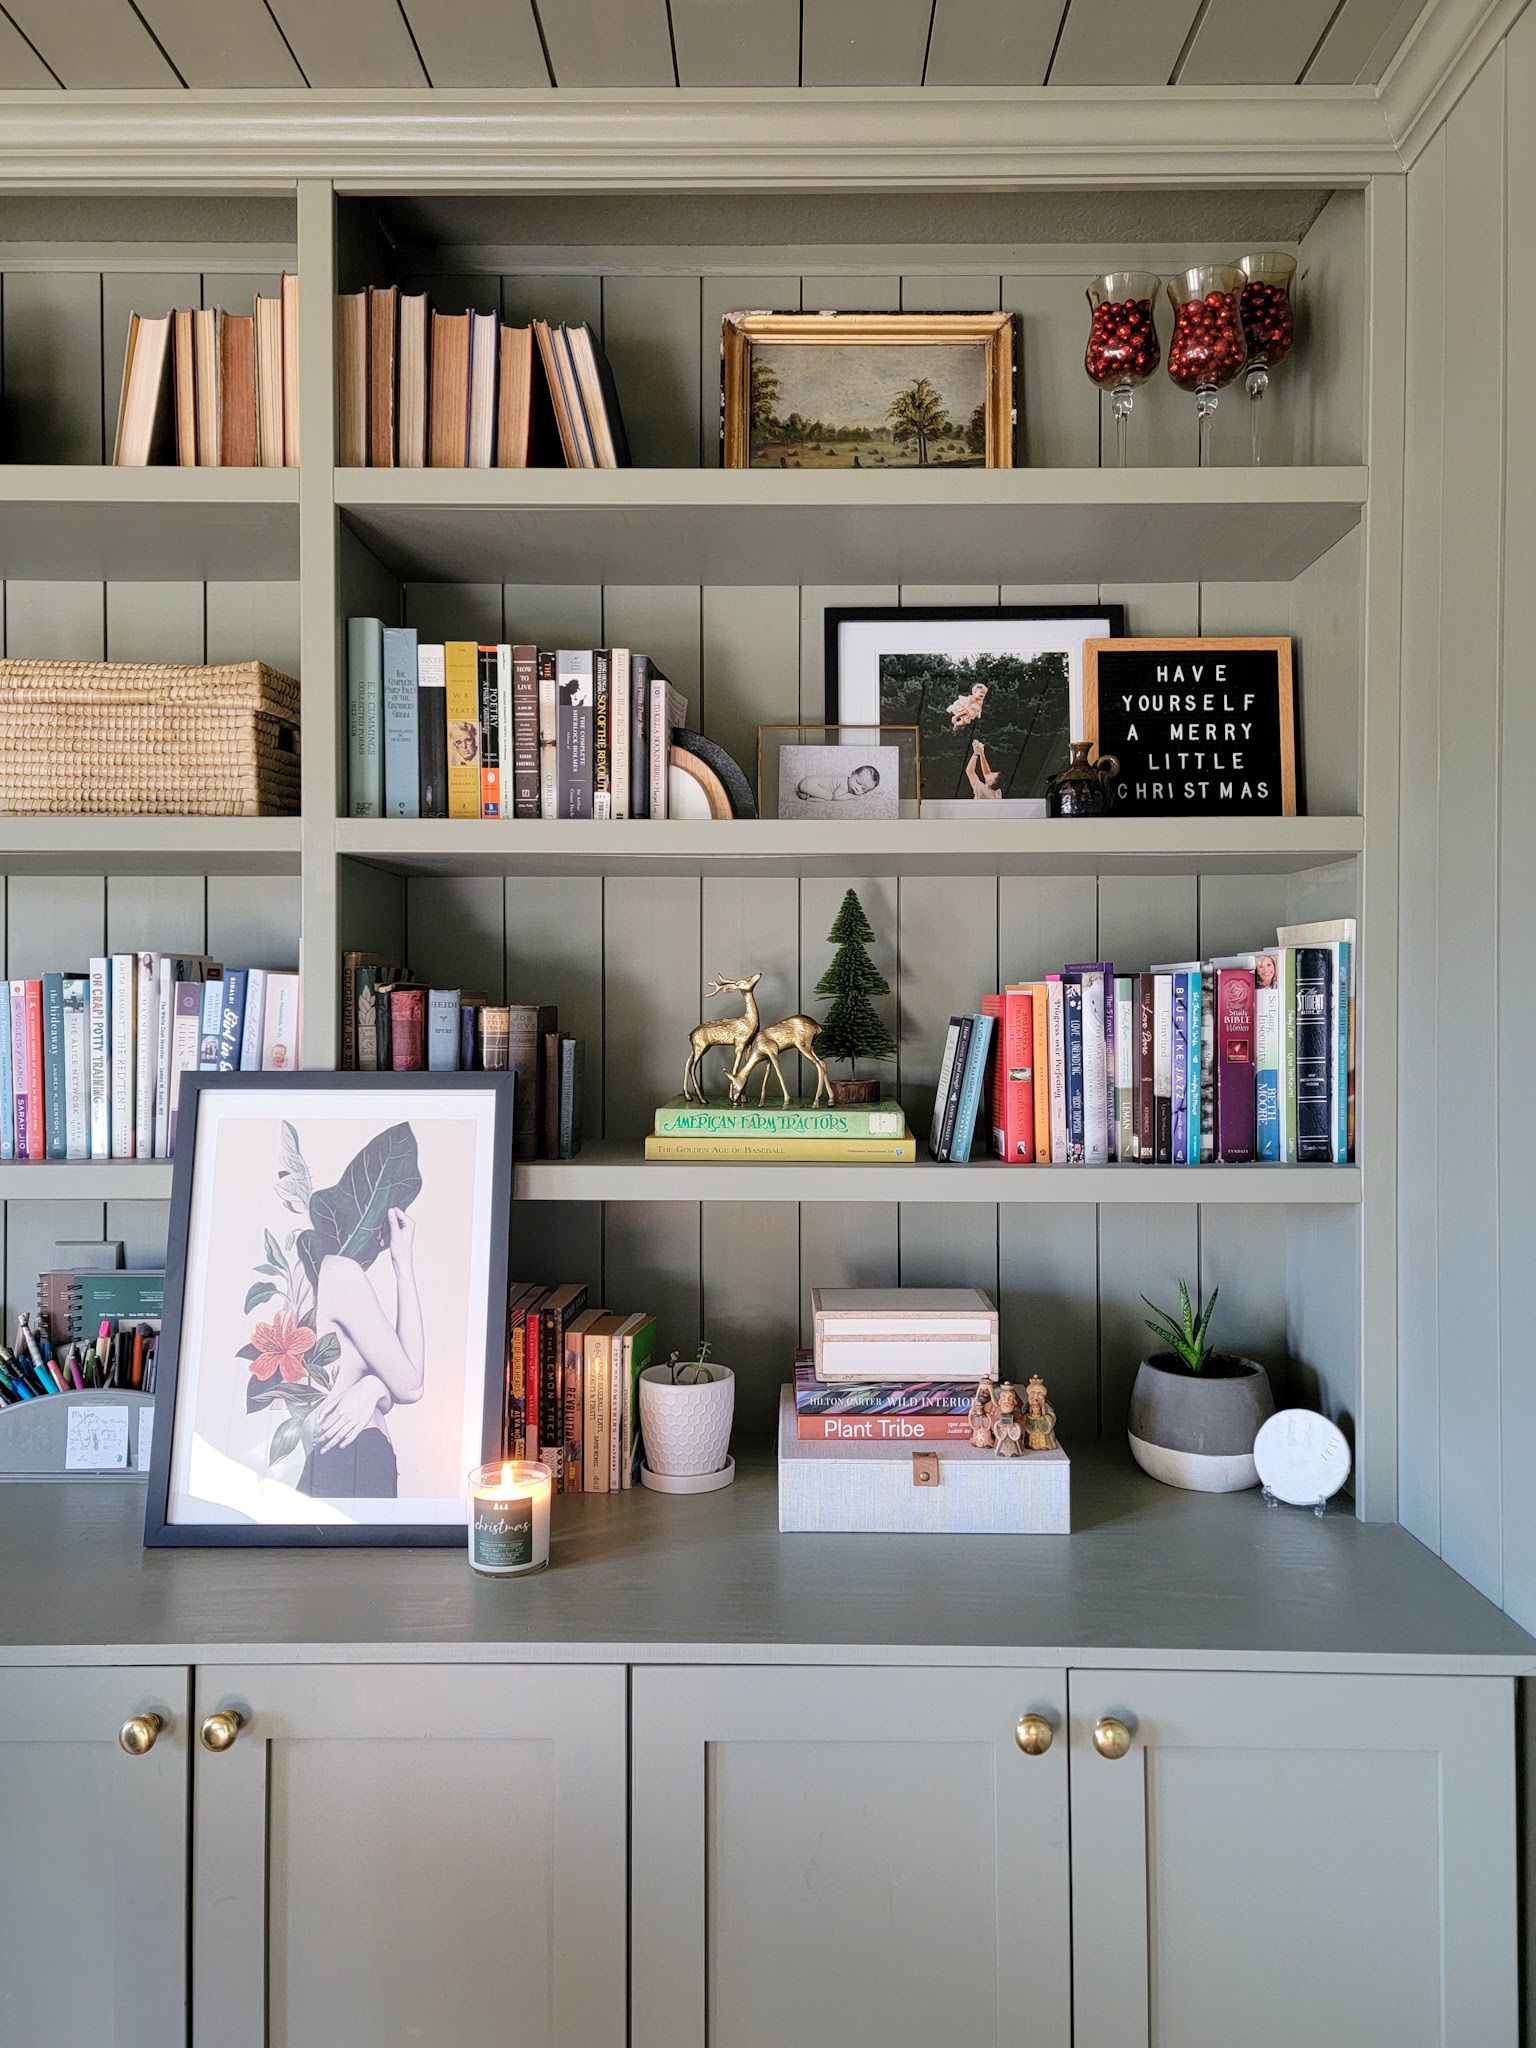
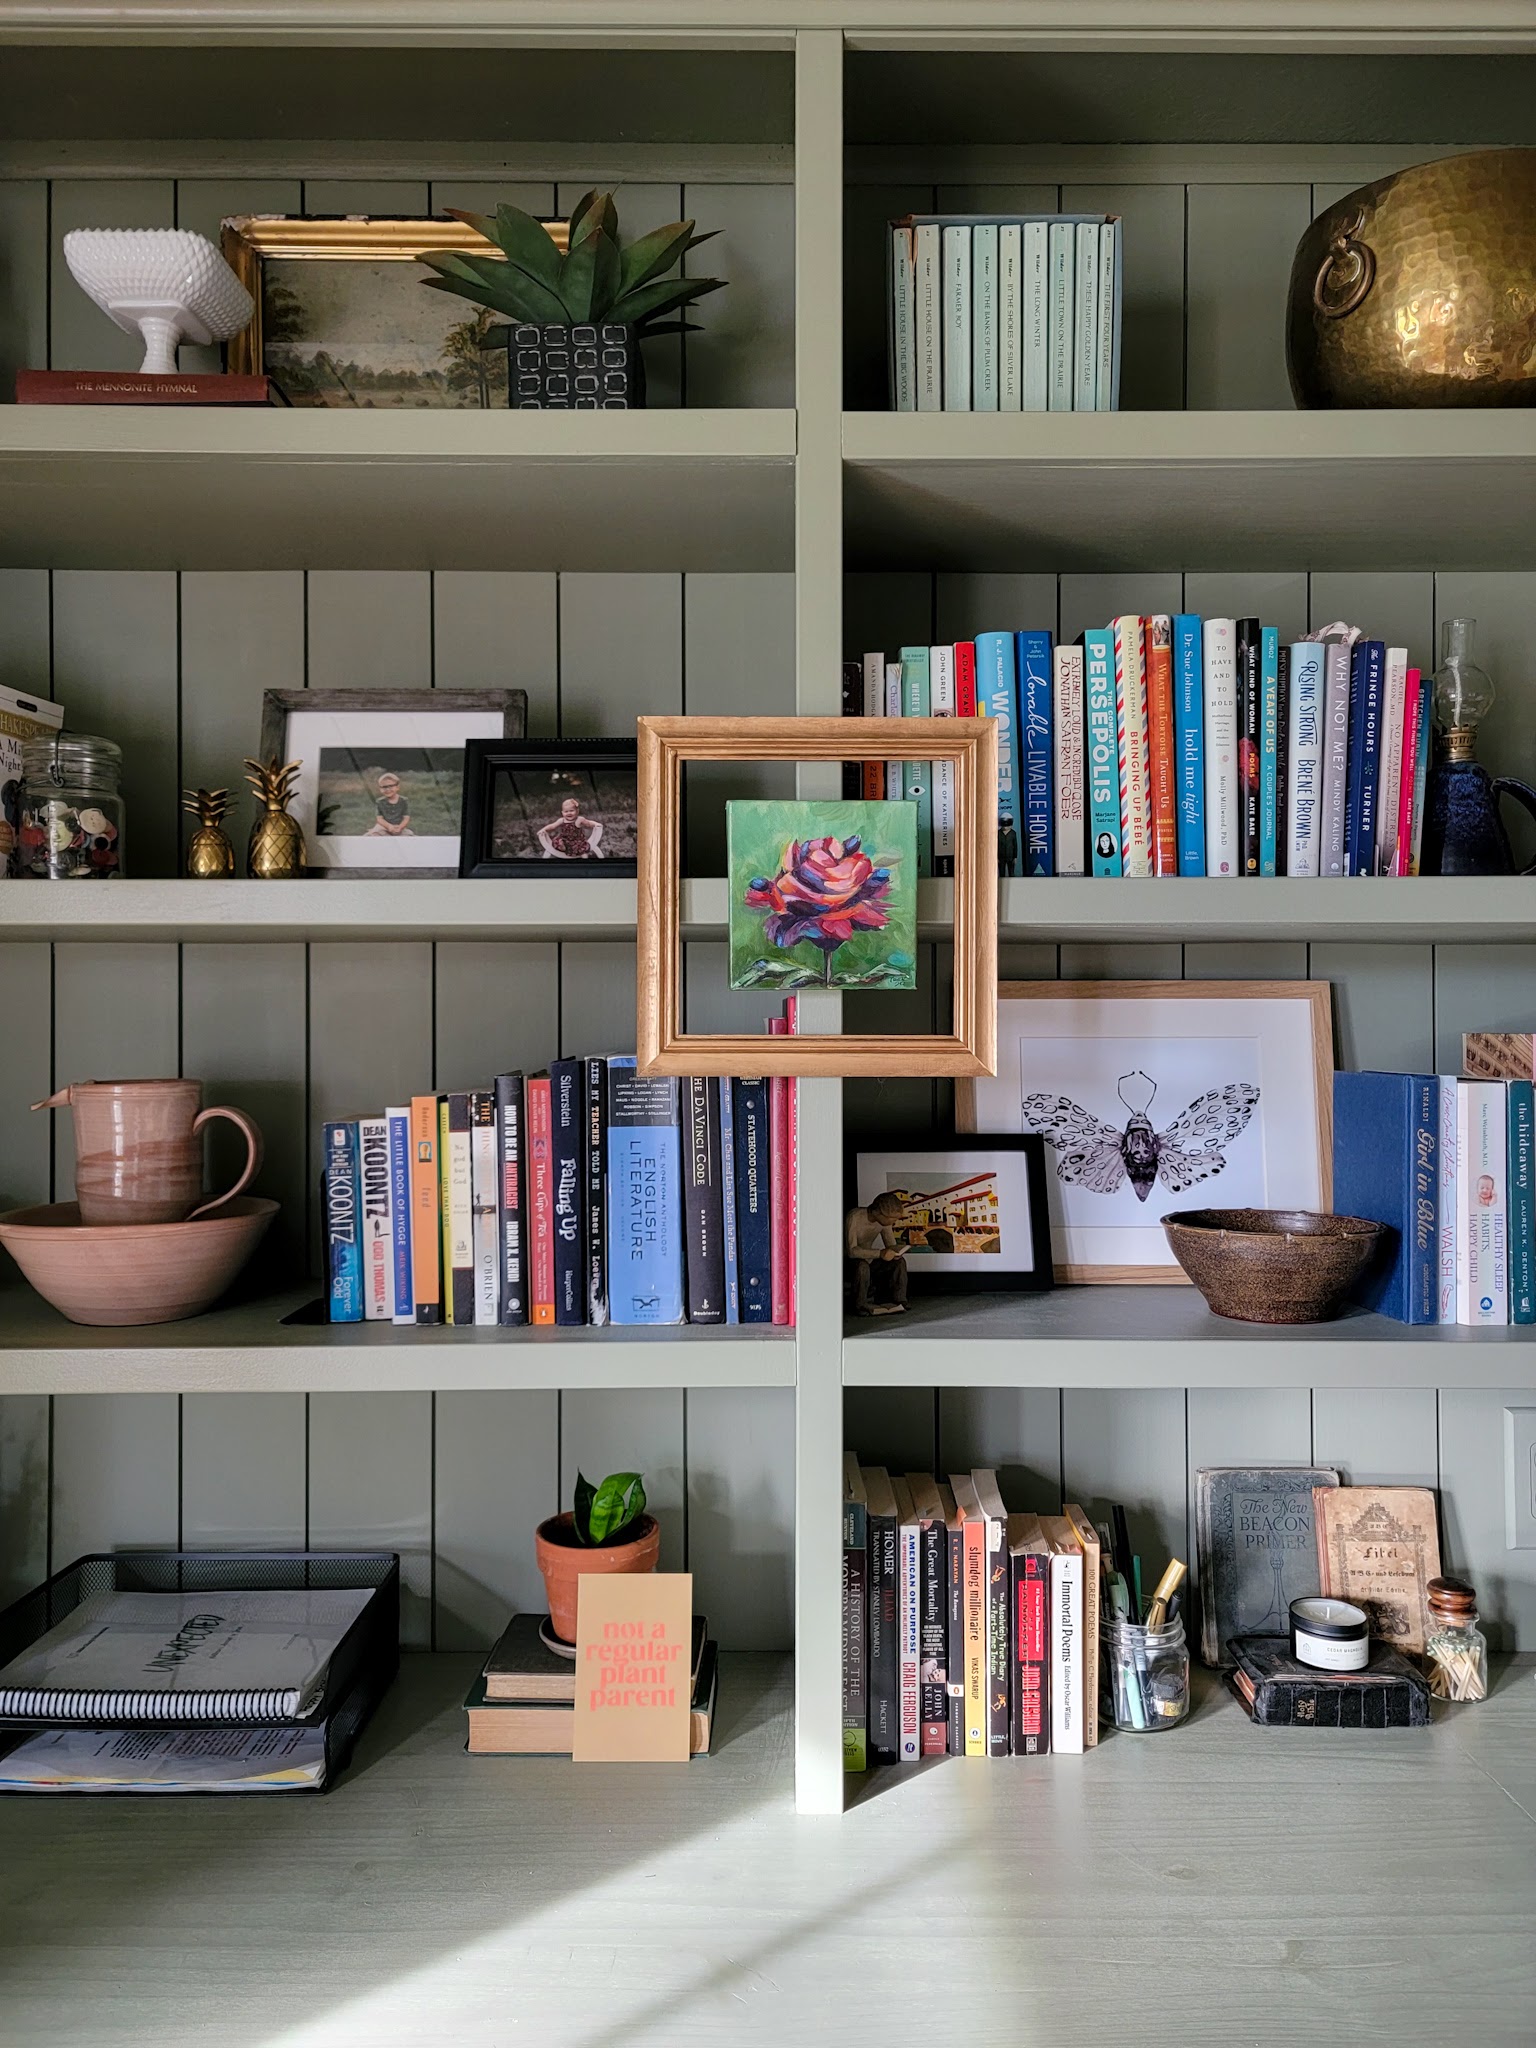
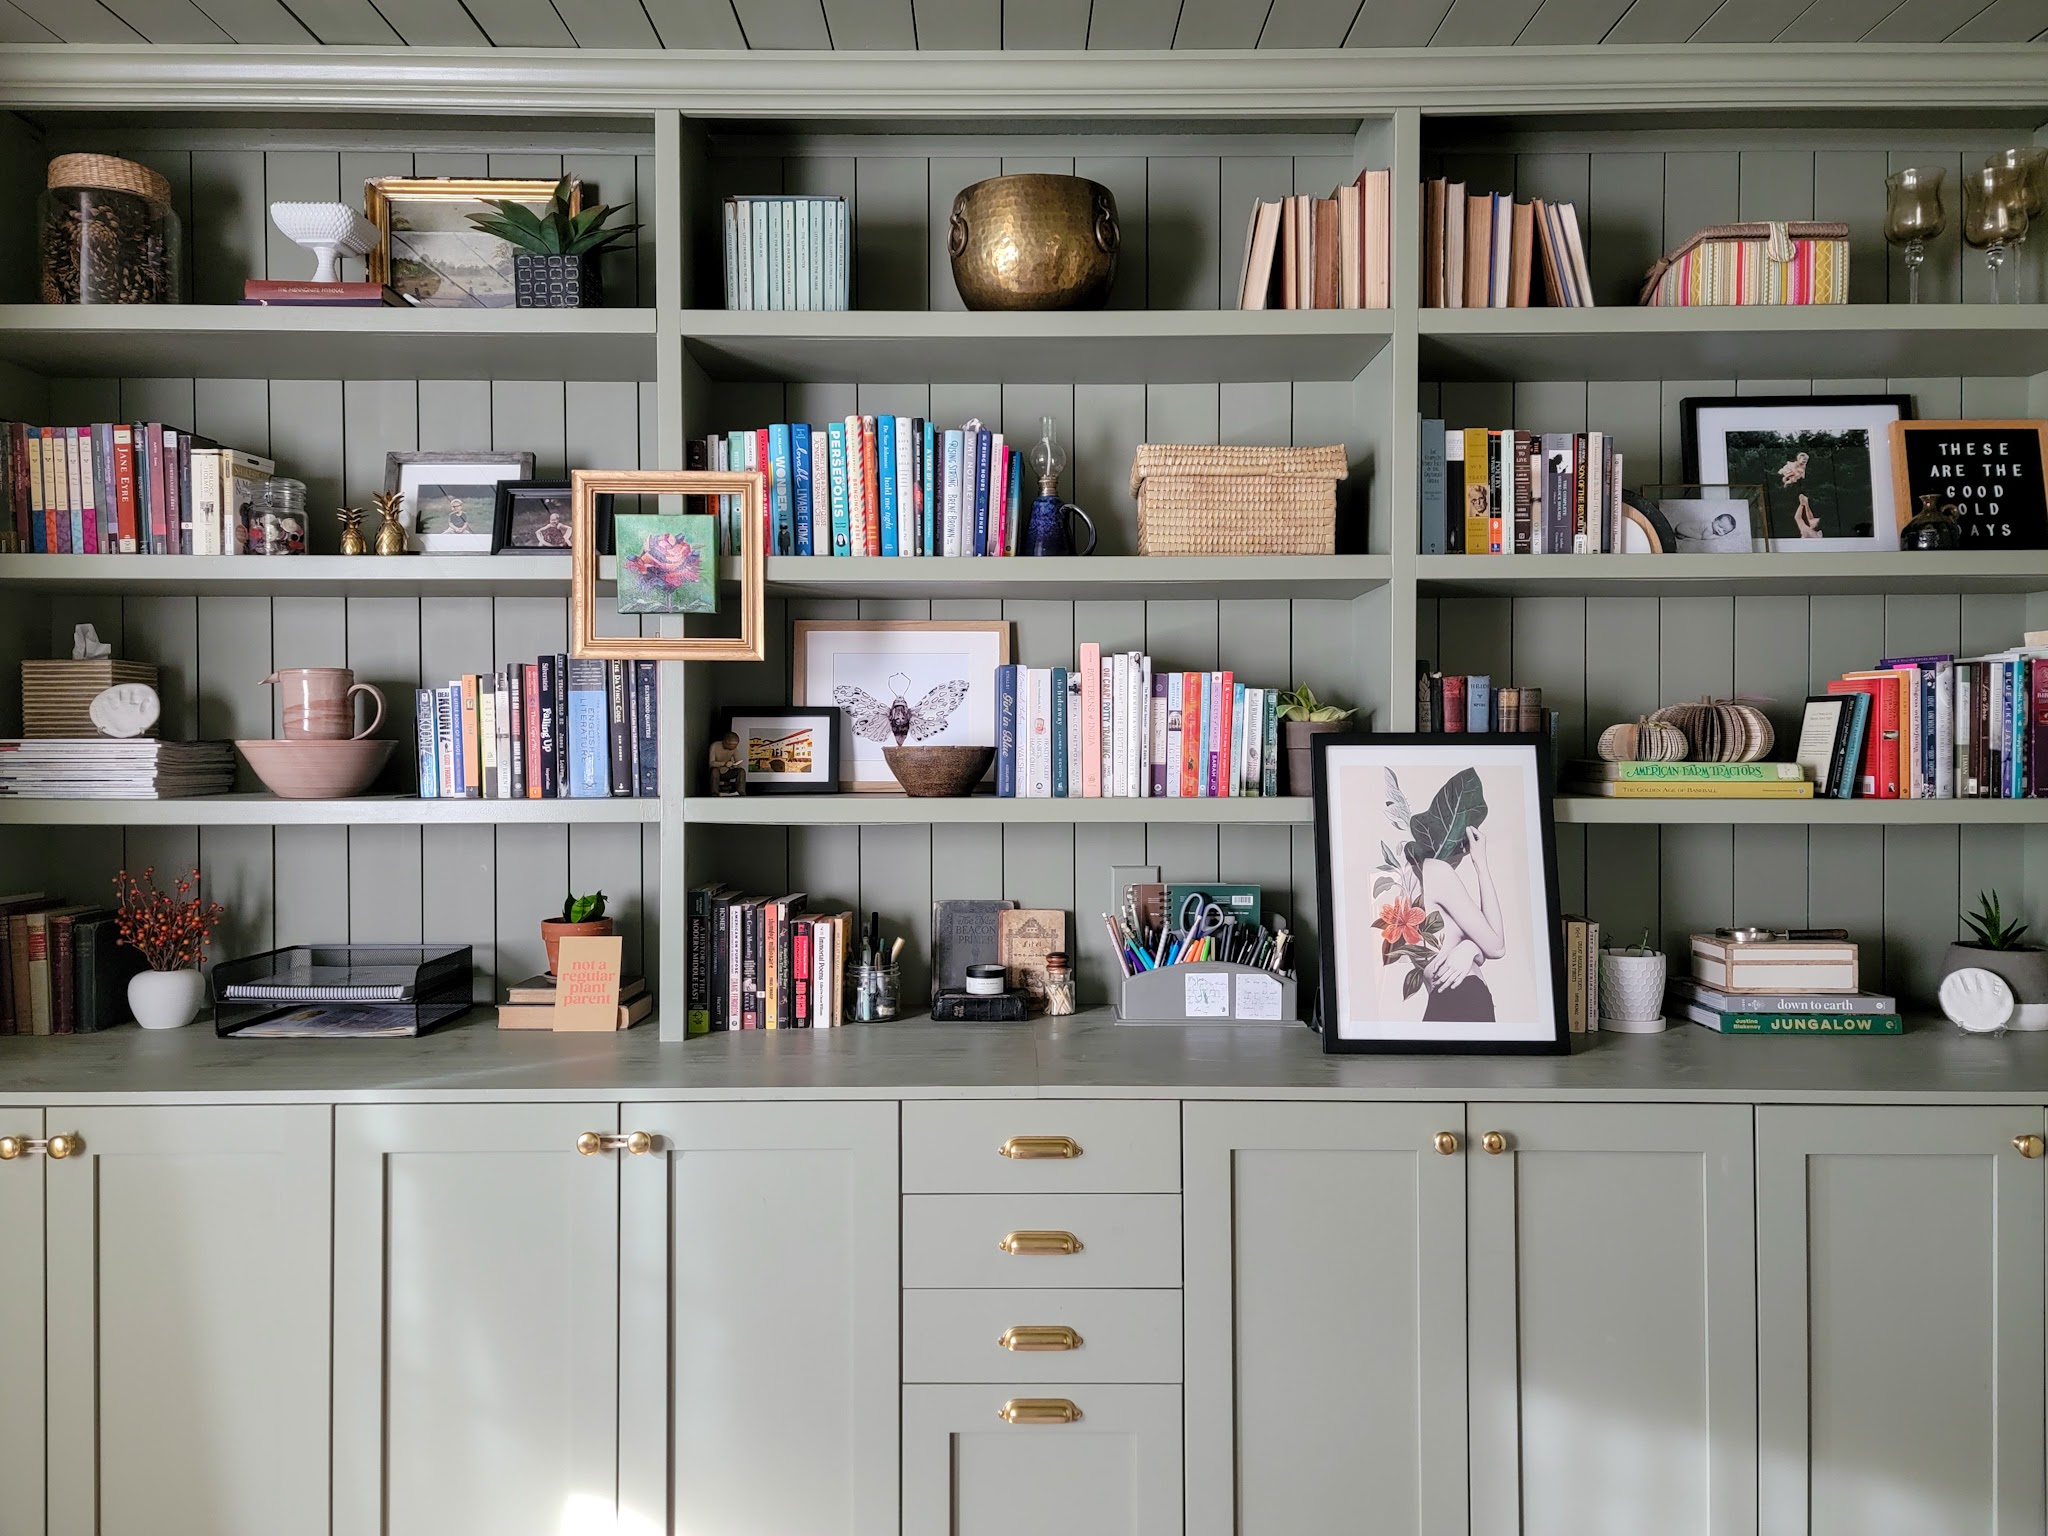
I loved the idea of a double frame so much that I used that again in my office! My sister is an artist and I loved this moody little flower on canvas she created. I decided to place it in an unique spot to showcase it and used command strips to place it on the trim work of the office built ins. That alone was a fun look, but adding a square frame that Justin made from scraps of trim from our house bumped it up several notches in my mind! I also added a vintage print I snagged at a sale recently to the top shelf – this might move somewhere else eventually but for now I love the peek of landscape up there.
I’m trying to reframe my ideas about what “art” is – anything can be displayed as a special thing. I’ve propped up meaningful books, added one-of-a-kind pottery from a local artisan, and even displayed the cute little card that came with a plant-related purchase. I love the collected, unique look this brings together.
When I purchased the masked girl print for Vi’s room, this unique print caught my eye. It’s not my usual style, but I instantly loved it and decided to roll with that feeling and purchase it in a large size. I love it just propped up against the shelves – it feels both casual and thoughtful at the same time.
Choosing to add these new items in front of the shelves, rather than on the shelves where everything else it, brought a new dimension to the built ins that I’m very into. The layers feel fresh and interesting, and maybe it’s not noticeable to anyone but me, but these shelves reflect our family and our history in so many ways. It makes our home feel like a cozy little haven – a home that gets used and loved and is lived in – and that’s a feeling I have always wanted for this house.
I’ve always been a fan of slow, intentional decorating and these small changes have strengthened my passion for it. I know I will continue to add and tweak and pay attention to the details for years to come!
Our playroom has gone through a few changes lately!
The playroom was the very first room we tackled in this house and since the initial update we’ve slowly been making other changes like swapping out the light fixture, adding chunky window trim, and building the play kitchen and dress up clothes rack. Two big projects remain: flooring and trim. My hope had been to first replace the carpet with a hardwood and then update the baseboards and trim with painted, chunkier versions; however, when Justin and I recently decided to delay the flooring project, I decided I didn’t want to wait any longer to at least make the trim more cohesive with the space. While I didn’t replace it, I did paint the existing trim and that made a big difference!
I also planned to add a big, soft rug to the room once we put down hardwood but now I figured, why wait? When I saw this rug debut in the recent CLJ x Loloi launch I instantly knew I wanted it for the playroom. It’s perfect – and SO soft!
The other big change lately has been a pretty significant reduction of toys, and today I want to give a deeper dive into what I call “The Toy Purge Experiment.” Because truly, the room can be beautiful but that means nothing if it’s not actually functioning well – and for our family, it doesn’t function well when it’s too full of toys. After all, it’s a PLAYroom, not a TOYroom. Let me explain!
The Toy Purge Experiment
Last month, I read the book Simplicity Parenting (you can read my full review here) and it made a huge impact on me. The author, Kim John Payne, advocates for simplifying life in four major areas, one of which is the child’s environment. The biggest suggestion with simplifying environment was addressing toys, and I found myself very aligned with his perspective. It’s not just that I don’t like clutter and don’t want my entire house overrun with toys, but it’s also that the author and I both believe that kids actually need less in order to play more.
It’s been nearly five years of parenting, and toys have accumulated. Of course they have! Birthday gifts, Christmas gifts, random gifts received from friends and loved ones, plus something I didn’t expect: all the trinkets that come with being in preschool. Seriously, I was not prepared for all the little things that come home with my children – prize box toys and small items in treat bags and novelty knickknacks in Valentine’s cards. And don’t even get me started on fast food kids’ meal toys or promotional toys from businesses and sports teams (whyyyyy are those necessary!?)
I know that our efforts over the years definitely helped keep things manageable, but things have slowly been spiraling. It happens! I’m honestly not mad about it either – I’m not trying to deprive my kids of the fun of a holiday treat bag or the joy of receiving gifts from people who love them. That being said, many of those toys don’t have a long rate of return. The prize box slinky gets bent out of shape. The cheap plastic holiday trinket gets broken. The cool racetrack toy is fun the first few times but it only does one thing so interest is quickly lost. These toys don’t actually produce play or spark meaningful joy anymore, but they contribute to the clutter and overwhelm of the playroom. These pictures may make it seem like the playroom was “fun” but what was actally happening was things were getting dumped out . . . and then were quickly abandoned or worse, not even really played with at all.
As Kim John Payne stated, “nothing in the middle of a heap can be truly valued.” It was time to remove the heap to let the valued toys be easily seen. Plus, the heaps were starting to spill out of the playroom and into all other areas of the house, and this mama does not thrive in that utter chaos!
Step One: The Purge
I’ve purged our playroom at various times throughout the years, but inspired by the book, I decided to go bigger than usual and see what happened. On a weekend where my kids were with their grandparents, I went through and analyzed every single toy in the playroom.
Anything that was broken or no longer worked well was an easy decision to get rid of. It was also pretty easy to remove the “young” toys that LJ and Vi have outgrown, though I saved a few for when Ollie gets older. I also removed anything we had duplicates of, even if it was something that is liked. Vi had five tutus in her dress up collection. She loves tutus! But she doesn’t need five options. Similarly, LJ still plays with matchbox cars on occasion, but he doesn’t need 15 of them. We don’t need seven puzzles that are pretty similar to one another or ten sensory balls. I also had to come to terms with the fact that some toys I got that I really liked weren’t actually toys that my kids played with. So out they went.
Step Two: Donate
The toys all got donated – my sister works for a school for young children with disabilities and she was thrilled to receive toys and puzzles to take to her classroom. It made me happy (in a way that probably shows that I grew up watching Toy Story) to see these things get to move on and find new life with other kids who will love and use them. Dress up clothes, which were mostly duplicates or things Vi has outgrown, were donated to a thrift store so another little girl can hopefully enjoy them.
The exceptions were what I call “the just-in-case favorites.” I decided to make some bold choices and remove some toys that were still considered “favorites.” For example, Vi is obsessed with Frozen and loves Elsa. But she had three Elsa dolls and that felt so excessive to me. I decided to remove one even though she still regularly played with it. (To be completely honest, I removed the one that I personally found to be the most annoying because it sings the same song over and over!) I also removed a few things that did still get played with, but that didn’t encourage much creativity or imagination (i.e. fixed toys). Rather than donate them, I kept these “favorite” items in a cabinet just in case this came back to bite me and a child was distraught over a missing toy. I didn’t want to get rid of something they really and truly valued. But guess what? It’s been almost six weeks since the purge and there has not been ONE. SINGLE. REQUEST. for these toys. Not even one comment about the missing Elsa! I’ll admit I’m shocked, but maybe I shouldn’t be.
Step Three: Let the Open-Ended PLAY begin!
My kids did not make a single comment about the playroom feeling empty. They haven’t said one word about any of the missing toys, favorites or not, but what they have done is PLAY. In fact, they’ve “re-discovered” some toys that they hadn’t played with much lately! I specifically chose to keep things like Lincoln Logs, Magnatiles, and Legos. These toys inspire building, creating, and imagination and it’s been so fun to see my kids focus in more on those things.
I also kept a wide variety of items to mix and match play in the dress up collection and play kitchen area – my kids invent play scenarios with these things daily! In our house, fewer open-ended toys will always trump a multitude of fixed toys that only do one or two things.
I truly feel like they’re playing more frequently because they’re not overwhelmed by choices. When there’s fewer options in front of them, it’s easier to see toys and select something that seems fun. In our experience, it hasn’t led to boredom; they are still playing and coming up with new things to do every day. And as a bonus: the playroom stays contained much more easily and is quicker to clean up. A win-win-win for this mama!
Step Four: Plan for the Future/Maintain
Things feel great for us right now, but more is coming. LJ’s birthday is in about a month, and Christmas comes a month after that. I’m trying to be intentional about what we ask for, but also, I’m not going to be super controlling over this. My kids have a say in what they ask for, and toys are a big part of that (I wouldn’t have it any other way!) So I may steer them towards choices of open-ended toys, but ultimately, I’m sure they’ll get a variety. That’s okay! I plan to do a mini purge right before Christmas and maybe I’ll try to involve them in that one. Now that I’ve seen that they really don’t miss the toys that aren’t there, I know I’ll be able to do smaller edits of the room over time to help keep things manageable.
While it can seem like you’re depriving your kids if you don’t allow for tons of toys, I really and truly believe giving the gift of play actually comes from having fewer, more intentional, choices. If you’re wanting to try this but not sure if you can commit, start with the things you KNOW your kids never play with. Keep them in a cabinet and see if the absence is noticed. Give yourself a length of time (one month, six weeks, three months, etc) and if your child hasn’t requested it by then, you can feel good about donating it. I also know people who never have all their toys out at once – they’ll have some out and some in a cabinet and will rotate through toys so things feel new and fresh. Maybe that type of toy-cycling feels better for you. Regardless, I would encourage you to give editing down the number of toys in your home a try! Like me, you too might find that less really is more when you simplify the chaos. 😉
One of my goals for 2022 was to update the flooring throughout the house. Ever since we moved in, we’ve planned to rip up the carpet in the living room and playroom and put down a hardwood throughout the main floor. We were thinking this was the year to finally do it, but Justin and I have been talking lately about different financial goals and decided we need to switch gears and prioritize some other things at this time. So for now, the flooring stays!
I had been holding off on updating the living room until we did the flooring, but now that that is a further project, I want to at least do a phase one update to the space. First on the list: carpet cleaning! The carpet is in such bad shape with lots of stains, but since it’s here for a while longer, I want to get it looking as good as possible. We have carpet cleaners coming on Friday and then I’m going to start in on some other updates to this space!
Living Room
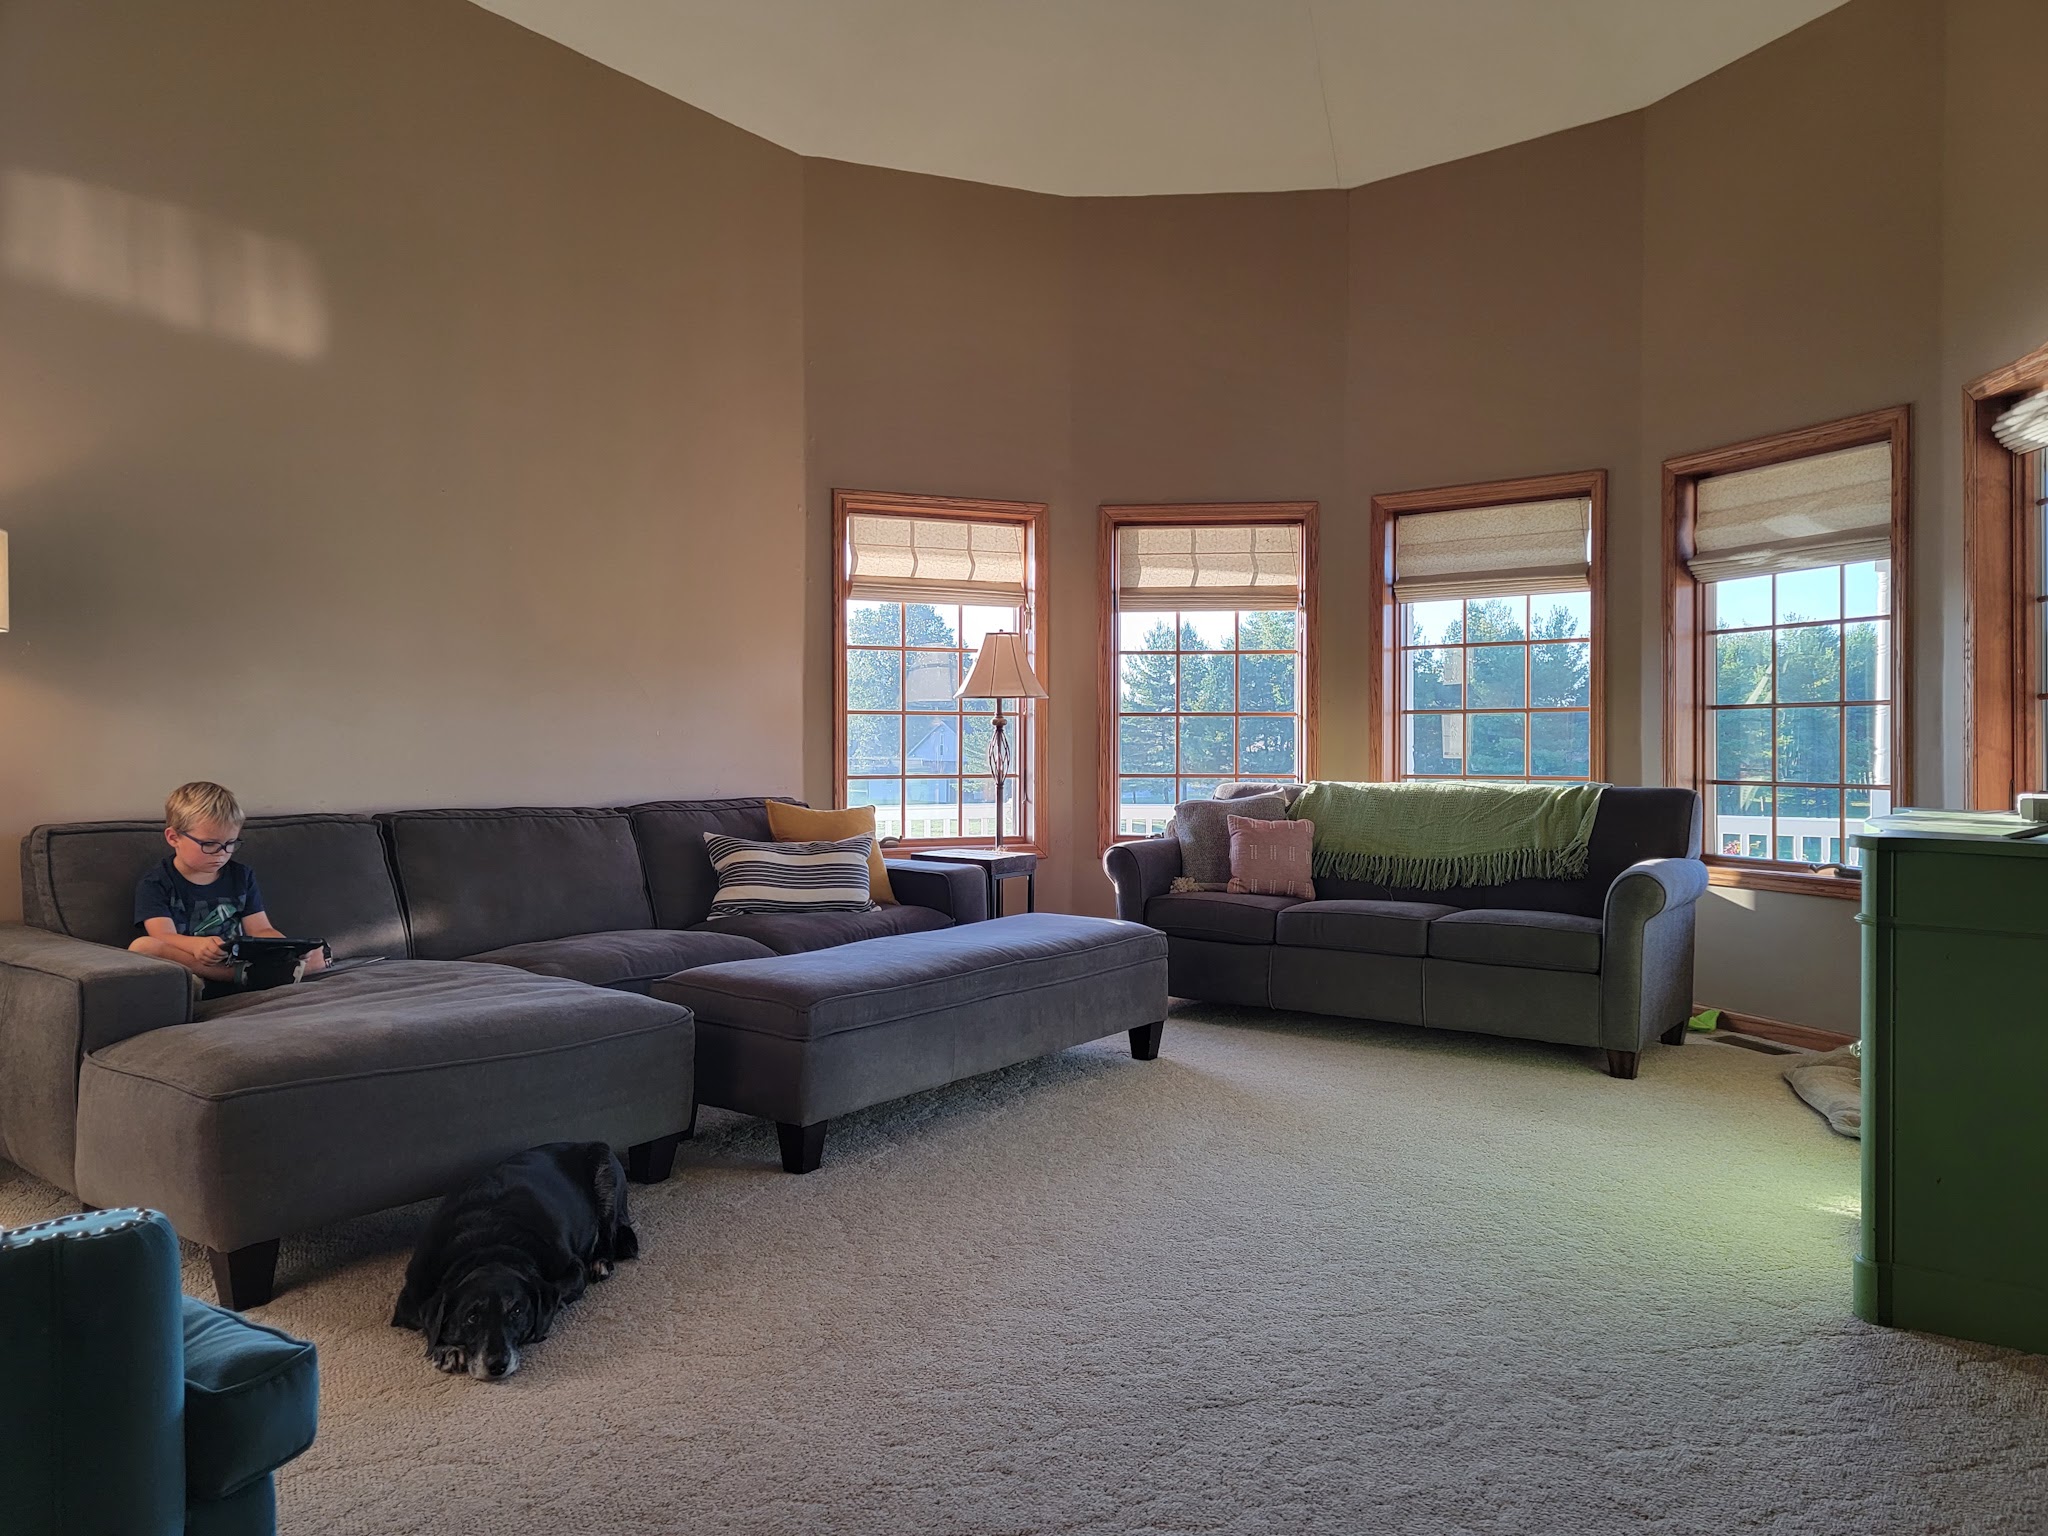
The living room has remained mostly untouched since we moved in 3 years ago. We plopped down furniture from our last house and have left it as is. It has been super functional for this stage in our life with young children at home, but it’s not exactly cute. In fact, this room is arguably the one we spend the most time in and yet it shows the least amount of personality (minus the child and dog, ha!)
Updating the flooring would make a huge impact here and eventually I want to get a different couch, but for now, I’m working with what we’ve got: carpet and a six-year-old sectional from Costco. I don’t want to add anything too precious because we still have several years of sticky toddler fingers and rambunctious couch jumping ahead of us, but I still think I can make the room functional AND beautiful for our family.
The two biggest things this room needs (besides flooring) are paint and lighting. I’ve gone back and forth on paint color – I really don’t want to do white but the room has such large openings and is very connected to the foyer and kitchen so continuing with white in here makes the most sense. I’m toying with the idea of a fun color on the ceiling though (and maybe planking?) so we’ll see. There is currently NO permanent lighting. The ceiling has a fan only and while we use two floor lamps, they are not sufficient for the scale of the room. I plan to have hardwired sconces above the couch and a large chandelier to match the scale of our high ceiling. These changes alone will make such a huge difference!
In addition to the carpet cleaning, I’m going to add a rug to the space to cozy it up. My throw pillows are showing a lot of wear and tear so I want to swap out the covers – I’m thinking a variety of earthy tones and subtle patterns. There is currently no artwork in the room but there are five large windows looking outside. I’m going to paint the windows black and update the window trim as I’ve been slowly doing in other rooms as we go. I feel like a gallery wall might add too much visual chaos and take away from the view so I’m planning to just hang curtains and add one large piece of artwork above the couch.
Because of the large cased openings leading into other rooms, I don’t have many different layout options and we pretty much have to have the TV on this small wall. It’s sitting on a buffet that was handed down to me from my grandparents; I painted it this bright green in our last house but it’s time for a new color. I would love to someday add a fireplace here (just a little gas insert with a pretty mantle) and mount the TV but for now I just plan to revamp what I’ve got.
Eventually I also want to exchange the smaller couch with two large comfy chairs and update the exterior door leading to the porch but I’m not sure if any of that will happen in this phase or not. I’m going to take my time finding just the right things so we’ll see when that happens. This room is not going to be a super fast turnaround but I’m excited for slow and intentional changes!
Playroom
The playroom is adjacent to the living room and has been a slow and steady process that is mostly updated.
I have been holding off on painting the wooden trim until the flooring was done, but since that’ll be a while now I’m going to go ahead and paint the trim. I also want to add a fun rug and then I’ll probably consider this room good for a while.
We’re still waiting on baby boy’s arrival but as of yesterday, his nursery is finished and ready!
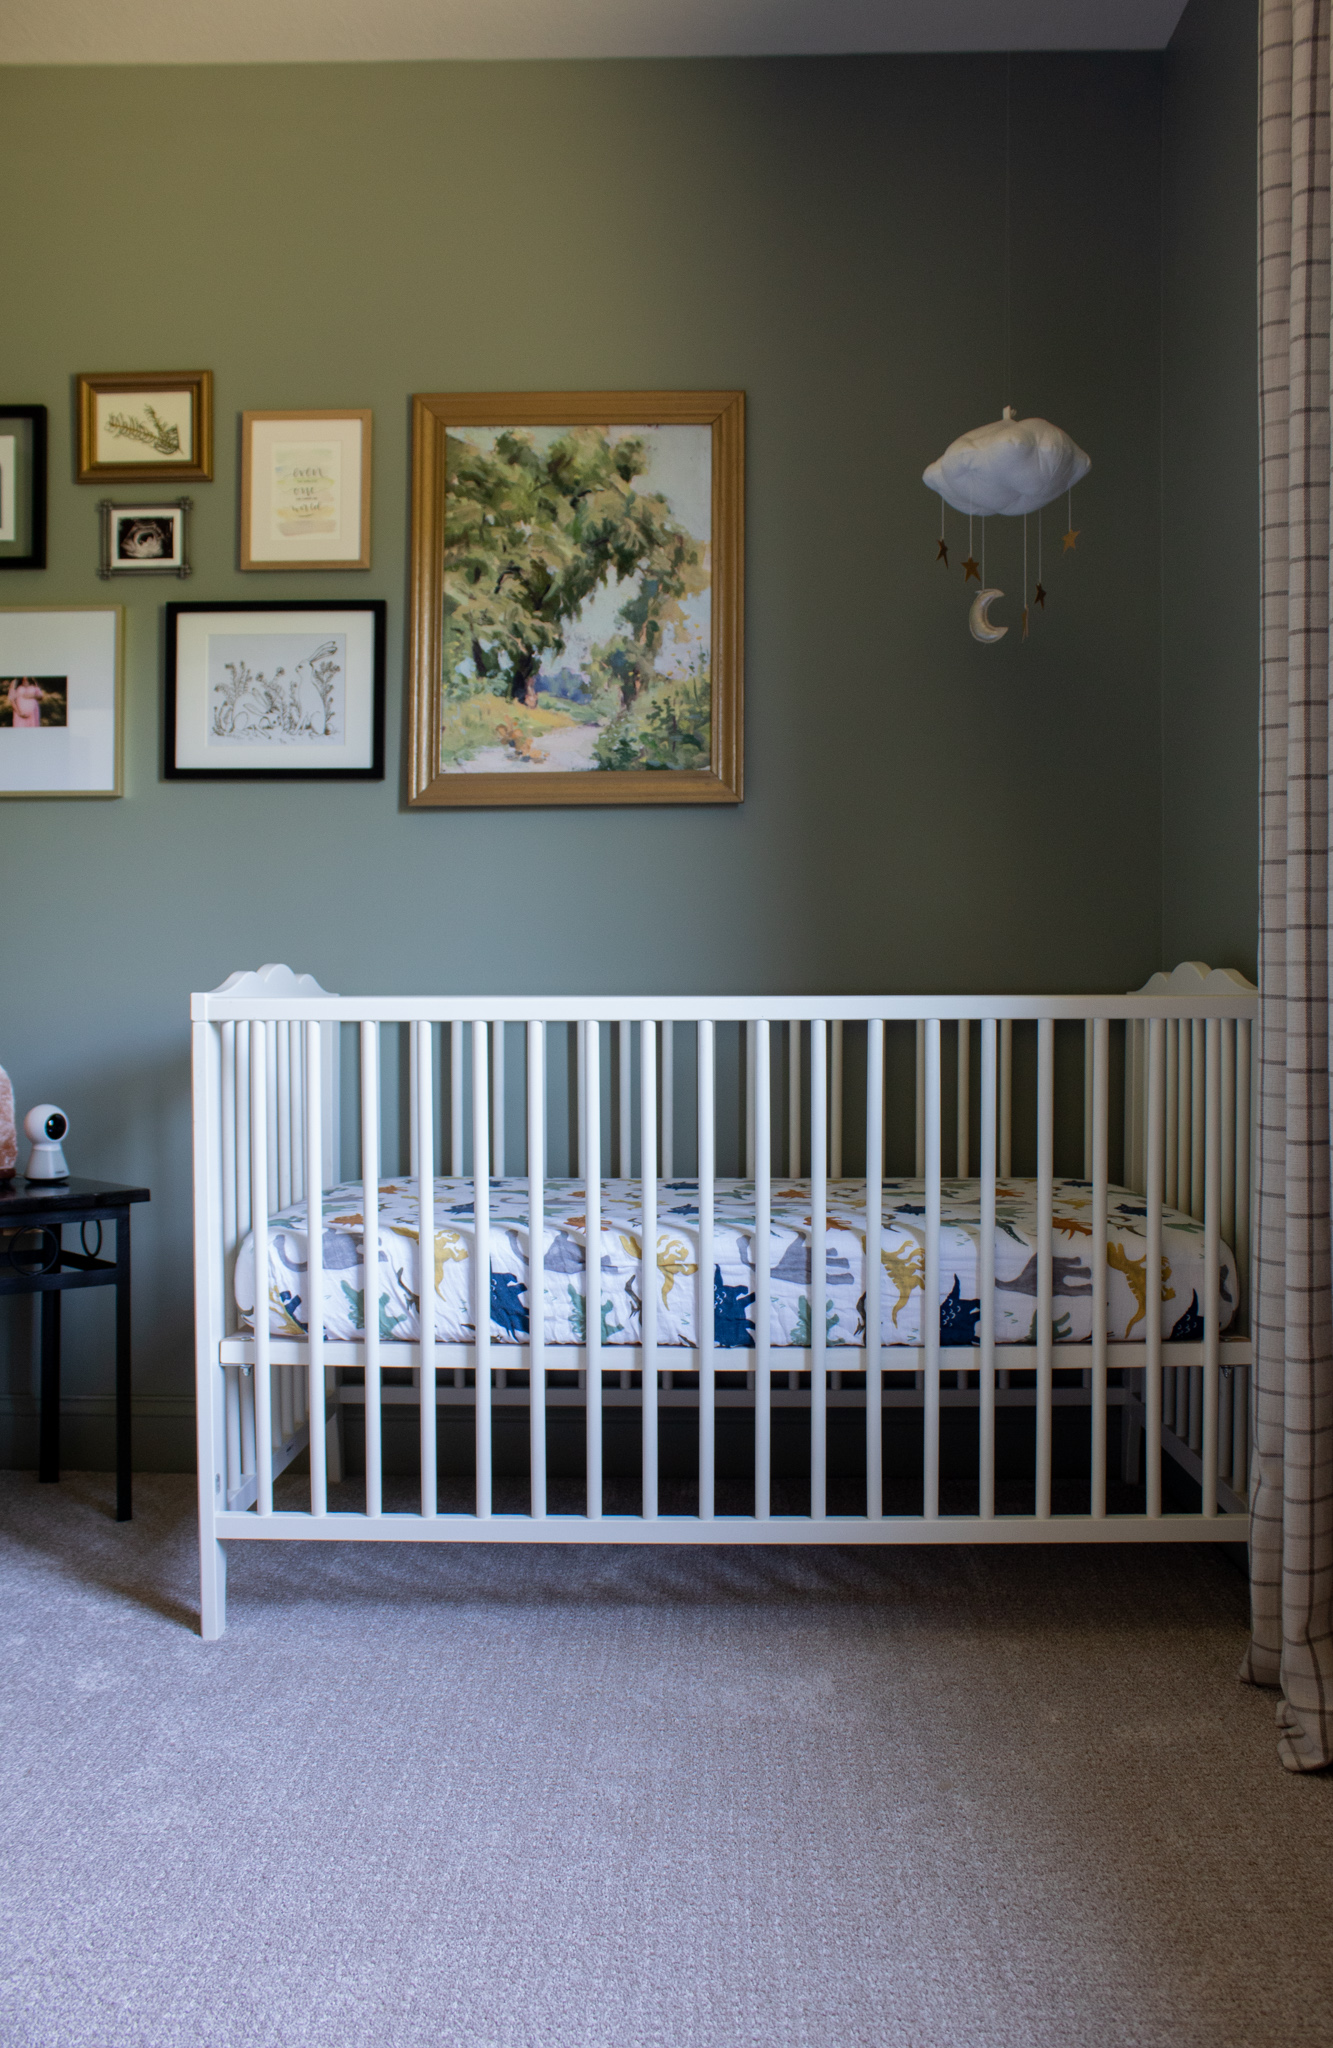
This was the first time I’ve really been able to go for it with decorating a nursery space. With my previous pregnancies, we chose to be surprised with the baby’s sex at birth so this is the first time we’ve ever known in advance. We also feel confident that this is our final baby so there’s no need to try to keep things somewhat neutral for the future. It was really fun for me to get to plan and design a nursery with a specific little boy in mind and I’m so happy with how it turned out. My goal was to create a soothing place for lots of baby snuggles, late-night feeding sessions, and (hopefully!) restful nights for our sweet boy. I wanted a blend of graphic prints and organic elements in earth tones that mimic the gorgeous woods you can see right outside his window. [And speaking of window – this room only has one window, never gets in the direct path of the sun, and is always a little moody and dim. I love it in person, but it does make it challenging to photograph well – the room isn’t quite as dark as these photos make it seem!]
Obviously, the main focus of a nursery is the crib. I’ve had the same Ikea crib for all my babies and it has served us so well. I’ve also used this little cloud mobile in all three nurseries (although not always above the crib) and I love how sweet and whimsical it is! The dinosaur sheet was a clearance find from back when LJ was still using the crib, but I never actually used it for LJ. It wasn’t exactly what I was envisioning for this nursery, but it’s hard to argue for buying new when you have a nice option on hand already and I’m satisfied with this choice.
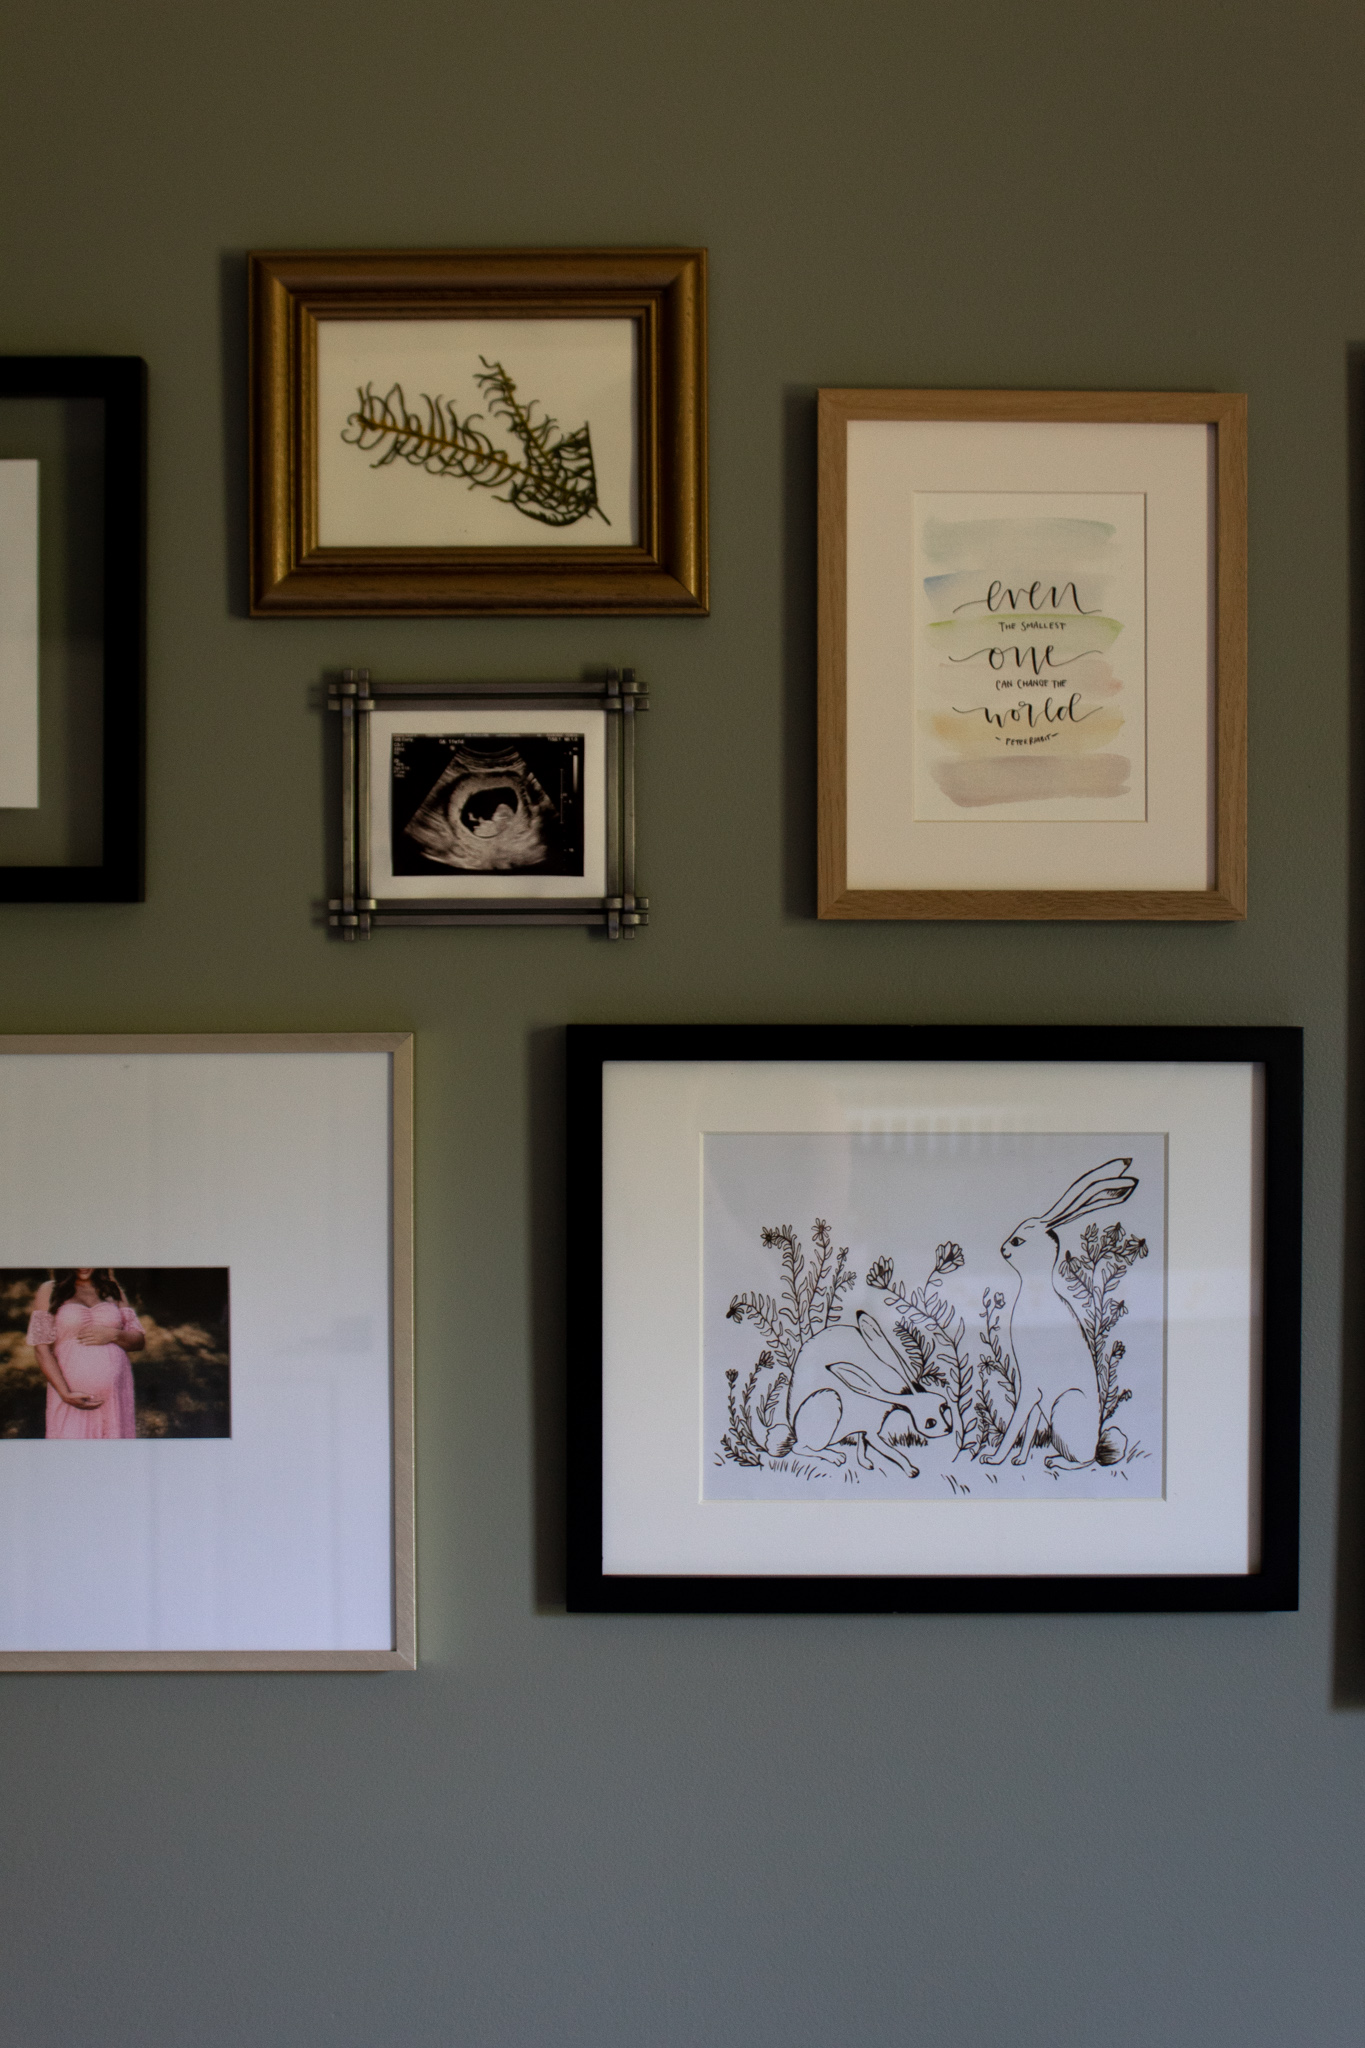
I decided to forgo one large print above the crib and instead create a gallery wall, specifically choosing to center it on the wall instead of over the crib. I wanted a collected look so I pulled together some digital download prints, a maternity photo, the baby’s sonogram, and a simple dried fern in a variety of frames, some new and some thrifted.
The chair we had in here previously was a handmedown La-z-boy from Justin’s grandma with a slipcover over it. It is comfortable and worked just fine, but when I spotted this dark mustard colored recliner with a grid pattern in a local thrift store, I just couldn’t resist! I knew it would be perfect in this room and I was right. The only downfall is that it doesn’t rock, but we are currently brainstorming solutions for finding a way to make it rock.
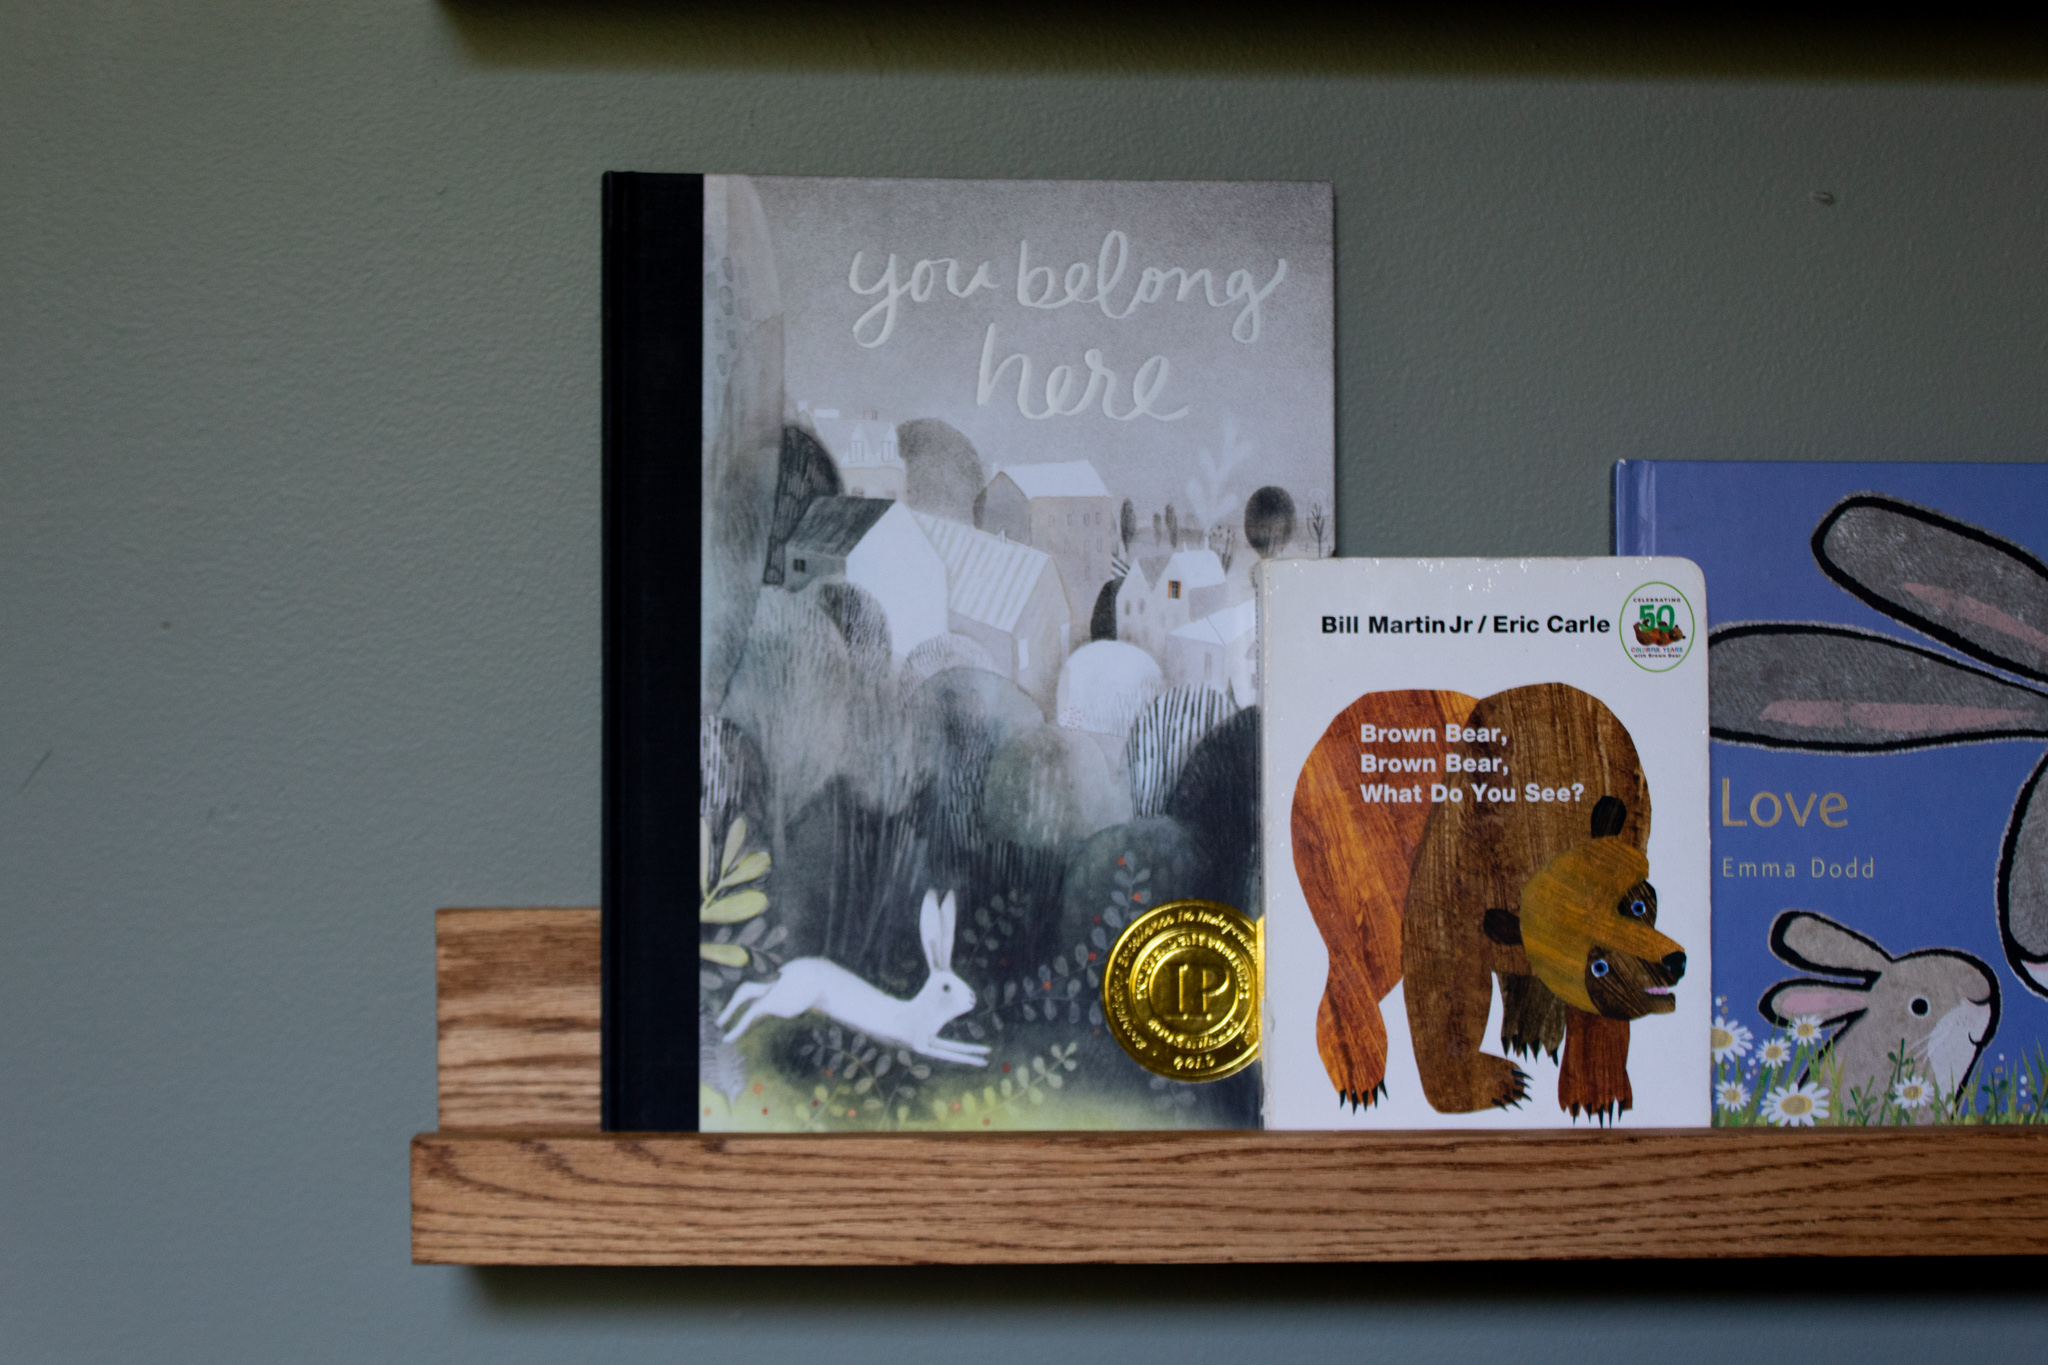
I asked Justin to create a few little book ledges for baby’s book collection and he made three for me following the same process as the ones we made in our secret nook. They turned out great and all of baby’s books fit!
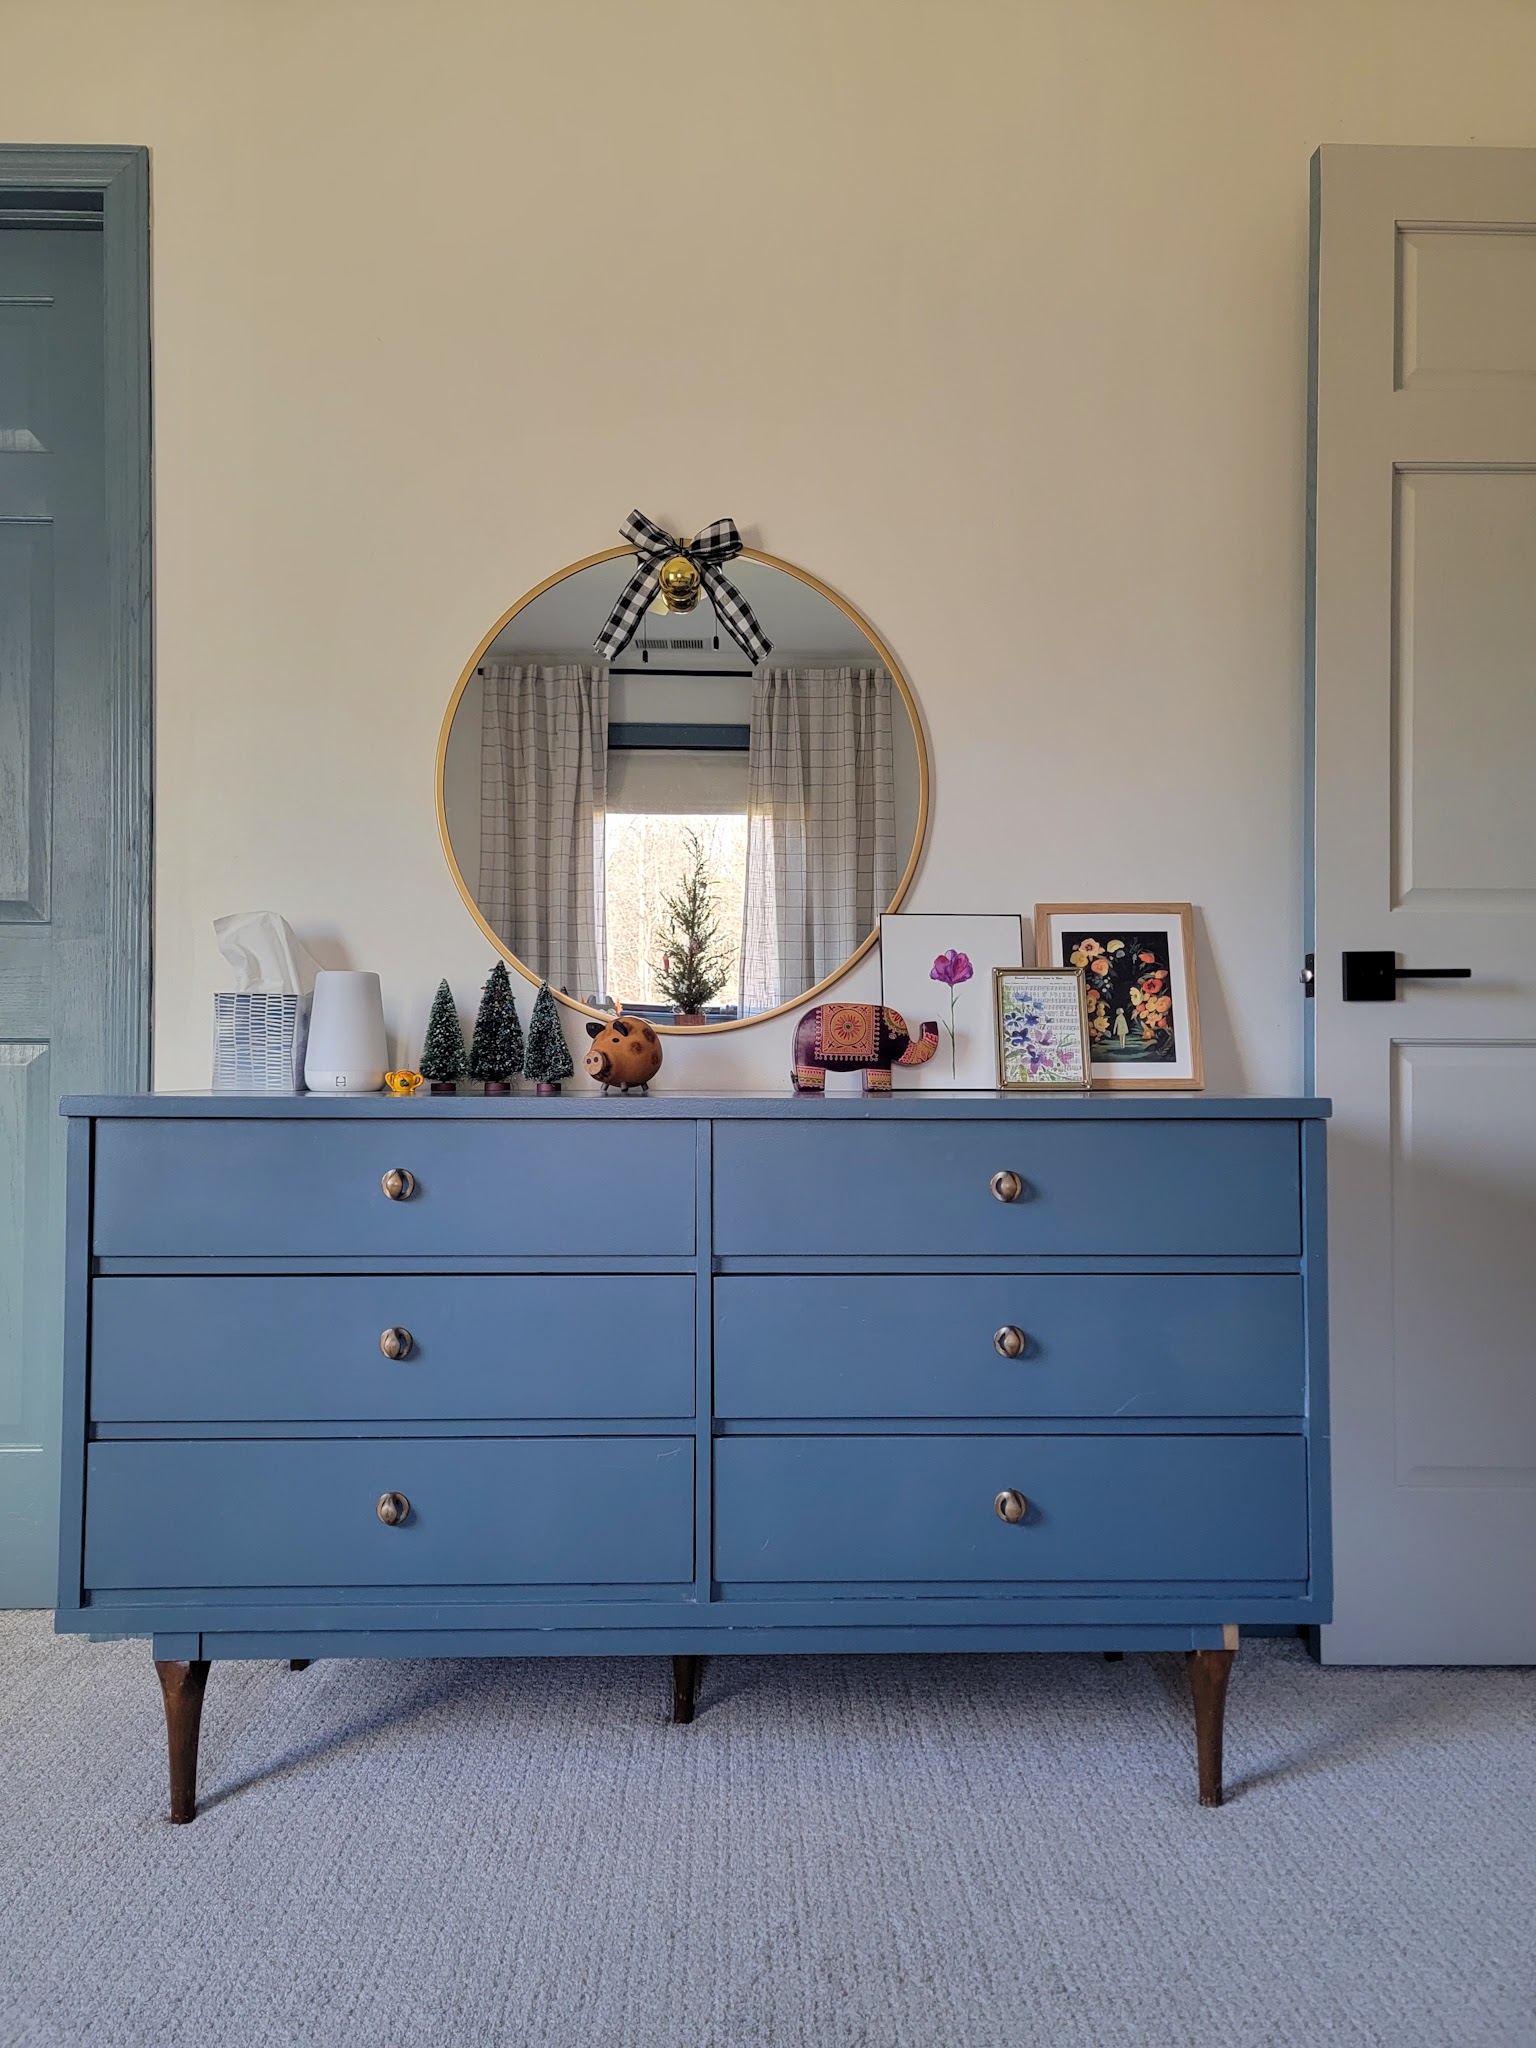
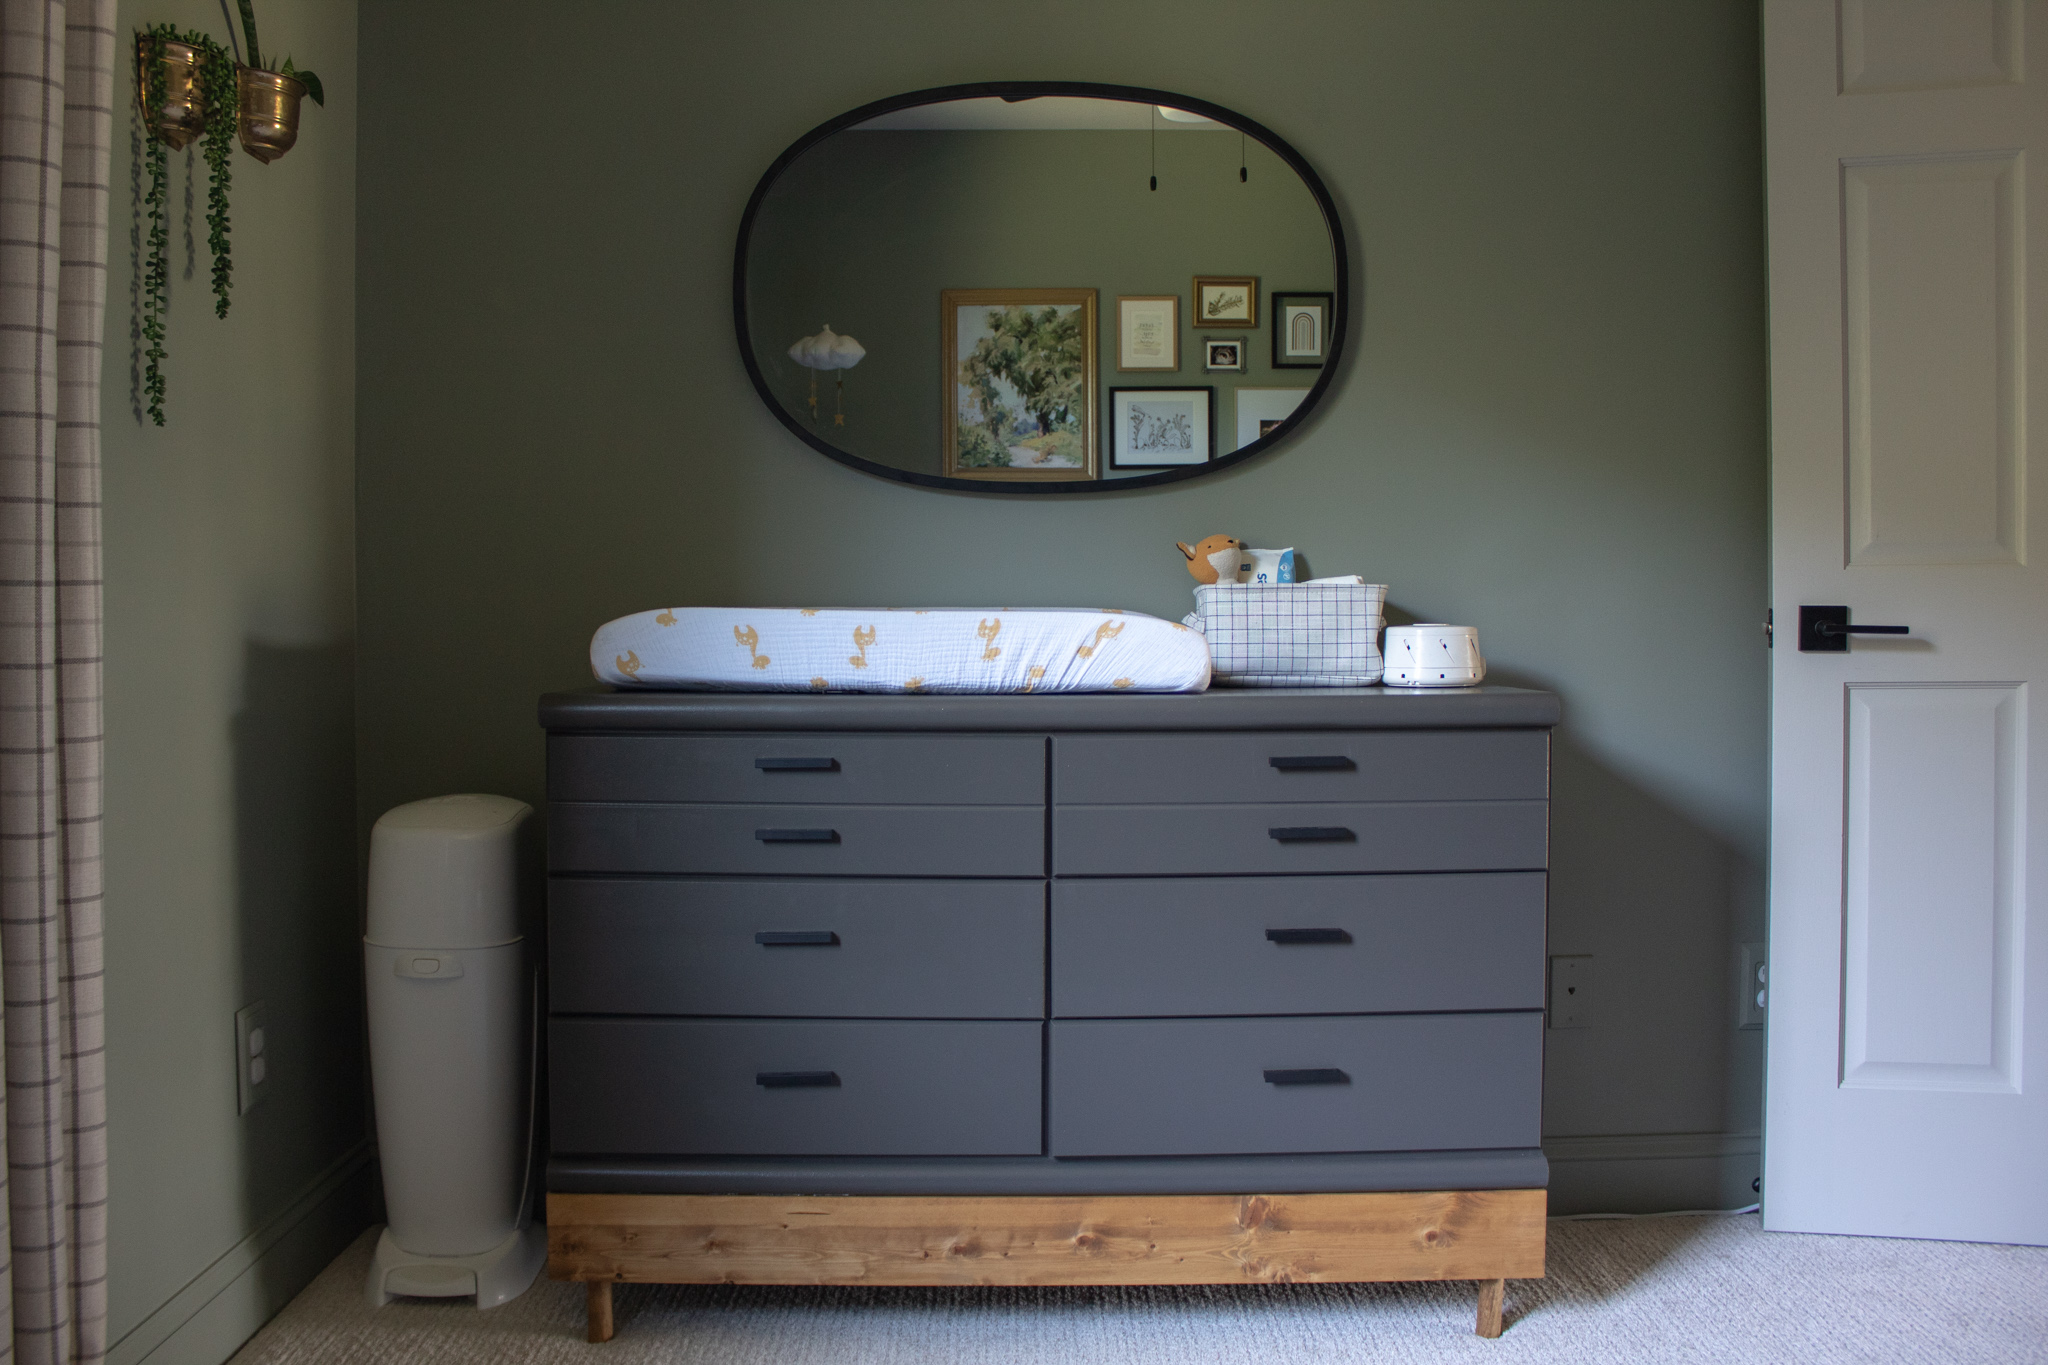
I kept the same dresser from Vi’s nursery, but decided to re-paint it in Sherwin Williams Iron Ore and swap out the gold drawer pulls for matte black ones. I did a little mirror switcheroo and moved the round gold one that used to hang here into the kids’ room and brought in the black oval one from the kids’ room.
I had the giraffe-patterned changing pad cover from LJ’s nursery and I think its colors and whimsical pattern translated well to this nursery. A little basket full of diapers, wipes, and ointments and we have ourselves a changing station!
I enjoyed spending time on some of the little details throughout the room as well – repainting the little side table we thrifted a decade ago, hanging plaid blackout curtains high and wide, finding vintage brass wall planters on Etsy for a unique touch, filling a basket full of soft baby blankets. Throughout this room renovation, we’ve painted the window and updated trim, replaced the thin baseboards with a chunkier version, upgraded the old worn carpet with this soft greige, and installed a new matte black ceiling fan. I painted the doors and Justin re-installed them with new matte black hinges and handles. I painted the ceiling Sherwin Williams Shoji White and painted wooden outlet covers – it’s the little things that really finish off a room!
Now the only thing we need is one sweet baby boy to enjoy this room!
Sources
Wall Color: Sherwin Williams Evergreen Fog in Eggshell
Ceiling Color: Sherwin Williams Shoji White in Flat
When we first looked at this house as potential buyers, we weren’t quite sure what to think of the pond. We never specifically looked for a property with water and had no experience with maintaining a pond; however, one step out onto the patio looking out onto the water and we were hooked. We knew this could be a very special place for our family and now three years later, we absolutely love it and are out there all the time. The previous owners created a small beach area along the edge of the water and installed a little wooden deck beside it. This has become my favorite spot to lounge and read a book while watching the kids play in the sand and swim. The one thing it was missing was an option for shade and this year I decided it was high time to come up with a solution – and we did!
We looked at weighted umbrella stands, but most options would’ve cost around $500 and we weren’t even confident what we chose wouldn’t tip over since the deck is not near anything to block a strong wind. Instead, we came up with a DIY version that not only looks much cuter (in my humble opinion haha) but is sturdier and MUCH less expensive. Granted, we used a lot of scrap wood and supplies we already had, but this version cost us right around $200. Today I’m sharing all the details with how we did it step-by-step. Here we go!
I wanted something that felt streamlined and modern so I bought this planter off of Amazon for the base of the stand. Justin took an old wooden 4×4 post we had in our scrap wood pile and cut it down to create a filler border around the inside edge. This is not a necessary step, but he did it to reduce the amount of concrete used and the overall weight of the finished product.
We plugged the hole at the bottom with the plastic gasket that came with the planter and moved the whole thing around outside until we found level ground.
Justin poured the concrete mix into a bucket and added water according to the directions, using an old broom handle to stir the mix.
Once the concrete mix had reached the desired consistency, he poured it into the planter and used a small spade to smooth the top flat.
Justin ended up using about 1 1/3 bags of concrete. I think one bag would have been sufficient if your umbrella is going to be near a house or other structure that would help to block wind, but since ours is out on a deck with no windbreak around it, we wanted a little extra stability.
Then it was time for the most meticulous part – getting the umbrella stand perfectly in place. This can be done solo but was easier with two people, as one of us used a tape measure from side to side in each direction to find the exact center while the other carefully set the pole in place, then we used the level to make sure it wasn’t crooked. We also stepped back and visually confirmed with one another from all angles that the pole looked straight up and down. We really took our time with this step and it was well worth it!
Once we were fully satisfied that the pole was not crooked, I took a piece of cardboard from the box the planter arrived in and used a box cutter to cut an “x” in the center. I slid the hole made by the x down over the pole and it created a kind of holder to keep the pole from moving in the wind. We weighted it down with some scrap wood and shovels and left it to dry and set for about 36 hours.
Our original plan was to stop here and fill the top half of the planter with soil and flowers, which I think would’ve been lovely! But before we could do it, we actually used the umbrella over the weekend when friends came to visit and we quickly realized that the base made an awesome catch-all spot for sunscreen, books, phones, etc. I was immediately inspired and came up with a vision for a removable tabletop that allowed us to access the storage underneath.
TabletopDirections
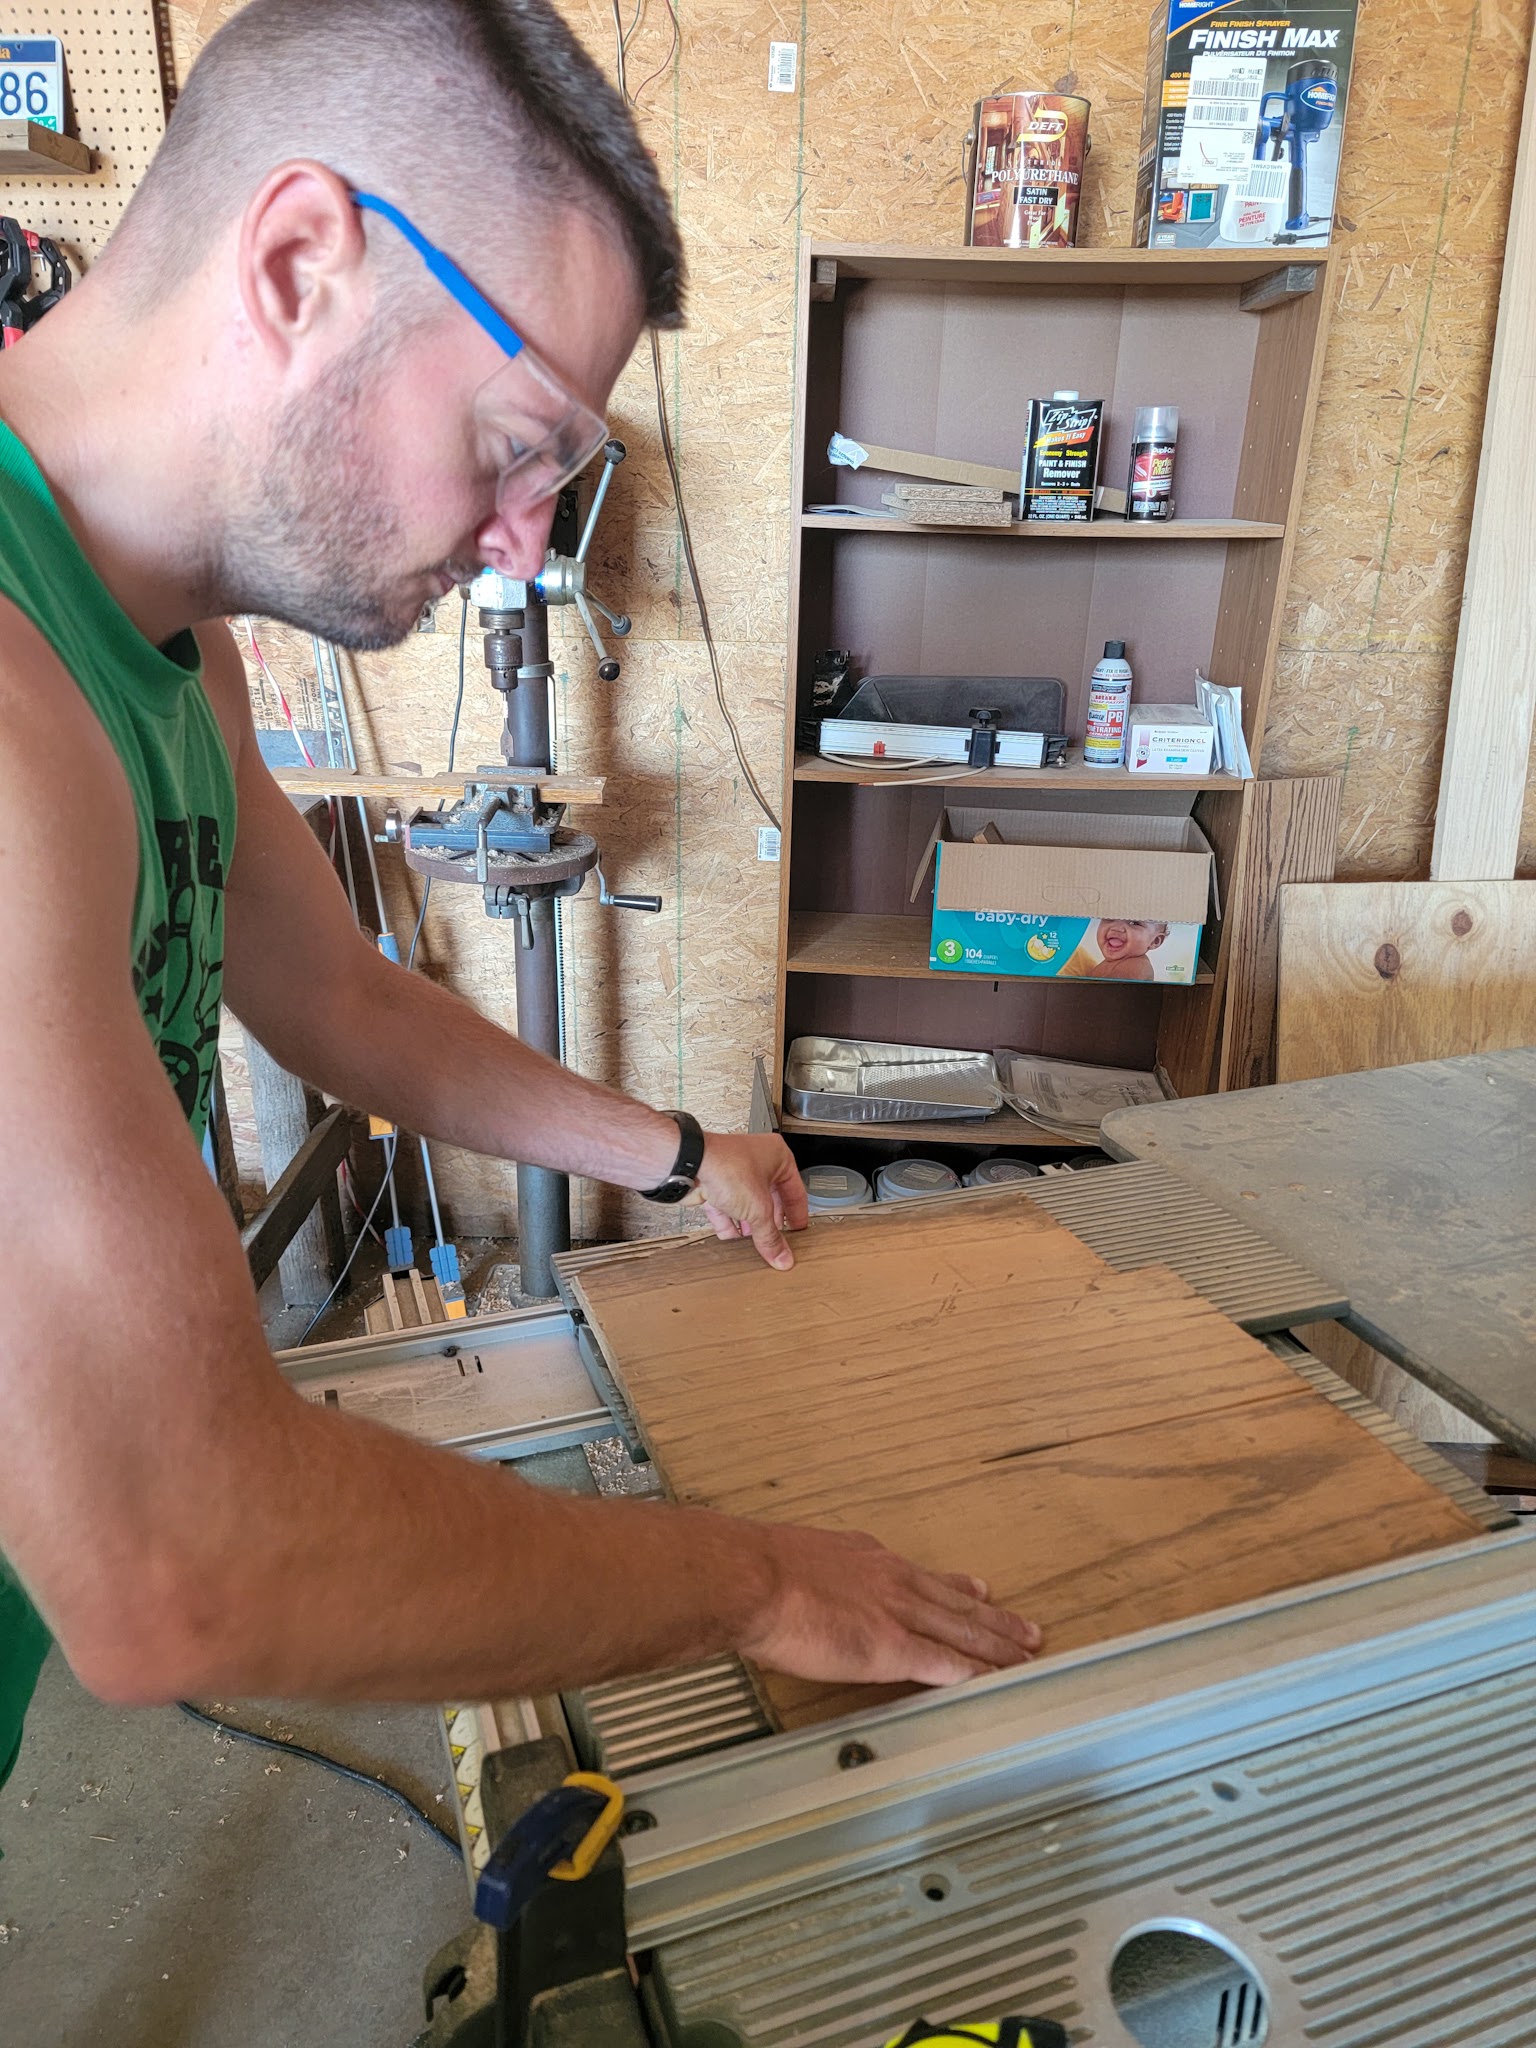
Once I explained my vision to Justin, he was excited to jump right in. He used his table saw and miter saw to cut down a piece of 3/4 inch plywood to size (in two pieces) to fit inside the planter.
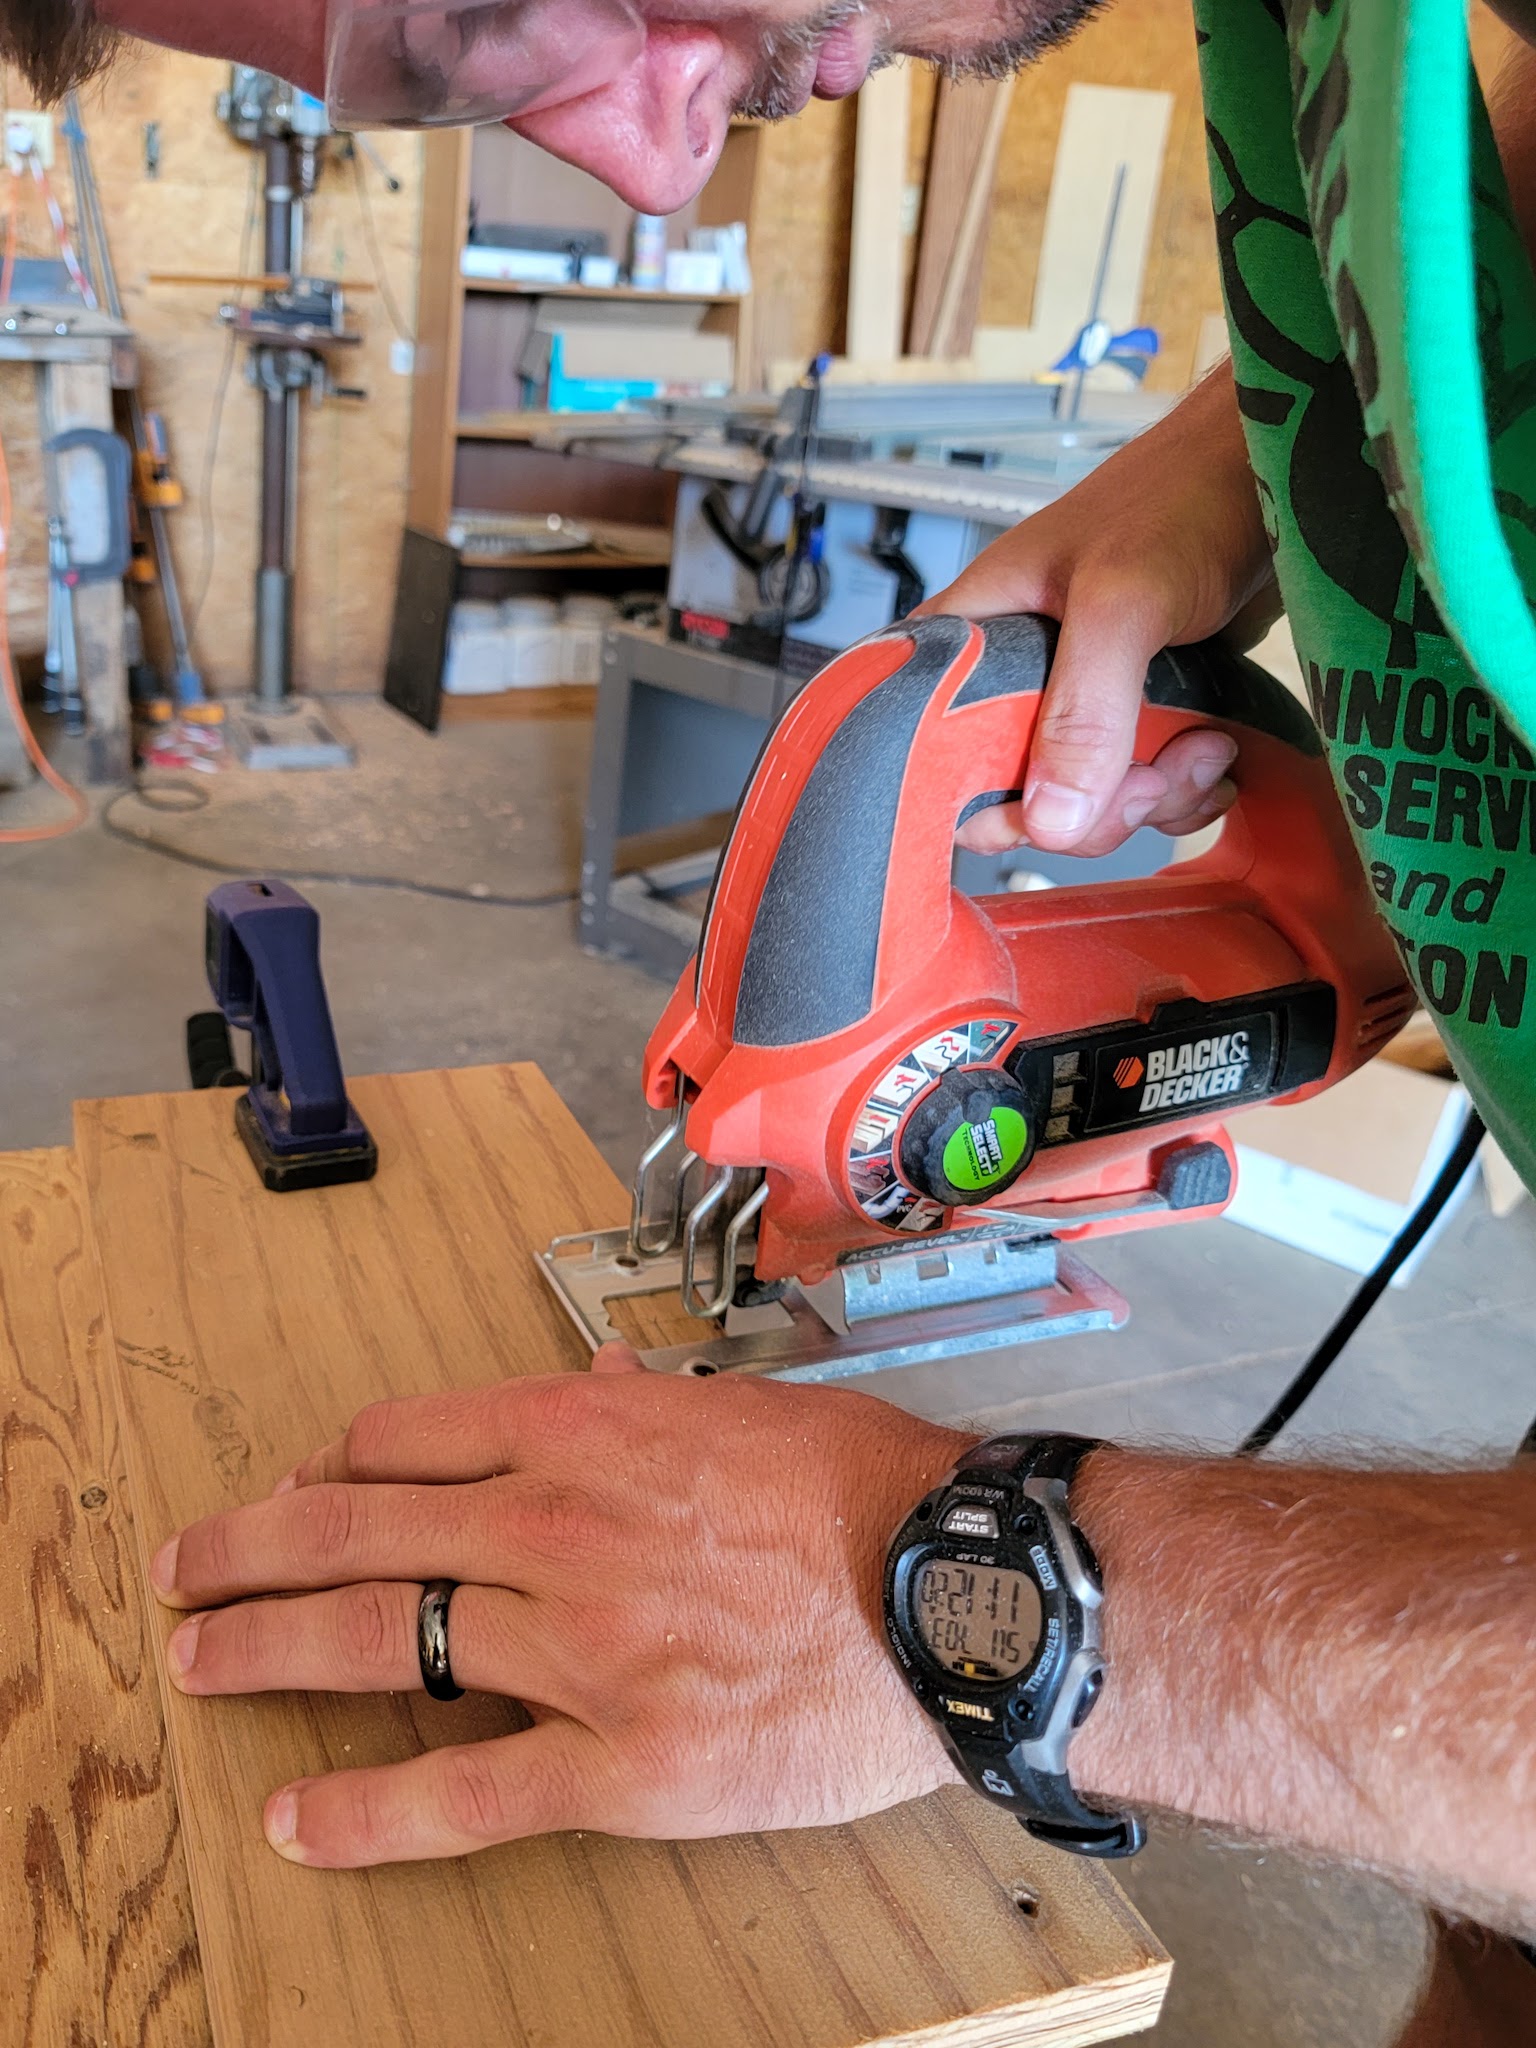
He then used a jigsaw to cut a small notch on the edge of each piece of plywood for the umbrella pole to fit through.
Tip: Justin spent a lot of time on these first two steps measuring and re-measuring to make sure the pieces would fit as flush to the inside edges of the planter as possible. We’re not including dimensions, because every planter and umbrella will be slightly different and it’s important to measure your own to make sure it fits well!
Once the pieces were cut to size I spray painted each one black.
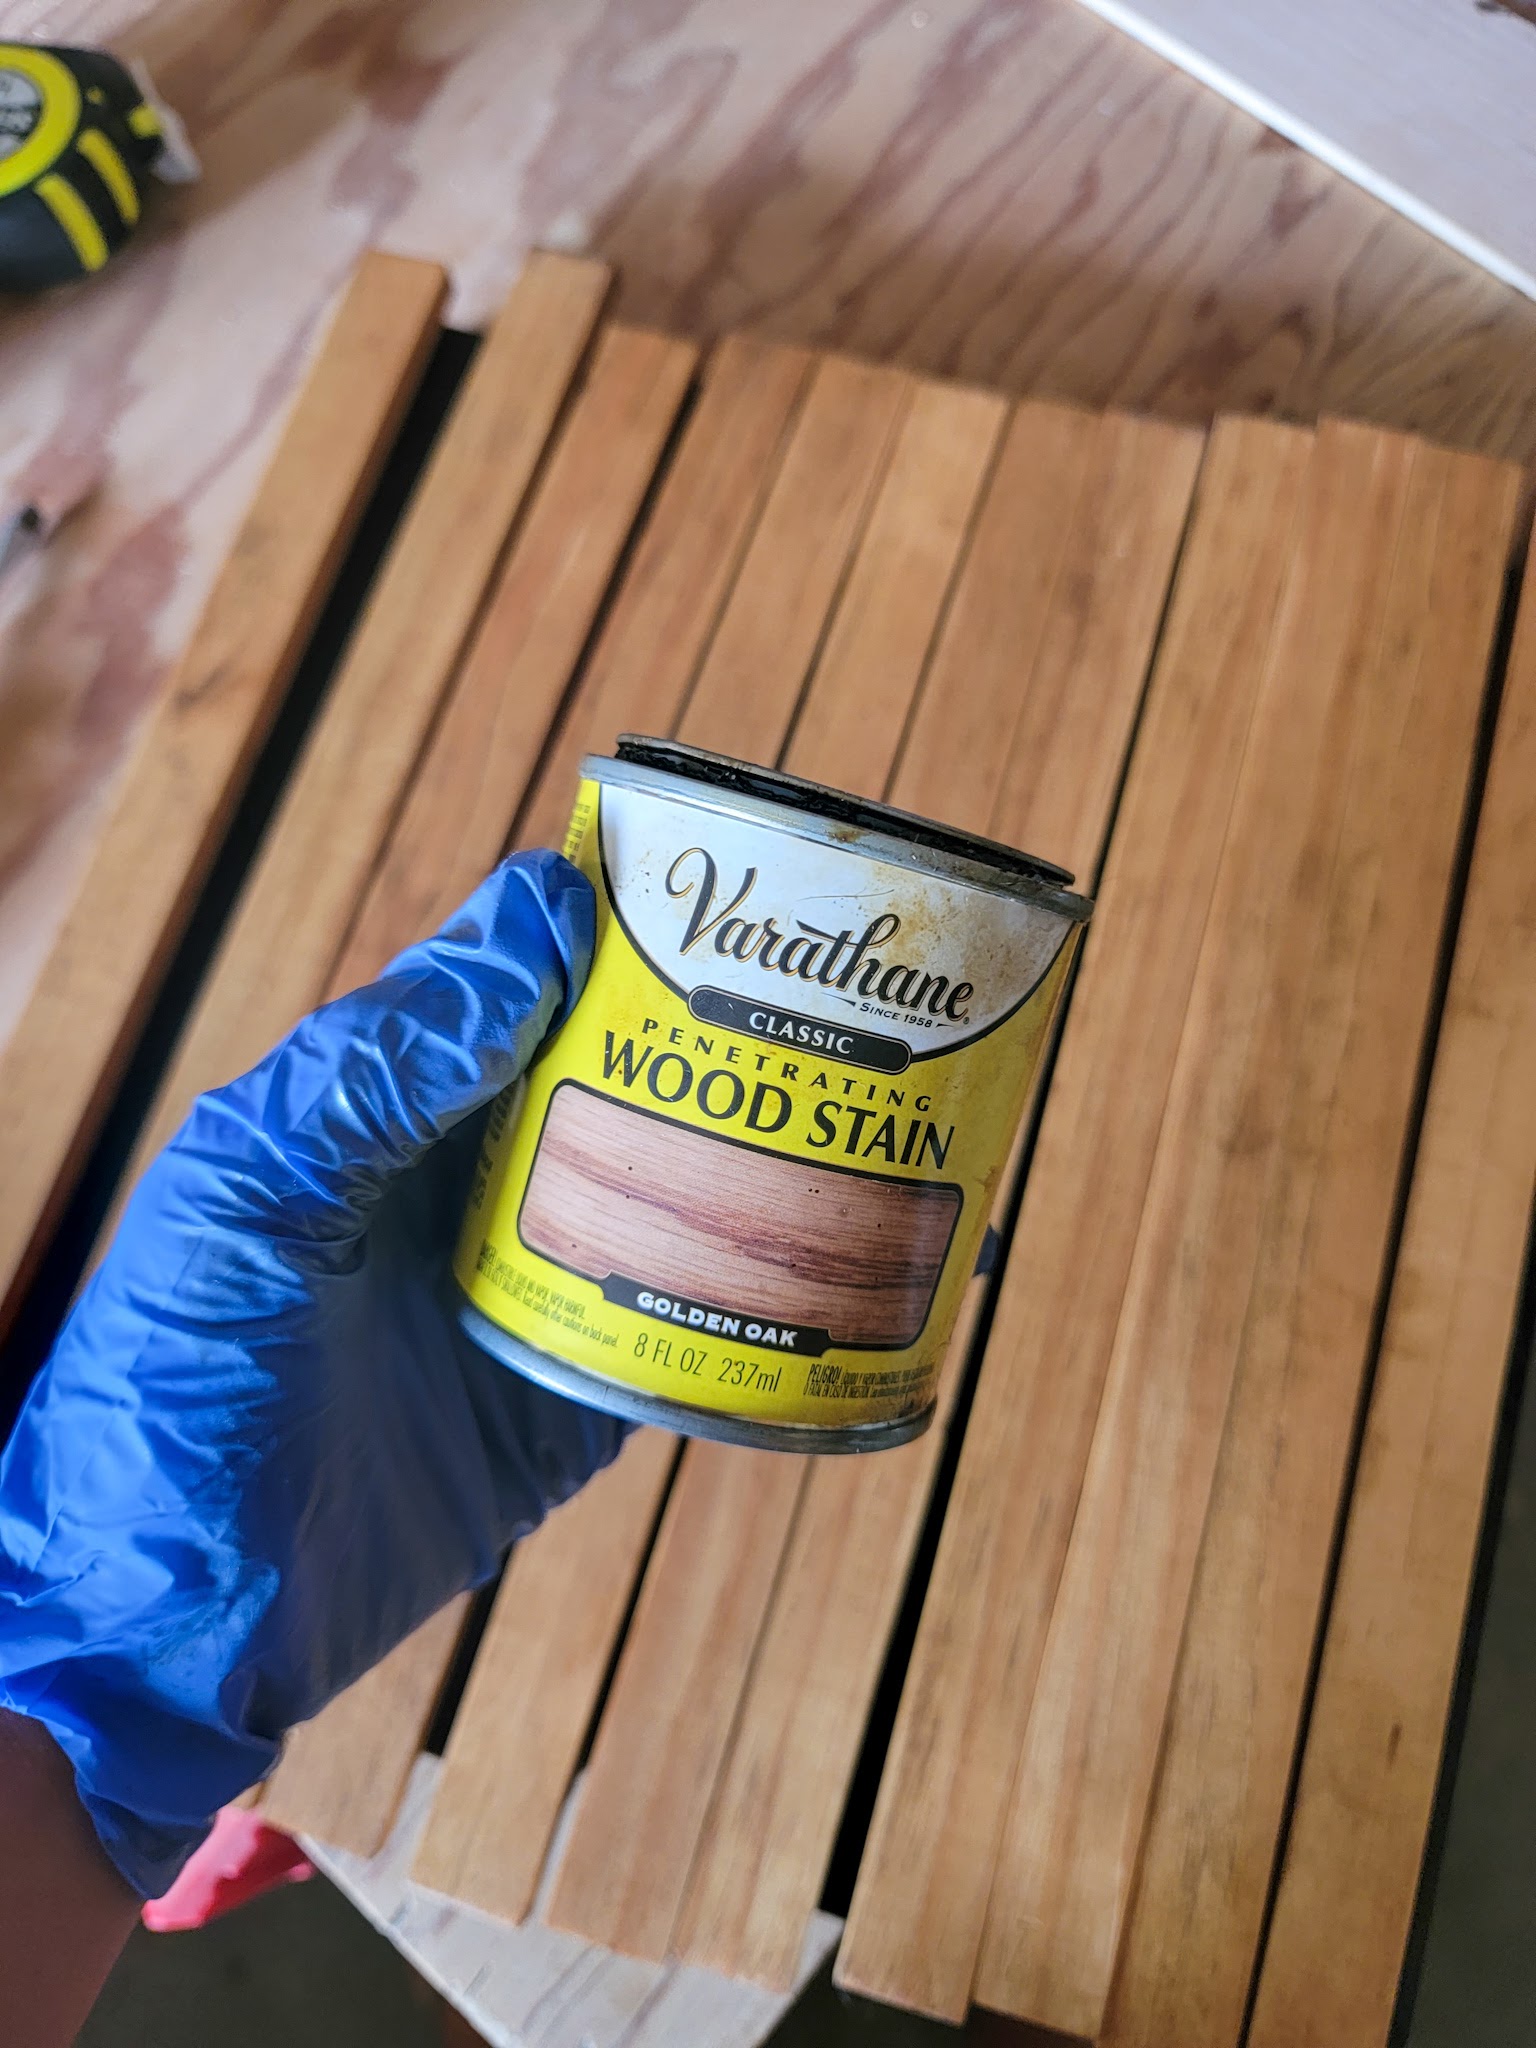
I wanted slats for the tabletop, but rather than buy new wood, we had leftover pine 1×5’s from the DIY clothing rack I made last year and Justin took one and ripped it down into one inch wide strips. He cut them to length so that they would hang over the edge of the plywood by a half inch and I tested a few stains from my stash before landing on Varathane’s Golden Oak.
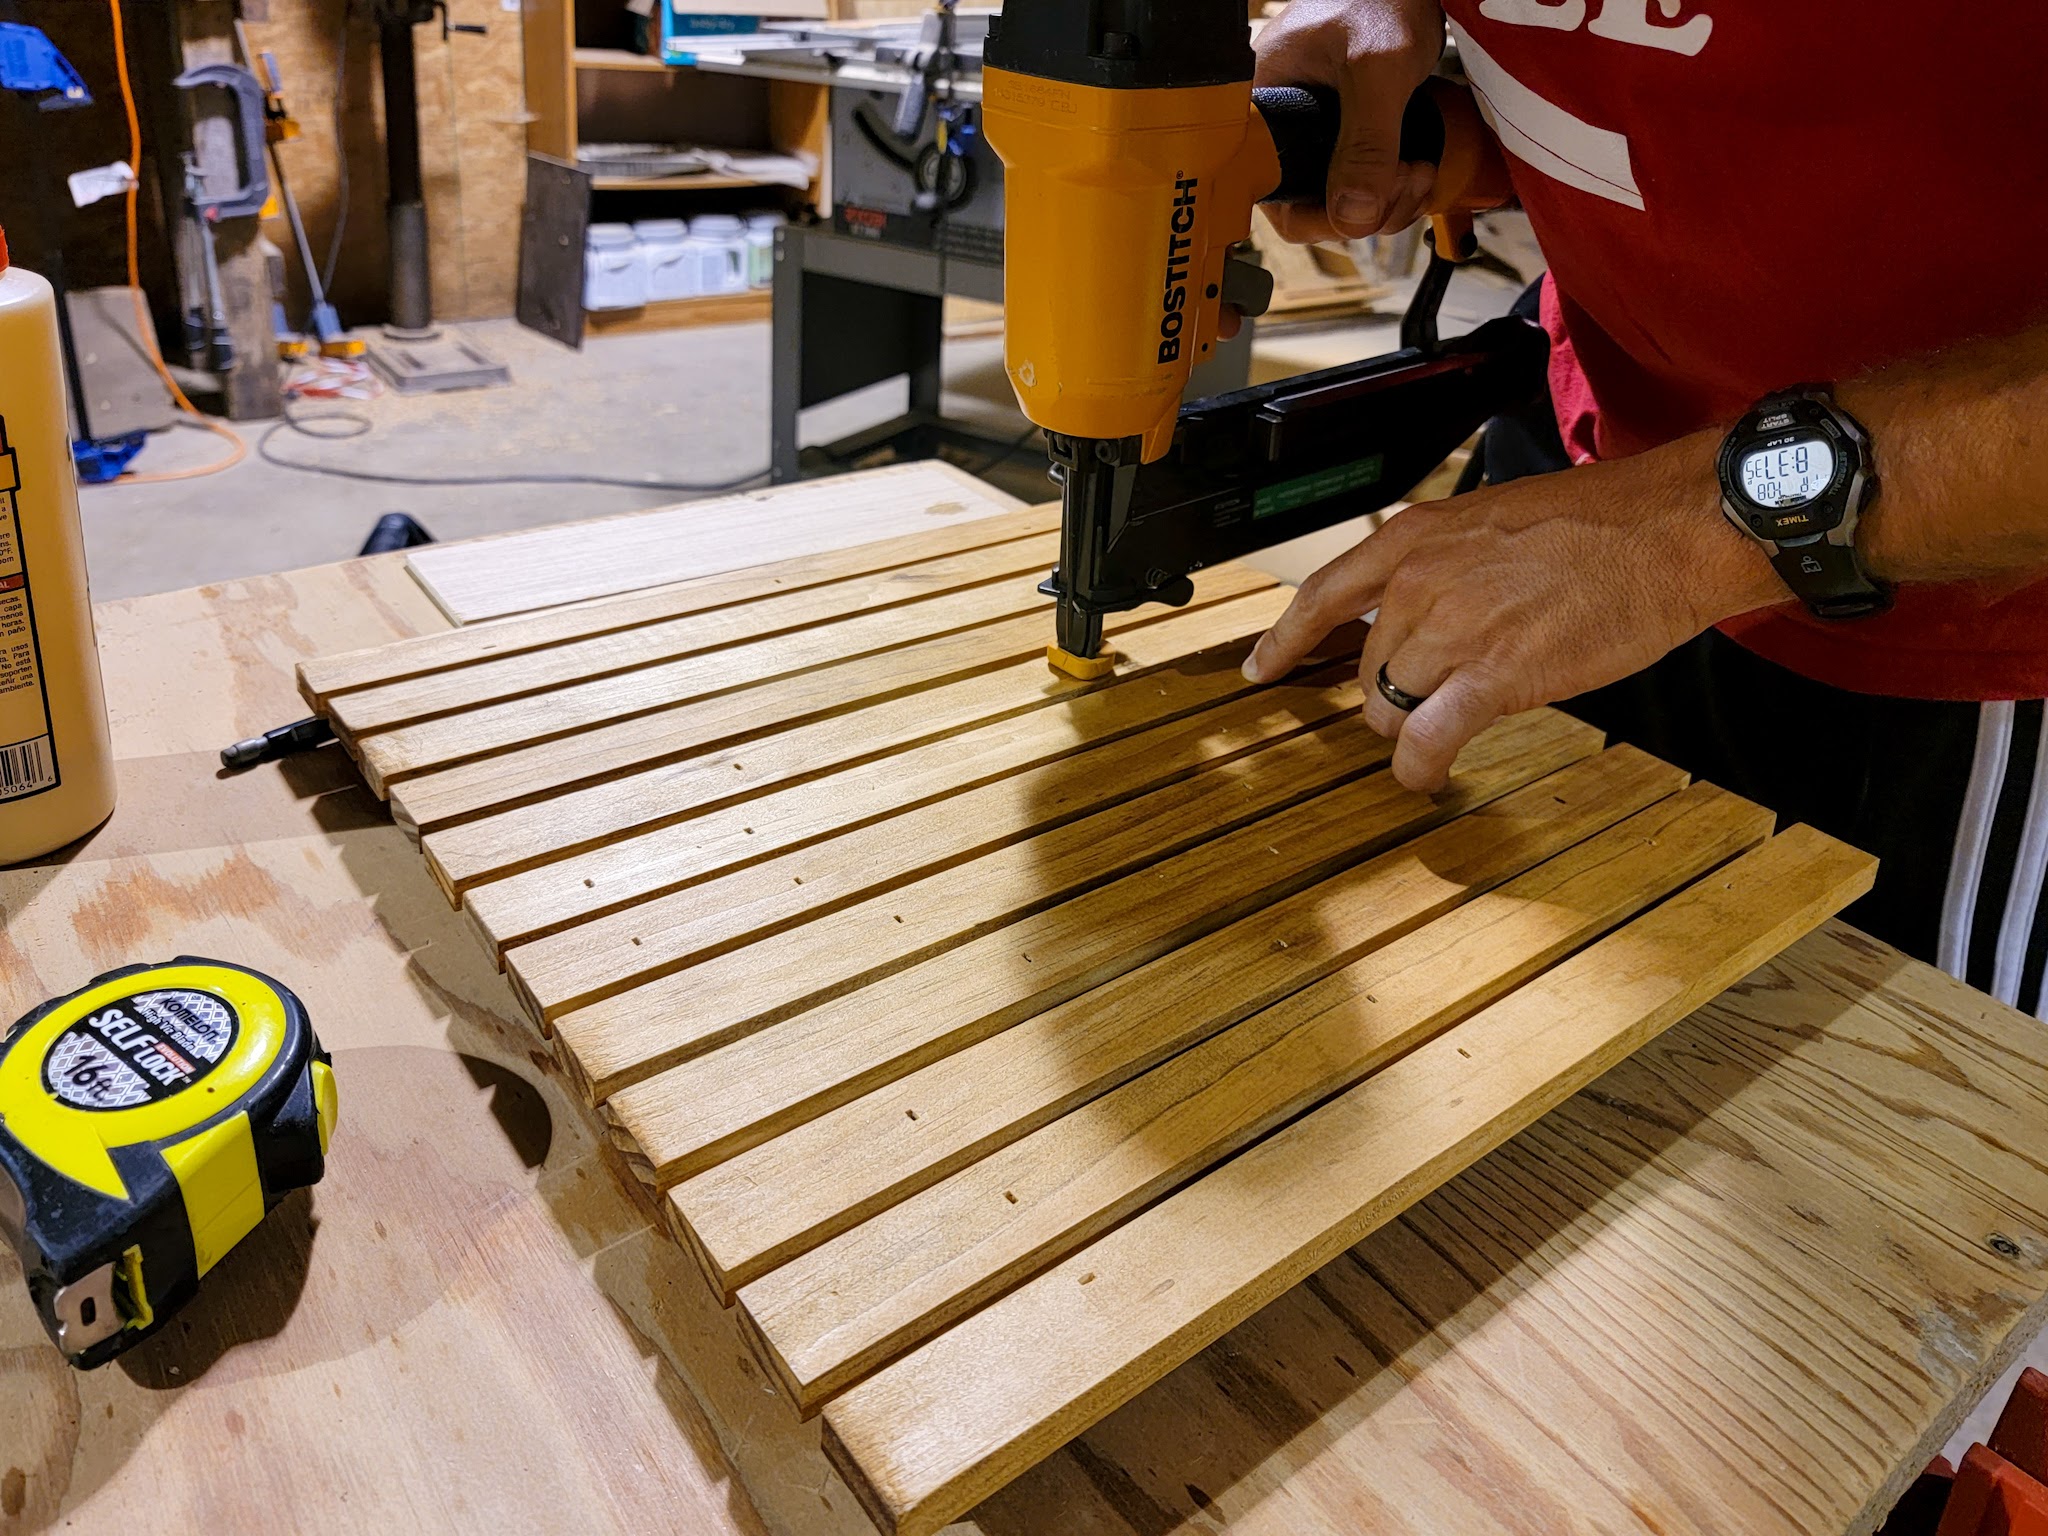
Justin applied a small bead of wood glue to the back of each piece, then used a nail gun and one inch nails to secure each slat in place (he used a thin piece of scrap plywood in between each one to evenly space them out). This is one step where I didn’t communicate my vision with Justin well and I wish we would’ve spaced the nail holes differently, but honestly, it’s fine and doesn’t bother me too much!
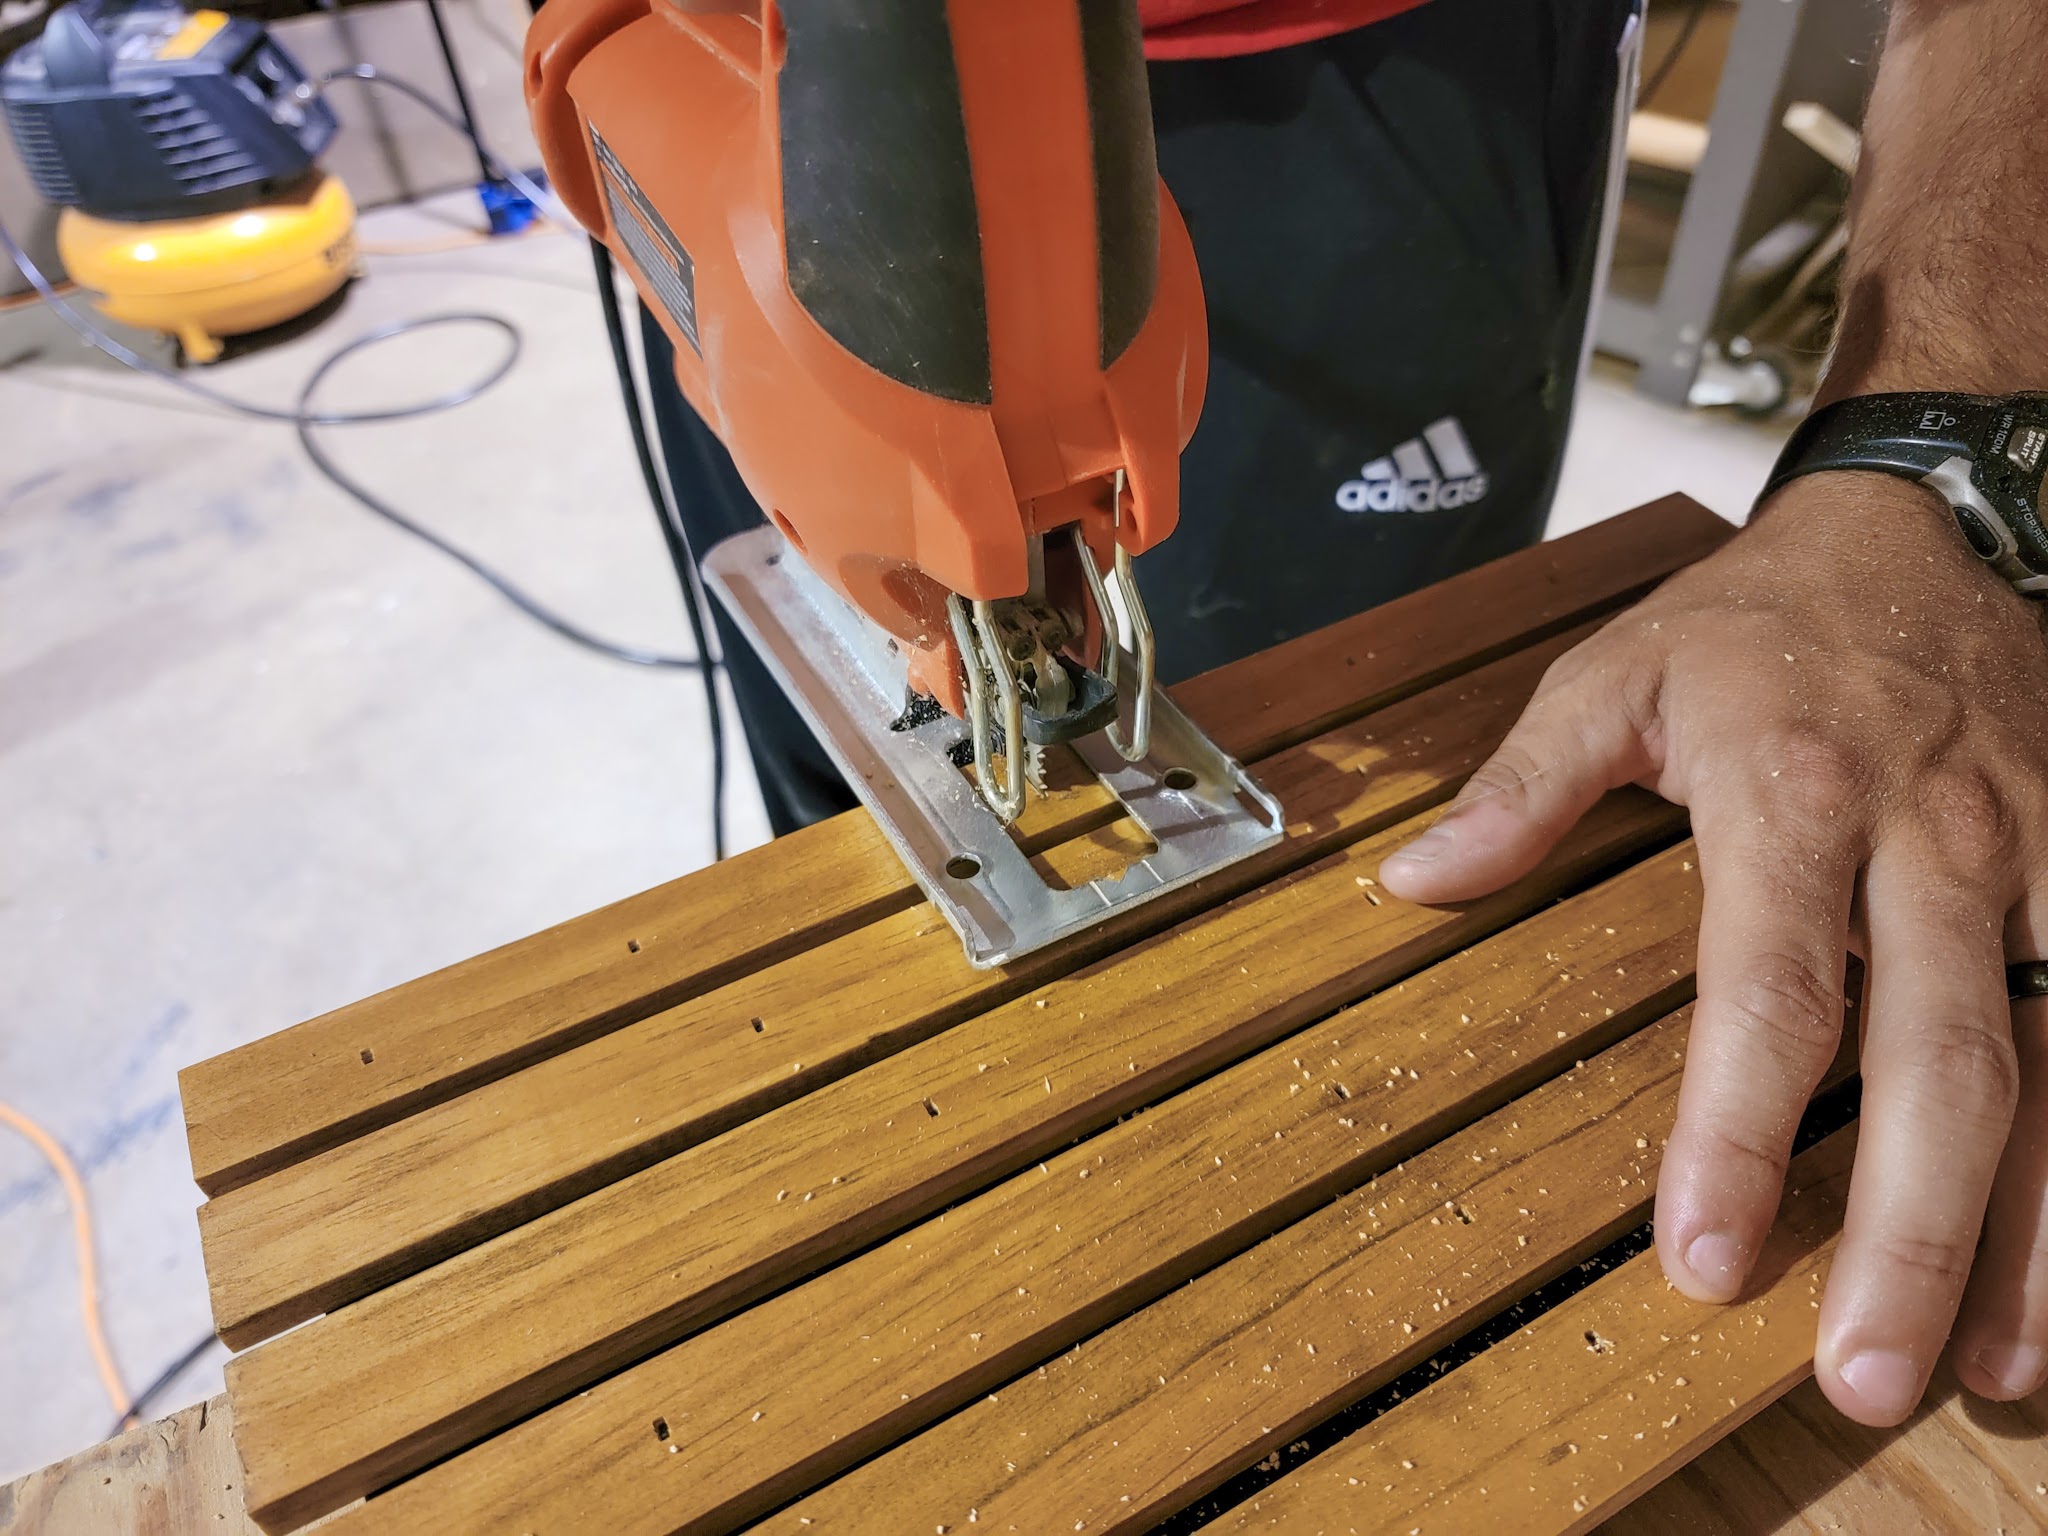
He used the jigsaw again to cut a notch in the top slats that matched the one in the plywood underneath and I stained that little notch as well.
Since this is going to be outside, I sprayed several light coats of clear spar urethane over everything to give it a good protective coat. We let it dry overnight and then we installed it in the planter.
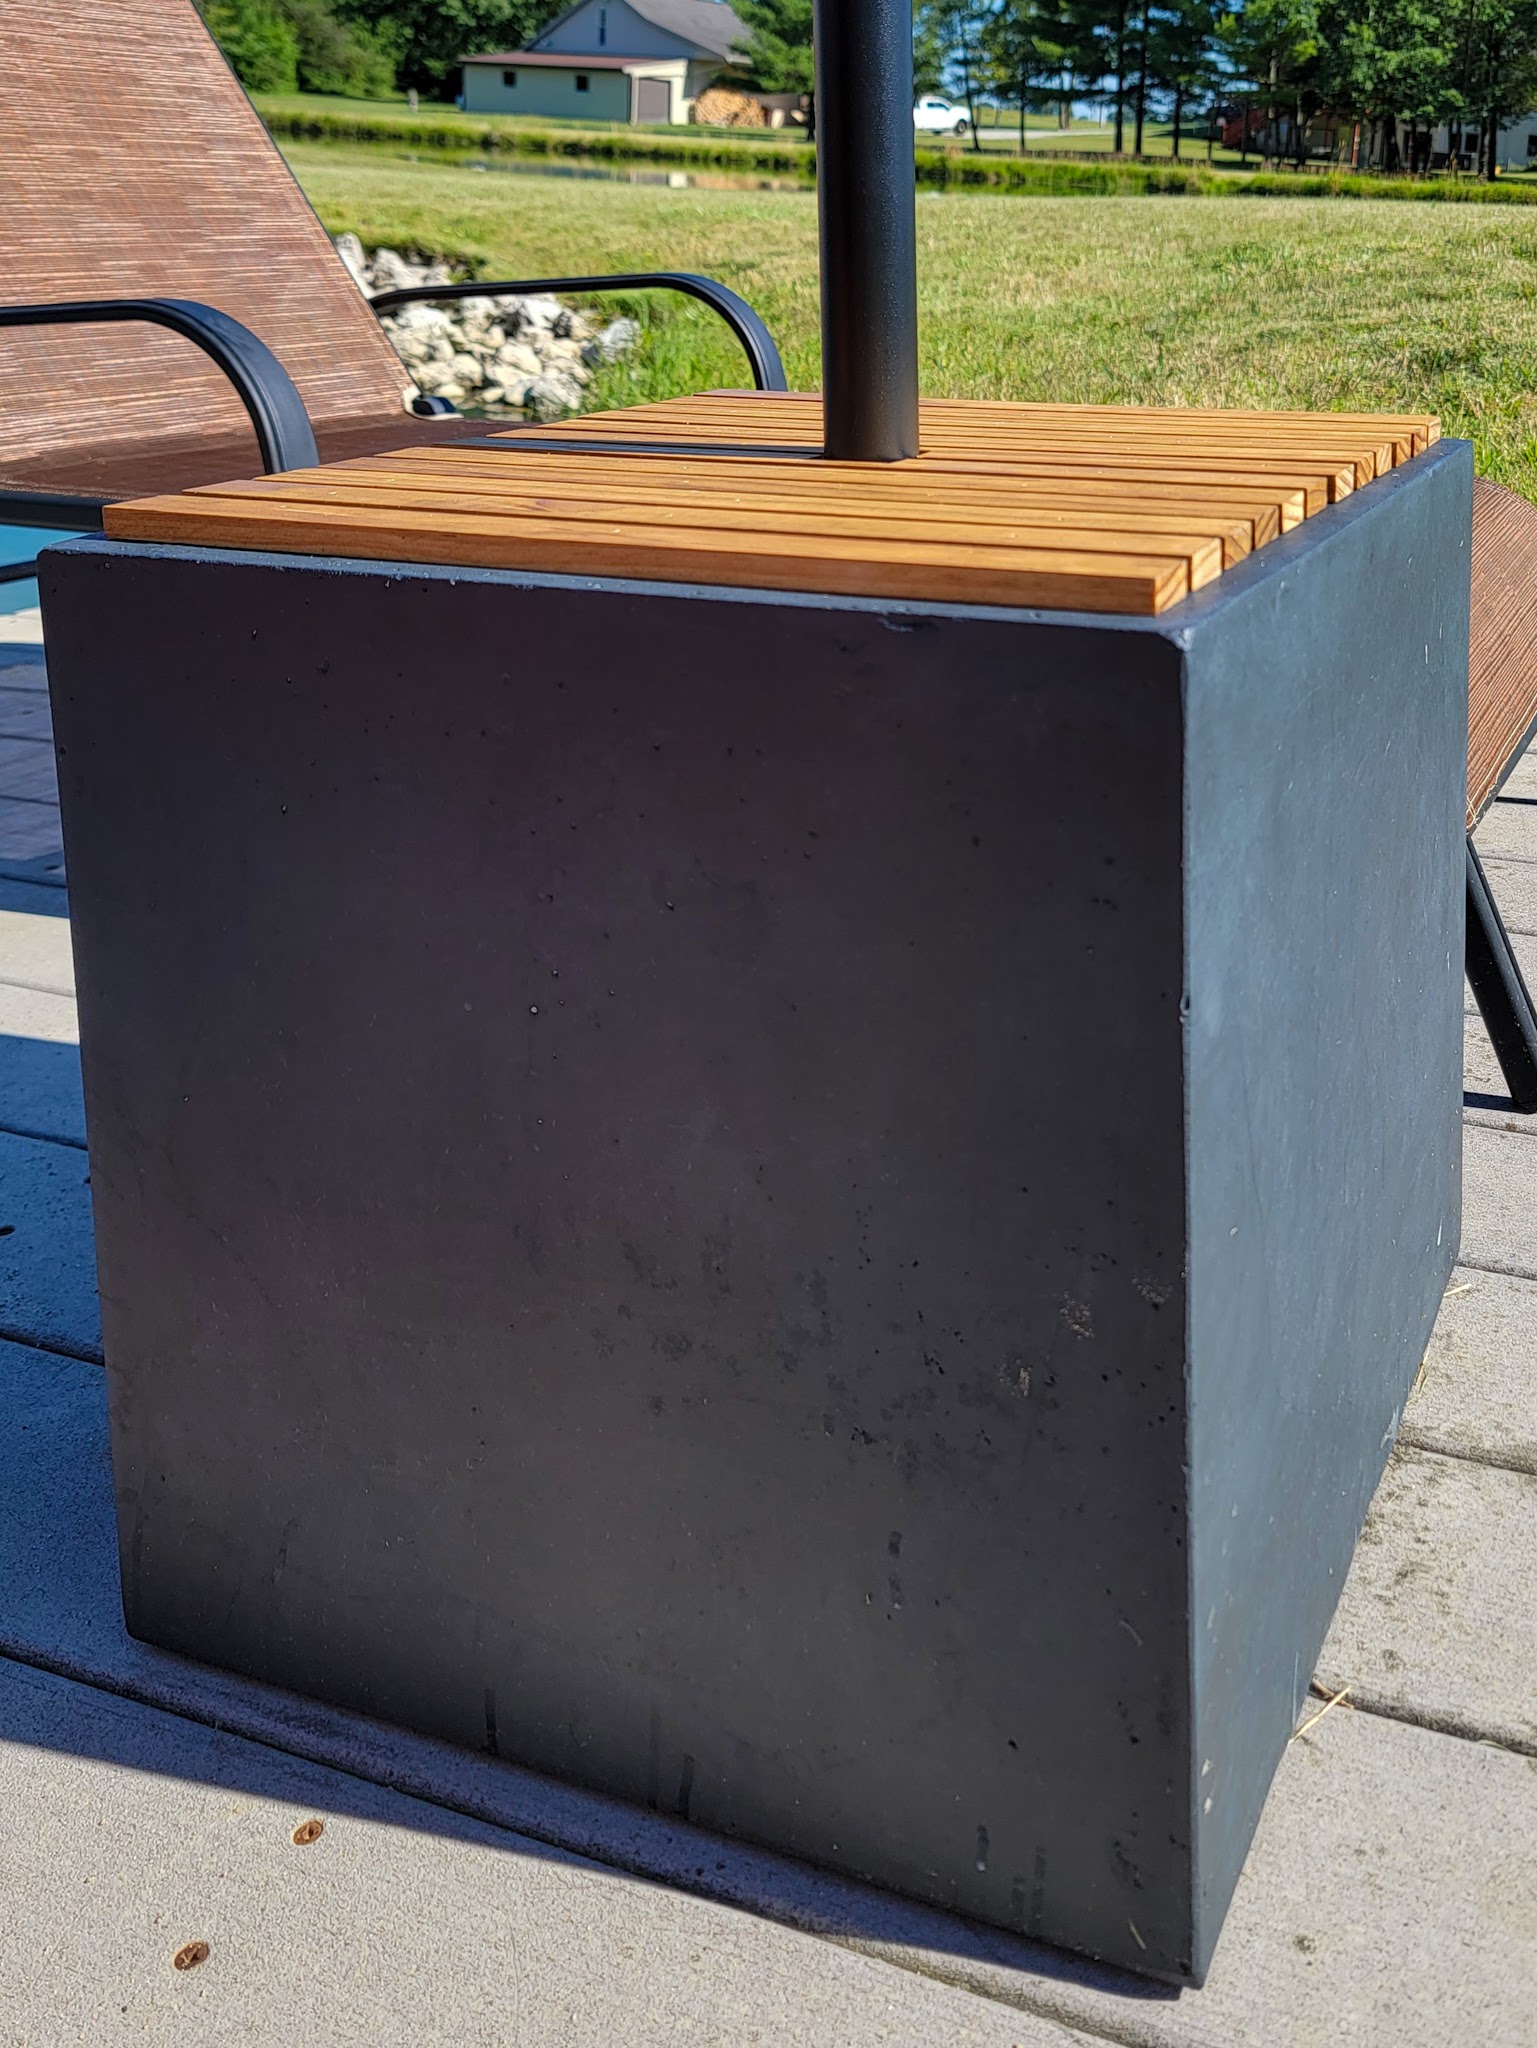
I am in LOVE with how this turned out – it honestly looks like it was always meant to be this way! I love that Justin took the extra time to make sure the slats were cut and spaced in a way that created an equal amount of space around the edge all the way around. It looks so good!
The top lifts off easily to provide plenty of storage underneath – it’s so nice to have a shaded place to store things out of the way!
Here’s a close-up of how the top looks in place. The plywood goes all the way to the edge inside and the slats keep it in place with a half inch overhang.
I have to give a huge shoutout to Justin here. This umbrella stand was my vision, as was the design of the tabletop, and he worked to execute my vision perfectly! I am so thrilled with how it turned out.
Ultimately, there is still a lot of work to do here. The deck actually needs completely replaced (boards are warping and breaking off) and we have plans to expand it to accommodate more people. For now though, this is such a nice little spot to hang out and enjoy and I’m thrilled that we now have the option for shade. In fact, it’s calling to my eight-month-pregnant self and I think I’ll spend some time out there today!