I’ve shown a lot of spaces in our home over the years, but there’s one space I haven’t really ever shown and it’s been for good reason.
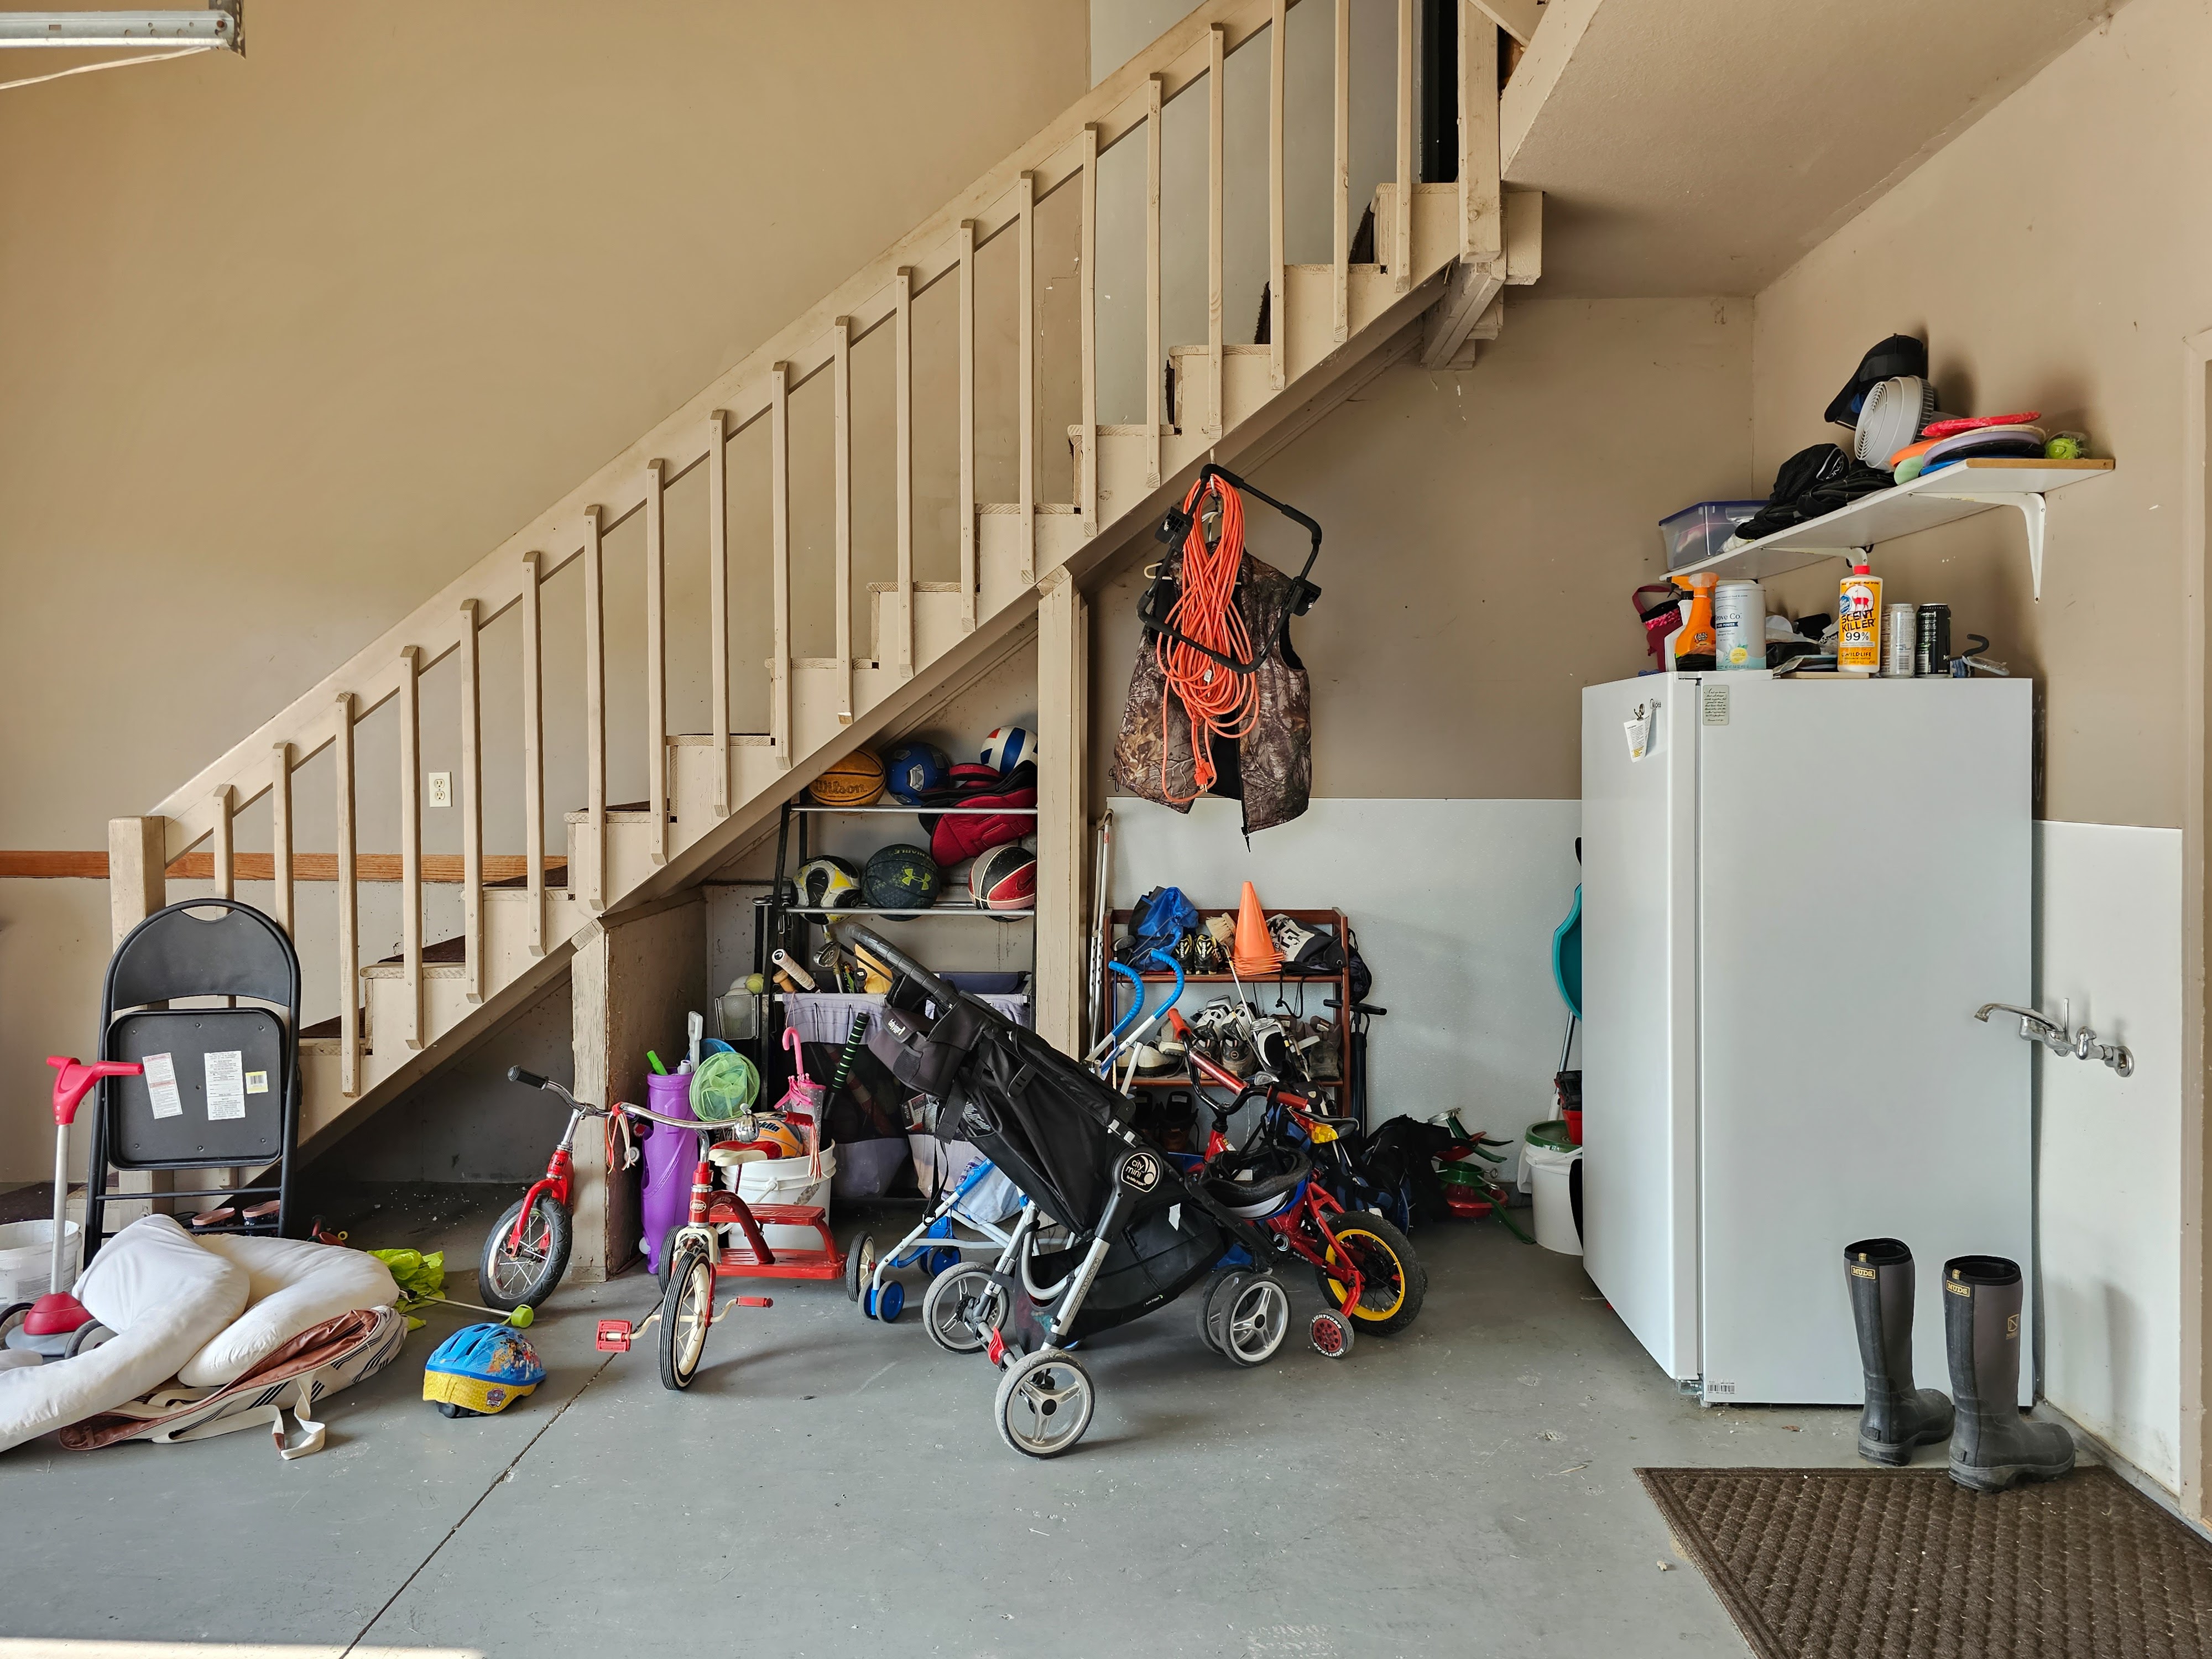
Our garage.
You know how people pick a word of the year? Well I’m picking a word of the summer: this is going to be the summer of STORAGE. Ha! I am actually very excited for this – we’ve lived in this house for four years now and we’ve just kind of been working with what we have in terms of our storage spaces but it’s high time to finally get these spaces working better for our family. Our garage feels like the best, most logical place to start. And yikes these photos make me cringe but they also make me all the more ready to finally make some changes!
It’s not the most glamourous space to update, but there’s no doubt it’s a workhorse for us and it needs to be functioning better to meet our needs in our current stage of life. Here’s what I’m planning to do:
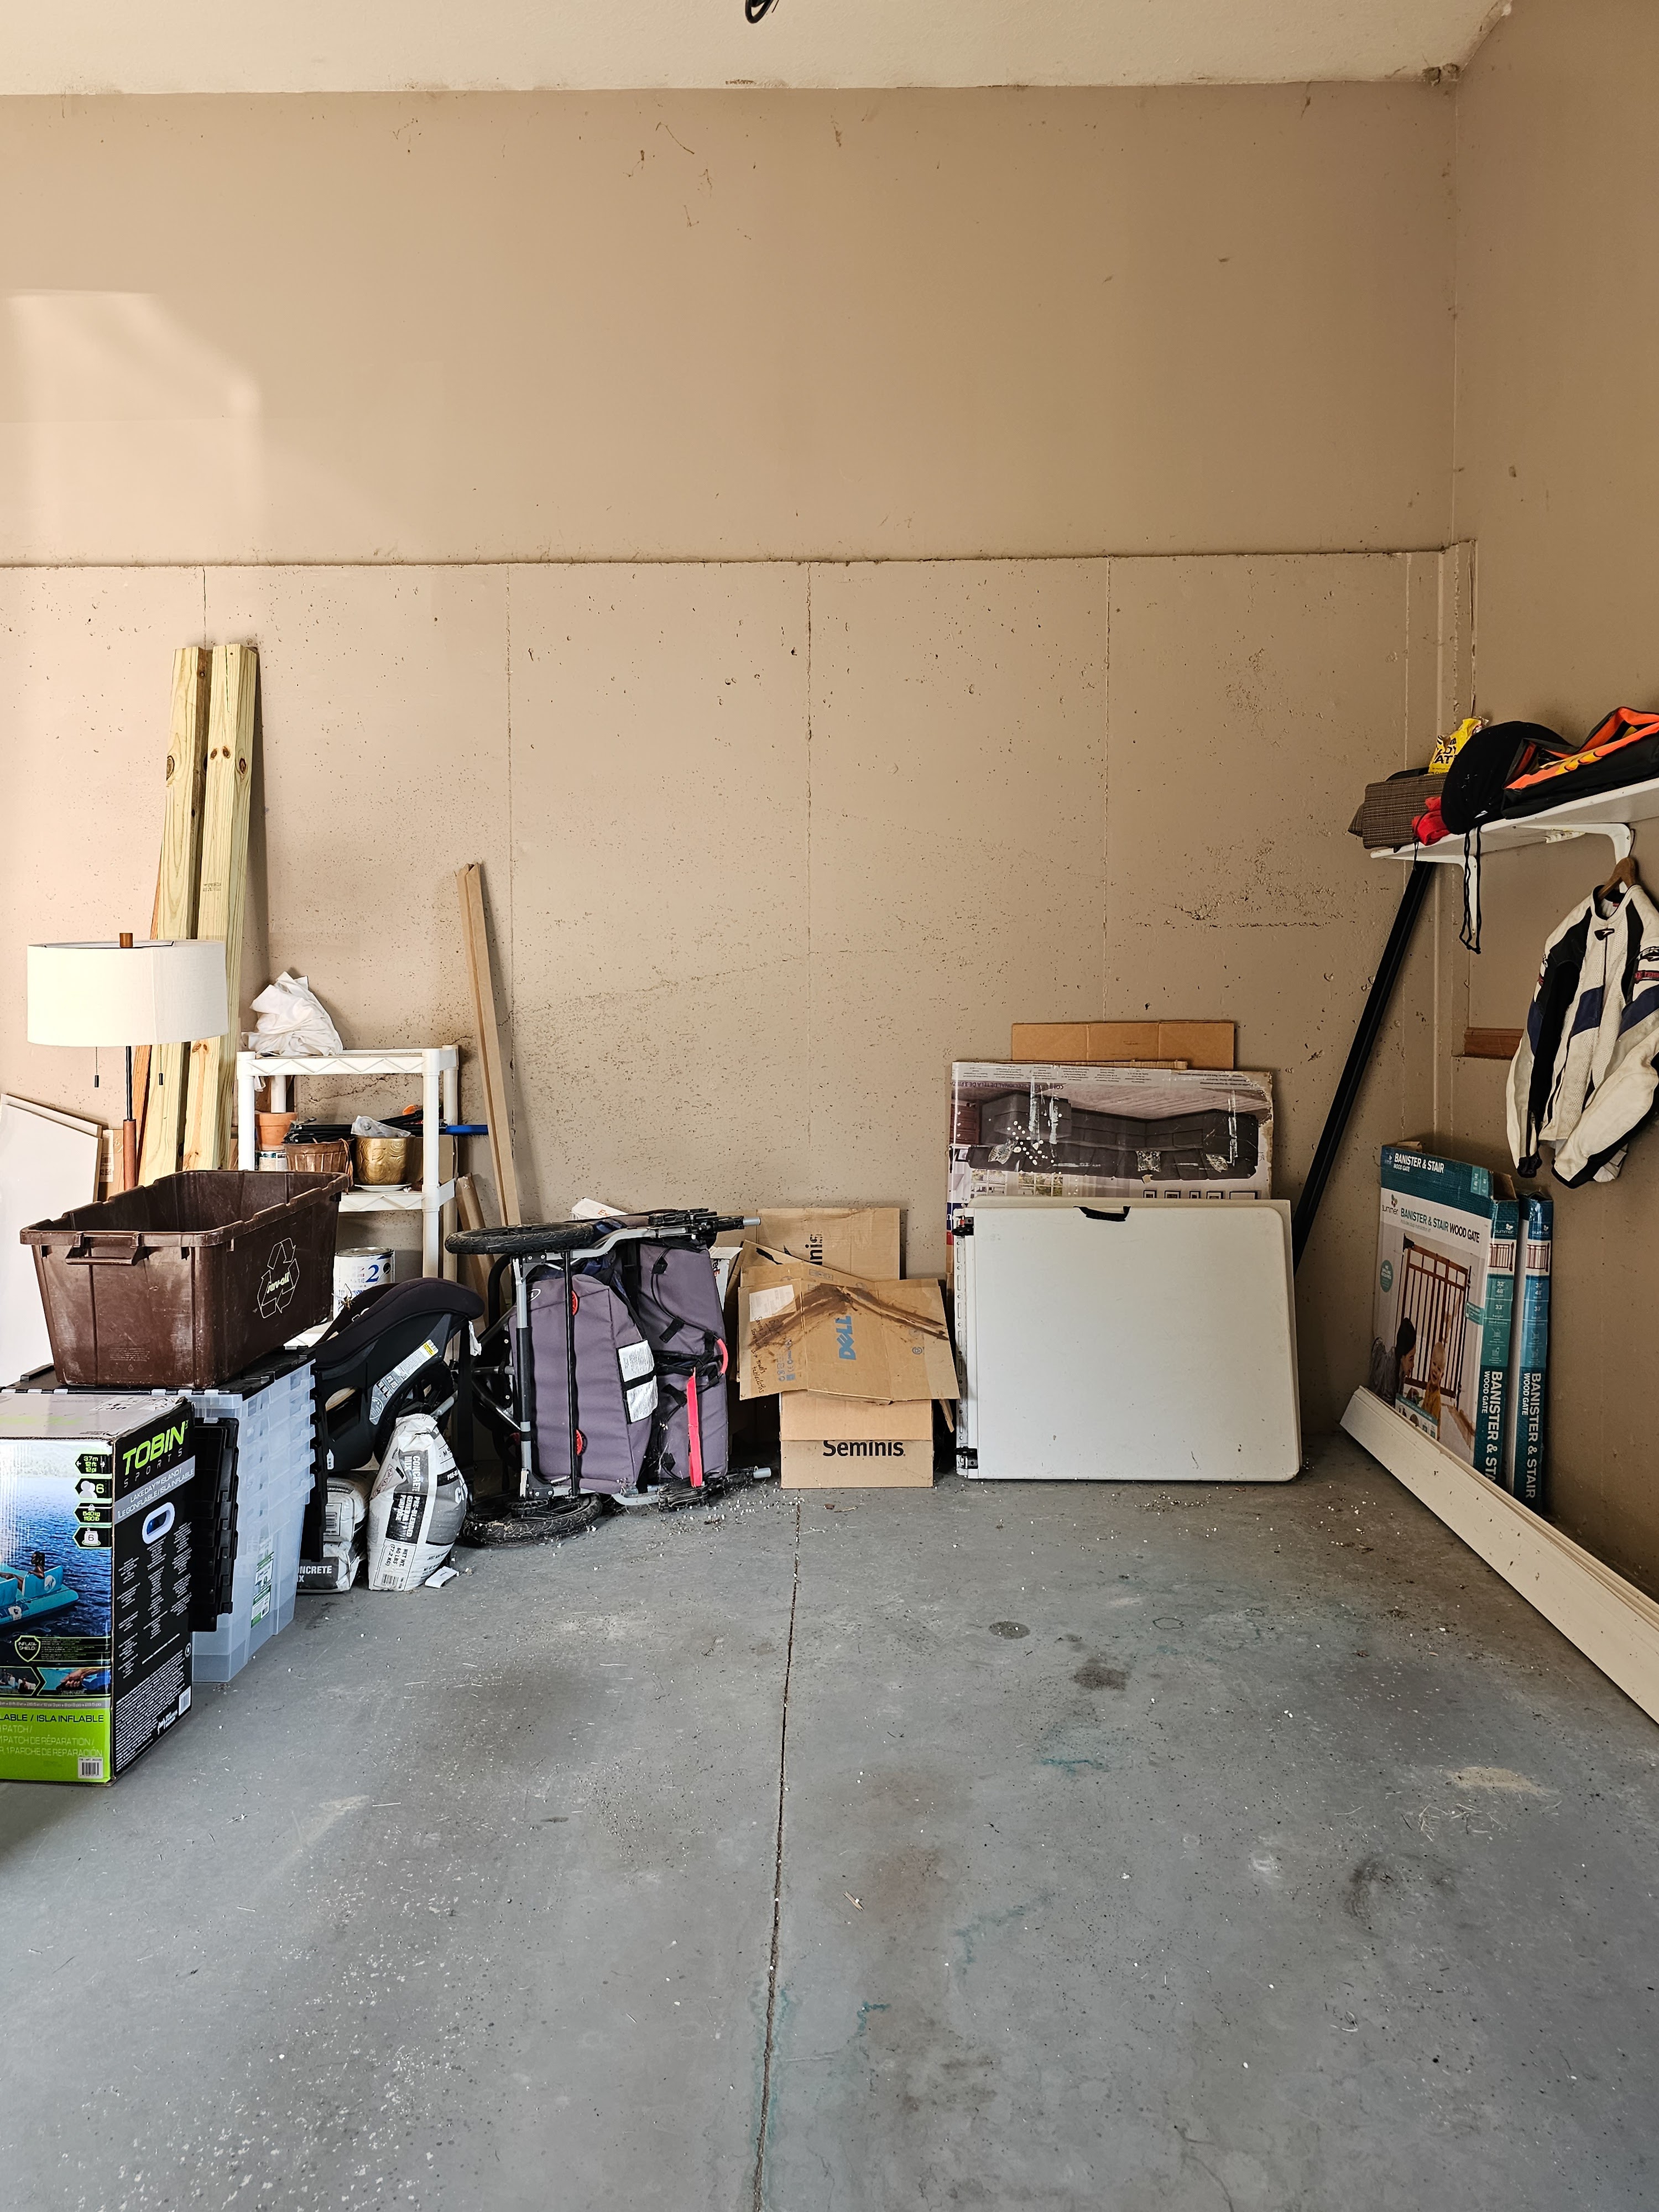
1. Clear everything out and purge!
The garage is kind of a dumping zone for all the random things that don’t have a place anywhere else. When we moved, a lot of things got placed here and never touched again: my knee brace from ACL surgery 15 years ago, old hiking boots, kickboxing gloves, extra jumper cables and who knows what else.
Also, the previous owners raised four boys here but by the time they sold the house, the boys were grown. They knew we had small children and so they left quite a few things that their boys had outgrown like sand toys and sports equipment. The storage rack with all the basketballs, soccer balls, etc was left by them and it has served us pretty well, but we’ve actually never taken the time to clear out everything and see what all is in it. And of course, over the past four years we’ve just accumulated more and more things – step one is clear everything out and do a major purge!
2. Create built in storage under the stairs
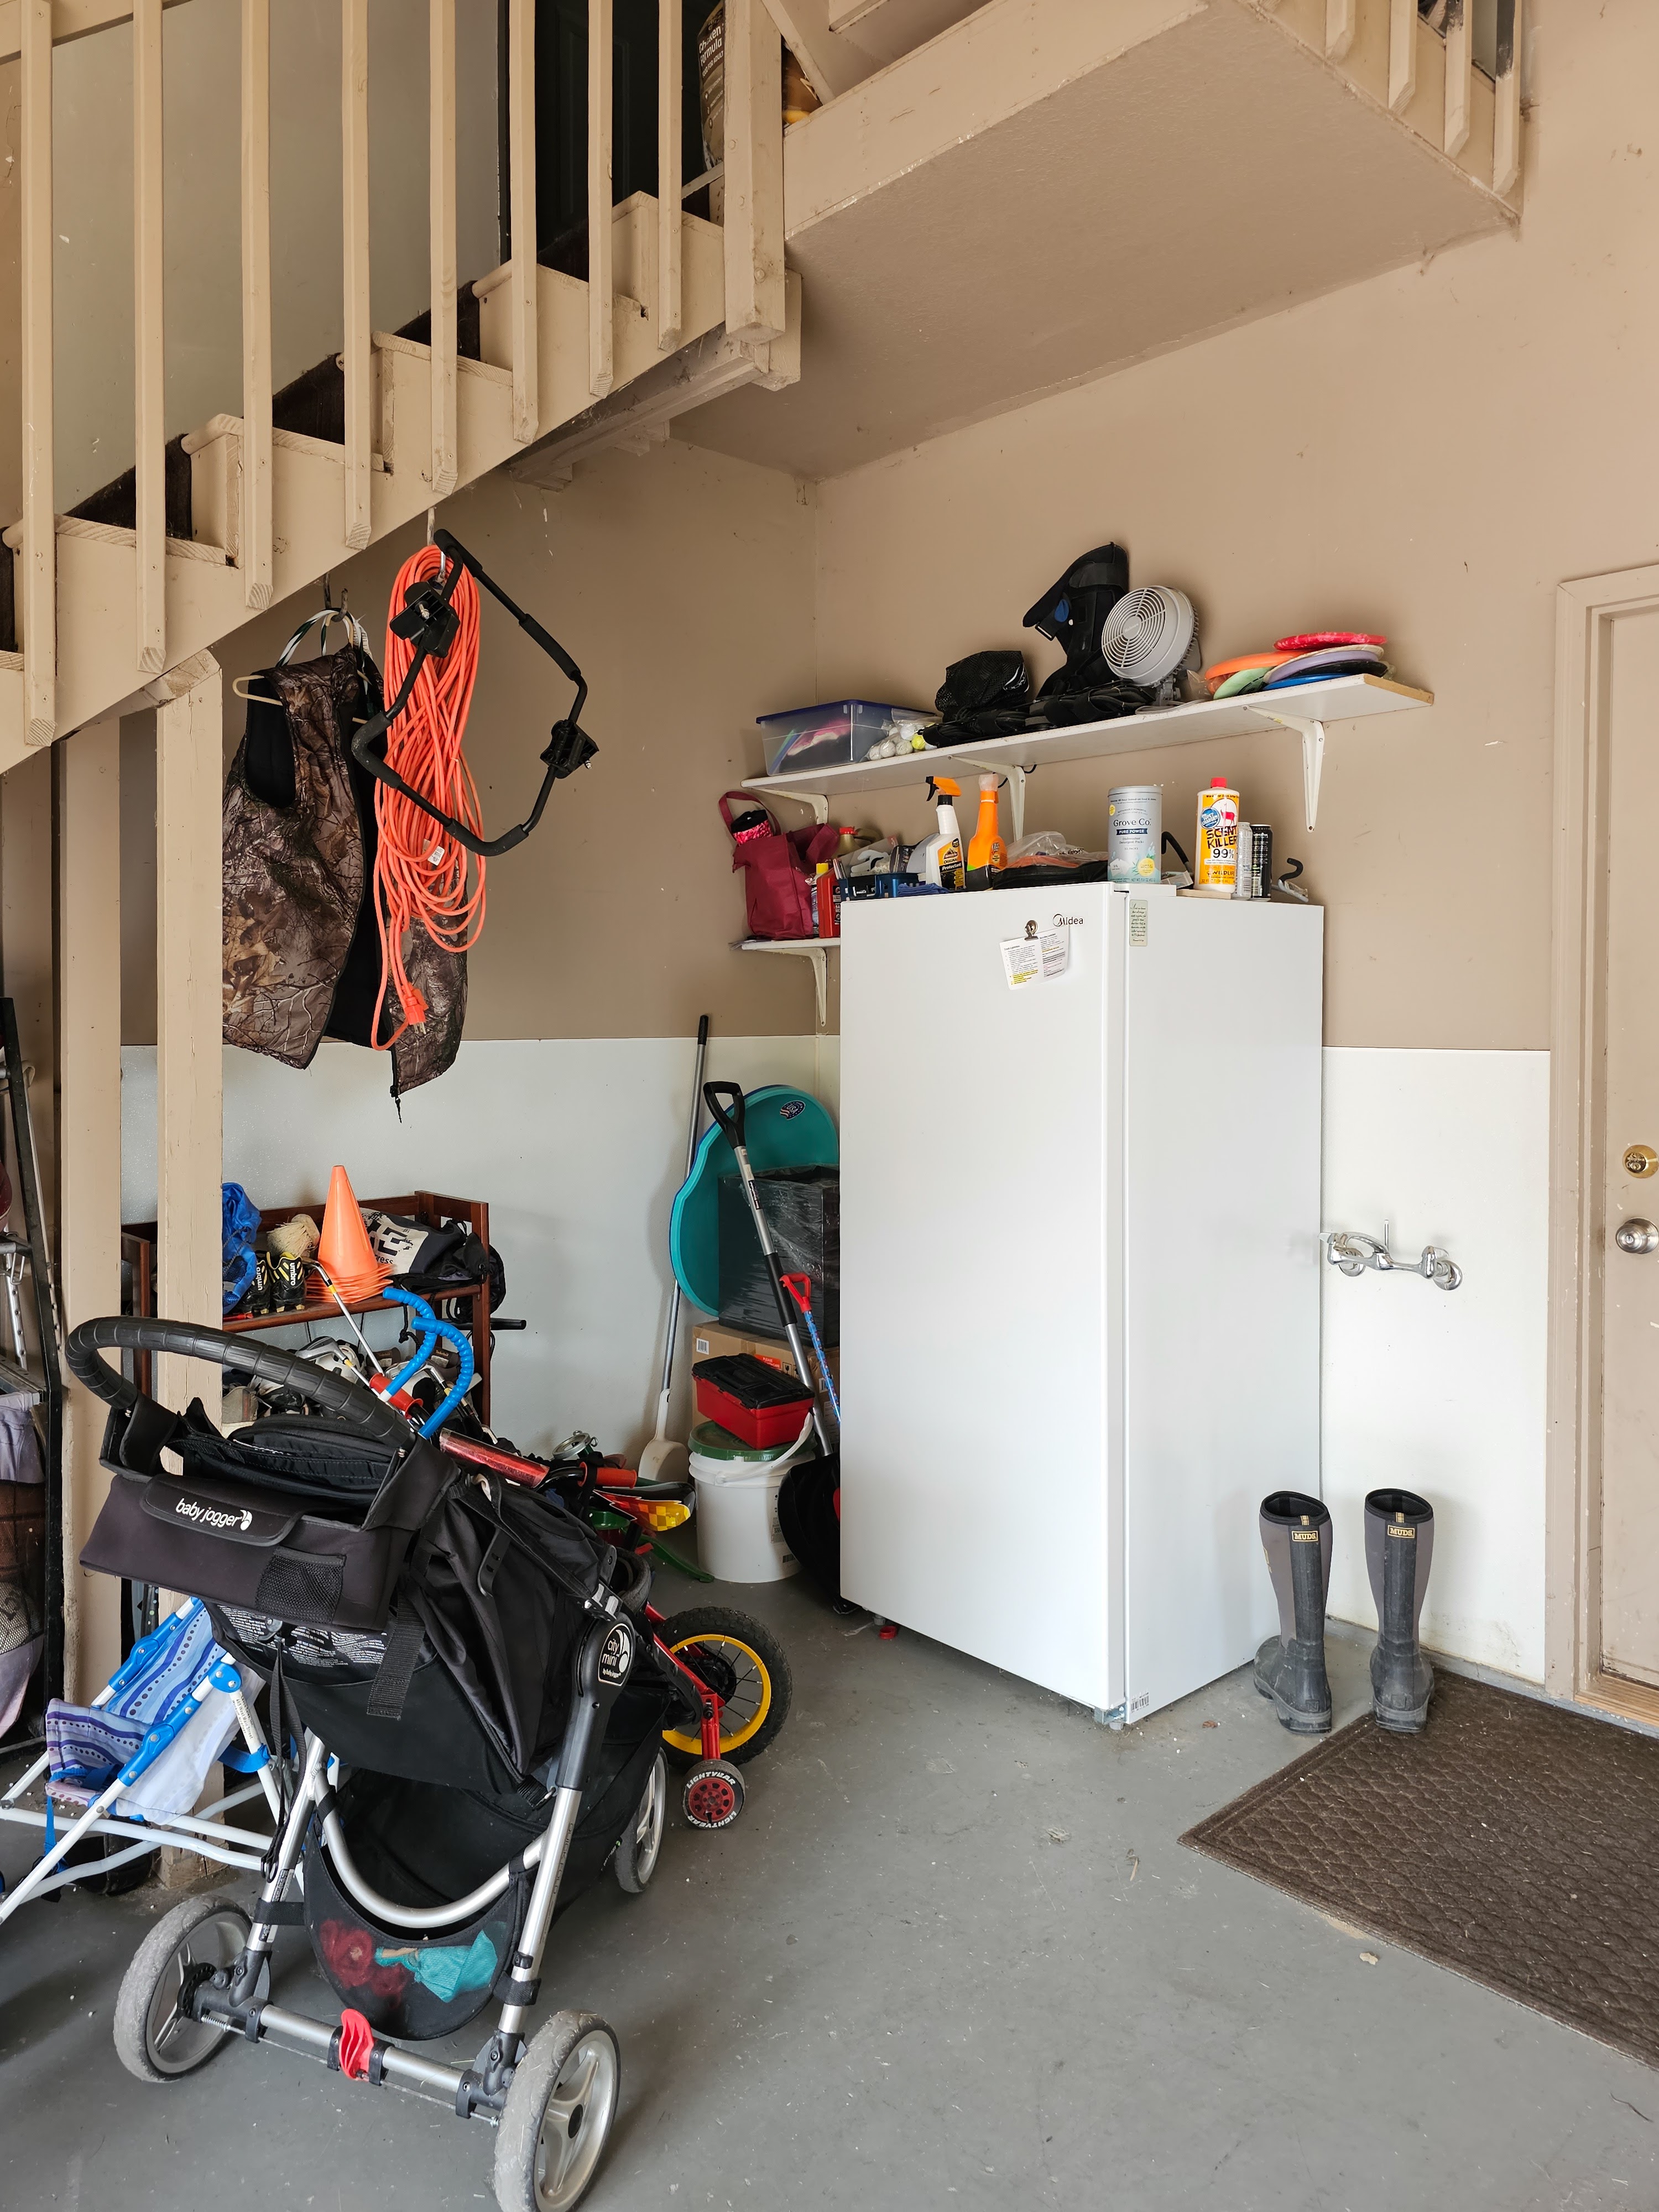
We may keep the ball storage rack from the previous owners, but we definitely need to add much more storage in this area. So far we’ve just been using the random storage shelves we brought from our last home and the existing small wall shelves; it’s been fine but definitely not ideal. I’m picturing simple but sturdy wooden shelves all along the right corner built to hold large bins of equipment.
My goal is to actually get to the point where the majority of items in our garage are stored underneath these stairs but that will only be possible by maximizing every vertical inch!
3. Better utilize side wall shelving
The previous owners installed simple shelving on the side walls. We don’t want to add more shelving because we want to leave space to walk around the sides of cars, but I think the shelves could be better organized and utilized to maximize efficient storage. This also includes the small shelving area at the bottom of our stairs where we keep our recycling!
4. Paint?
Our garage has very tall walls and I’m not sure painting would be worth the effort, but at the same time, if we’re going to all this other work, we might as well get the space looking nicer altogether? If we were the only people who ever see our garage I might not be interested in painting, but because this is the entrance people use to access our basement anytime we host, I think it might be worth it. If nothing else, getting rid of all the cobwebs would make a big difference! We’ll see how motivated we feel to paint once everything is cleared out of the garage.
Today’s going to be a beautiful sunny day so it’s a good time to get started – I’ll be sharing the progress in real time over on Instagram so be sure to follow along there if you want the play-by-play!
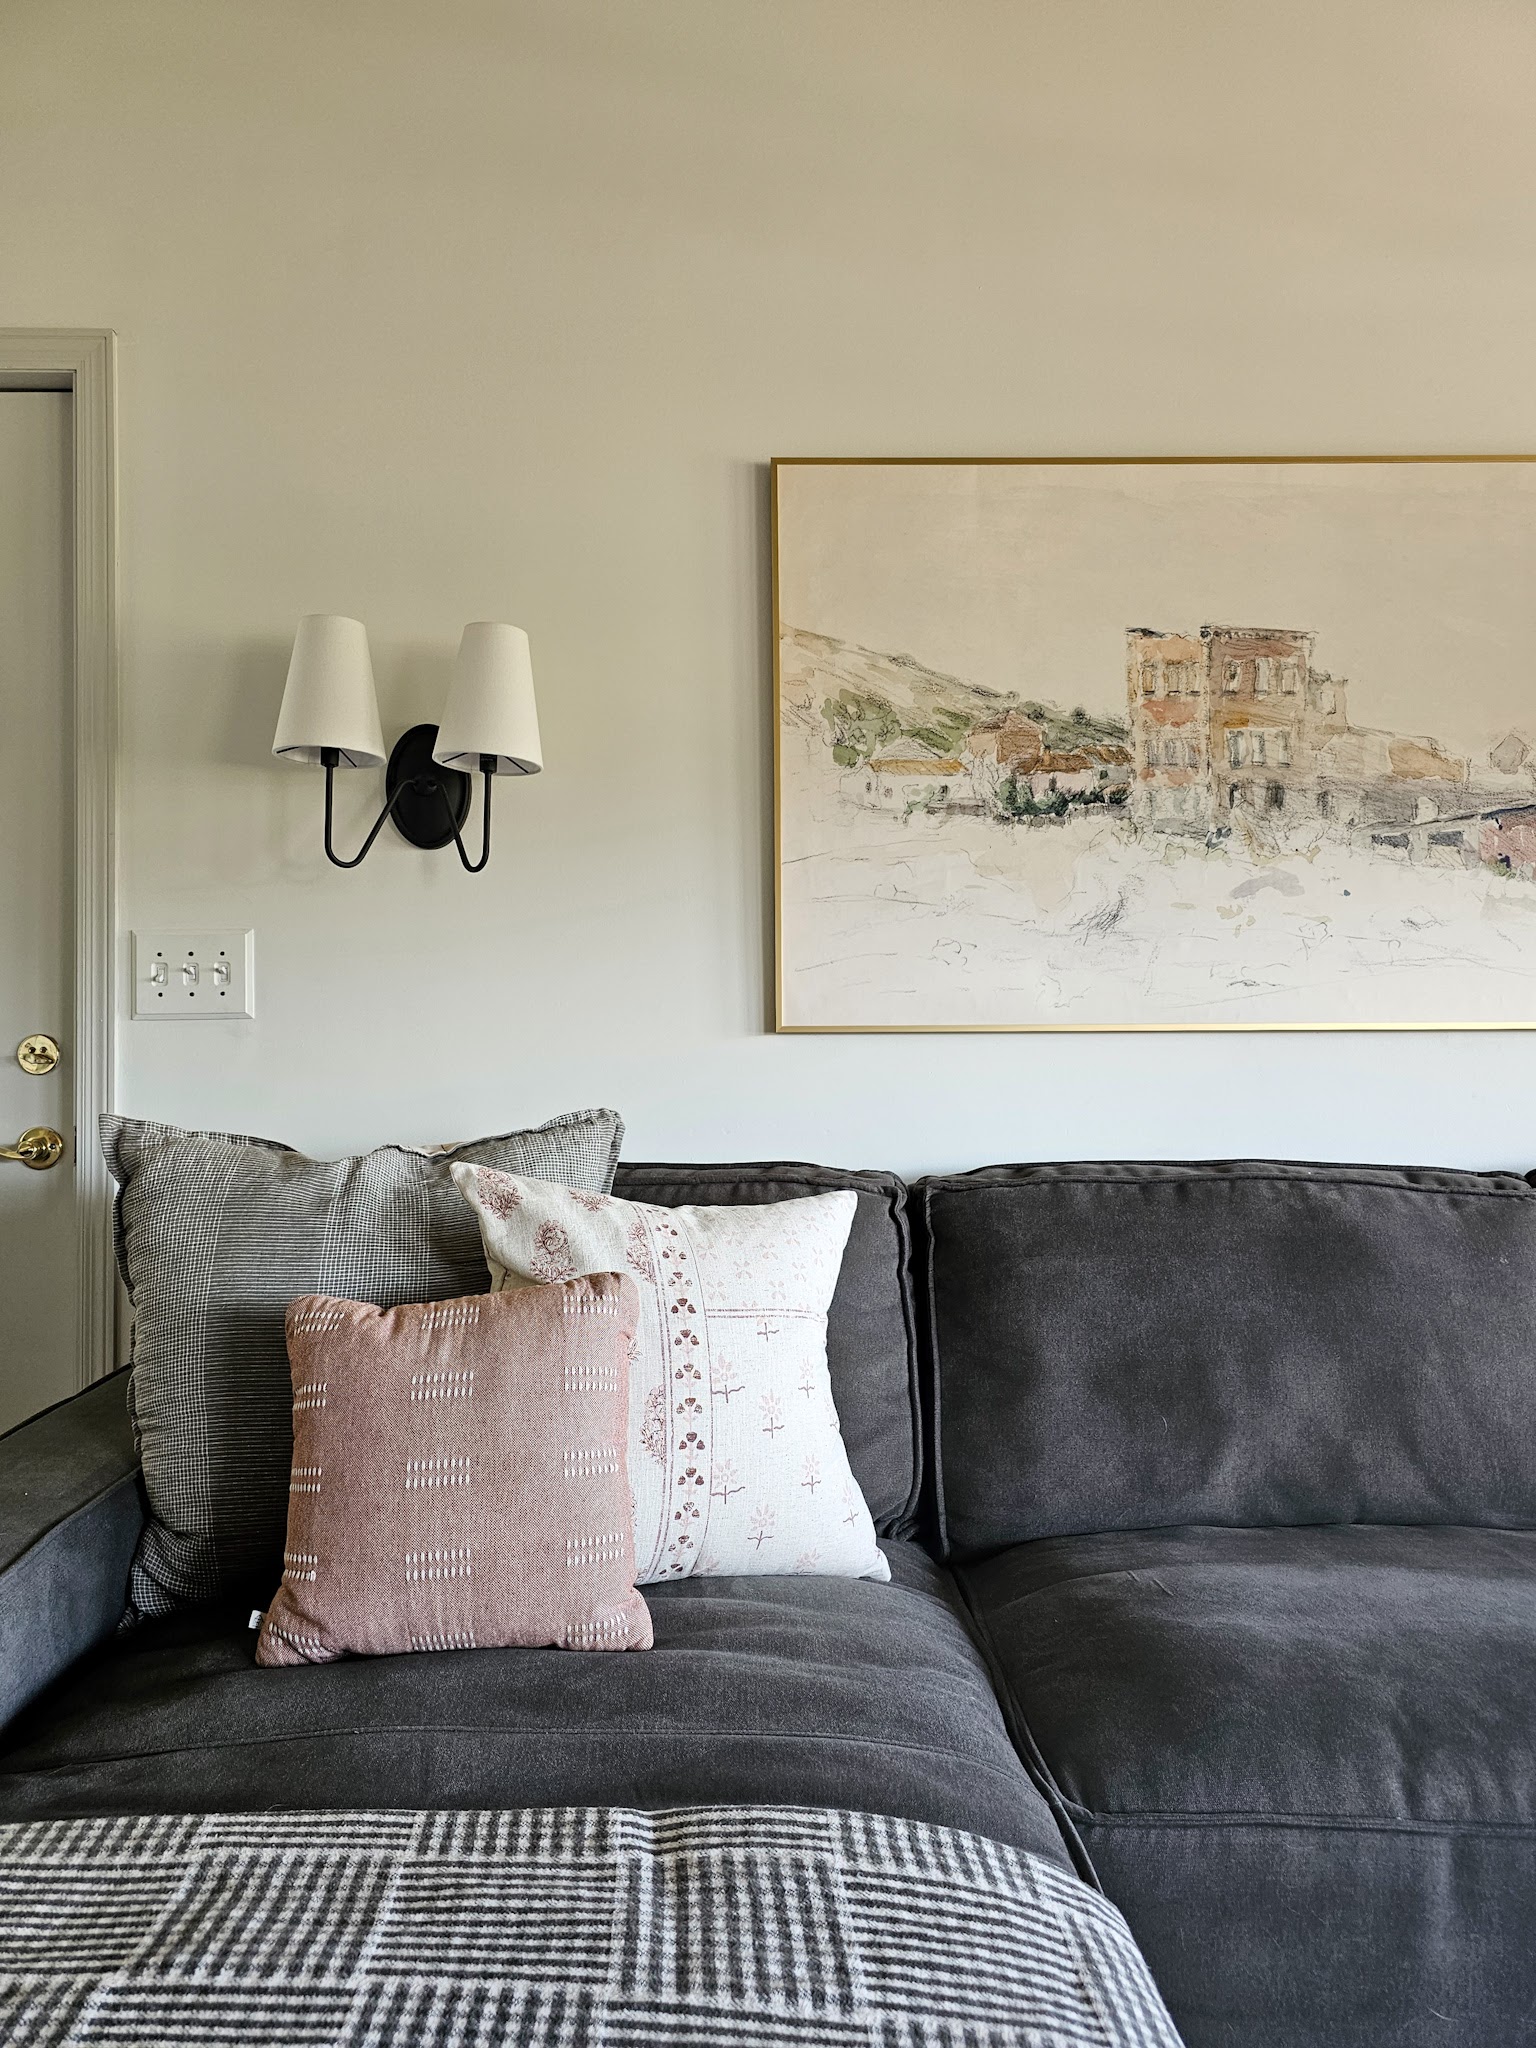
I’ve said before that the living room wins the award for slowest and steadiest renovation and I recently made another small change. It might be subtle at a glance, but in our day to day life this change made a big difference for us!
Last month I shared that I added some new pillows and artwork to the living room. The pillows were all from Target and while I obviously really liked the pillow covers, the inserts left something to be desired. I specifically chose pillows that had removable covers so I could easily clean them if needed and swap out the inserts.
We use the things in our house – it isn’t worth it to me to buy something that’s beautiful but not comfortable/easy to use/helpful/etc. It needs to be pretty and functional! While these pillows were technically functional, they weren’t very soft and comfy for lounging on the couch – and isn’t that the whole point? I knew from past experience with similar inserts they likely wouldn’t maintain shape over time.
I decided to buy new inserts to increase the comfort and longevity of the pillows. I chose these inserts and sized up for each pillow – for a 20 x 20 cover, I bought a 22 x 22 pillow; for a 22 x 22 cover, I bought a 24 x 24 pillow, etc. Sizing up gives each pillow a fuller look!
Here’s a side by side comparison of the original insert (left) and the new insert (right). You can see that the new insert is larger, fuller, and made of a different material. They feel so much more substantial!
The difference may seem subtle on camera, but I promise in real life it looks and feels significantly different. They’re cozy, comfortable, and we will enjoy lounging with them for years to come!
Before
After
Before
After
And just a reminder – our large frame over the couch is from FrameItEasy and my code for 10% off your order is still active until Wednesday (May 24, 2023). You can click this link to order and the discount will automatically be applied!
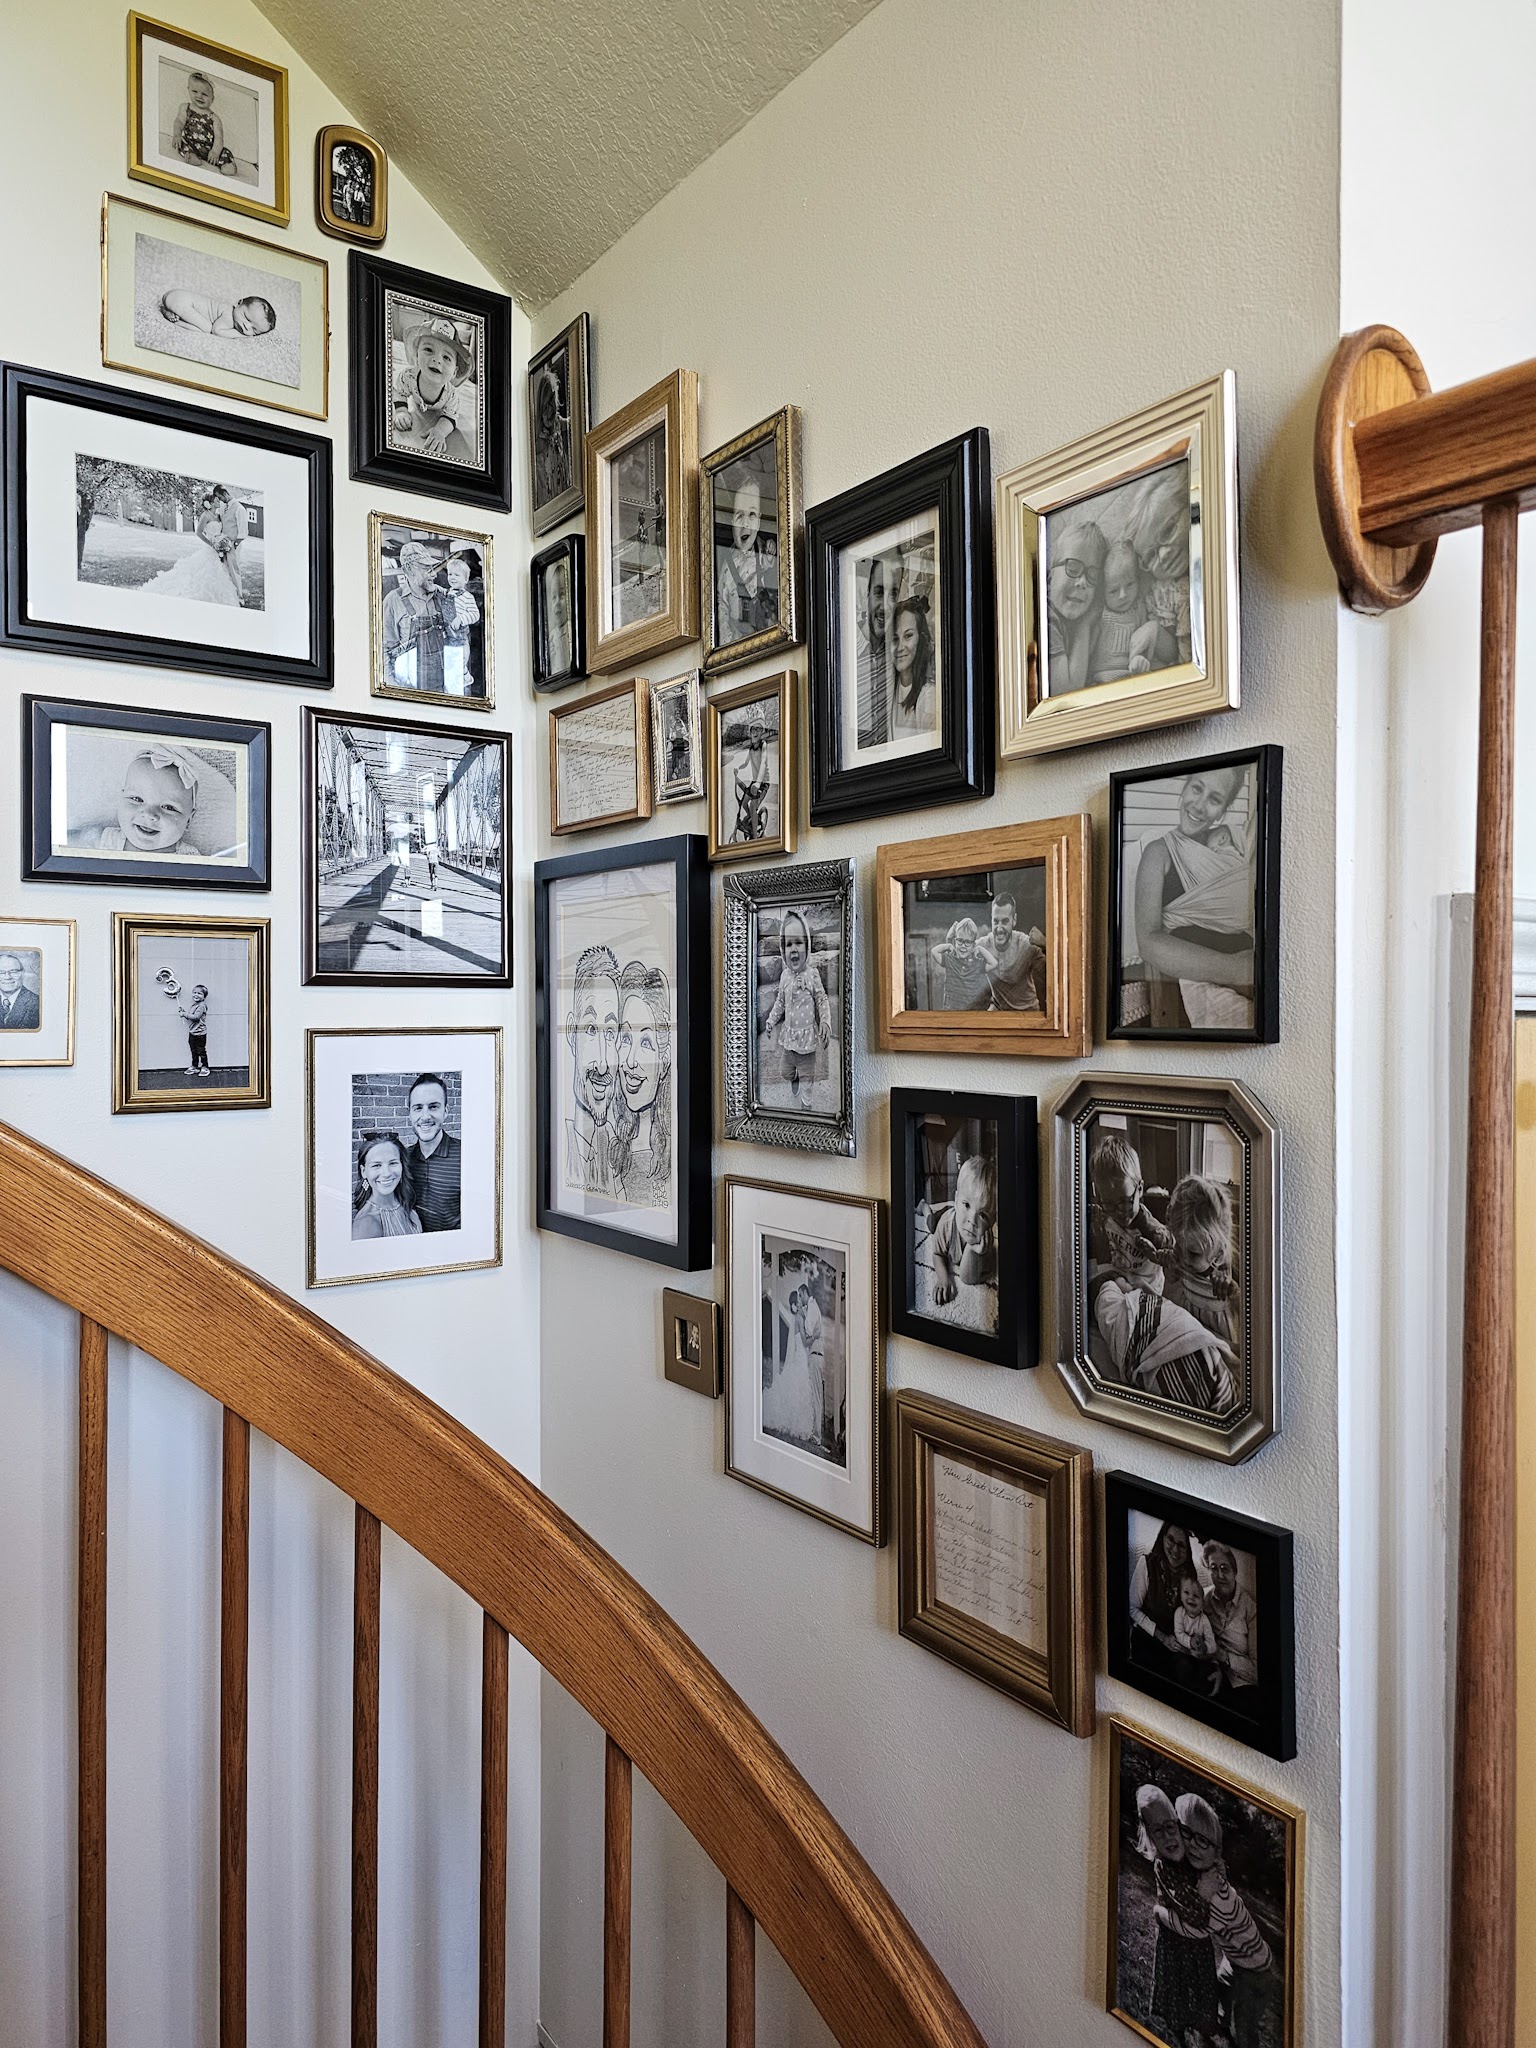
Last week, I shared an update to our spiral staircase gallery wall and I received a request afterwards to share more of my various gallery walls. I thought it would make for a fun Friday post to just do a little round up of all the gallery walls in my house and just briefly talk about each one.
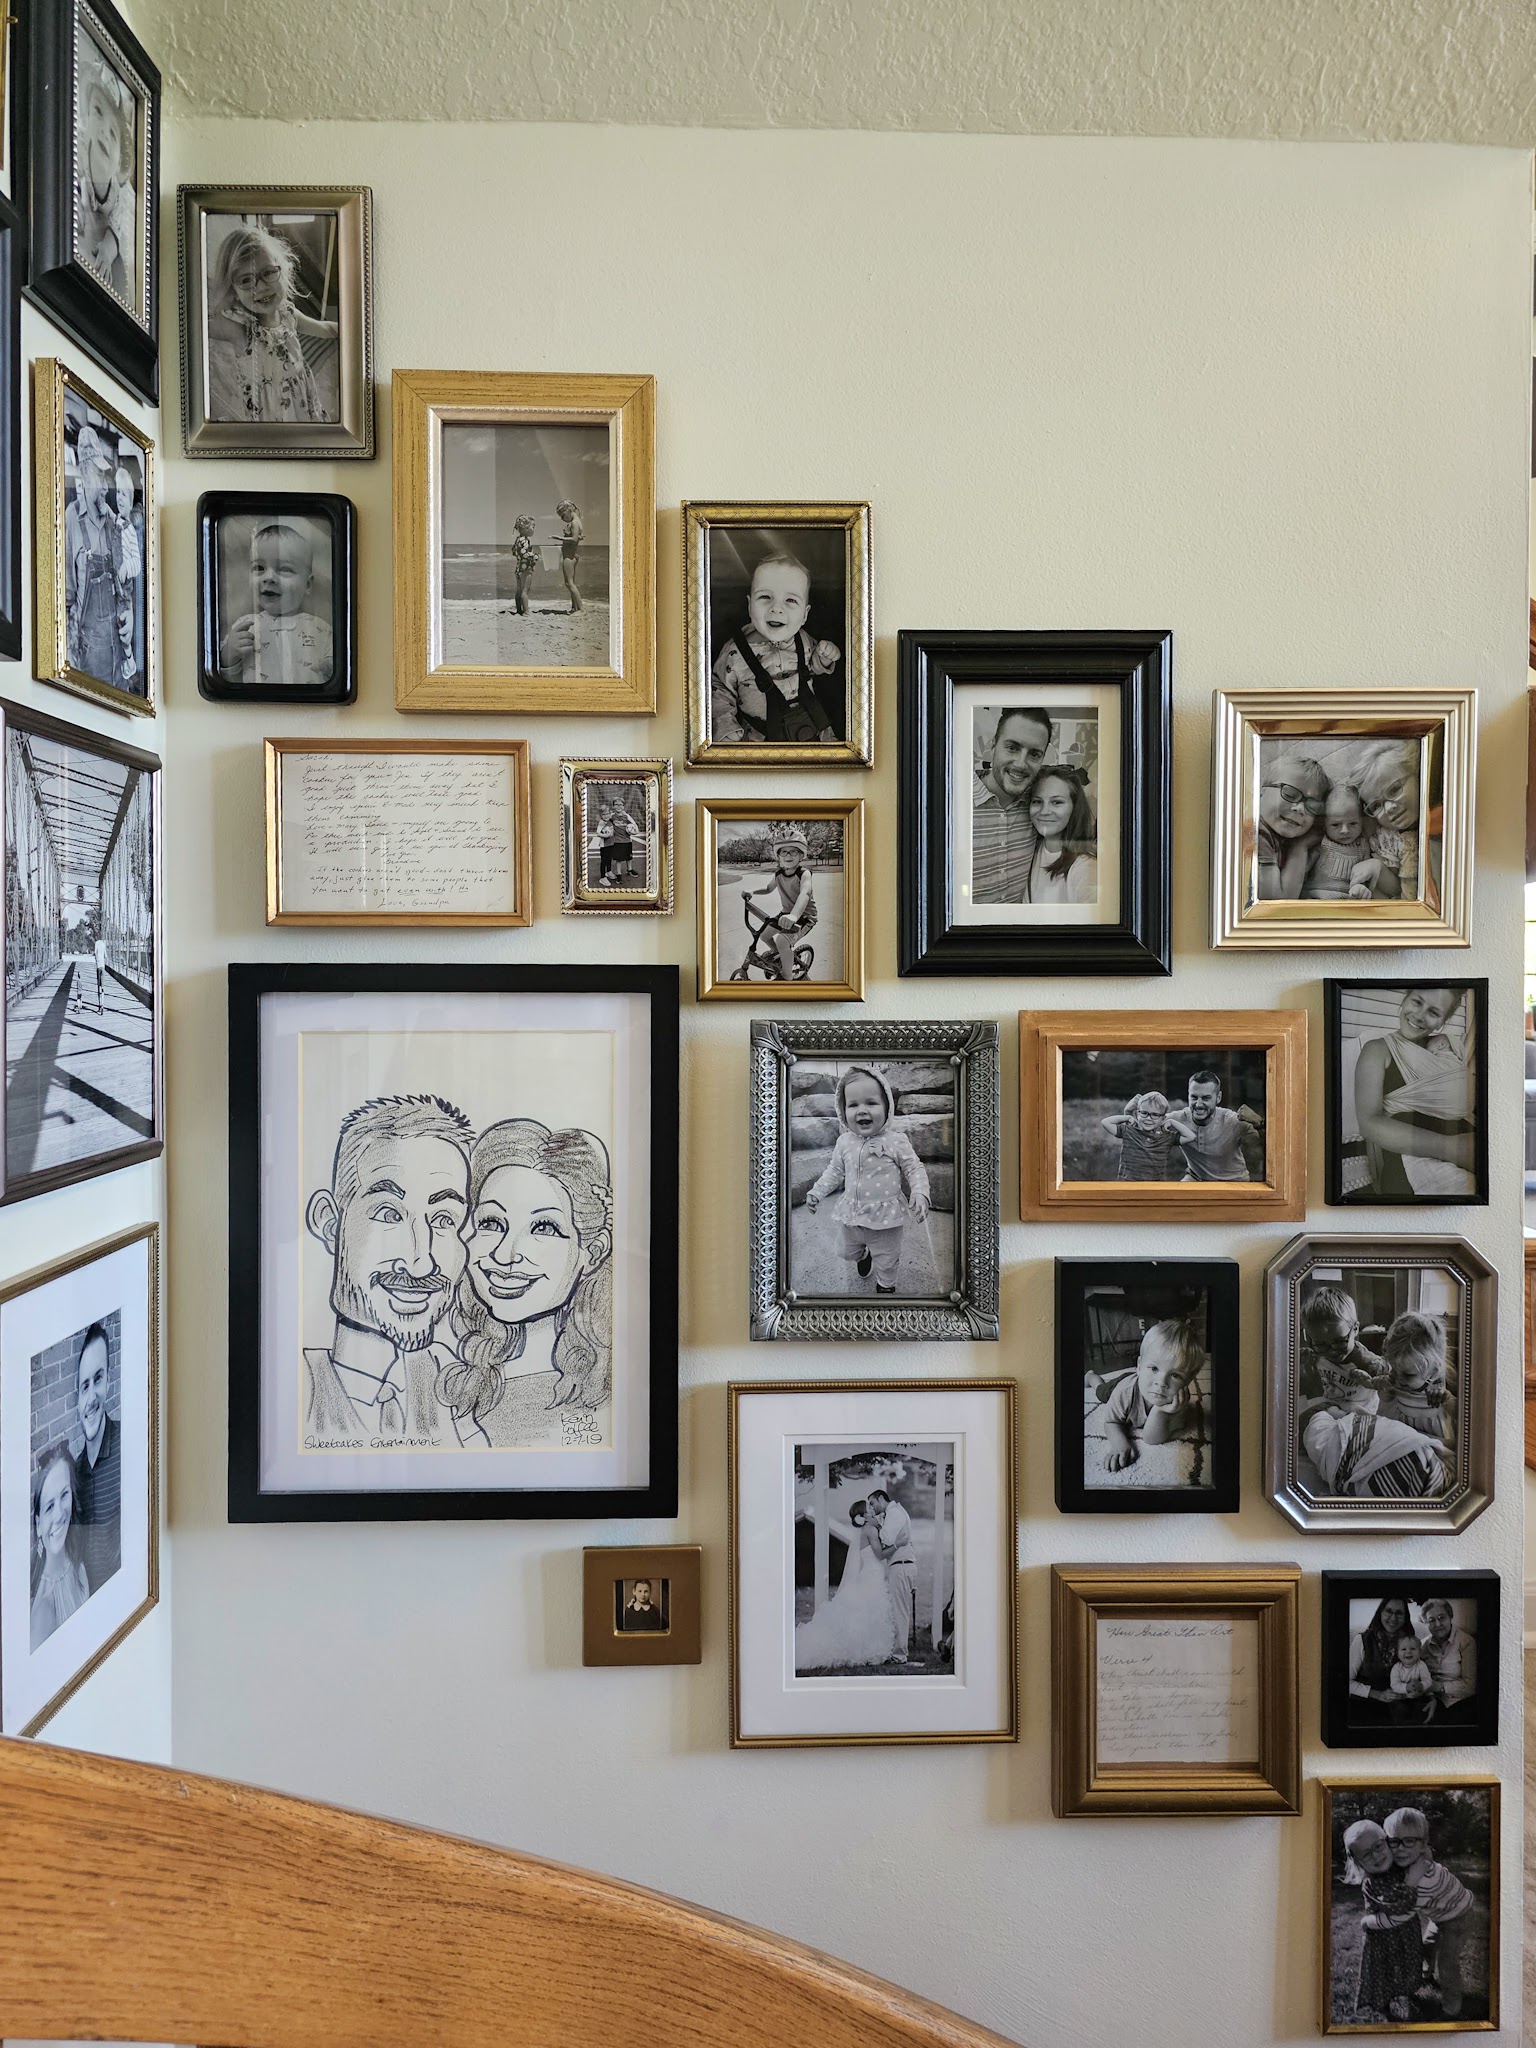
Spiral Staircase
The theme for this wall is legacy. I wanted this collection of photos to feel like a scrapbook of our family history.
I chose mixed metal frames for a collected-over-time feel and printed all photos in black and white to create a cohesive look. This wall has a few professional photos but is mostly casual moments we snapped on our phones and just documents life through the years. Keeping legacy in mind, I also chose a few handwritten notes (one is a letter my grandparents sent me in college, one is hymn lyrics found in my great-great aunt’s bible after she died) and photos of generations before us (my grandma’s school picture, Justin’s grandparents wedding picture, baby LJ with his grandma and great-grandma, etc). This is a very special wall for our family!
Playroom Wall
I wanted the playroom to feel, well, playful so that’s the word I kept in mind while building out this gallery wall.
I decided to use this wall as a place to display professionally taken family photos in full color and mixed in some bold, colorful artwork and mirrors. I didn’t want things to be too chaotic so I chose frames in gold or shades of green/blue/greige to keep things connected. The overall effect feels bright and fun!
Kitchen Gallery Wall
This small wall in between the living room and kitchen houses our thermostat, so I chose to blend it in to a gallery wall. The theme of this wall is history – subtly different than the spiral staircase gallery wall for a few reasons.
For one, this wall is full of the colorful mementos that didn’t fit the B&W scheme of the spiral staircase. There are colorful photos: one of my dad, brother and I from childhood and one of my grandpa with his parents. Since it’s technically in the kitchen, I have two handwritten recipes – one from my grandma and one from Justin’s grandma. There’s also some nods to places we have traveled: a map from a meaningful city for us, a scrap piece found in the wall of our family farmhouse, a colorful postcard from a trip we took with baby LJ. And it’s all centered above my grandma’s antique commode. History!
Kids Bedroom
LJ and Vi have a shared bedroom and they each have a gallery wall above their bed. I wanted them to flow together, but be distinct for each child so I kept a few things consistent (they each have a black-and-white line drawing, animals, hanging word art, colors, mixed frames) and then sprinkled in things that fit their unique personalities.
For LJ, my straight-laced, yet energetic firstborn, I chose pieces that feel both neat and playful – just like him!
For Vi, my adventurous and creative middle child, I chose art that felt a little mischievous and sweet – her personality in a nutshell!
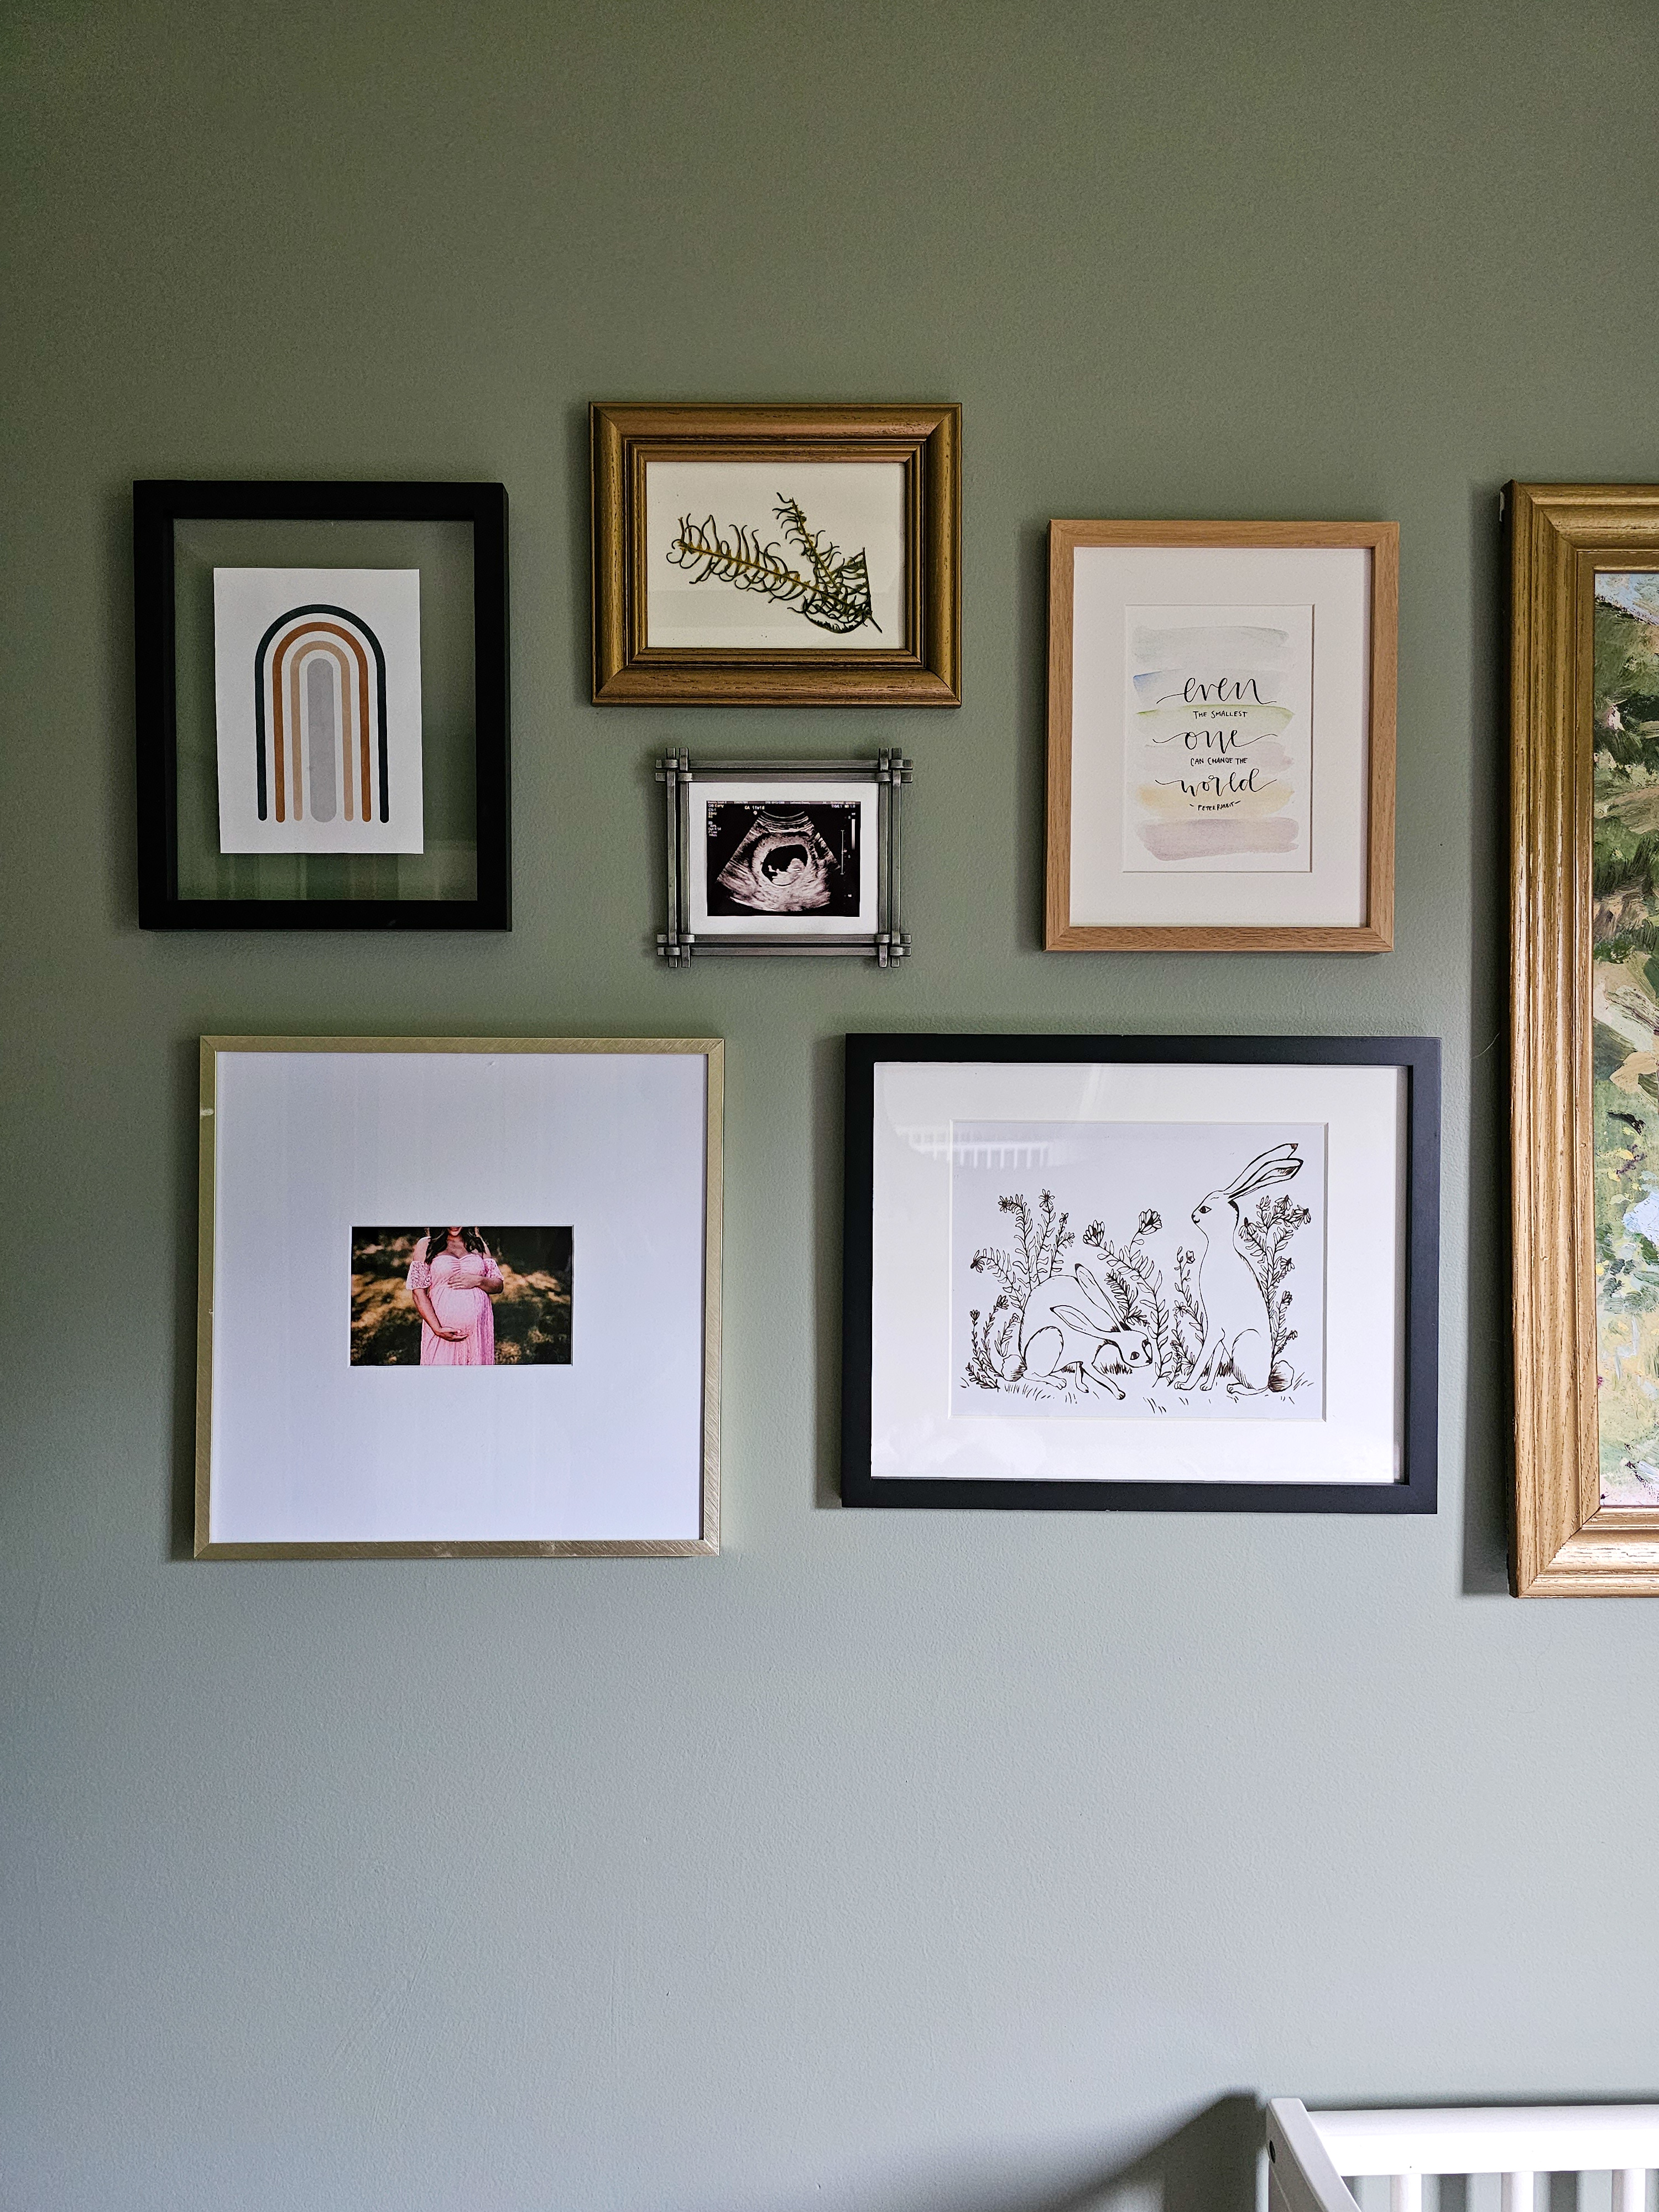
Nursery
I created this nursery gallery wall before Ollie was born, so I hadn’t met him yet but knew a little boy would be joining our family. I wanted a sweet & whimsical feel to this space and chose pieces accordingly.
Again I went with mixed metals – gold, silver, and black – but I kept colors softer and more muted. I chose the only photos I had of Ollie at the time: a maternity photo and his ultrasound. I also brought the outdoors in through artwork: a landscape print, bunnies in a meadow, a snipped piece of a dried fern, a rainbow print.
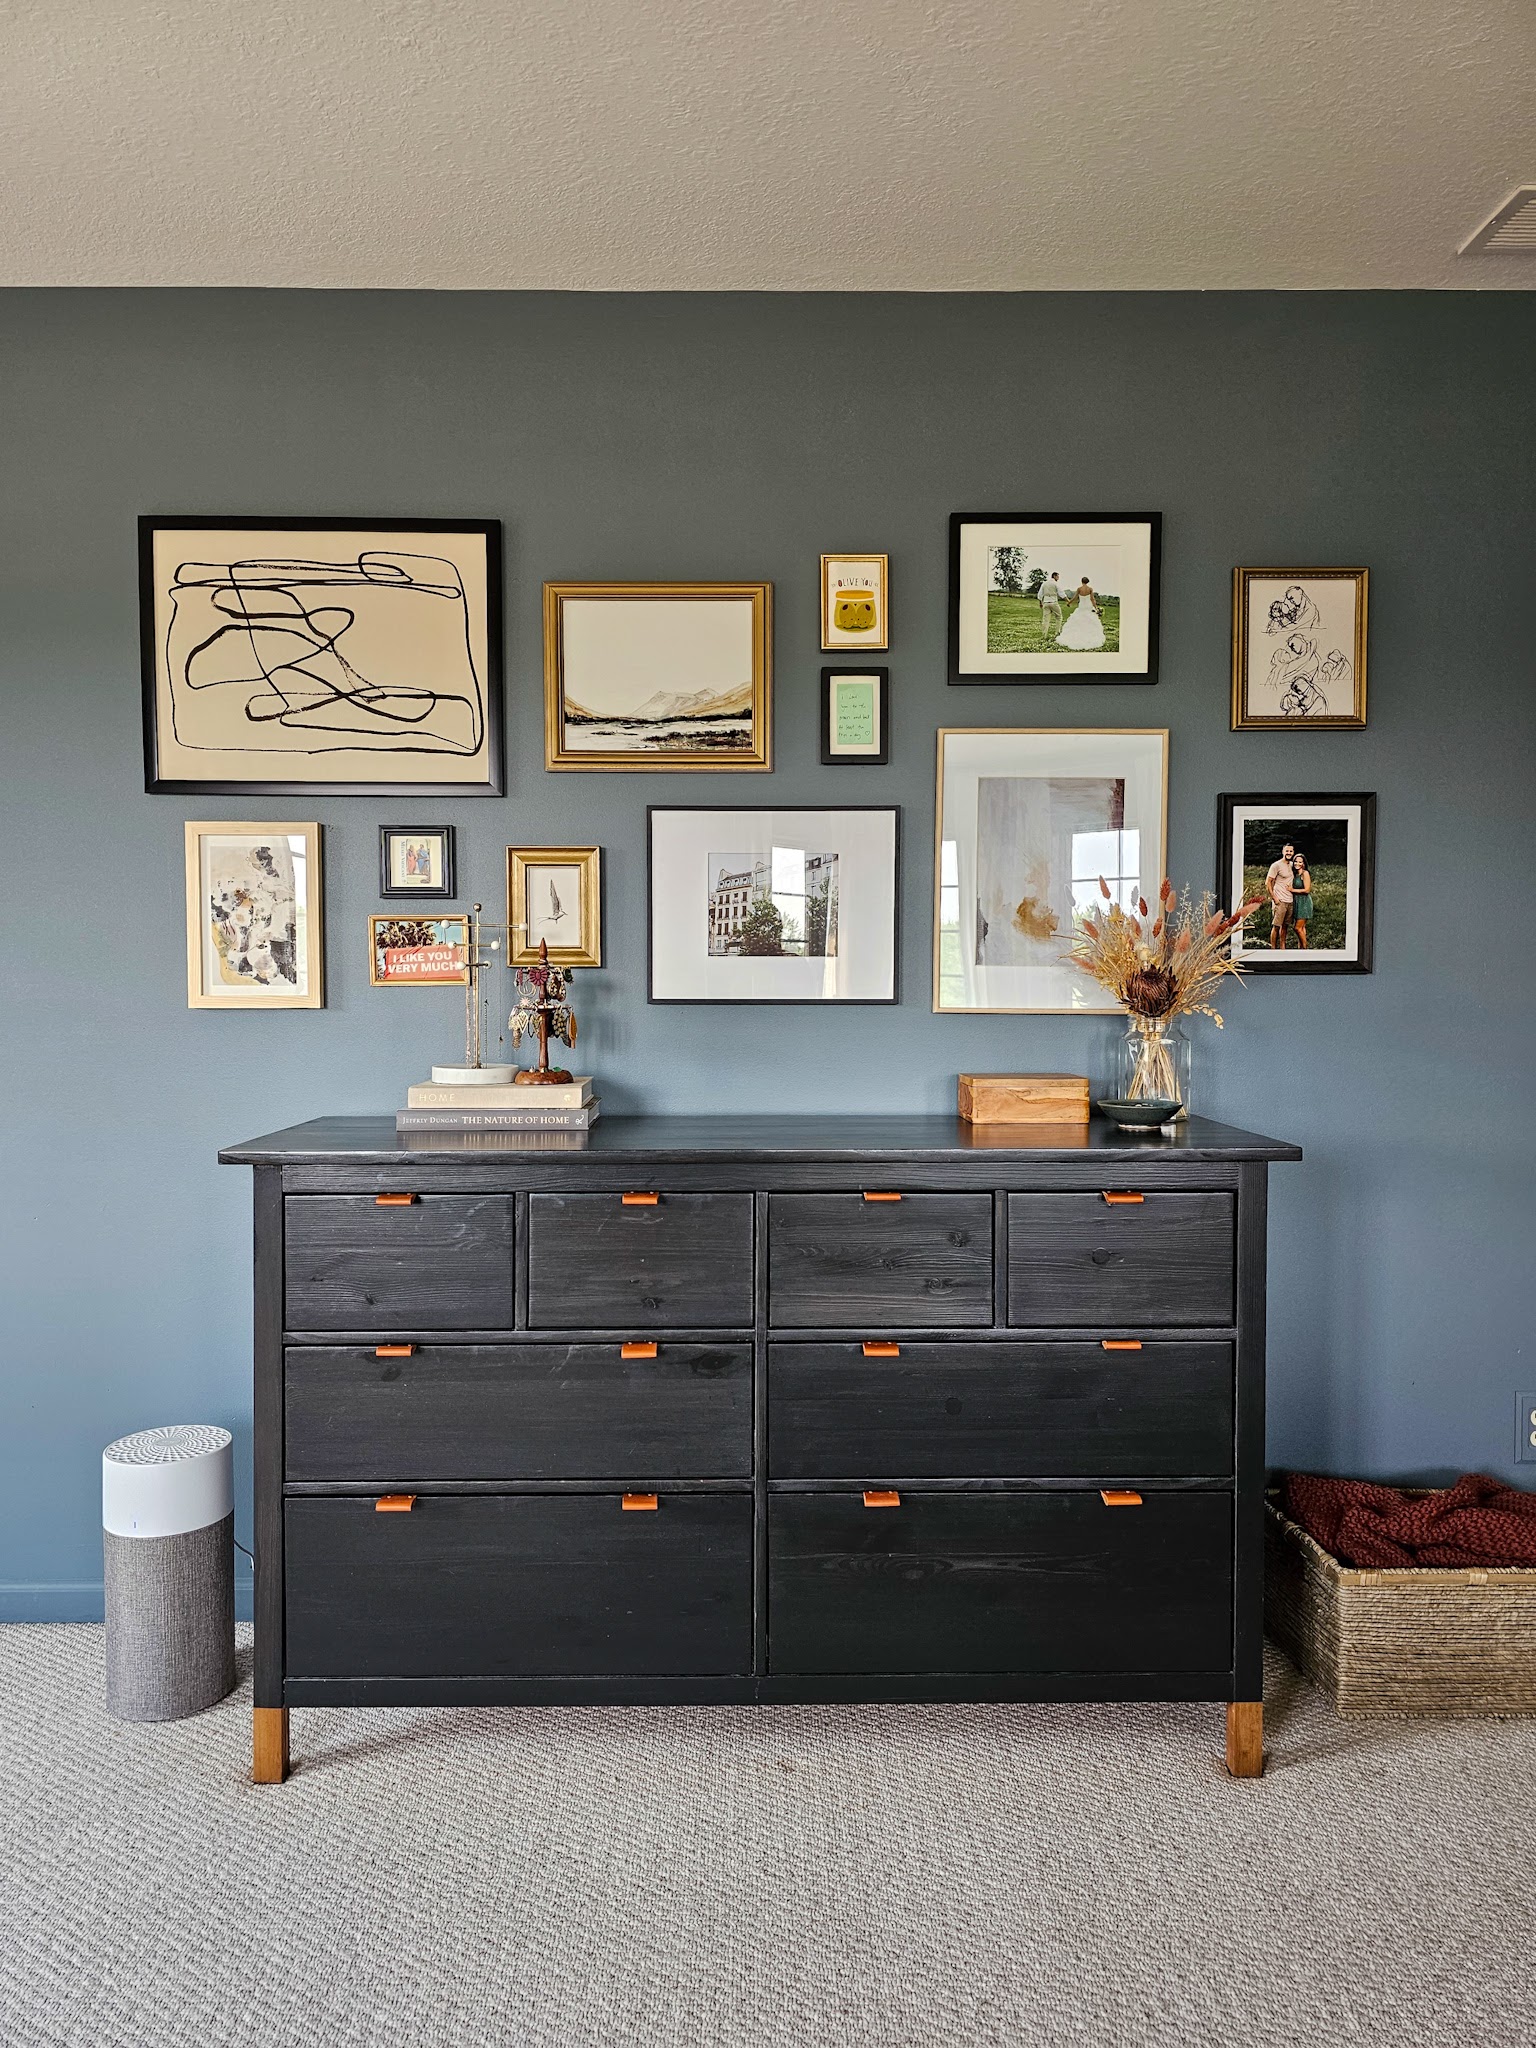
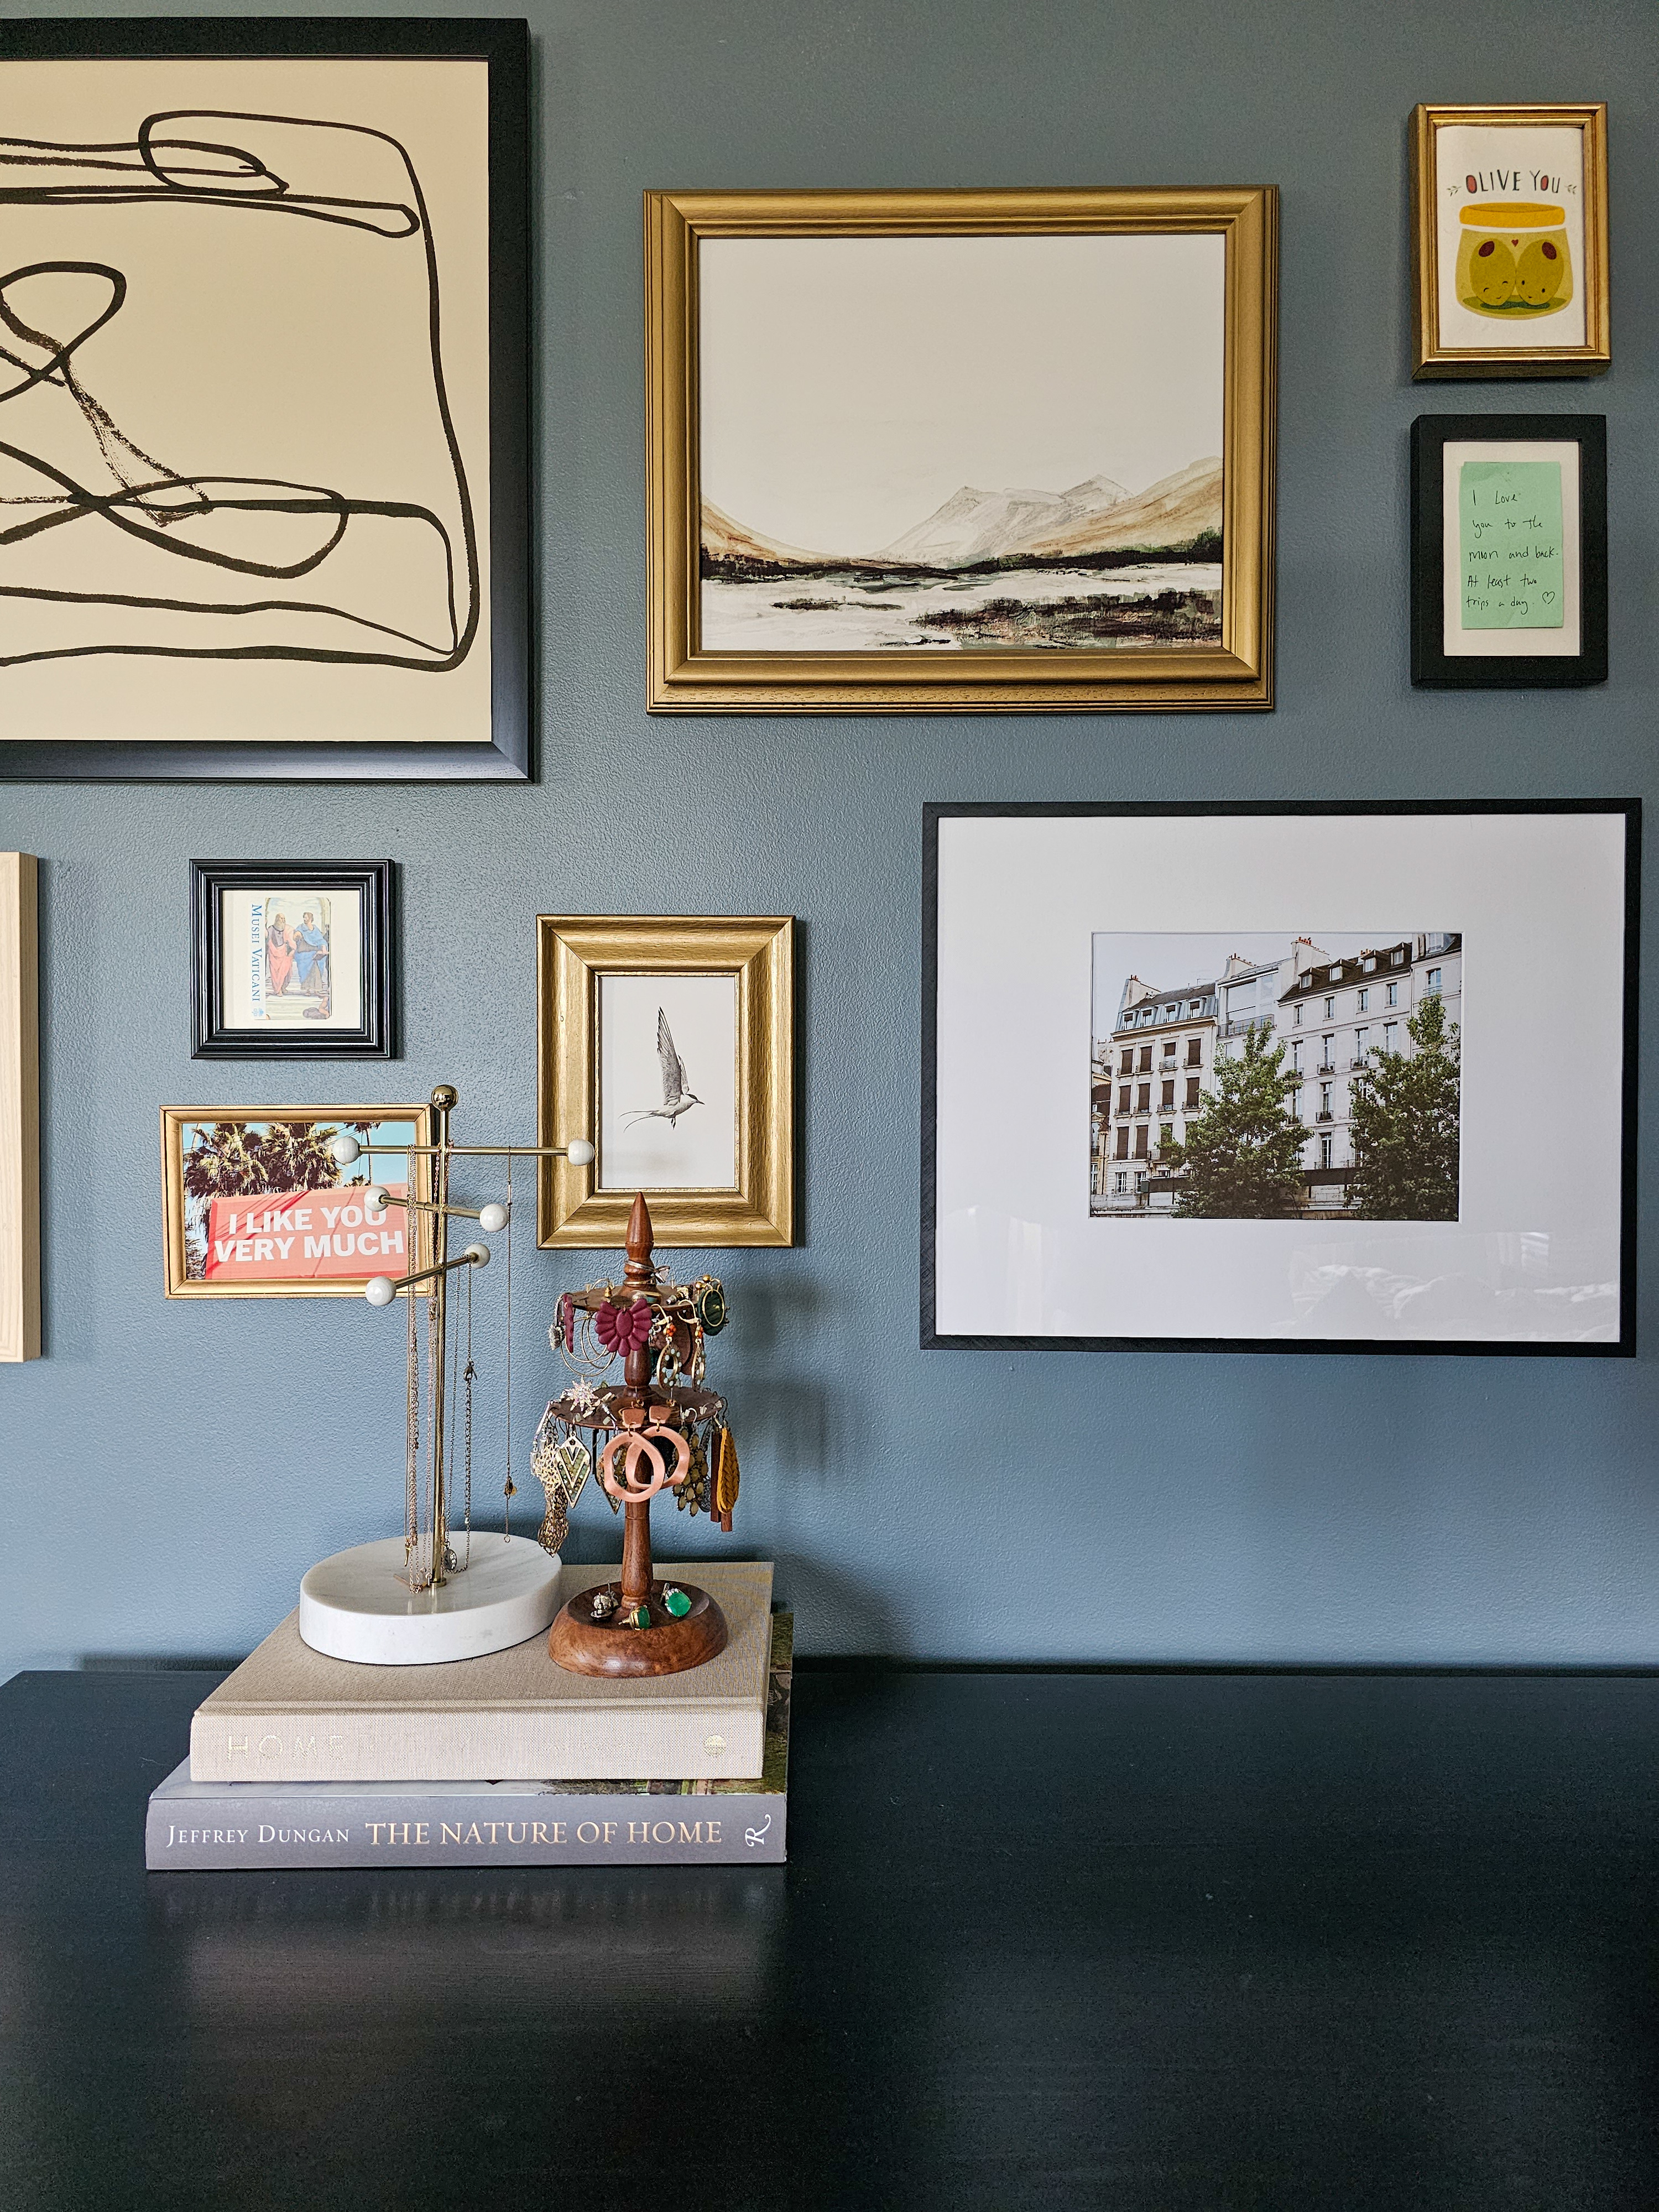
Primary Bedroom
Not to be too on the nose, but the theme of this bedroom was love. Specifically, I wanted to see our marriage reflected up on the walls. I chose to mix gold, black, and natural wood frames and extend the wall beyond the dresser for a fuller effect.
I wanted our bedroom to be relaxing and soothing, so I worked in several abstract pieces to give a dreamier effect. I also chose a few special mementos – a ticket from our travels in Italy, a note Justin left for me, a card I gave him once – to mix in with photos of us. We love travel so I also chose a couple prints that inspire dreams of future adventures.
I love that each gallery wall is different and conveys a unique part of our family’s life. Each wall feels like a piece of the puzzle and makes our home feel like us. Now on to plan my next wall . . . 😉
Back in 2021 I created a little gallery wall in the corner wall above our spiral staircase. It felt like the perfect place to do something a little unique so I curated a collection of mixed metal frames showcasing casual family memories. I always had the plan to update and add to the gallery as time went on and our family grew and this week I finally made the time to do it!
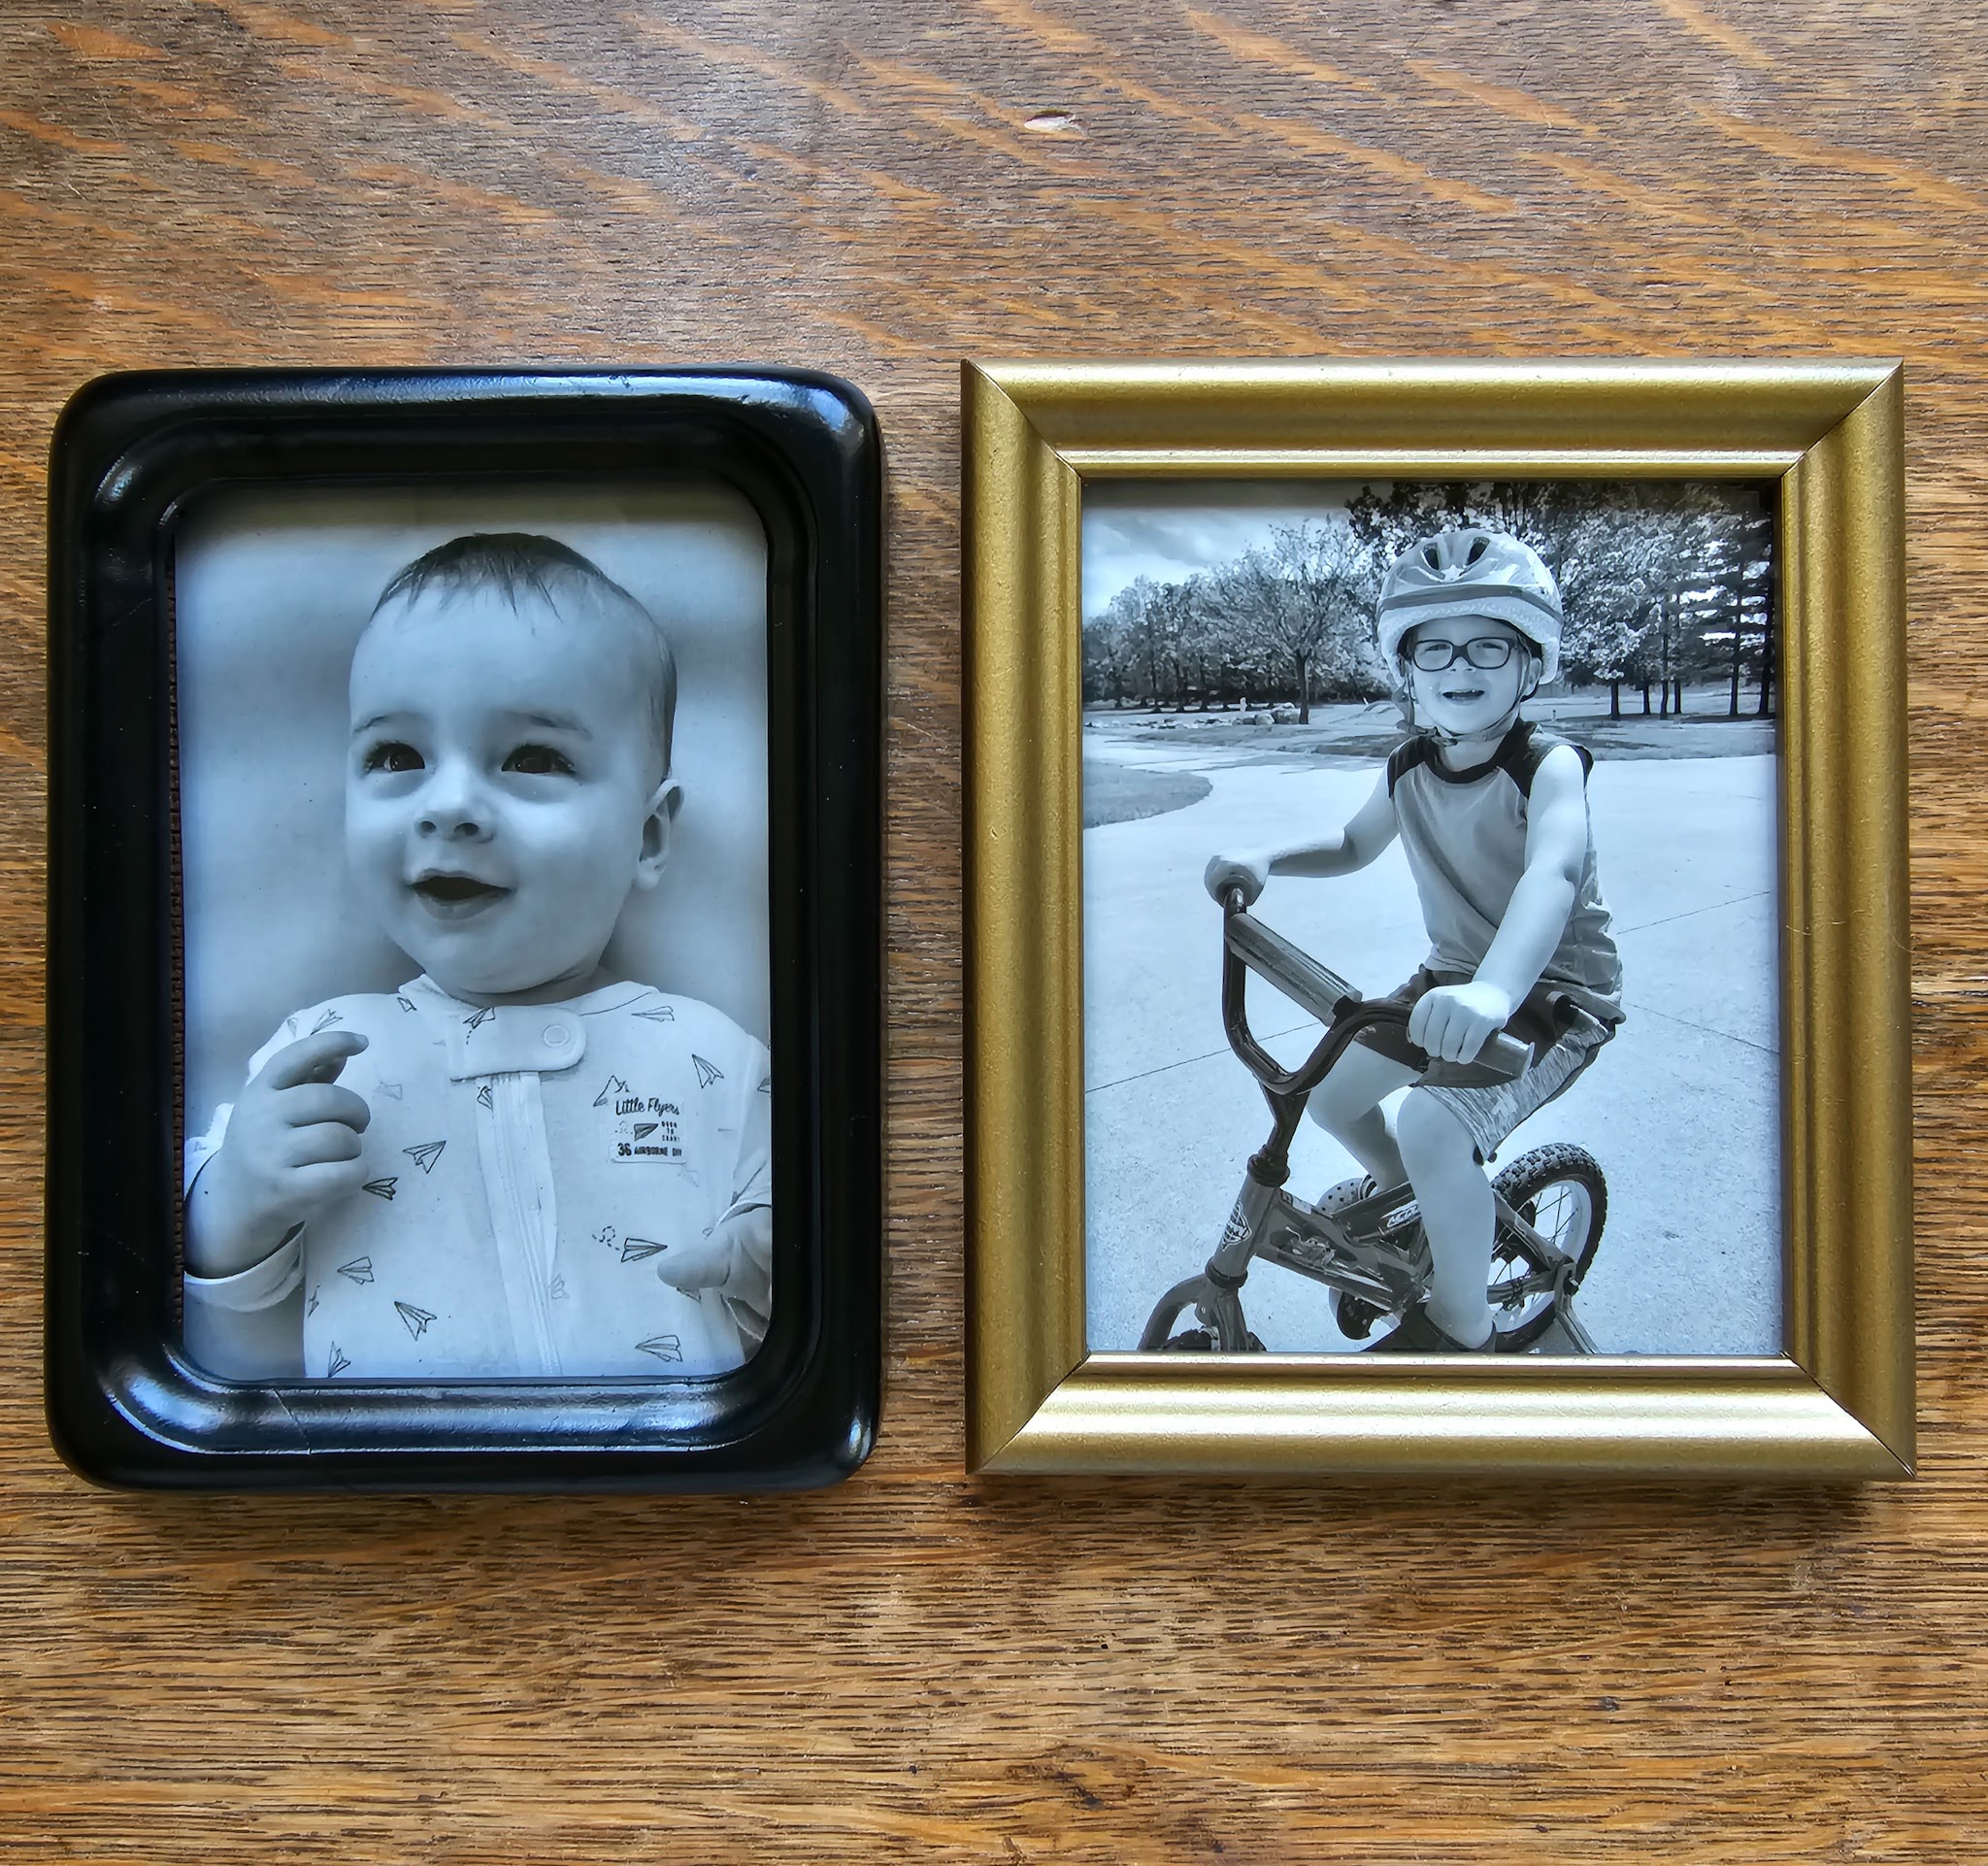
I love seeing different phases of our life reflected in this wall – we’ve got special mementos mixed with black and white photos of newborns and great-grandparents and every stage of life in between! I love seeing of a baby picture of LJ near another picture of him riding his bike as a 4 year old, and glimpsing special moments like the kids meeting Ollie for the first time or Vi exploring the beach with her cousin always has me reliving those sweet memories as I walk up and down these stairs.
My favorite part of this update (aside from seeing more memories on our walls) is that every single frame I used in this update was thrifted – it gives such an eclectic, collected vibe to the wall!
It’s no secret around here that I love thrifting and finding secondhand items to use in my home. Thrifting is good for my wallet and good for the planet, plus it helps me find unique items for my home. Win, win, win!
Of all the things I enjoy hunting for, thrifted frames are up there at the top of the list. I have thrifted dozens of frames over the years and love using them throughout my home. The other day, I thrifted 22 new frames in one shopping trip – the cashier was definitely curious at checkout, ha! But 22 frames for $28 total was an absolute no-brainer in my mind. As I sifted through options at the thrift store, I was elated to find so many unique small frames. I knew they’d be perfect for this project!
I love mixing metals so I’m always on the hunt for good metal frames that I can use as is, but in many cases, the frames are the size or shape I want, but not a color that works for the space. As long as the frame is solid quality, I still buy it knowing I have some options for making it work.
Today I thought I’d share the techniques I use for upgrading thrift store frames, both for this gallery wall project and other spaces in my home. When I shop with these ideas in mind, it really opens up the amount of possibilities for frames that might otherwise get passed over in the thrift store.
Spray Paint
My tried and true option is spray paint. A couple coats can completely change the look! The key is to keep the coats light so the paint doesn’t run or bubble up – a nice smooth finish will really elevate the frame. My go-to spray paints are this black one and this gold one.
Latex Paint
Occasionally I want a colorful frame and for that I turn to latex paint. I could buy colorful spray paint, but I have so many little sample jars of paint from various projects in the past that I like to use what I already have on hand. I recently snagged a couple jars from my stash to paint two wooden frames for our playroom wall and painted them Chatroom and Homberg Gray, both Sherwin Williams. I have found that it’s easiest to stick to simple frames (no ornate designs) and use a small angled brush to paint multiple thin coats.
Rub n Buff
I’ve struggled with Rub n Buff in the past and was on the verge of giving up on it, but I recently received some advice on how to apply it better. Now that I’m getting the hang of it, I’m liking it more and more! Rub n Buff can be used on a variety of surfaces but I think it works best on wood and metal. To apply, make sure you’re wearing gloves and dab just a tiny amount onto your finger. Lightly rub it all over the surface of your object, then use a clean soft cloth and buff the surface in small circular motions.
Sand + Stain
This option is the most labor-intensive of my options, but sometimes I want a wooden frame to retain the wood look. So many wood frames in thrift stores have an orangey colored stain that feels very 90s, but if the frame is a fairly simple design, an option is to sand it down and re-stain it a desirable color. For this frame in the kids room, I sanded off the old stain and just gave it a coat of polyurethane to keep a lighter wood look. If I wanted a darker look, I could have used a dark colored stain or even a gel stain. I only recently used gel stain for the first time (on my kids’ bedroom dresser) but I was instantly a fan so I might try that out on a frame in the future.
Next time you see an, ehem, ugly frame for sale at a yard sale or secondhand store, I hope this inspires you to not just pass over it but to think if there’s a way to make it work for your space! It might just be a perfect option 🙂
This week I made some more progress in the living room with a few small changes that made a big impact.
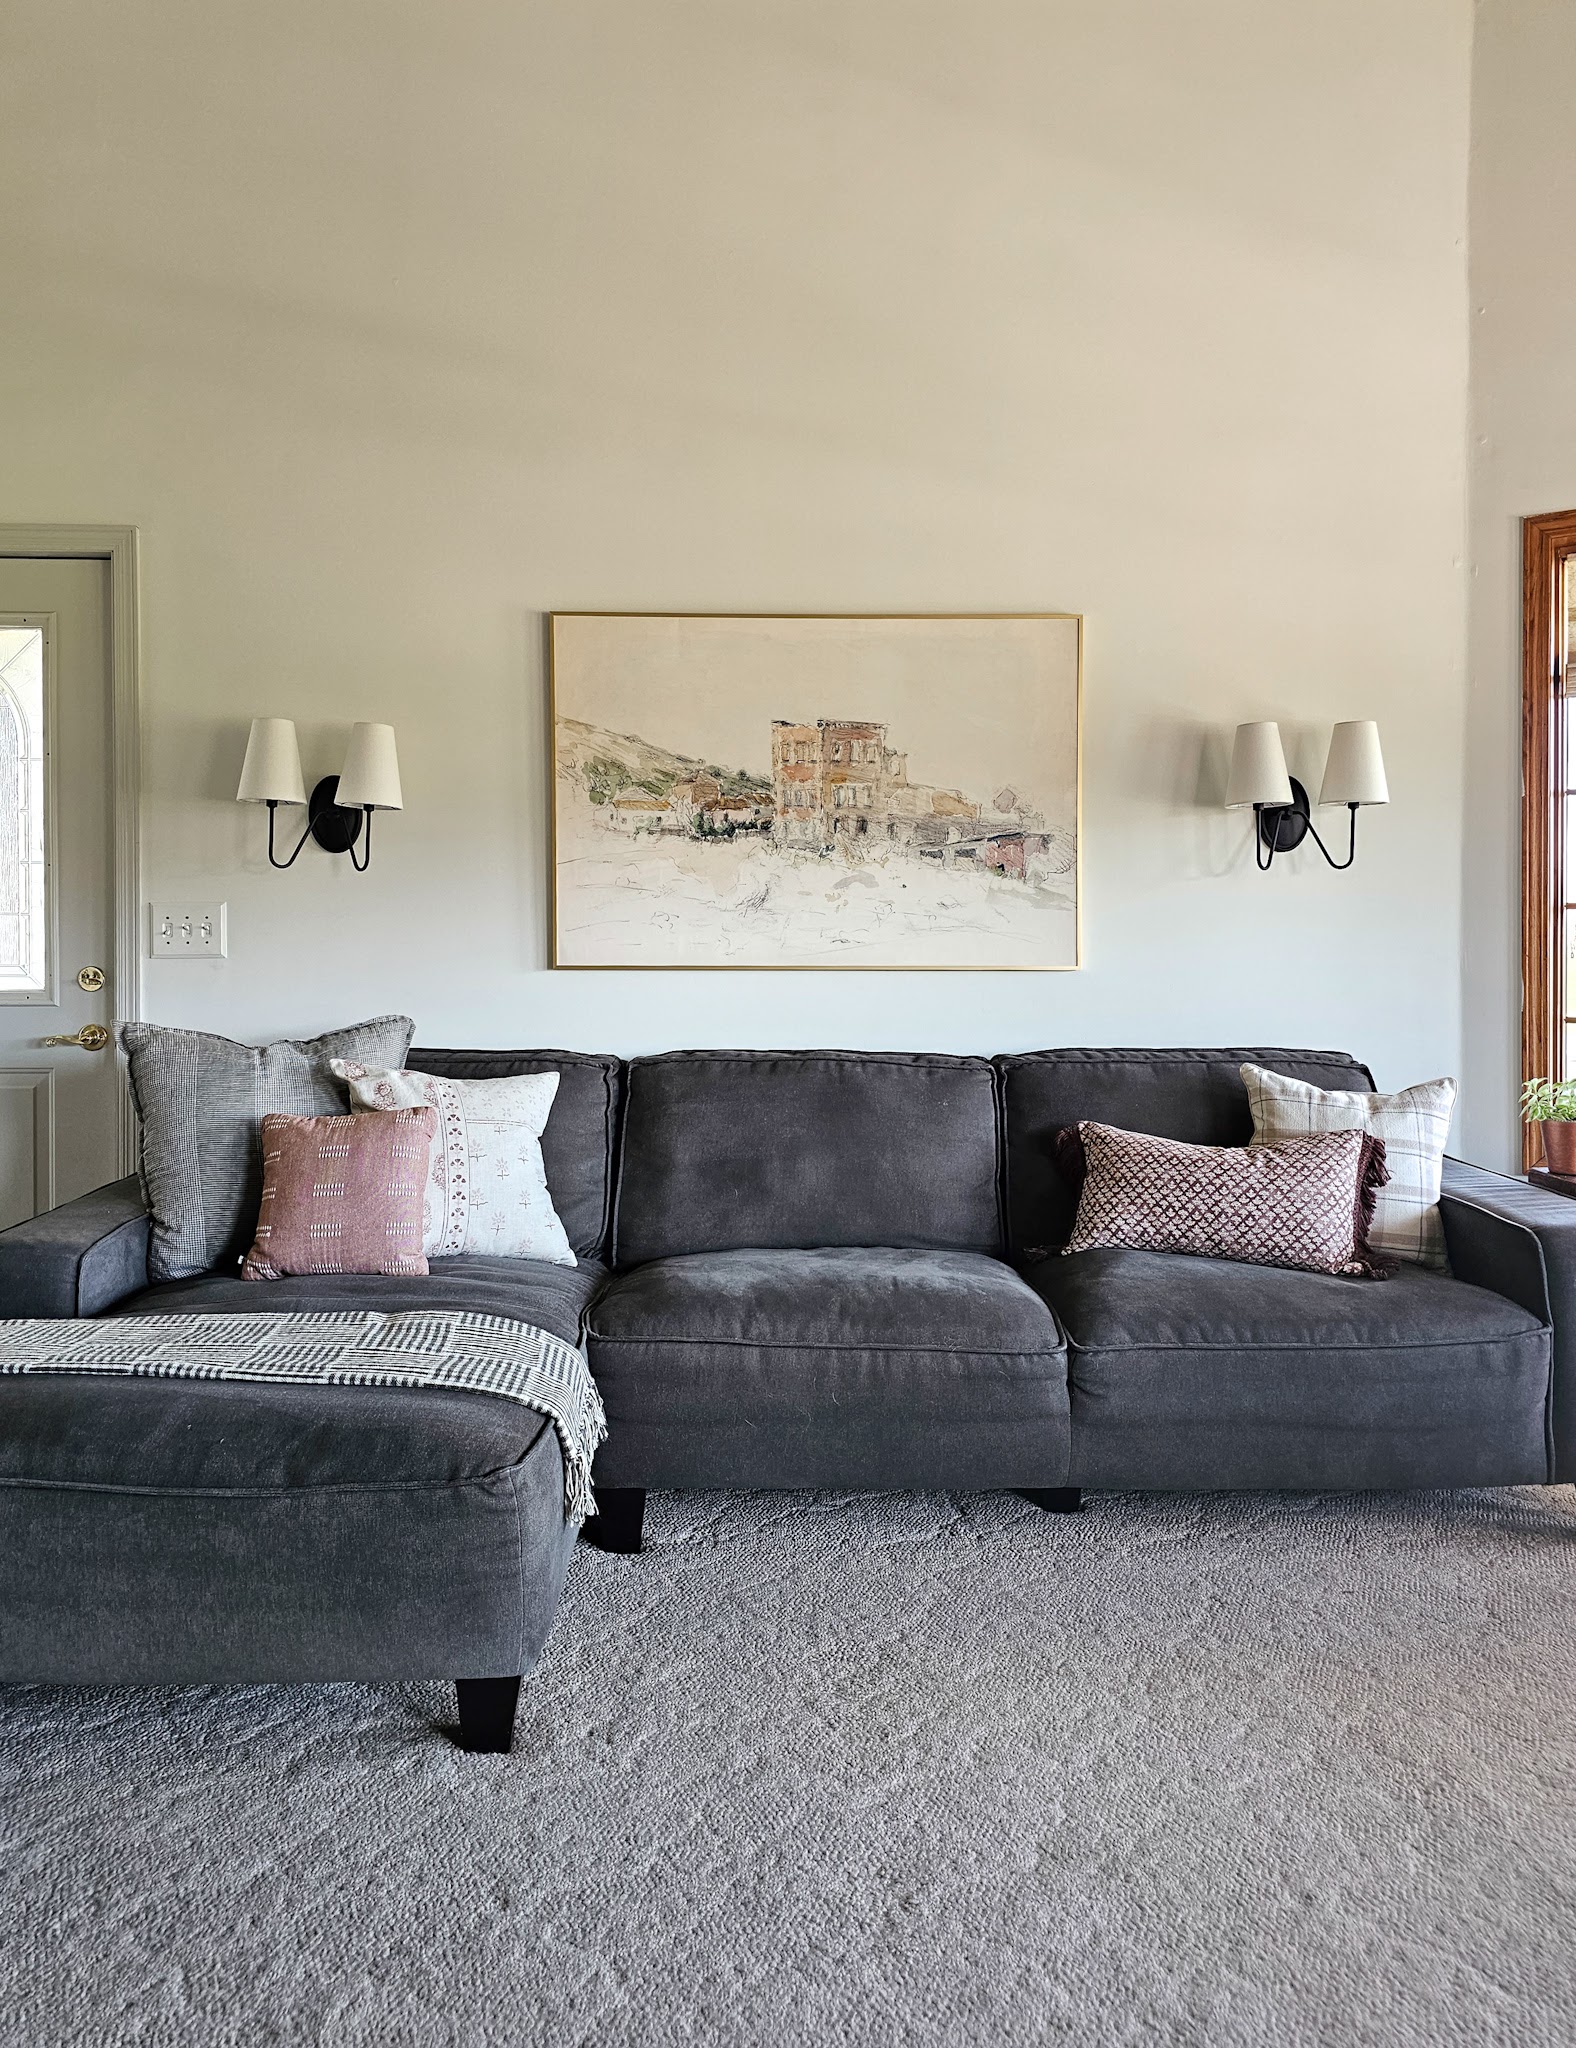
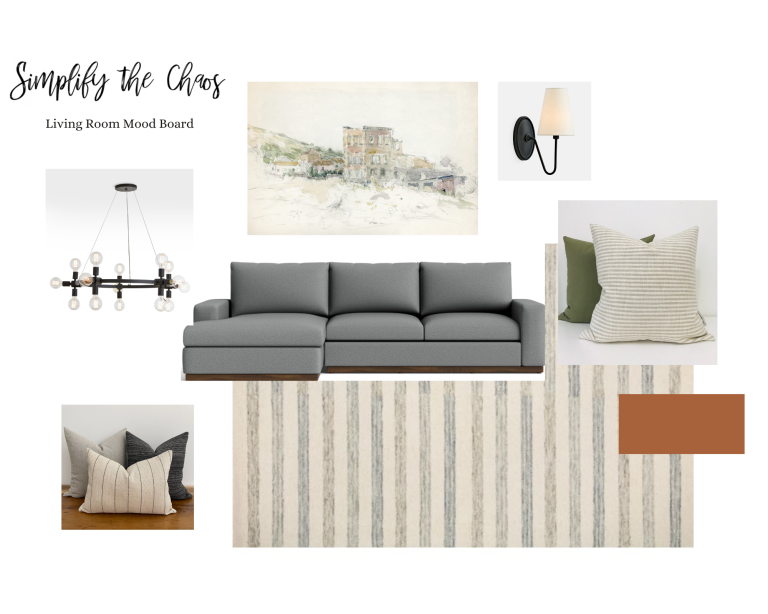
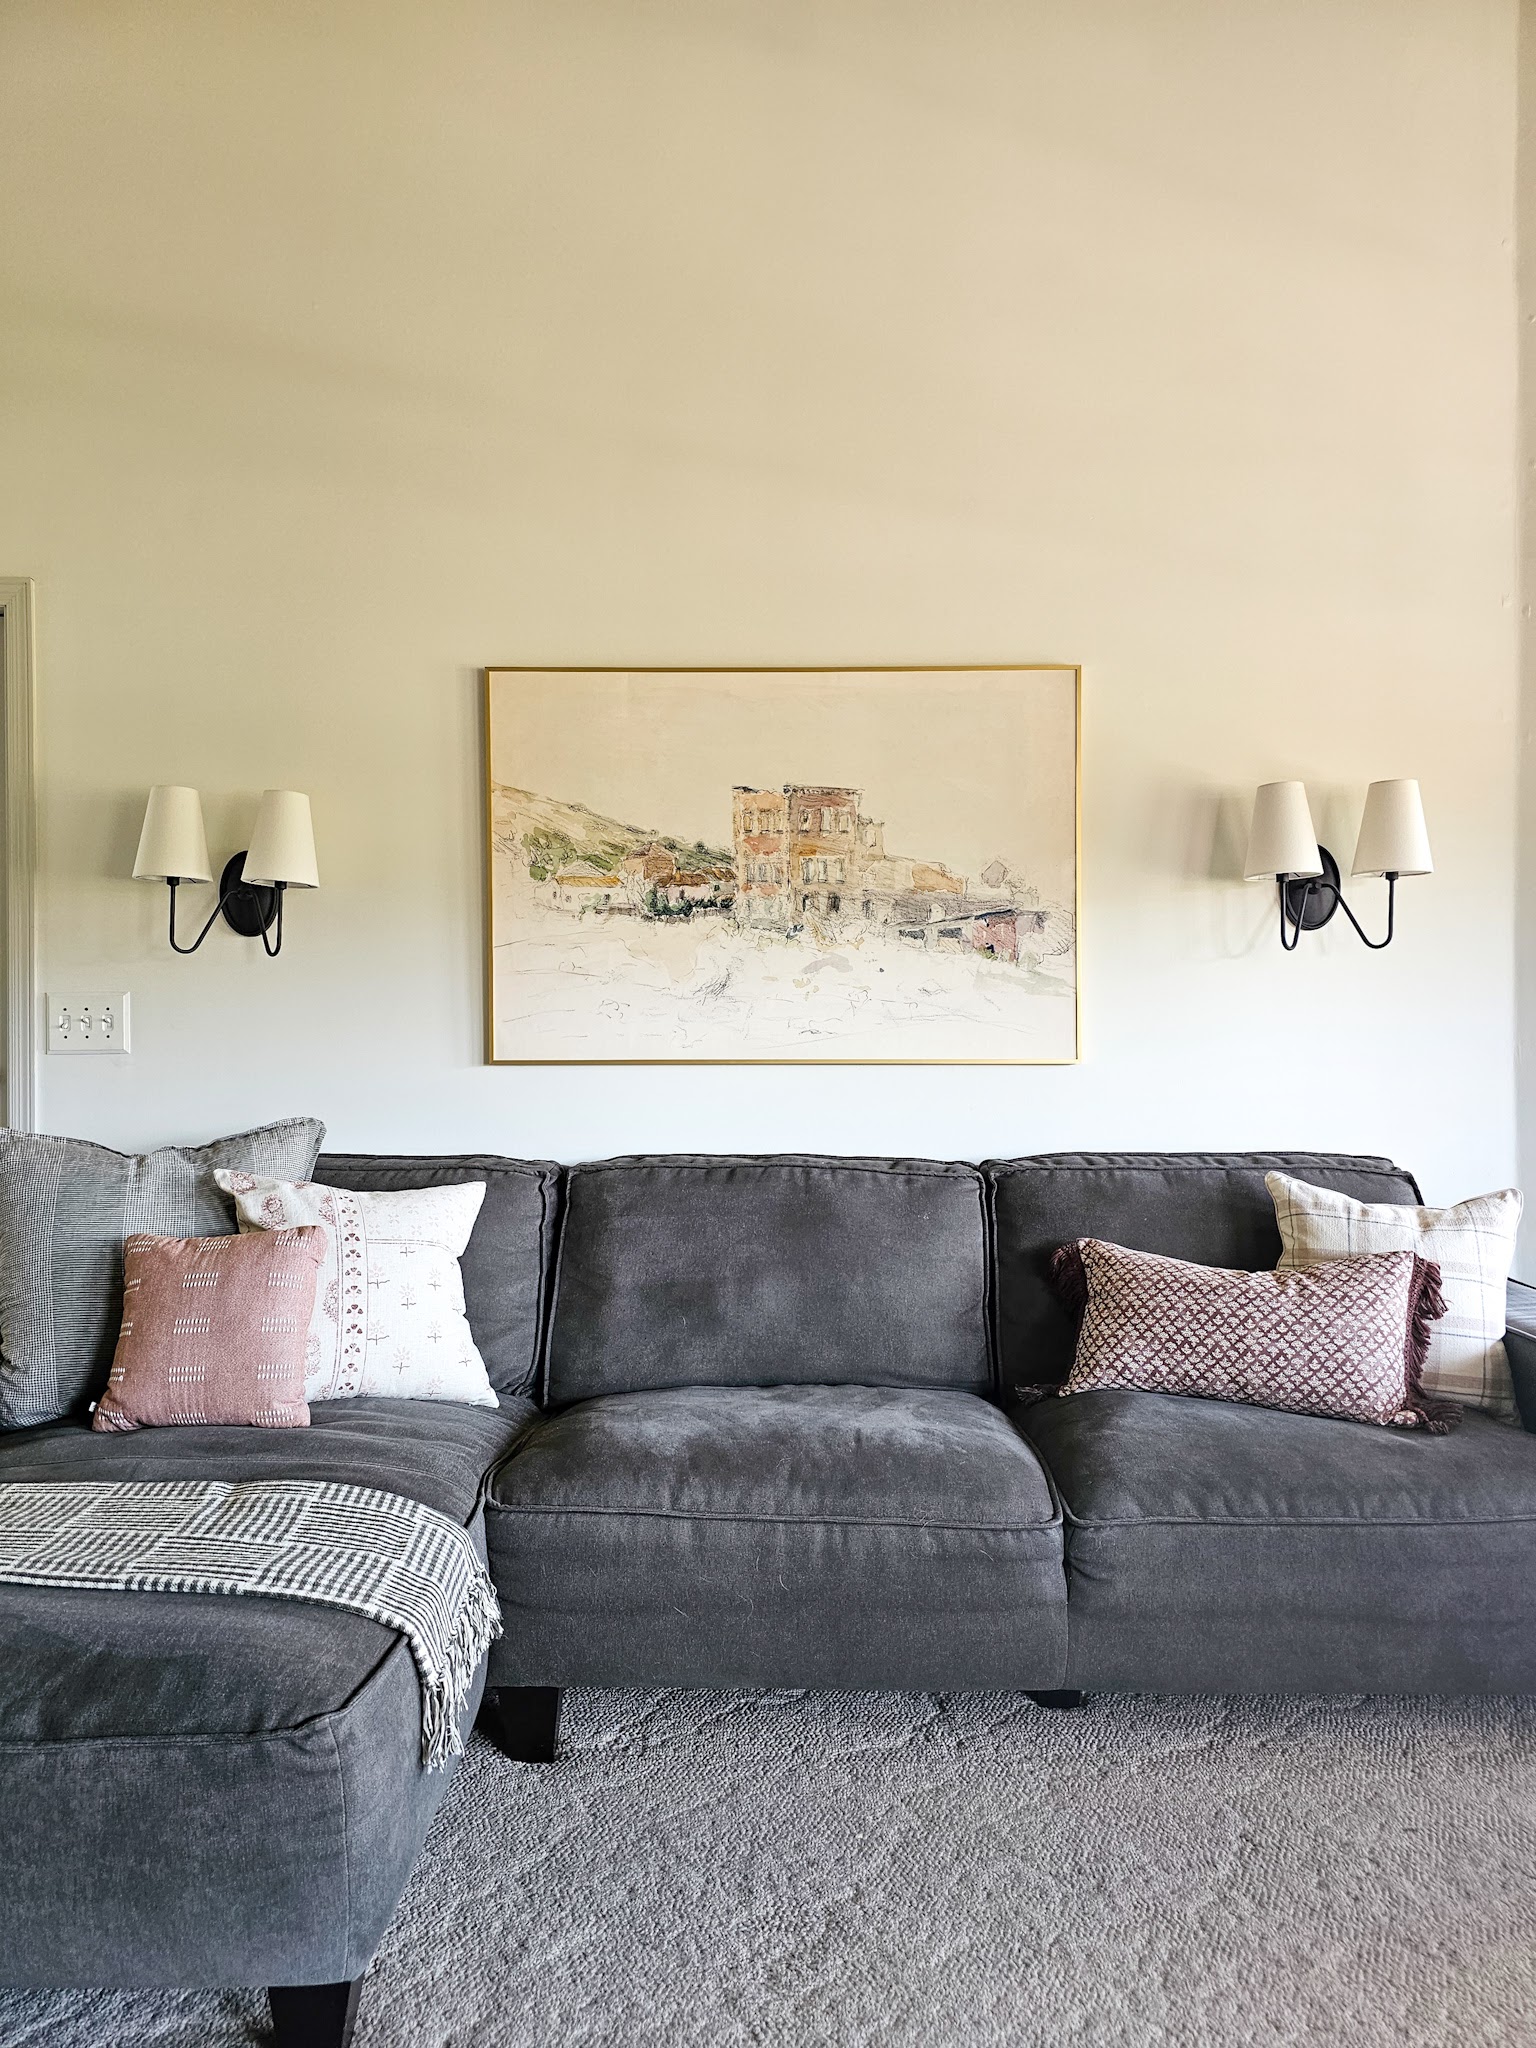
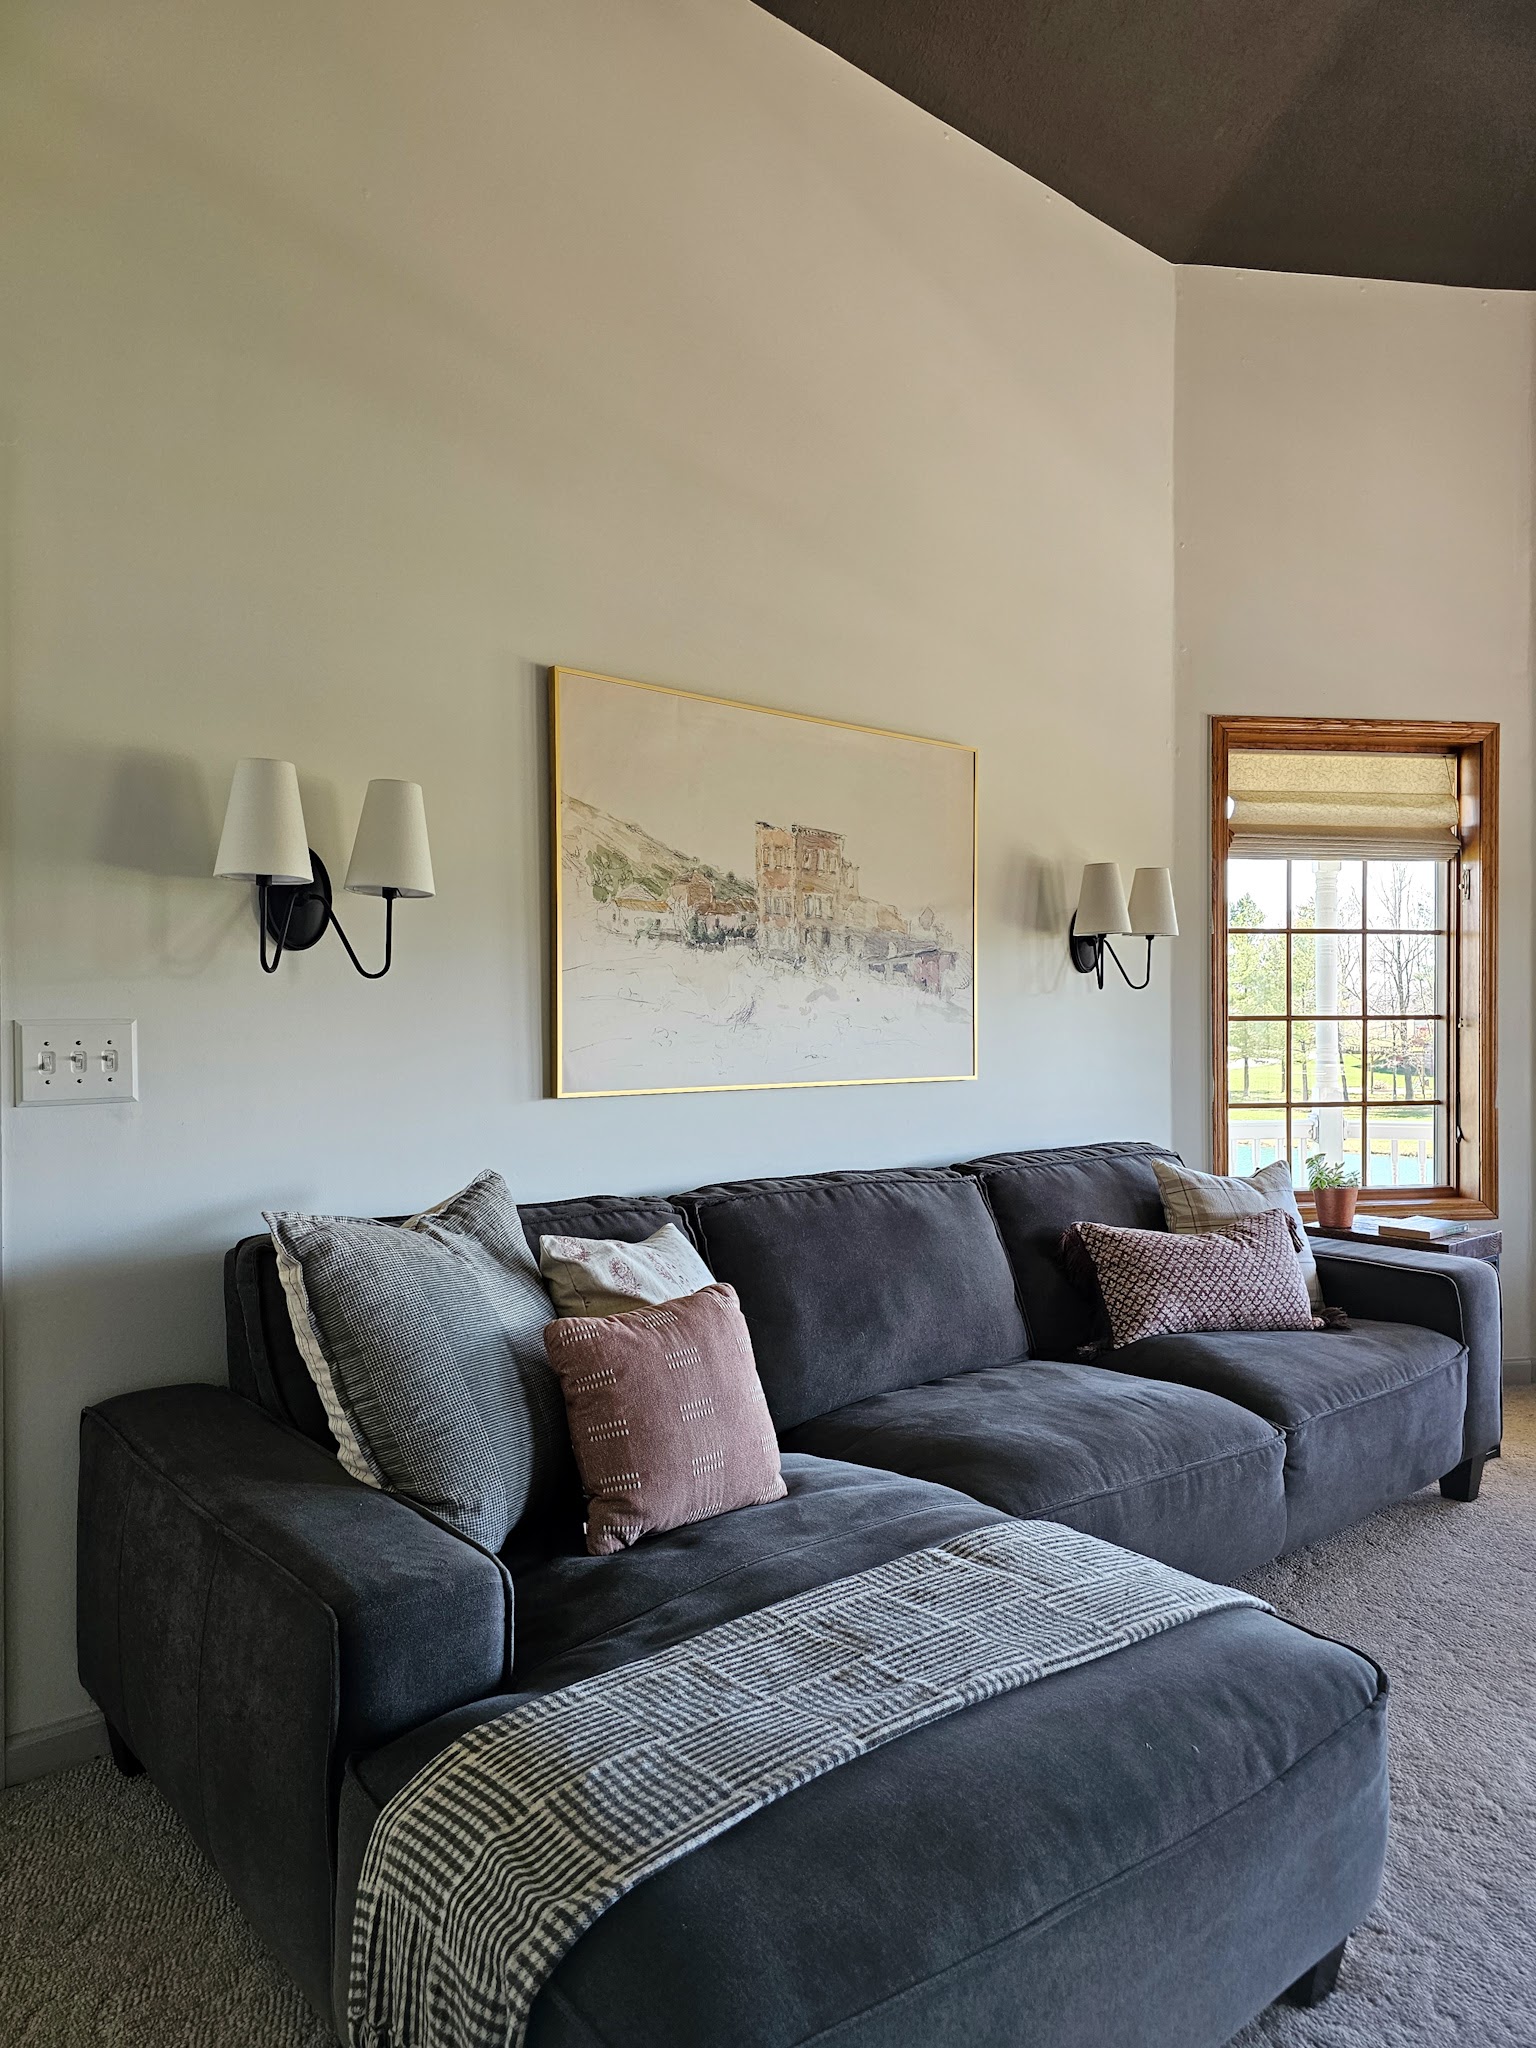
The living room is the slowest renovation we’ve tackled so far. I shared the mood board back in October and since then, I’ve painted the walls and ceiling, swapped out the ceiling light fixture, and hired an electrician to hardwire two sconces. We also purchased one new chair for the bay window area. That’s it! Basically, I’ve been taking this Phase One renovation in, well, phases, and every so often I come back to do a little bit more. This week, I finally finished off this wall:
Before-ish
Midway
After
Let’s start with the artwork, as that was a driving force in all the other decisions with this view. From the start of planning this room, I had this print from Juniper Print Shop in mind. I like that it has interest, but it’s not overwhelming. The wall is huge and I had no chance of filling it; with a bold ceiling already I wanted to just have the art be a bridge between the couch and ceiling. It’s named Italian Hills and reminds me of Justin and my trip to Italy 7 years ago. I was drawn to the soft, muted colors used – it’s the same color palette that’s reflected throughout the rooms in the rest of the first floor so it felt like a great way to tie everything together.
I purchased the print as a digital download. Their website says their digital files are formatted to print up to 24×36 inches but I was able to have it printed locally at a larger size and I’m happy with the end result. (They do offer oversized prints too but I wanted a different size than they offer – more on that in a minute).
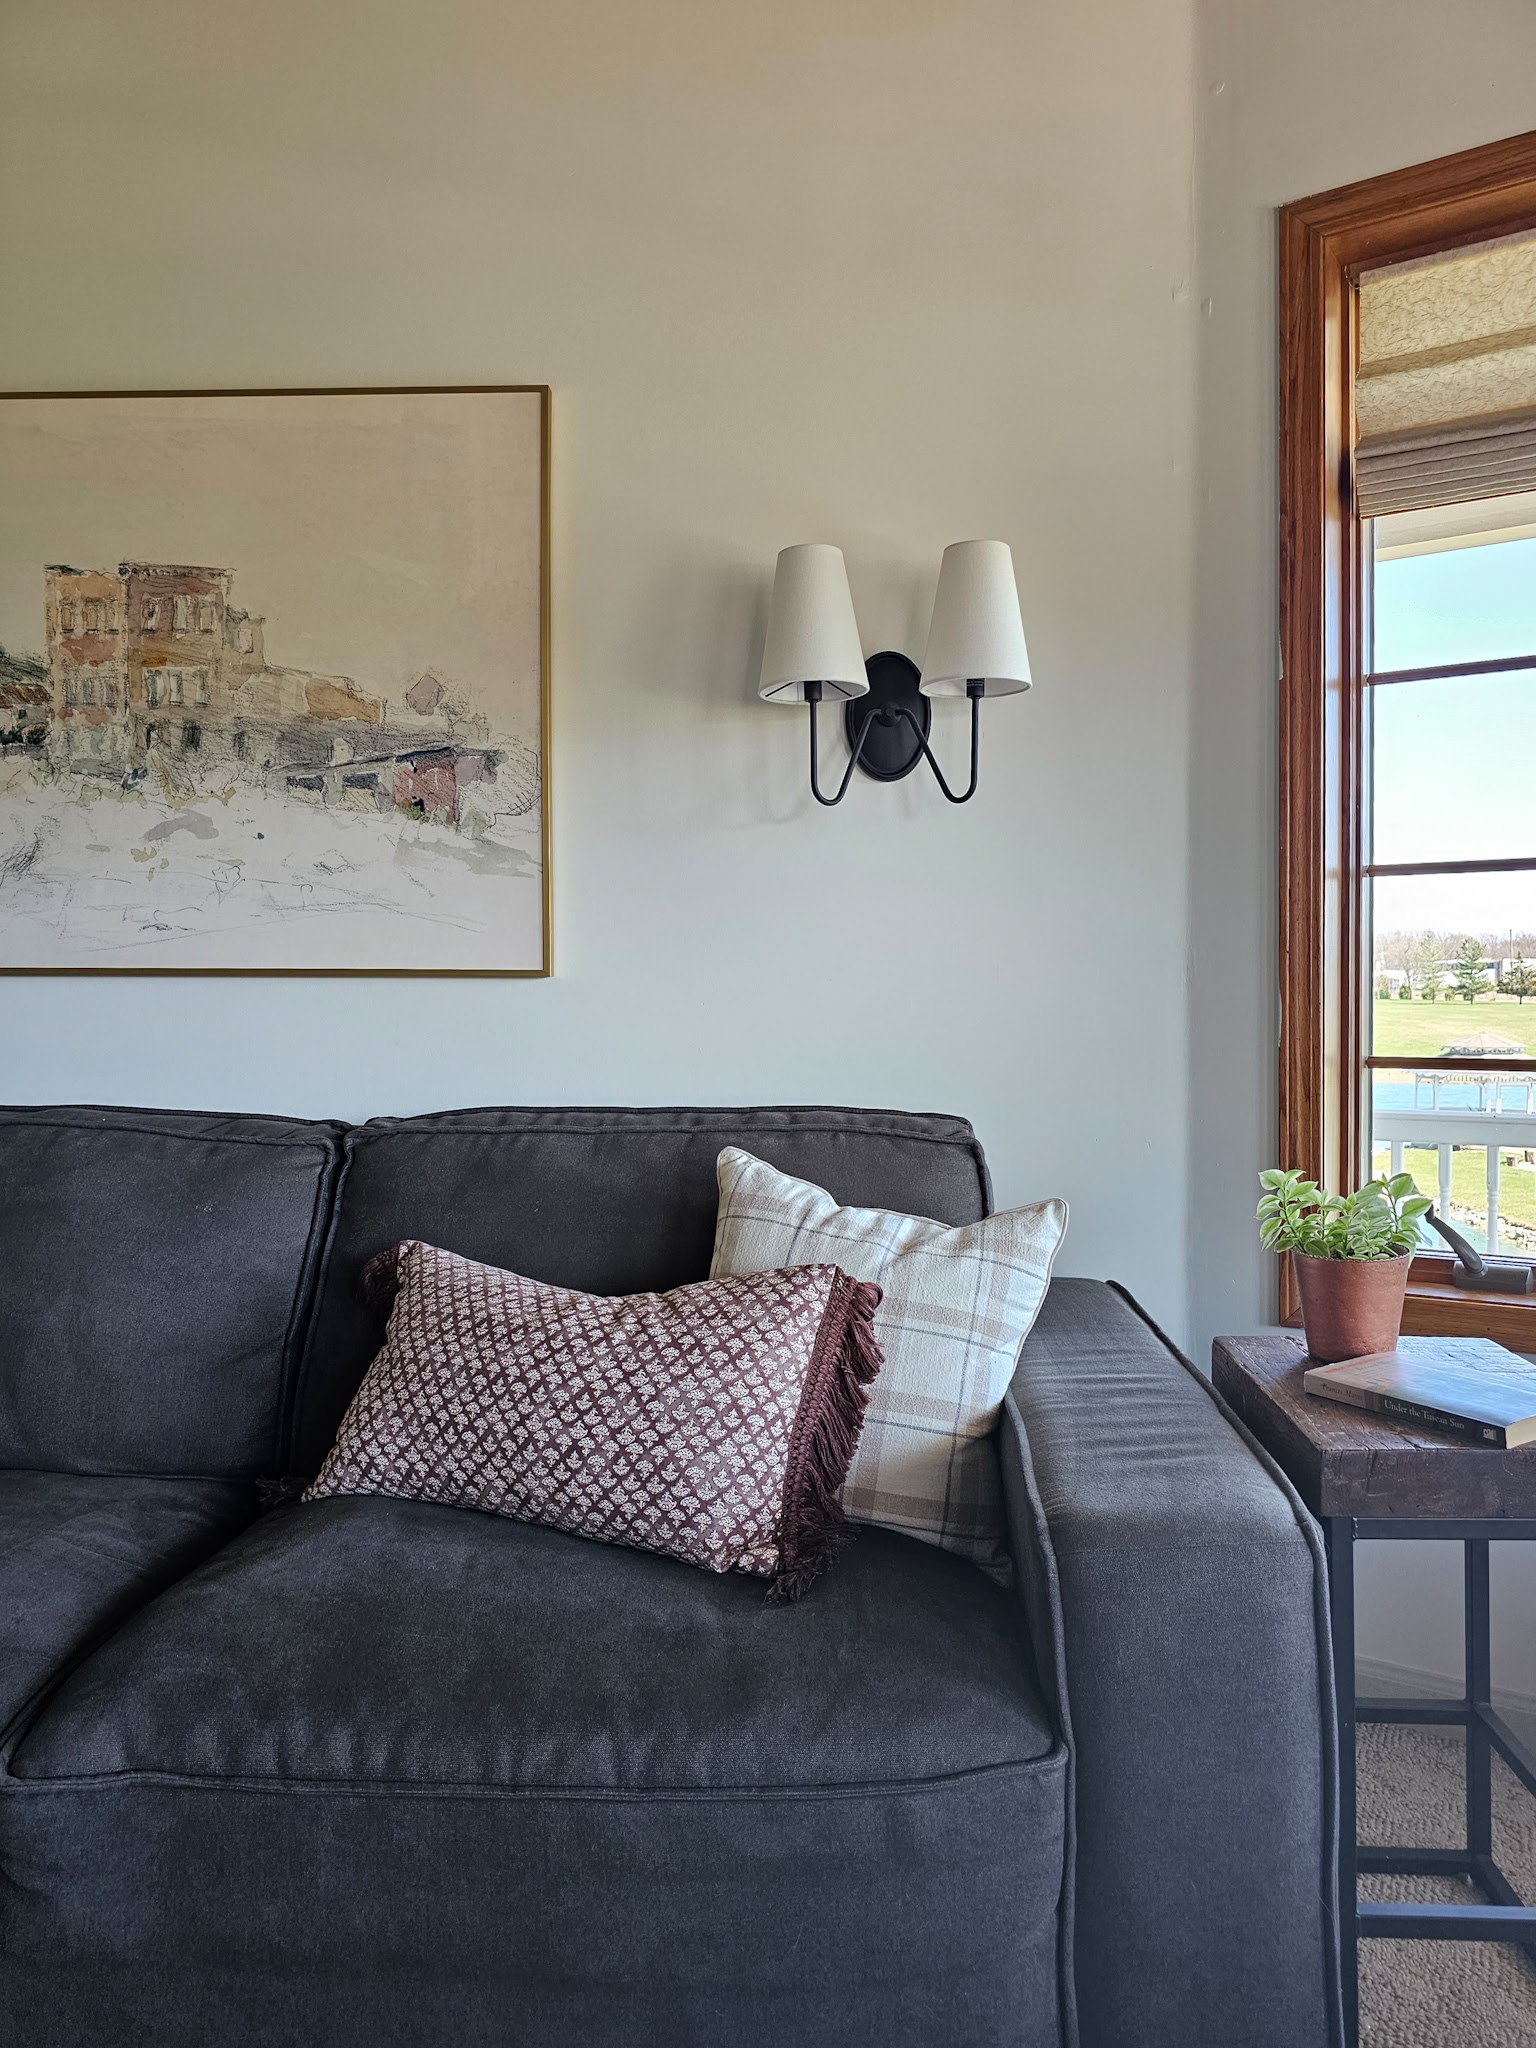
With the print in mind, I went a little bit crazy in Target and bought 13 different pillows to try out on the couch. I wanted to play off the colors in the artwork and chose patterned pillows with shades of green, taupe, and mauve. My vision was to have a mix of colors and patterns for a cozy, collected feel and I tried out numerous combinations before settling on these five.
Of the 13 pillows I bought, I’m only keeping 3. The large green pillow and small square pillow were actually two I already had – a reminder to always shop your own home first! A few new pillows gave a fresh feel to the ones I already have and I love how they all look together.
Because I was bringing in interest with the artwork and a mix of colored and patterned pillows, I wanted to keep the frame for the artwork pretty simple and streamlined. This gold frame from Frame It Easy was perfect for its understated elegance!
In the interest of full transparency, I received this frame from Frame It Easy in exchange for sharing on Instagram and providing them with photos for marketing. A blog post was not part of the contract, but I’m choosing to share about the frame and company here because I’m genuinely happy with the product and like how it looks in my living room.
Frame It Easy can create frames in whatever size you want – even if it’s super unconventional, like 14 5/8″ x 31 1/4″. I mentioned before that I wasn’t able to use the oversized prints Juniper Print Shop offers and that’s because none of their offered sizes fit the wall space in between the sconces like I wanted. I used painters tape to measure out different proportions and settled on 51″ x 34″ as my desired size. Frame It Easy asks you to put in the dimensions of your artwork and then creates a custom frame to fit. You can also upload your photo or artwork and have them print it, but due to the size of mine (and the file size given by Juniper) I had it printed locally.
Frame It Easy provided me with a link to share – if you’re interested in ordering, you can access their website through this link and you will automatically get 10% off your order, no additional code required! (I do not make a commission off of sales).
I originally used the acrylic cover that came with the frame, but because of the large bay window area in the room, there was SO much glare no matter what angle you were looking from. It really distracted from the artwork and I knew it would always bother me, so I removed the cover and am much happier with it now. I know I run the risk of my kids getting their fingerprints on the print but it felt like a risk worth taking to get to actually see all the details in the art without the glare.
I’m super happy with this wall in the living room and feel like it’s in a good place for now. It does make it pretty obvious though that the rest of the room still needs some work – as you can see from this view, the windows stick out like a sore thumb. Painting them is next on my list for this room!
It’s been four years since we first walked through our house and from the very first showing, I had a vision for our home office. The room had no permanent storage, but I envisioned built-in bookcases along one wall and was so glad to bring that vision to life back in 2020. We have SO much storage space now and today I wanted to take a look at all the ways I utilize different types of storage in this room.
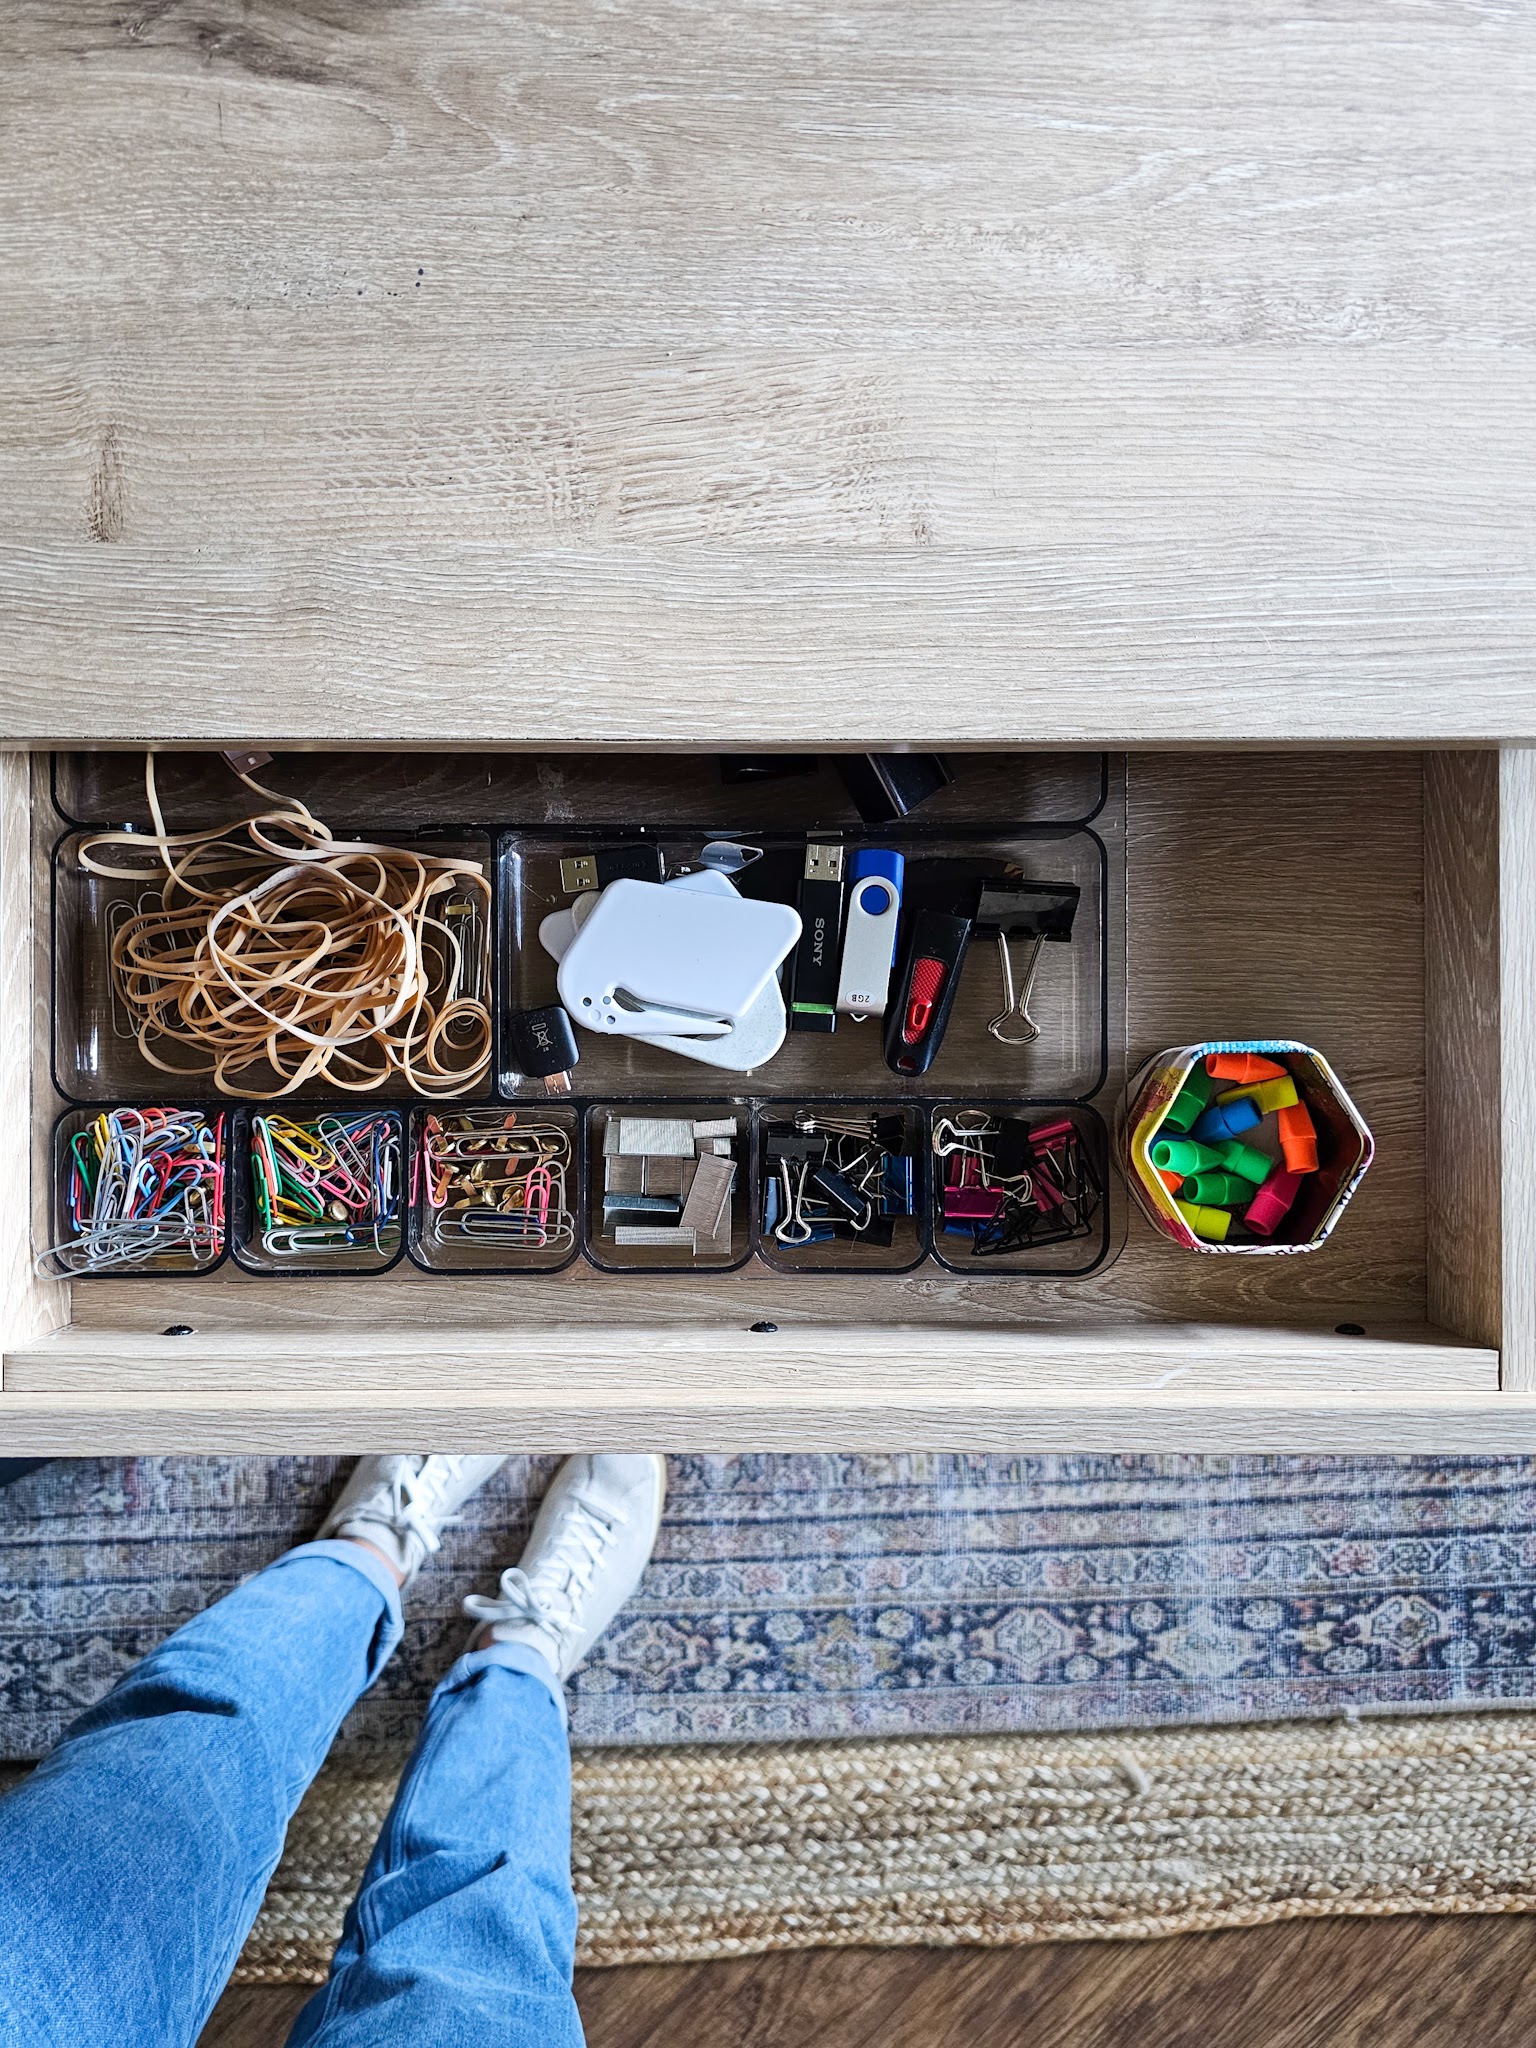
My desk has two small drawers that house basically what you would expect to find in a desk: notepads and sticky notes in one drawer and office-y bits and bobs (rubber bands, paper clips, binder clips, erasers, flash drives, etc) in the other. These are the things I’m often reaching for throughout the day as I work from home.
When designing the built-ins, I knew I had the option to do floor-to-ceiling bookshelves a la Beauty and the Beast, but I also knew that having some closed storage for my family was crucial. Utilizing cabinets on the bottom half was a game changer for our home’s organization!
I store typical office supplies like our printer, paper, notebooks, folders, and cords in the cabinets but they also house a lot of random things like construction paper and tubs of art supplies, my paint swatch decks and wallpaper samples, computer bags and tripods, and all of our family’s many, many games.
I originally wanted all the cabinets to have shelves and doors but we used Ikea cabinets and I couldn’t get a configuration to work in the allotted space. I had to pivot and include a set of drawers in the middle, which ultimately worked out better than all doors anyways! I love having a set of drawers to easily store things like my office backstock (rolls of tape, extra sticky notes and paperclips, etc), my stapler, all our batteries, command strips, envelopes, labels, etc. I’m so thankful for the drawers!
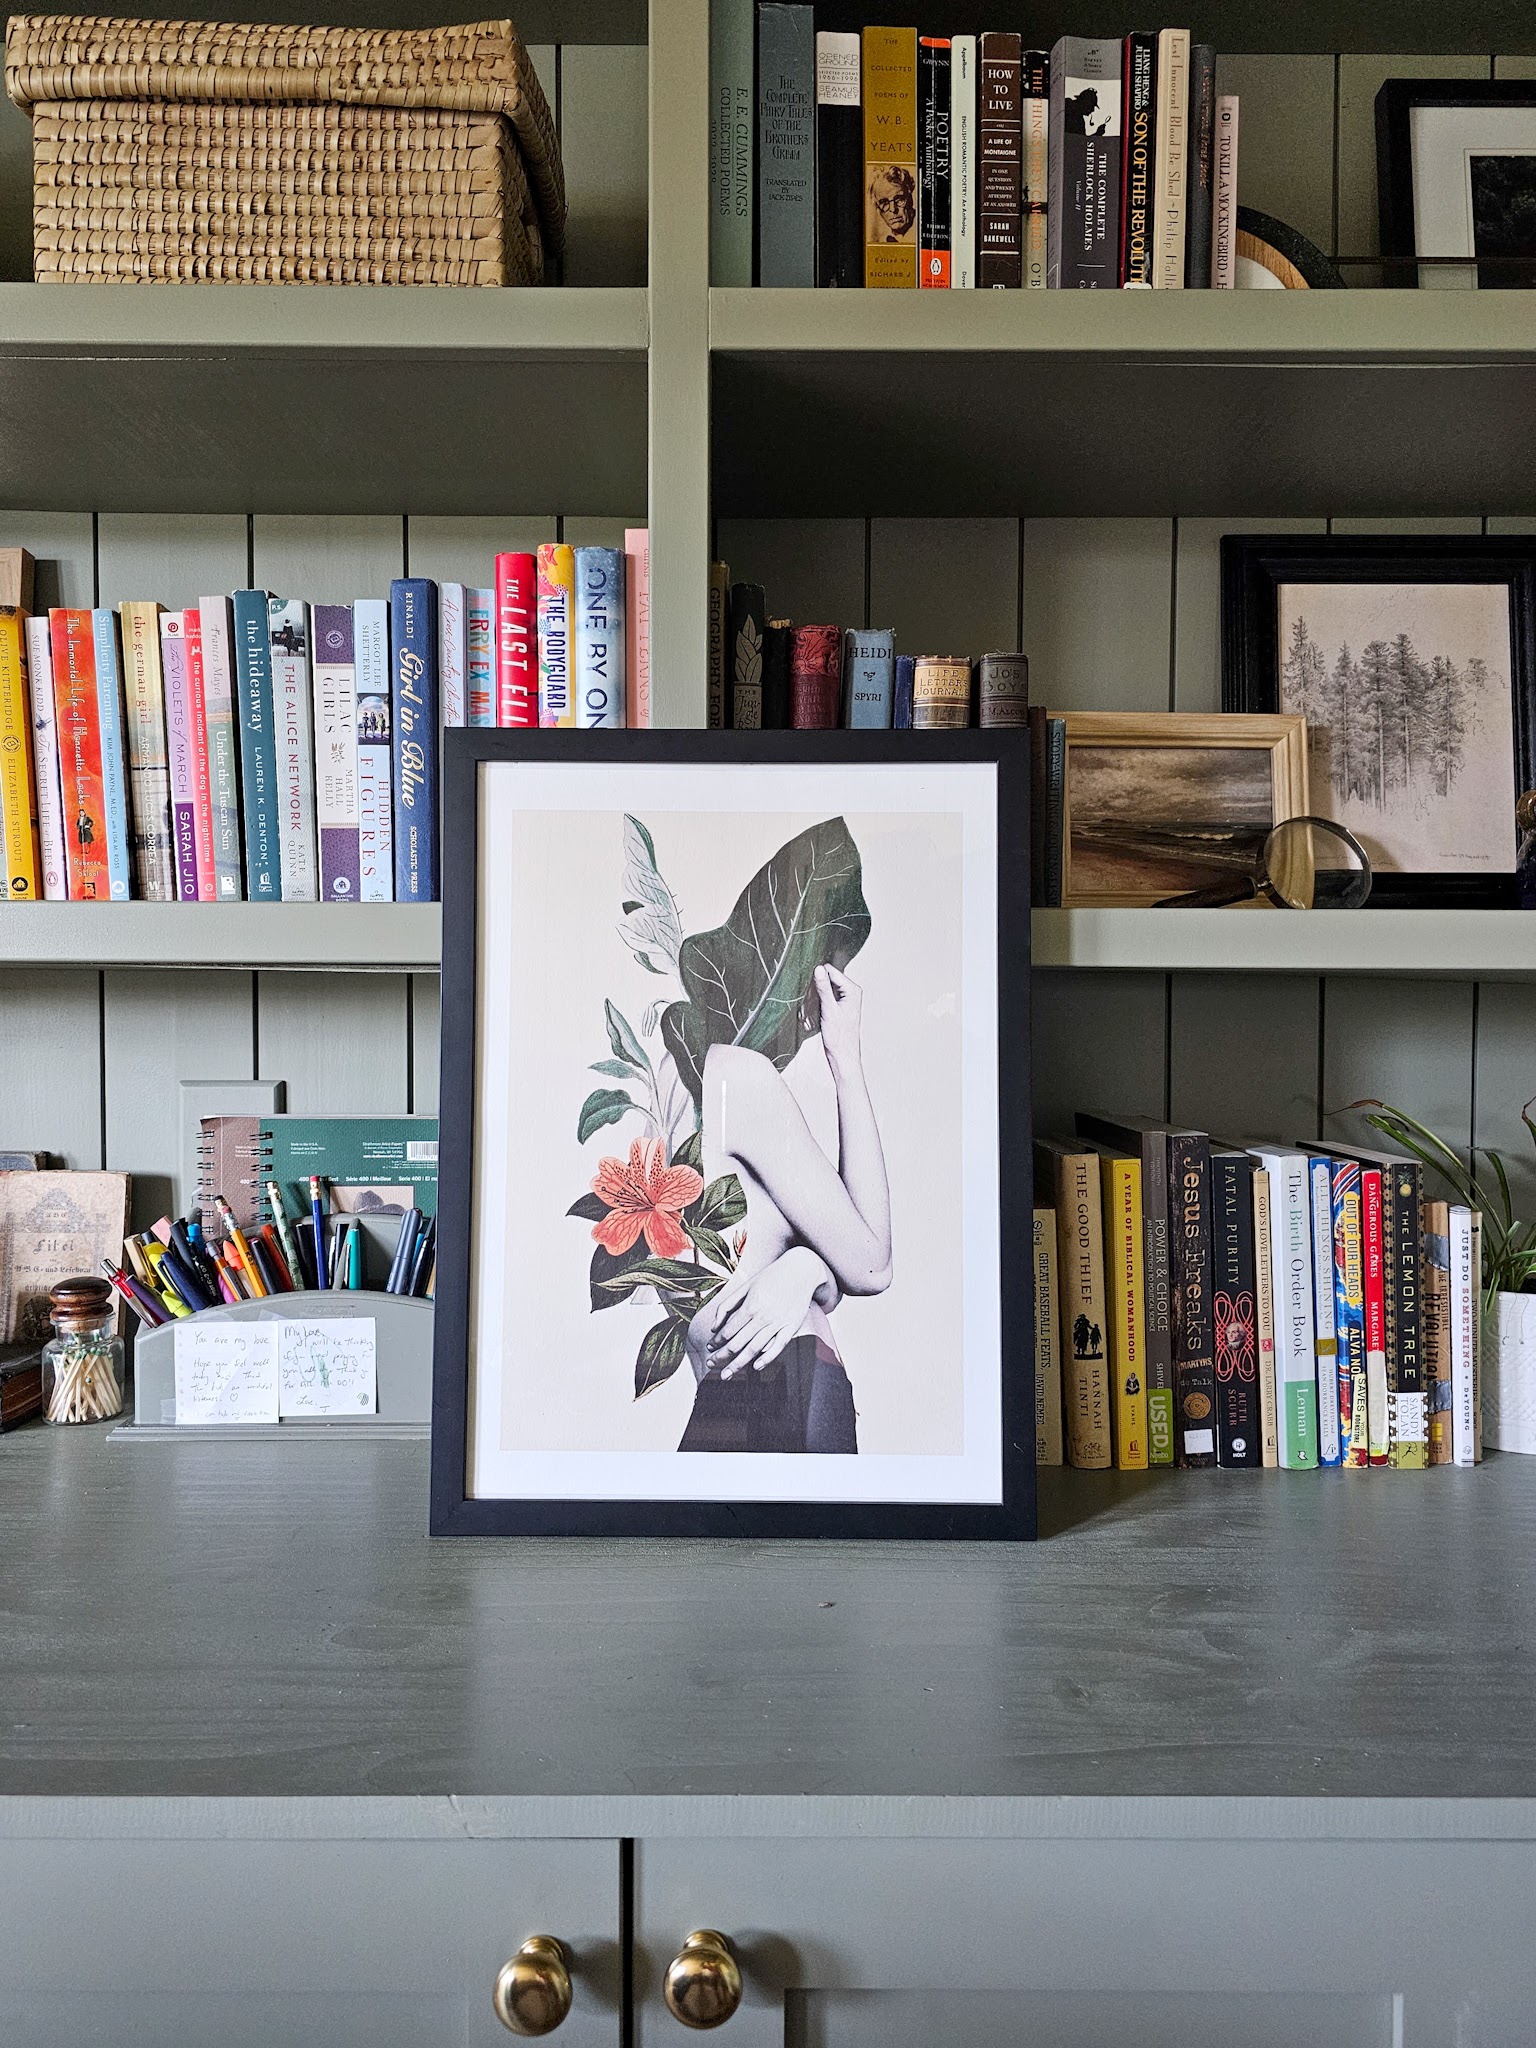
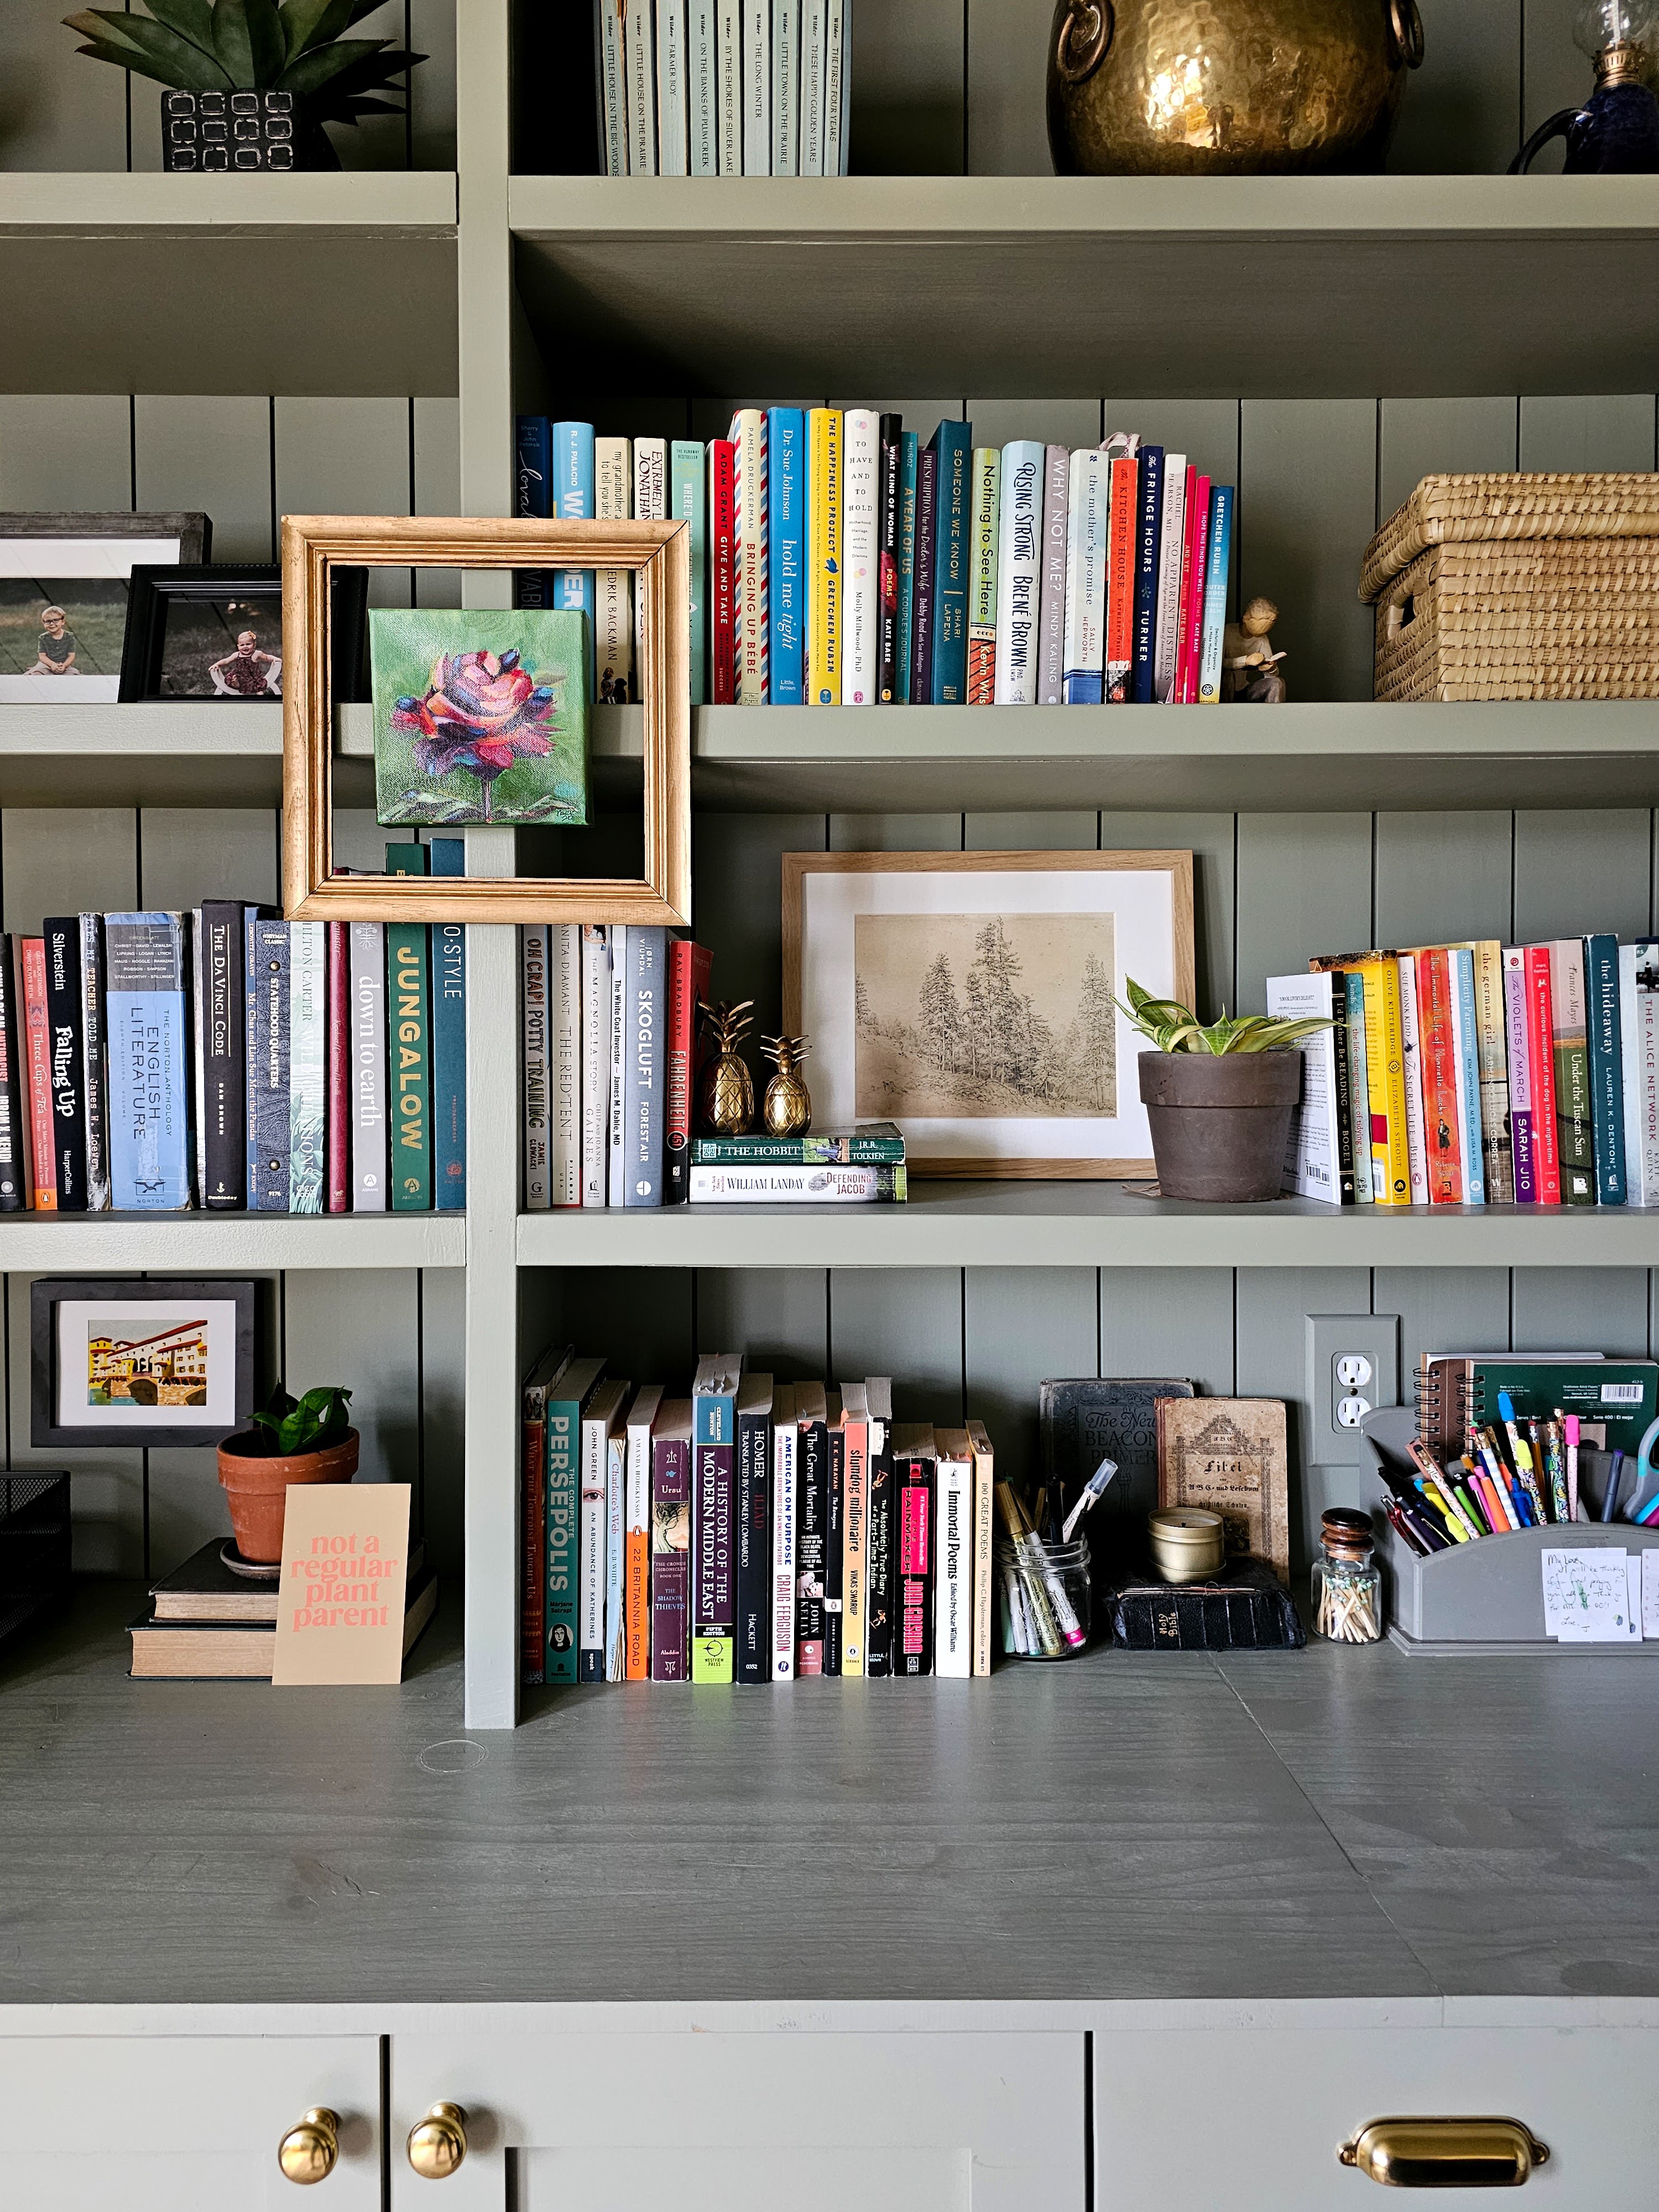
In addition to holding all my books, I also wanted to utilize the open shelves for beautiful and functional storage. Some items, like my spare buttons and calligraphy utensils, are stored in simple glass jars and are out on display. I have a little utensil holder for easy access to all my pens, pencils, and a few notebooks and also have black stacked paper holders to house school papers.
For not-so-display-worthy items, I rely on storage boxes.
I have all my permanent markers hidden in this pretty white box out of the reach of little hands. It’s stacked on top of another, larger box filled with all my sewing supplies.
This woven basket box houses all the greeting cards I have on hand. Several years ago I made some simple dividers to categorize the stash and they make it so easy to grab a card for the right occasion!
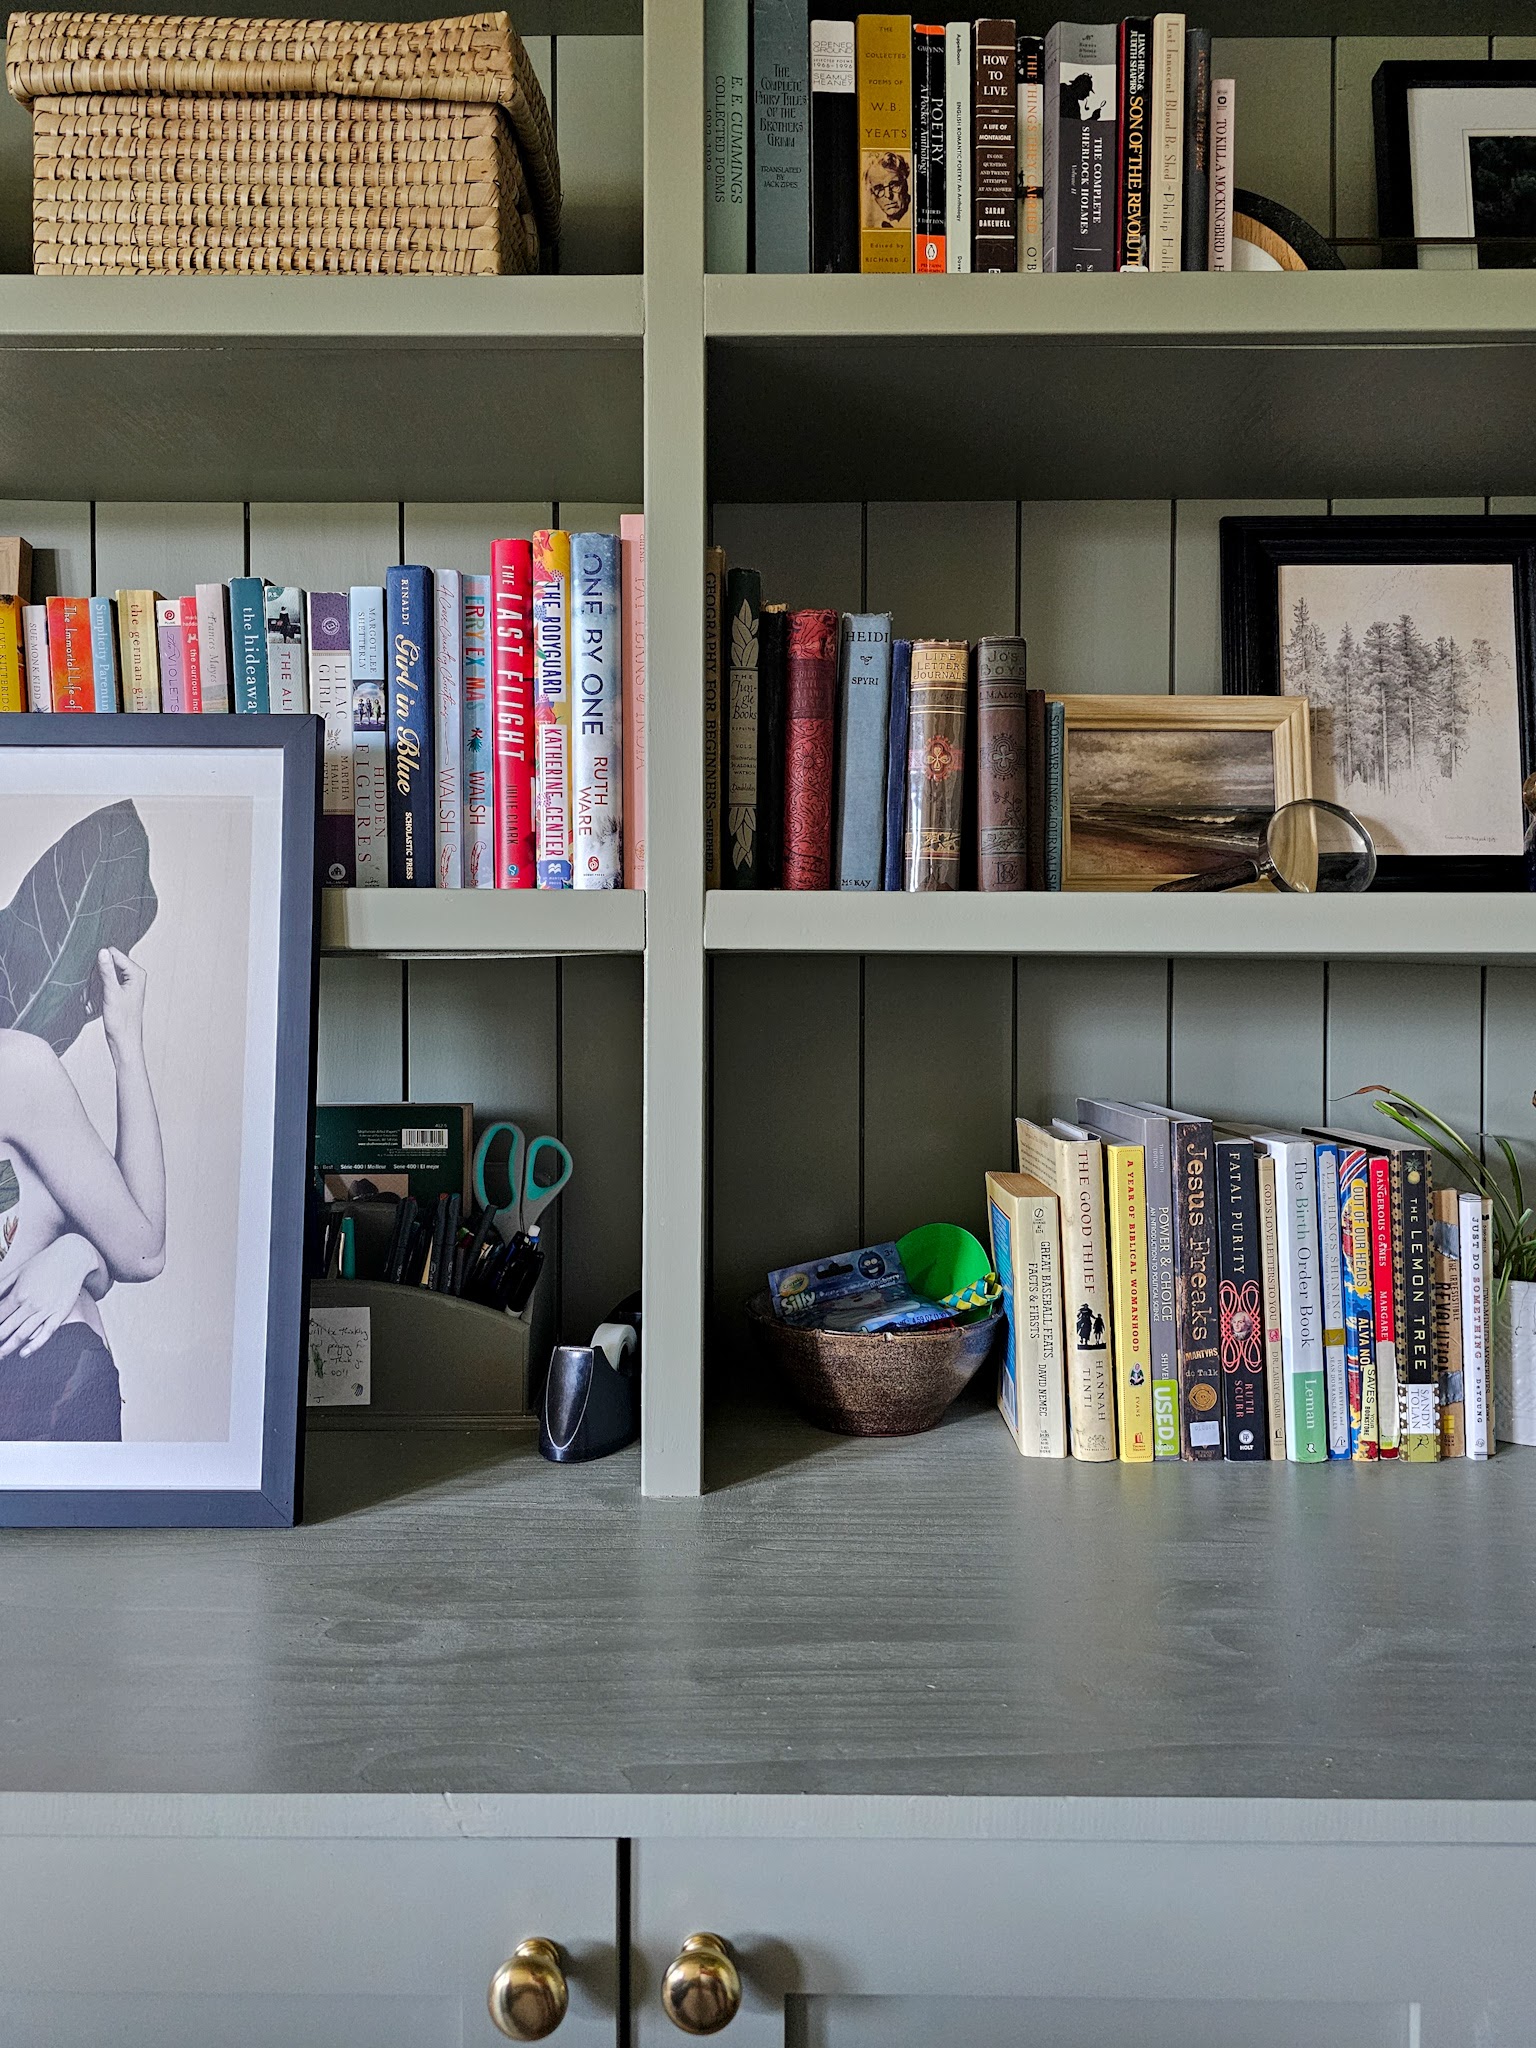
I also have some sneaky hidden storage. Tucked behind a large art print are utilitarian things like scissors and a tape dispenser, plus a pottery bowl filled with the little knick-knacks my kids pick up as birthday party favors, arcade game prizes, school holiday toys, etc.
These trinkets cause SO much clutter in my house; my kids bring them home and love playing with them for a few days, then lose interest and my house is littered with tiny toys. When that happens, I just quietly pick them up and dump them in this bowl. I can still “find” them if my kids ask or start to look for them, but they’re also out of sight, out of mind, and my kids usually end up forgetting about them.
Once the bowl gets full, I donate the trinkets to LJ’s previous preschool teacher to use in her prize box so they can have new life in someone else’s house. 😉 For the record, my kids almost never look for the toys after I put them in the bowl – easy come, easy go!
It’s hard to imagine our home without the office now. It’s such a great space for keeping our things stored and organized, which allows the rest of the house to stay streamlined with way less clutter around. It’s an all-star of a room for sure!
About six weeks or so ago, Justin and I completed a DIY Lego table for our kids. It has been a big hit with our children, particularly LJ, and has already gotten a ton of use. I knew when we completed the table that I needed to also address the storage for all the excess Legos and the past six weeks have made that even more evident. I finally took some time yesterday afternoon to organize our stash and I can’t believe the huge difference it made!
We had been working with a hodgepodge of storage bins: bright blue divided bins from when Justin was a kid, random clear bins from around our house, and white narrow bins I originally bought for the Legos. I totally blanked on taking a before picture, but I took a video of my organizing process and grabbed this screenshot from the beginning to give you an idea of the chaotic storage situation.
It took me a long time to find bins that would work for my purposes. I wanted lidded, stackable bins that were somewhat cute since they will always be out and visible. Size-wise, I didn’t want them to be too tall, since we don’t want a deep pile of Legos inside, but they needed to be tall enough to fit some type of divider. I also did NOT want them to be clear, which ended up being the hardest requirement! A lot of bins fit all my other parameters but were clear; I specifically did not want clear because when the Legos are put away, I want them to be somewhat discreet. The whole purpose of the Lego table was to corral Lego creations and keep tiny pieces up off the floor, away from little ones. By having opaque bins, I figured they’d be less enticing for curious little hands. Whenever babies or toddlers are in the basement, there is always adult supervision but I figured any extra help to keep them uninterested in the Lego space is going to be beneficial.
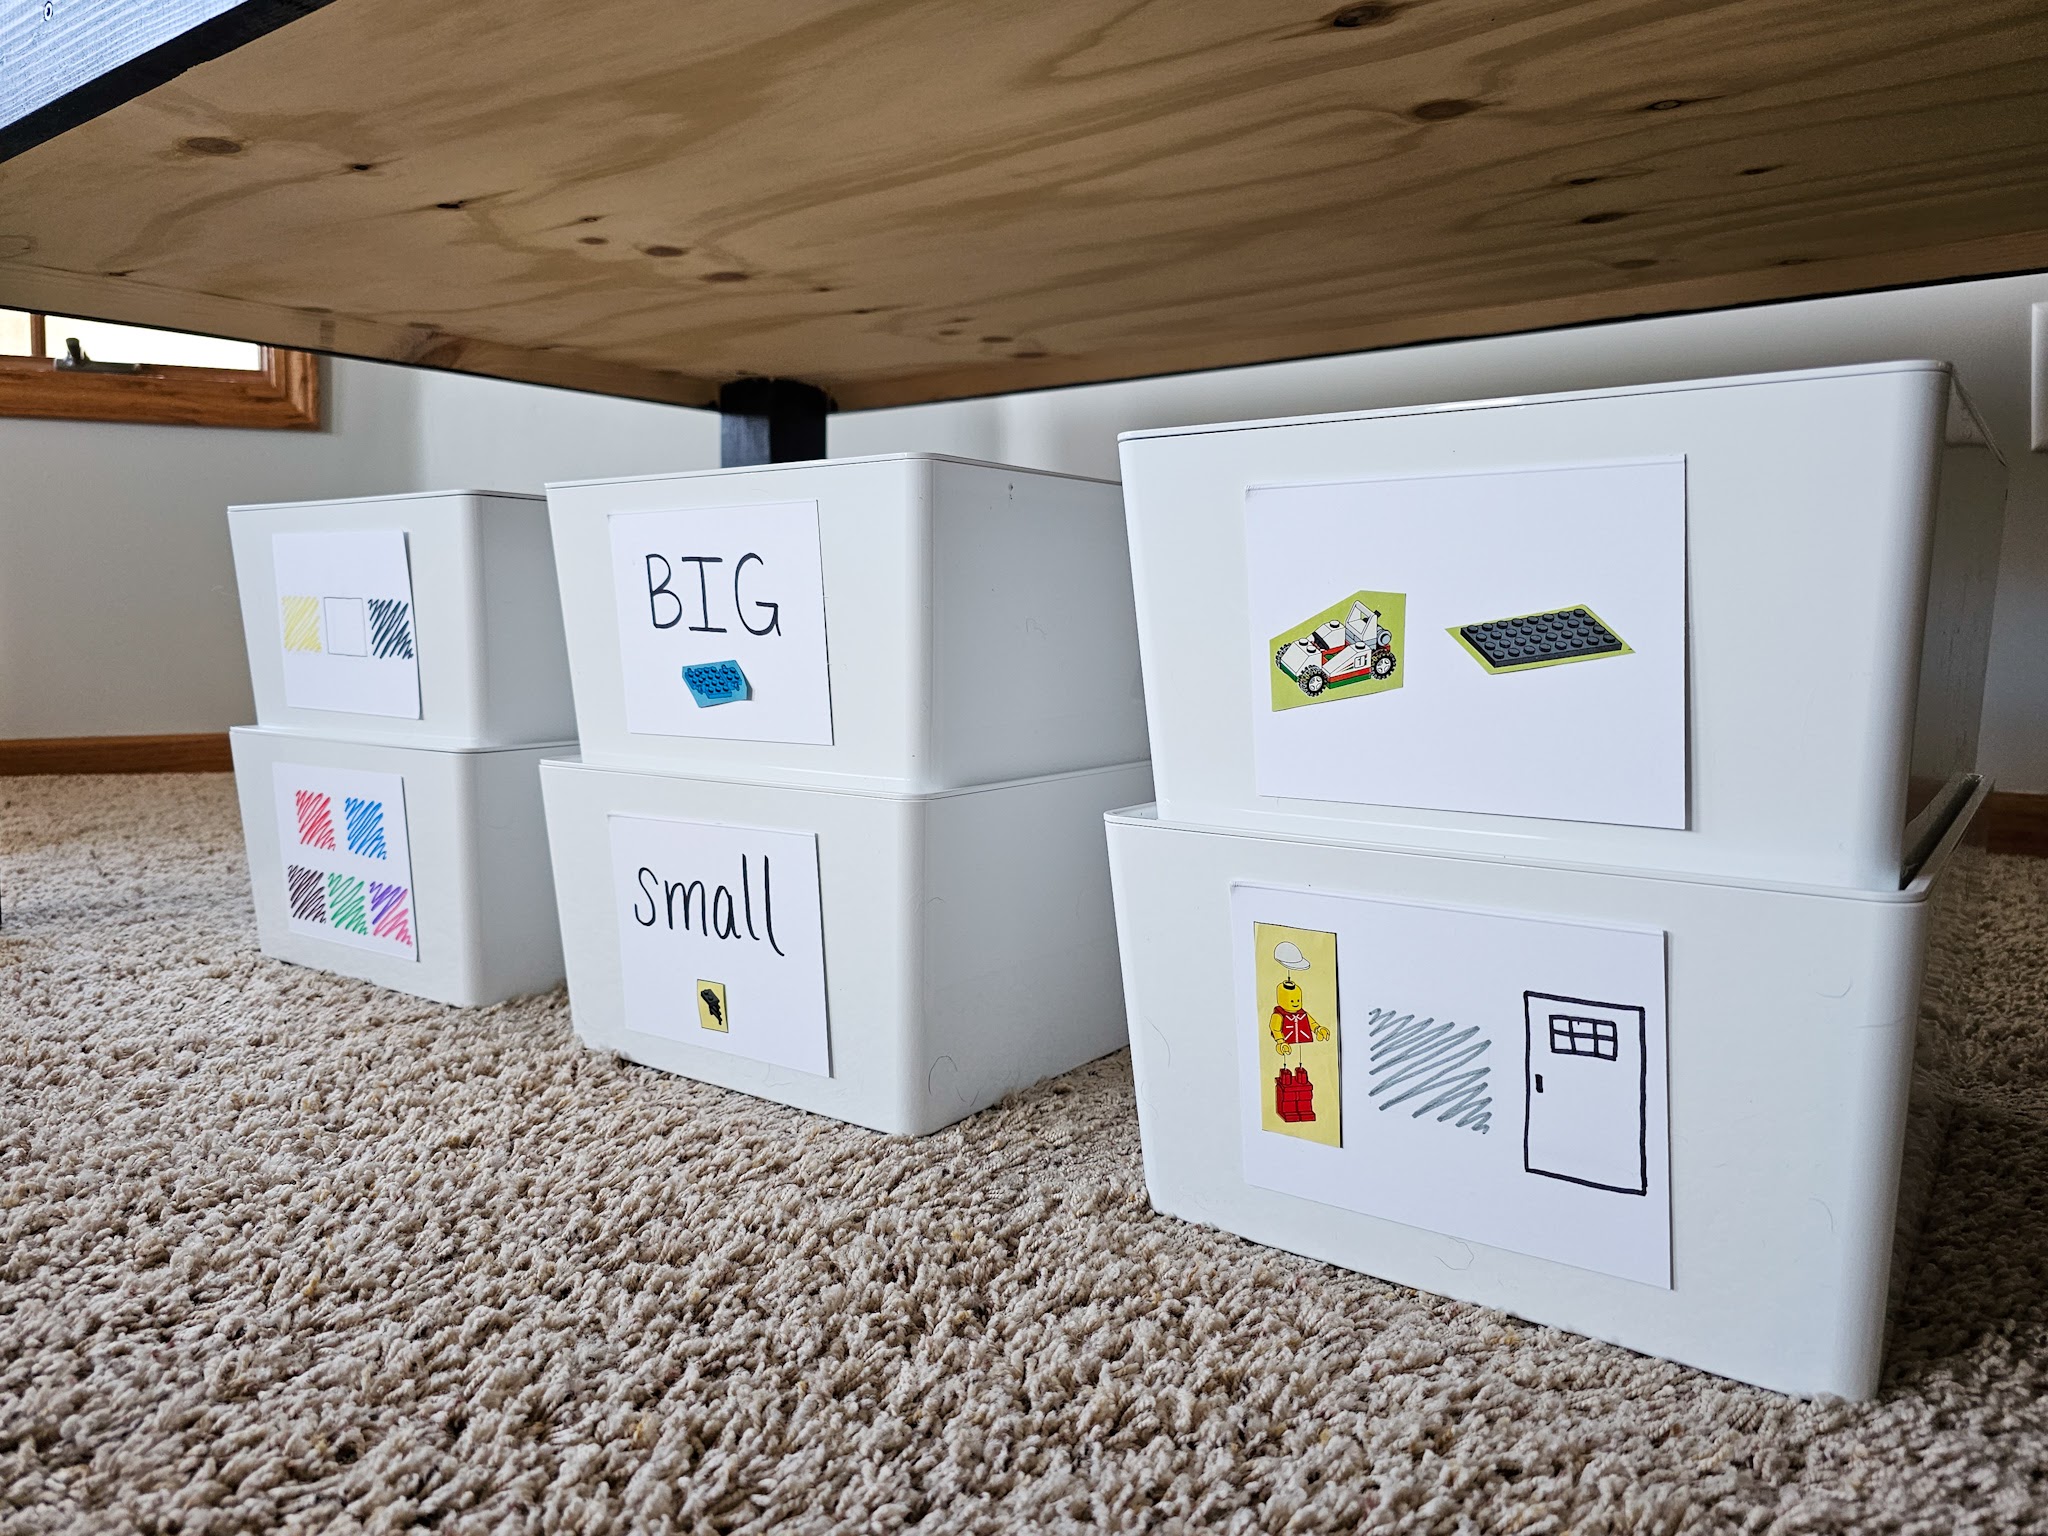
I thought I had hit the jackpot with these cute white bins, but I didn’t factor in the inset lids and bottoms – these plastic dividers fit inside but were slightly too tall to allow the bins to stack with the inset. I kept searching and finally landed on these Ikea bins – they were a little taller than I would have liked but they fit all other requirements so I decided to go for it. I chose the Kuggis in 10.25″ x 13.75″ x 6″ size.
I wanted adjustable dividers to customize sections based on the amount of Legos in that category. These plastic dividers were perfect! The length fit perfectly inside the Ikea bin; to adjust the size to fit the width of the bin, I just bent the divider back and forth at whatever length I needed. Sometimes it broke just with bending, other times the bend helped weaken the plastic and I could cut it with a scissors easily. I also used the scissors to trim off any sharp edge of plastic to keep edges smooth and safe for the kids.
I have no grand illusions of this staying perfectly organized, so I didn’t stress out too much over categories. I just tried to divide things in a general way that would make pieces easier to find. LJ’s exact words were “Mom, this looks so much better!”
My kids can’t read yet so I kept bin labels simple. I used cardstock, markers, and a few cutouts from an old Lego instruction book to remind them what was in each bin.
LJ could tell right away what each picture meant, so mission accomplished! Justin and I did decide on two catch-all bins of all the “weird” pieces that don’t really fit any category and we divided them into a big piece bin and a small piece bin; the former teacher in me loves the chance for them to start to recognize those simple words as they play!
I’m super happy with the result of this quick organization. It was such an easy way to *ahem* . . . simplify the chaos. 😉 And honestly, even if the divided categories don’t end up lasting and all the Legos end up in piles in the bins, I’m satisfied knowing the storage bins will continue to hold up and keep things discreetly contained for years to come.
This mid-afternoon blog post is brought to you by Daylight Savings Time, which I am blaming for being sleep-deprived this morning and not hitting “publish” like I thought I had.So Happy Monday afternoon!
The longer we have lived in this house, the more I feel like I’ve honed in on a specific vision for it. I’m so glad we didn’t do major renovations when we first moved in; living here has shown me how we actually need certain spaces to function and that has completely changed my mind on some ideas I had when we first bought the home. As I’ve spent nearly four years tackling smaller renovations room by room, I’ve cultivated spaces that feel right for our family and it’s been really gratifying to see those spaces now work together throughout the house like pieces to puzzle.
That being said, I have been feeling like some of my earliest projects don’t quite fit that puzzle very well. These renovations happened so early on that I didn’t necessarily have the “whole house vision” in mind and now that I do, I’m wanting to go back in and re-address some things. There’s one space in particular I’ve been thinking about a lot lately and feel ready to tackle: our guest suite!
When we first moved into our house, the guest suite immediately rose to the top of the project list. Technically, it couldn’t be considered a bedroom at the time because there was no window, but I immediately saw the potential. We hired a contractor to put in a window, strip the wallpaper, and demo the en suite bathroom – you can catch up on the initial renovation in previous posts (click here for the bedroom and here for the bathroom).
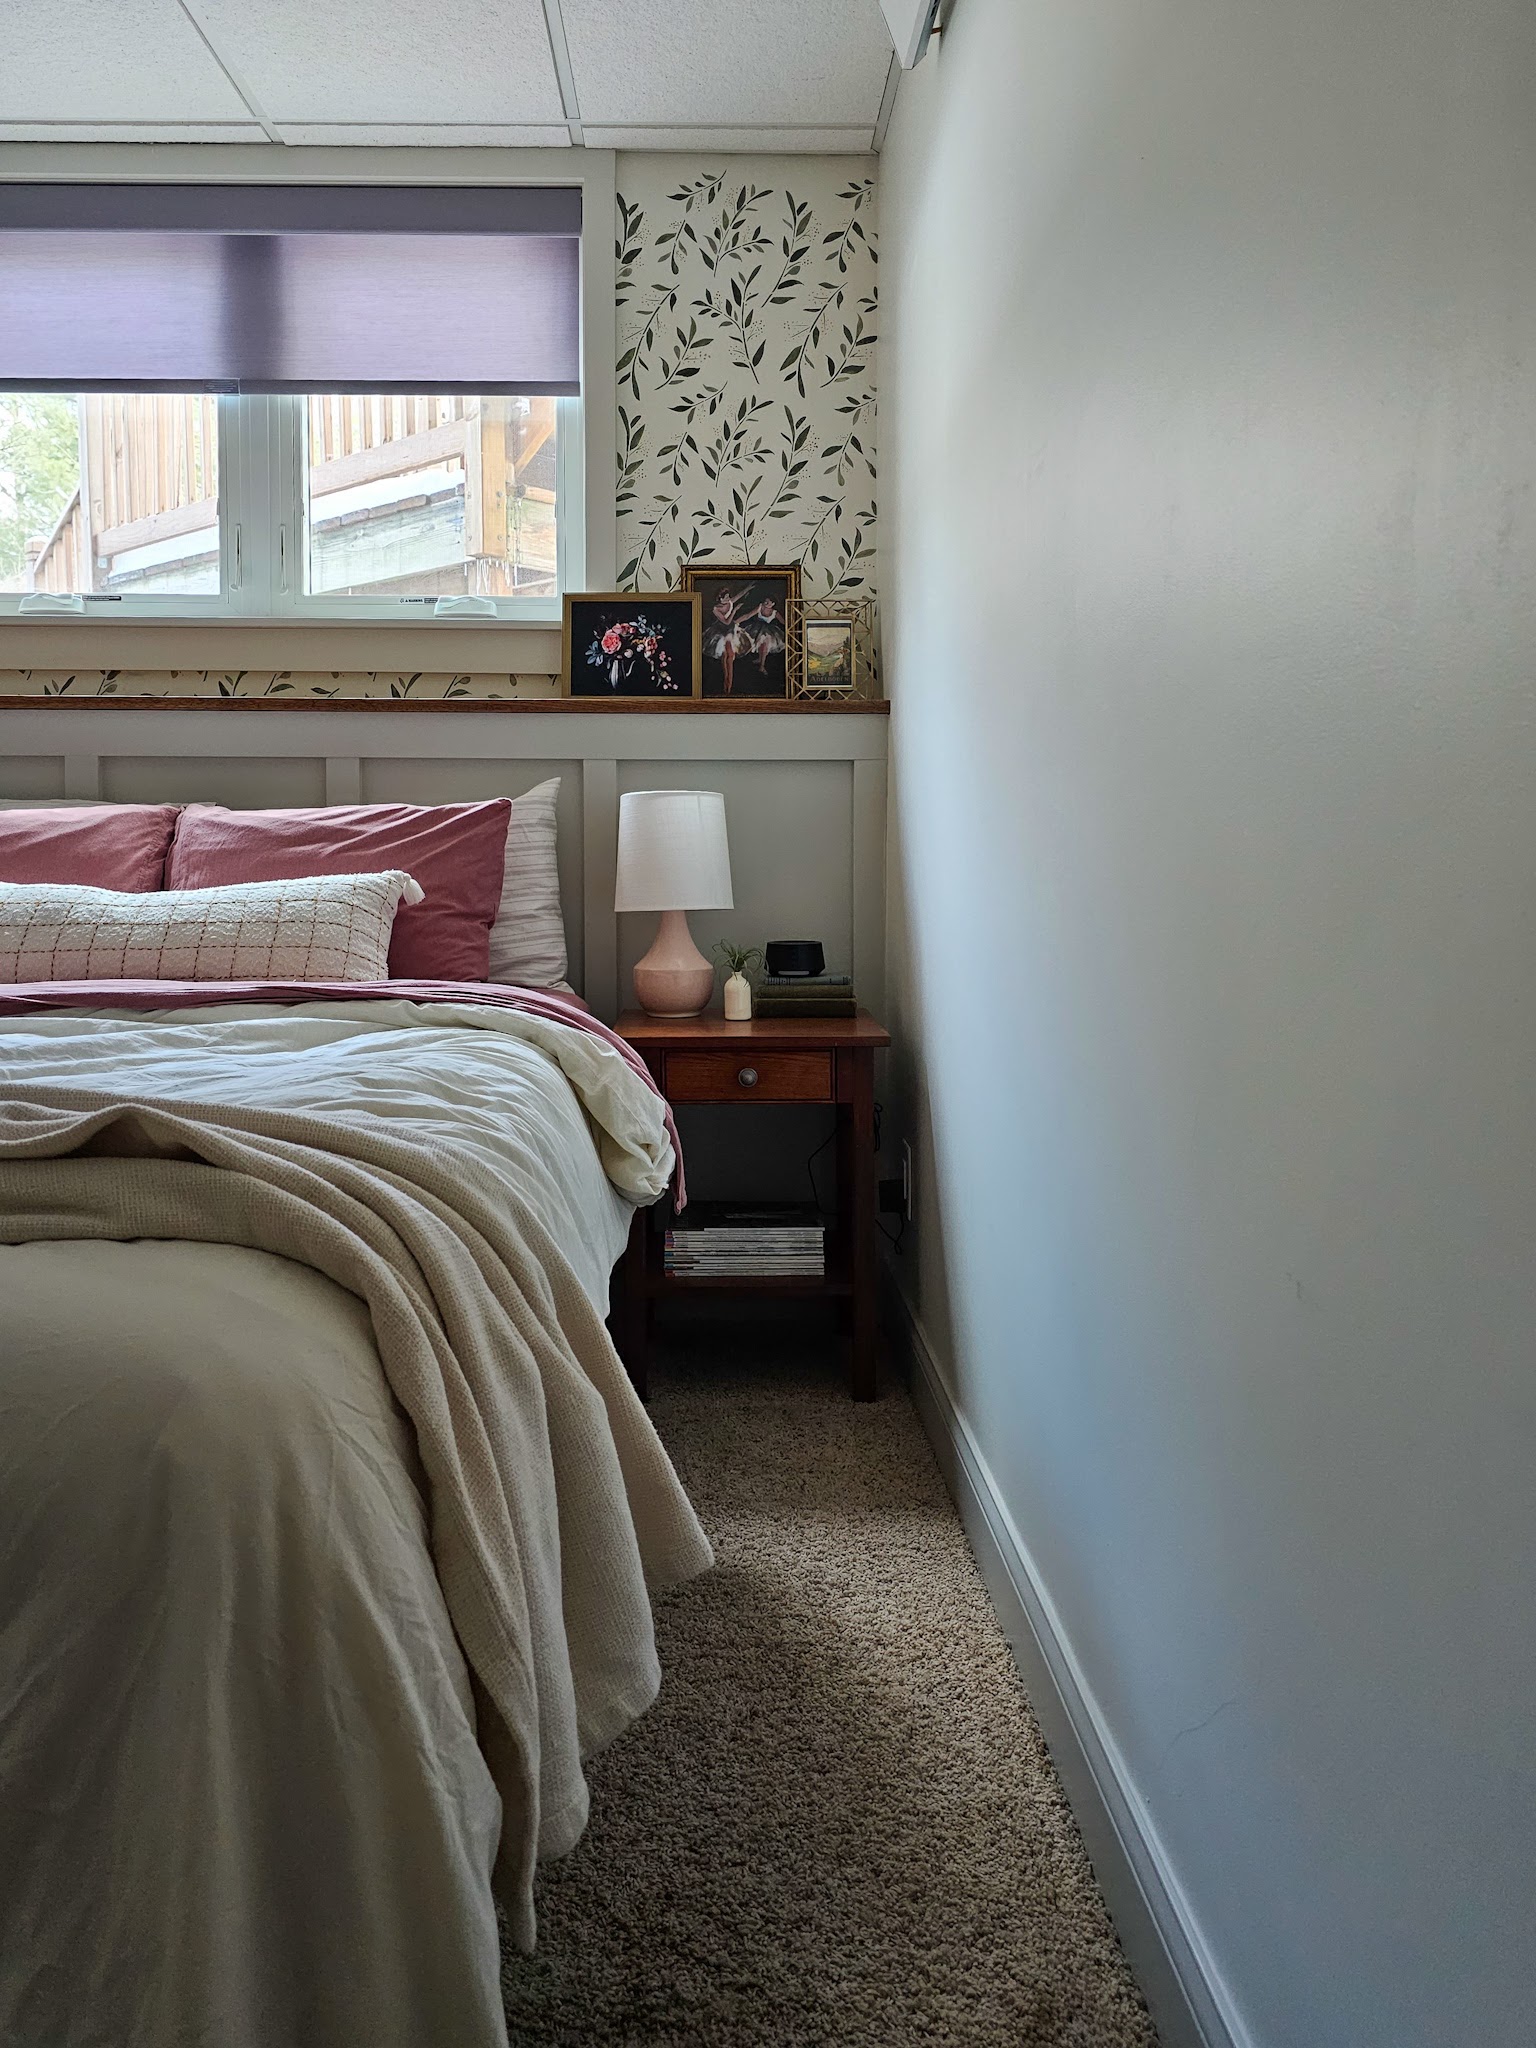
We initially finished the guest suite in early 2020 – just in time for a global pandemic and a very long pause on hosting guests. Ha! Eventually, I decided I wanted to add a bit of interest to the plain white walls and started a botanical wallpaper look using paint and a stencil. It was fairly labor intensive and I wasn’t sure I wanted to go all the way around the room so I paused after two walls. Along the way I also updated the bed and bedding and swapped out the nightstands for the ones from Justin and my bedroom (I still love all those changes!)
I recently had some inspiration for the guest suite that I think is going to make it make so much more sense with the rest of the house – it gave me that excited, adrenaline feeling in my gut that made me know this is the right direction to take the room! Here’s what I am going to be addressing:
1. Finishing the Faux Wallpaper. I do want to complete the wallpaper look all the way around the room and I’m going for it. I know that it will be time consuming, but I truly believe it will be worth it!
2. Paint the trim + doors + built-ins dark. Initially, I chose white walls and a light greige contrast trim because I thought it would help brighten the fairly dark room (the window is partially shaded by our back deck and with that + the angle of the house compared to the path of the sun, it never receives direct, bright sunlight). Now I have more confidence in leaning into the natural shadowiness of the bedroom and I want to go dark green on the trim. The goal is a cozy, moody retreat!
3. Finally update the ceiling light! The last remining boob light (if you know, you know) in our home has numbered days and I cannot wait to see it go.
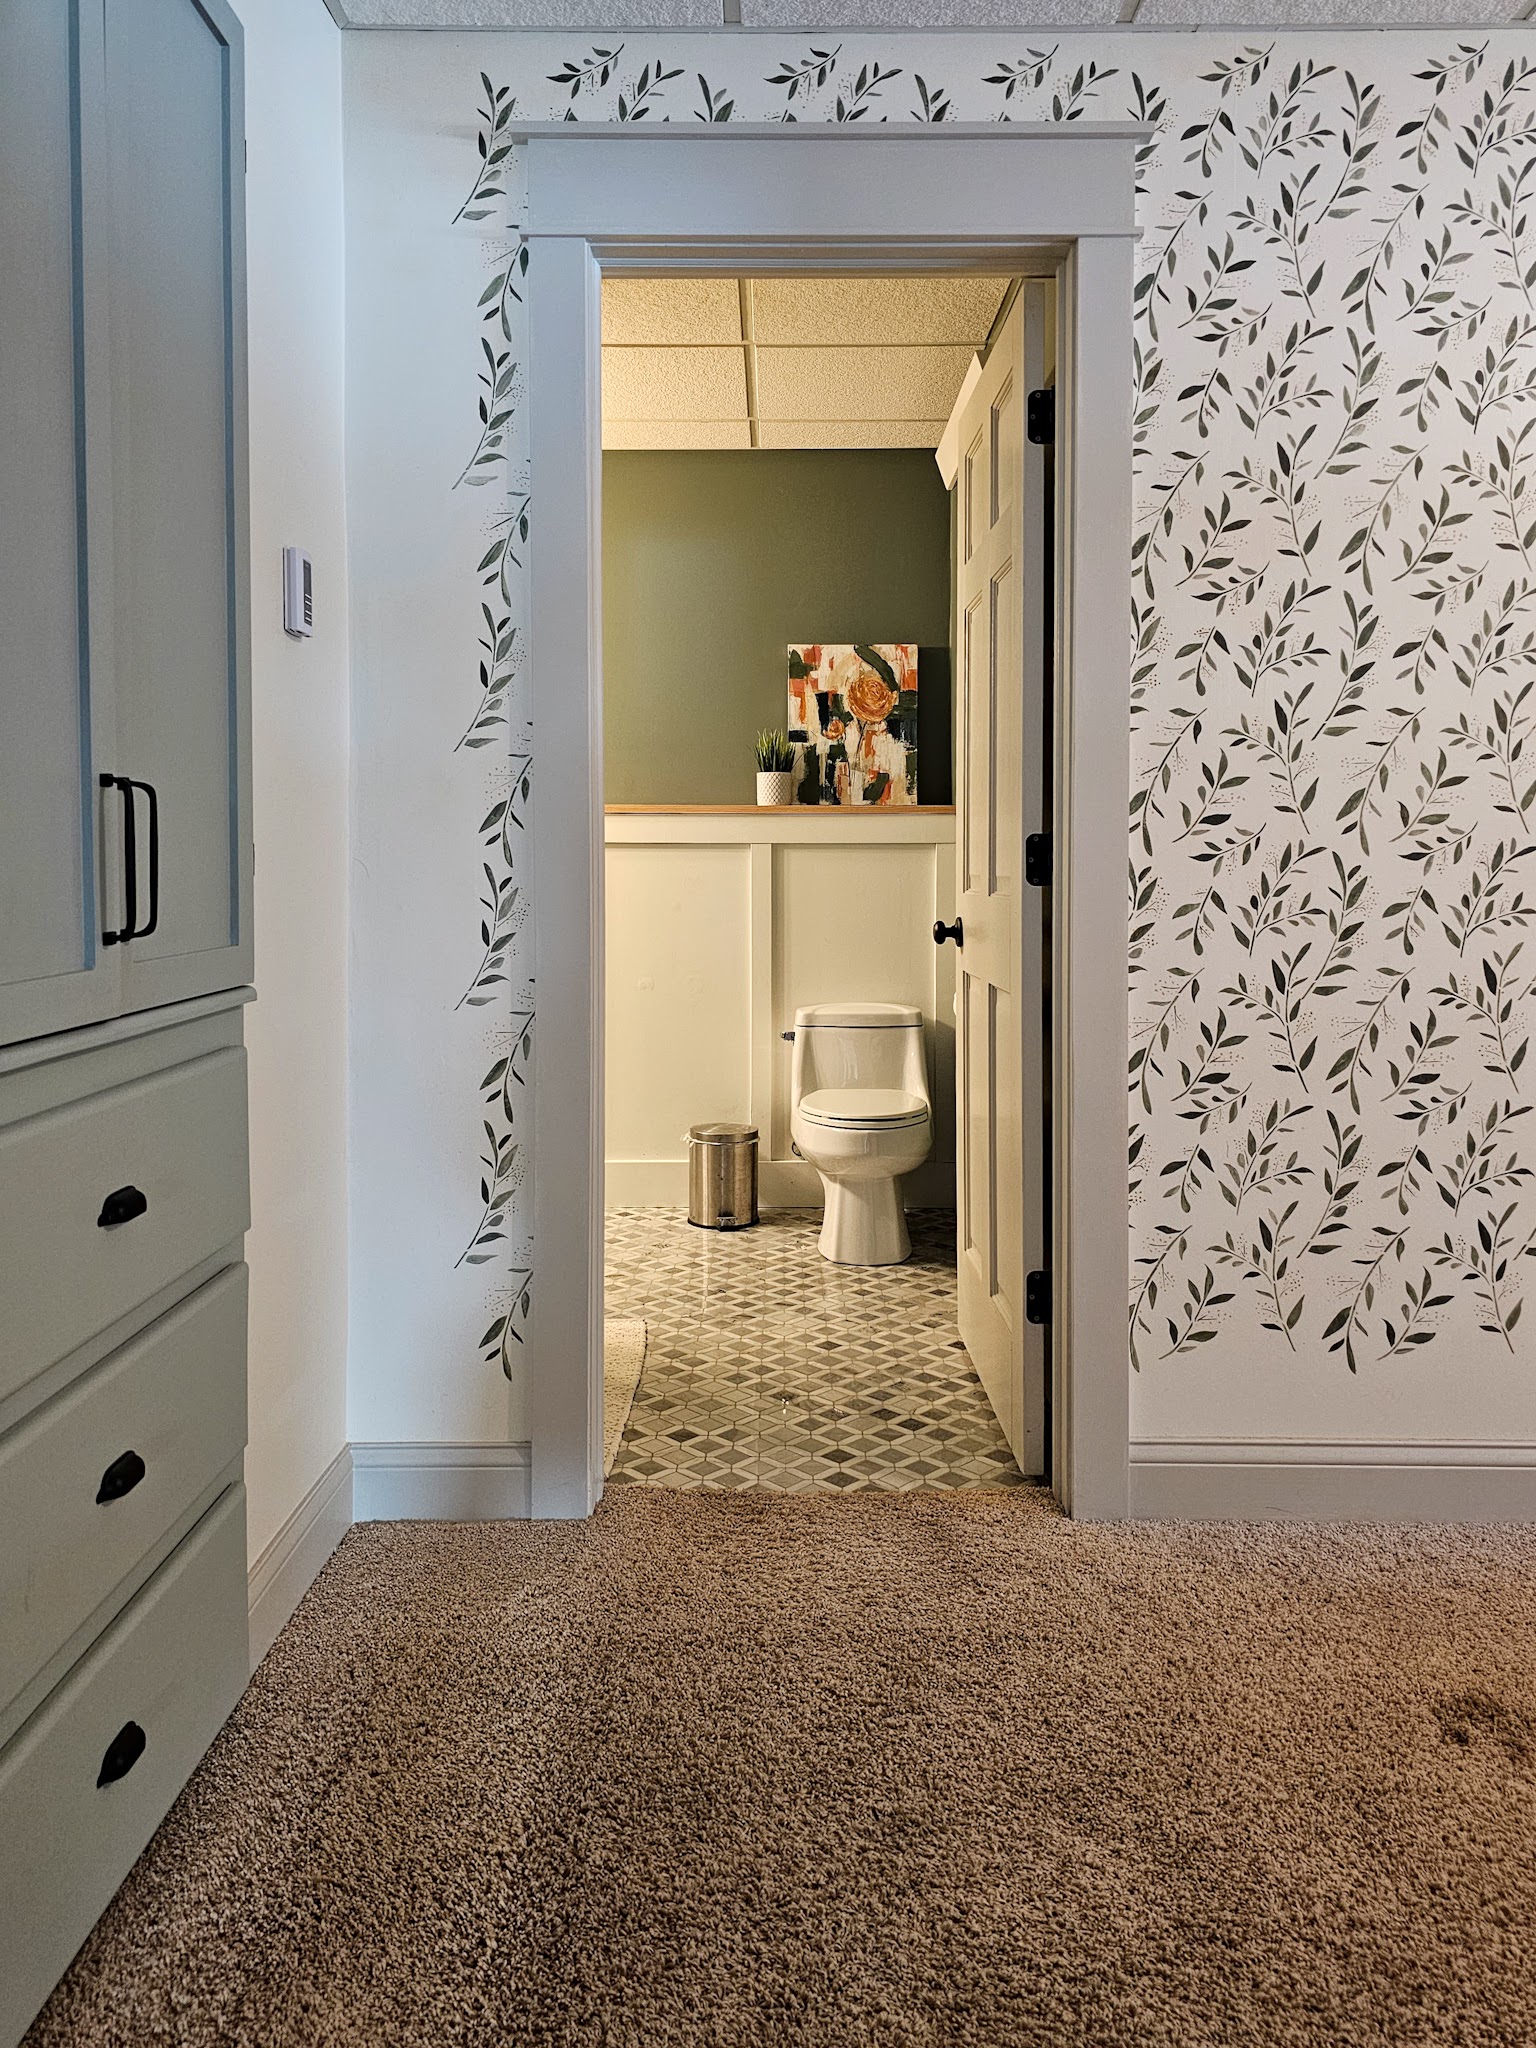
4. Repaint the en suite bathroom. With the wallpaper going on every wall in the bedroom and the trim going dark green, I think I’ll need to change the guest bathroom color. I am currently leaning towards a pink and again, it’s giving me that adrenaline feeling of being nervous for a dramatic change but also excited because I think it’s the right call.
5. Replace the carpet. We are finally ready to get new carpet in the works throughout the whole basement. The current carpet is very worn, stained, pulling up in places, and just very much in need of being replaced. I do want to replace with another carpet because a) our basement gets very cold and carpet is such an easy way to keep it warm and cozy and b) this is a big rec space/entertaining space for kids and carpet makes more sense to me for kids to play on.
I’m starting this week on the wallpaper stencil – you can follow along on Instagram for the play-by-play!
Over the past week, I’ve been working to remove the paint from the kids’ shared dresser and restore it to a natural wood finish. It all came together yesterday and to say I’m in love is putting it mildly!
Before
After
Somewhere between 7-8 years ago, Justin and I bought this vintage midcentury dresser on Facebook Marketplace for $30. It had signs of wear and tear and the easiest solution at the time was to paint it, so I chose a mid-tone blue and gave it a little upgrade. It has lived happily as a kid dresser for the past 5.5 years (even serving as a changing table when LJ was younger) and is still one of my favorite thrifted finds to date.
I recently completed the mountain mural accent wall in the kids’ shared bedroom, and when I got everything back in place, things didn’t feel quite right. It seemed like a lot of painted surfaces: painted walls, painted trim, painted door, painted dresser. It also felt really heavily blue! I knew I needed to bring in some natural elements and decided to try to strip the paint off of the dresser. I had never attempted this before but figured worst case scenario would be I could just repaint it in a different color if stripping didn’t work.
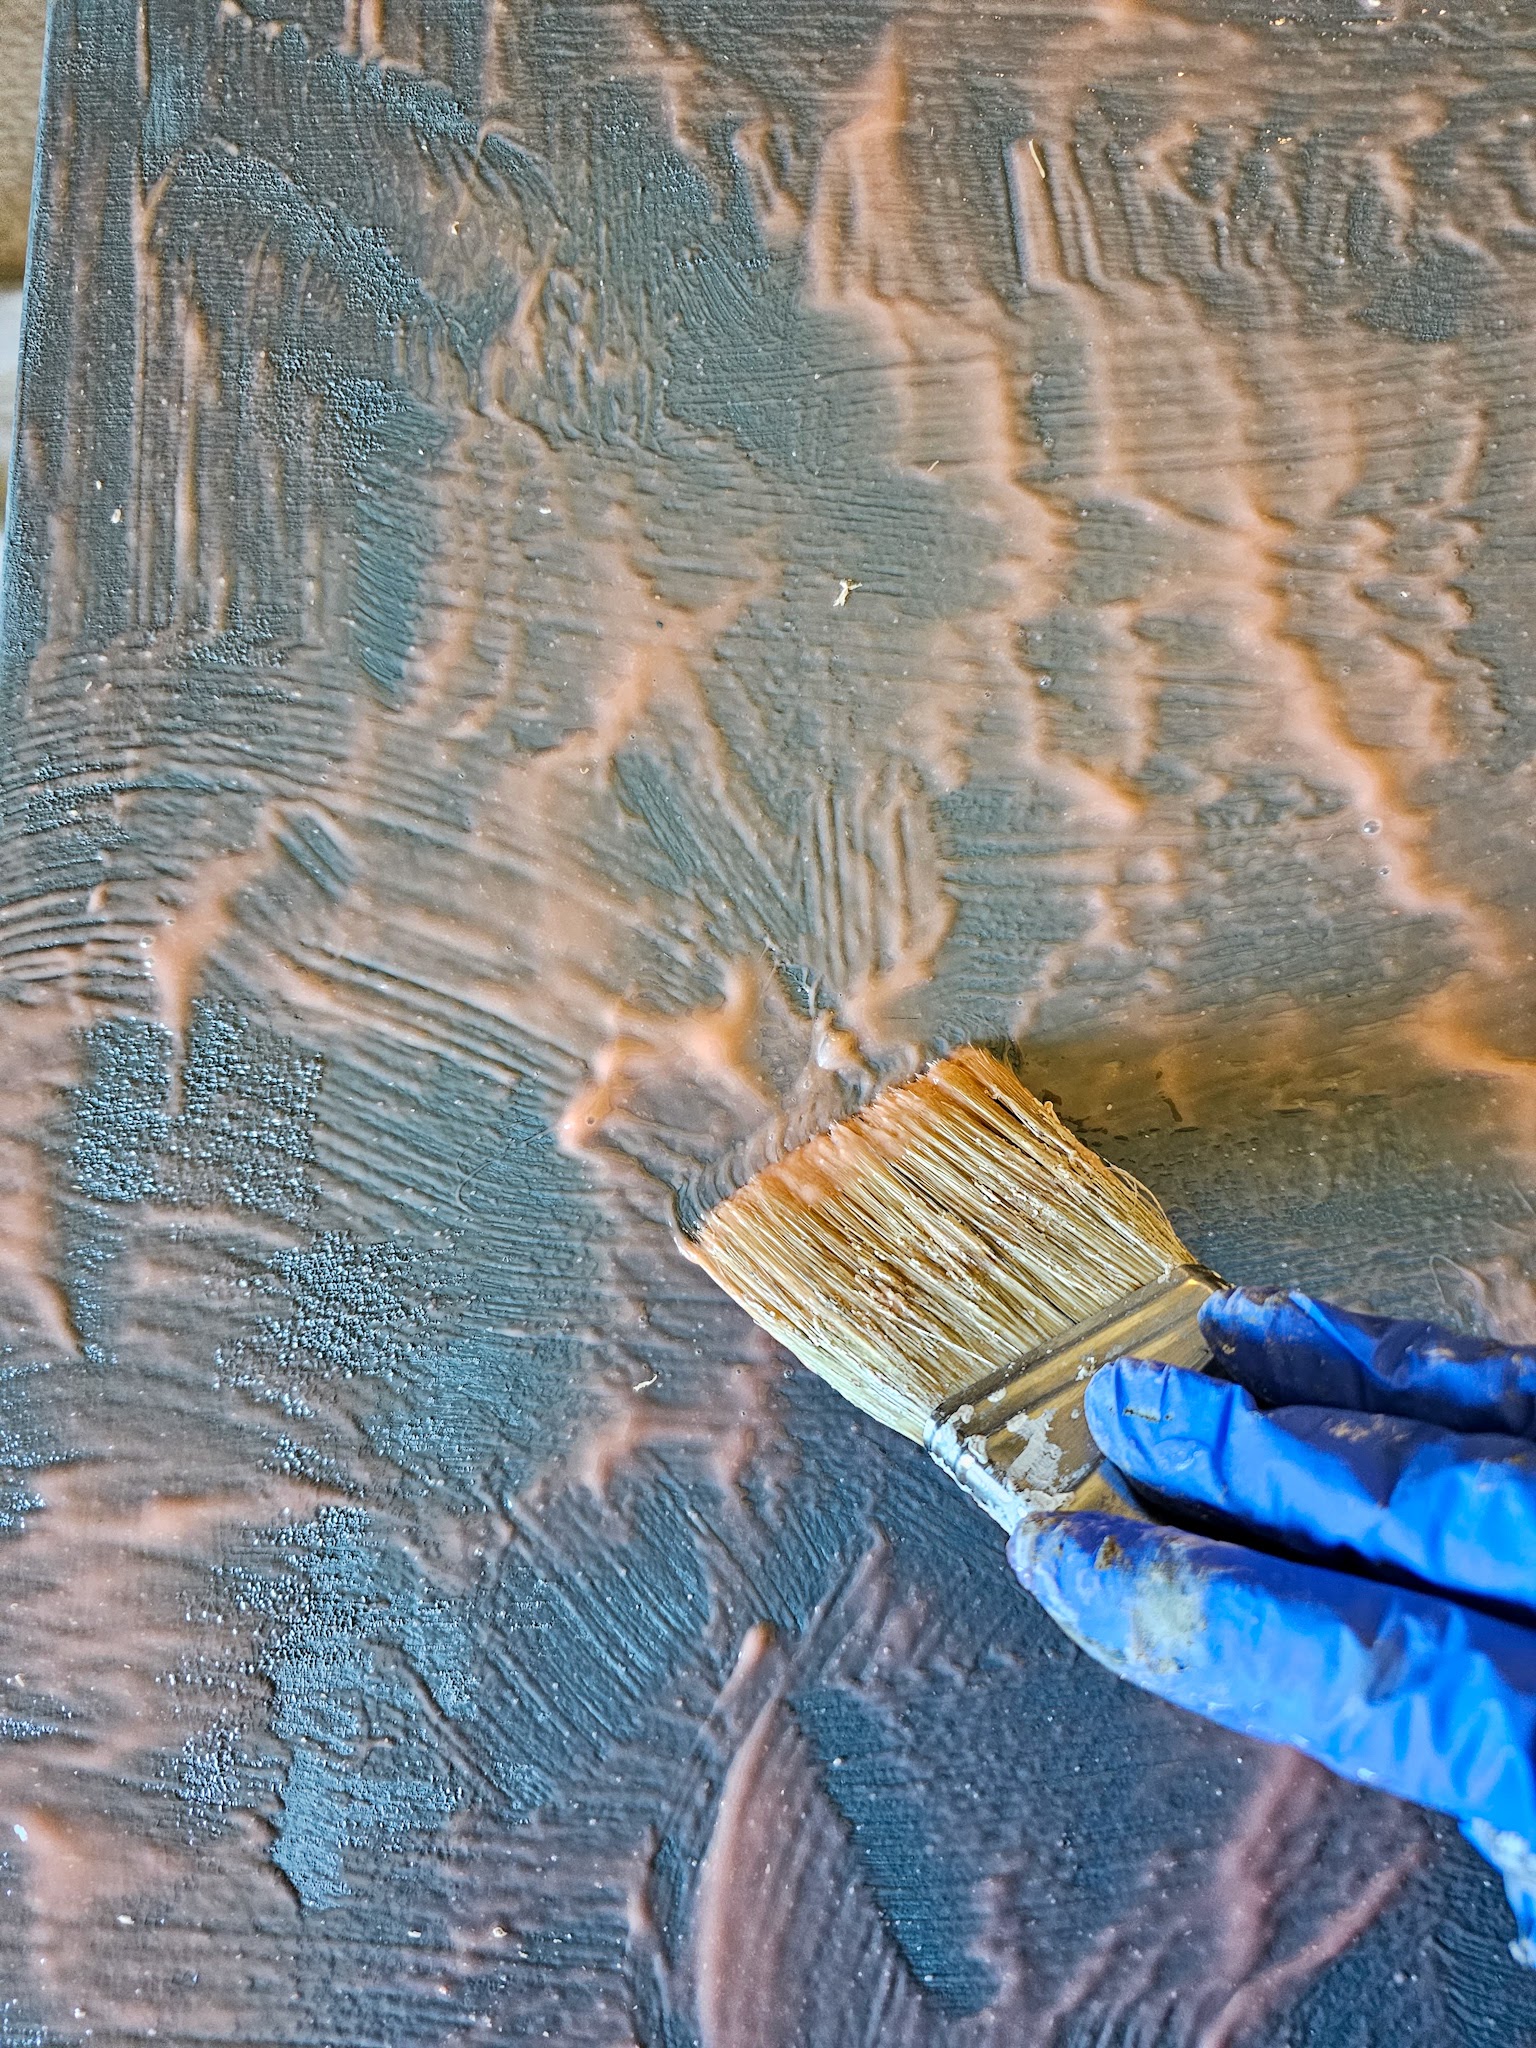
After doing a bit of research online, I bought a product called Citristrip to try. First things first, I removed the drawers and hardware and placed the drawers face up on a drop cloth (I save old bedsheets for this purpose!) I wore a double layer of latex-free gloves and assembled things in my basement where there is a big open space and plenty of circulating air – Citristrip is safe to use indoors but I still wanted lots of ventilation.
I poured it out directly onto the dresser and used an old paintbrush to roughly apply it everywhere. After some trial and error I learned that thicker is better – you want a pretty thick layer on top of the paint!
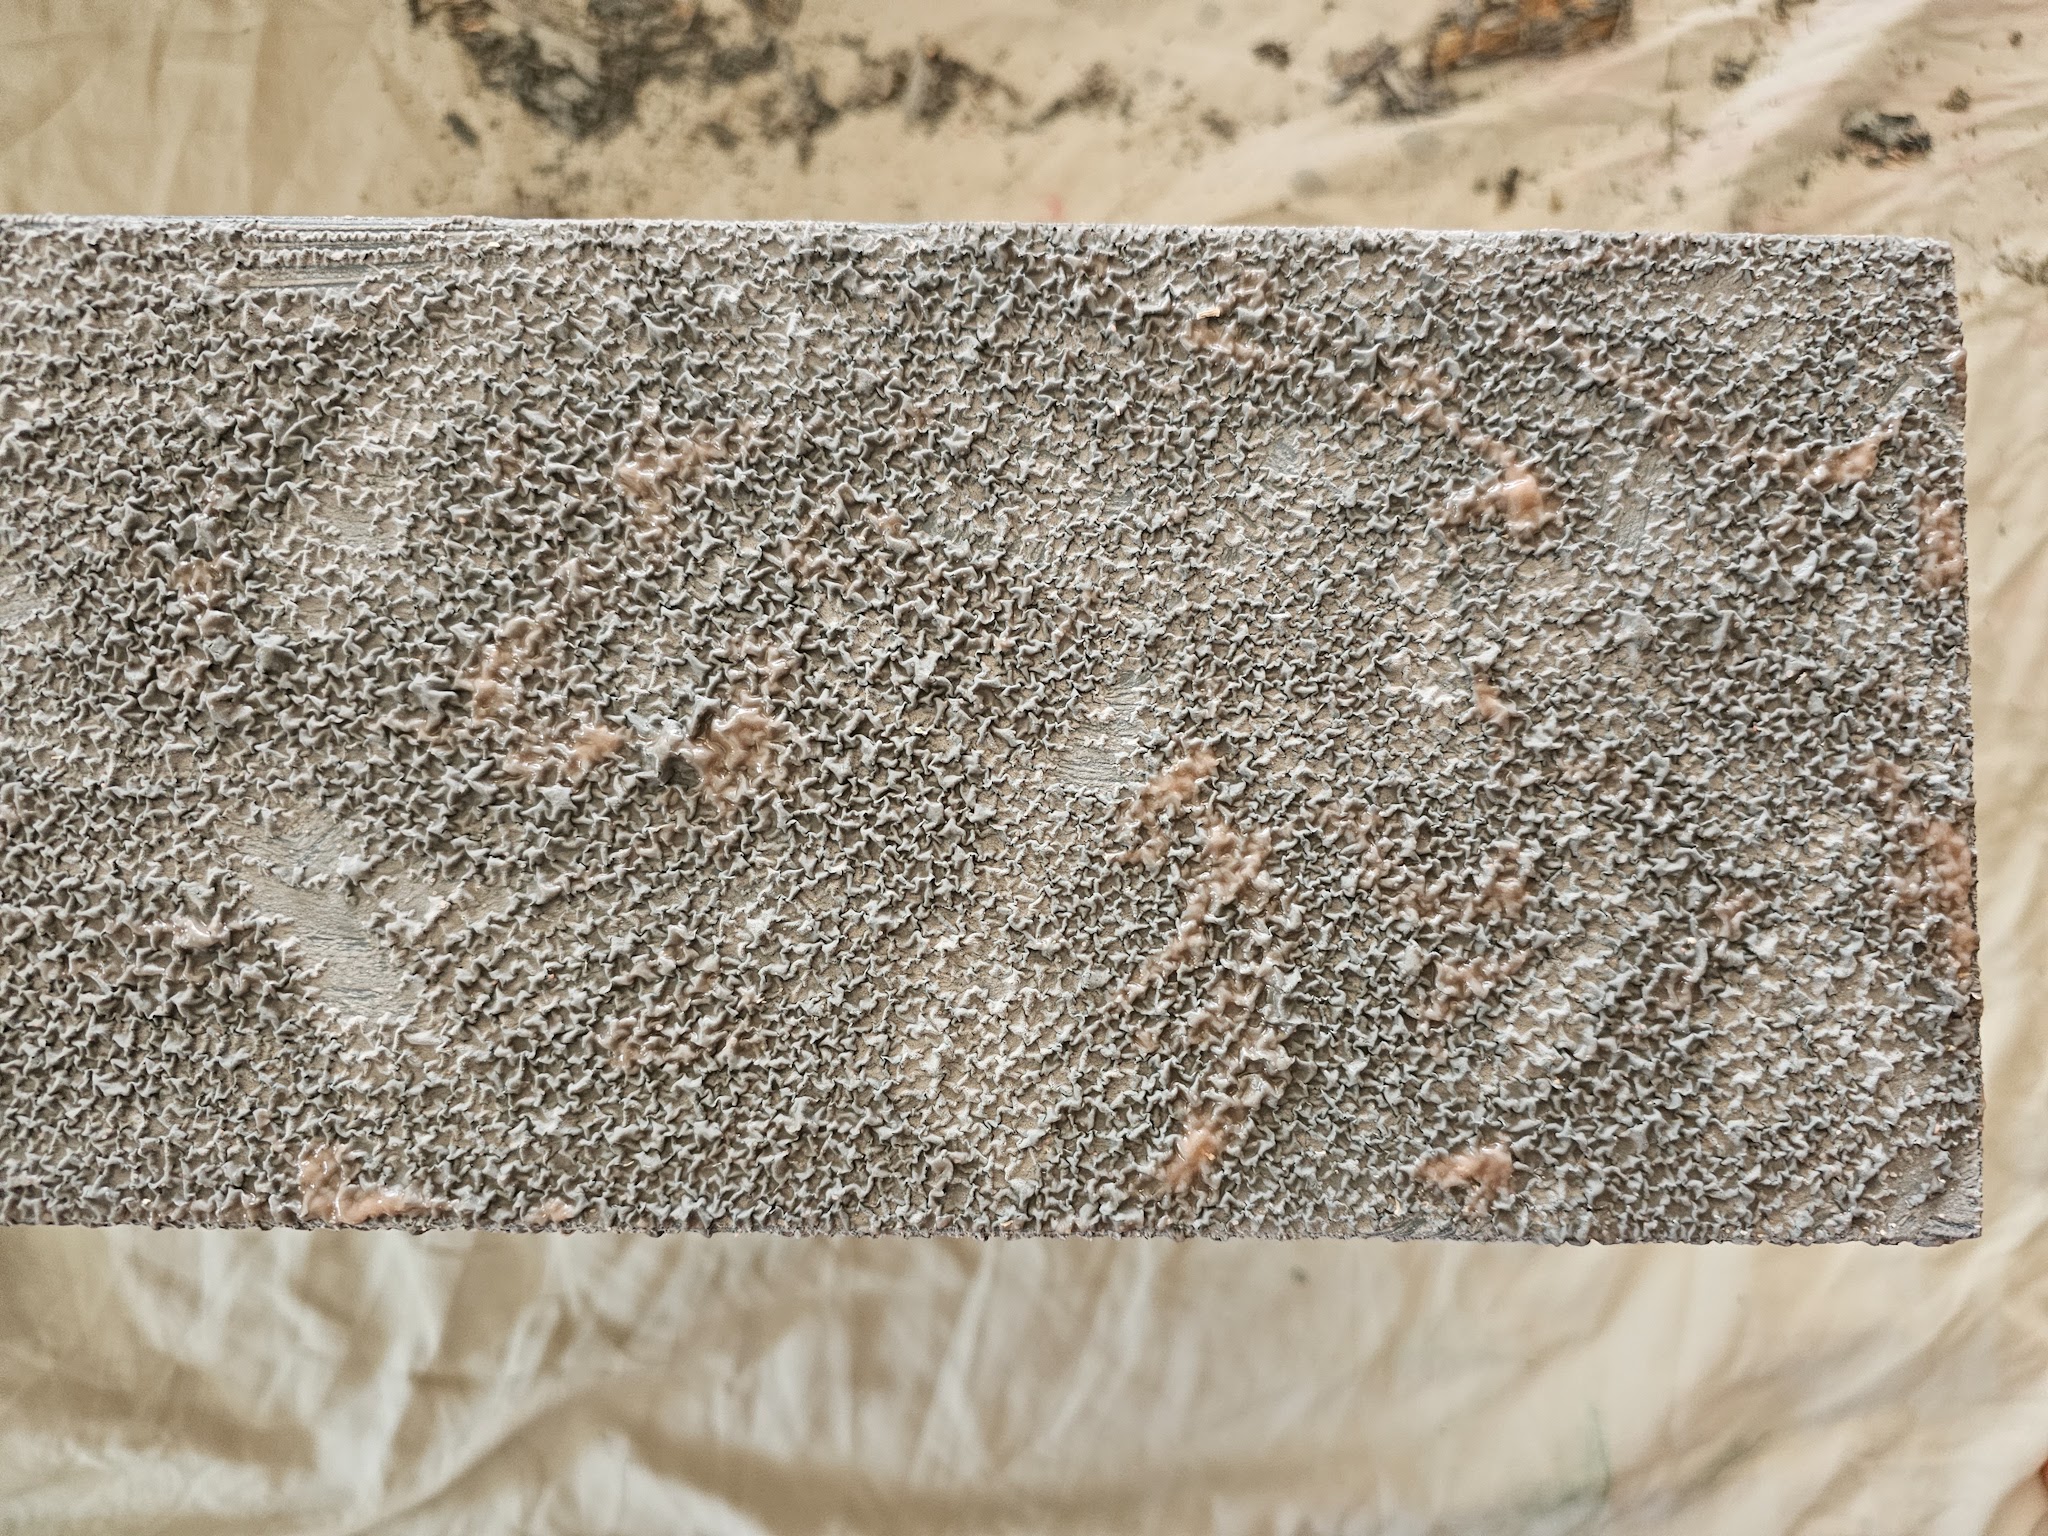
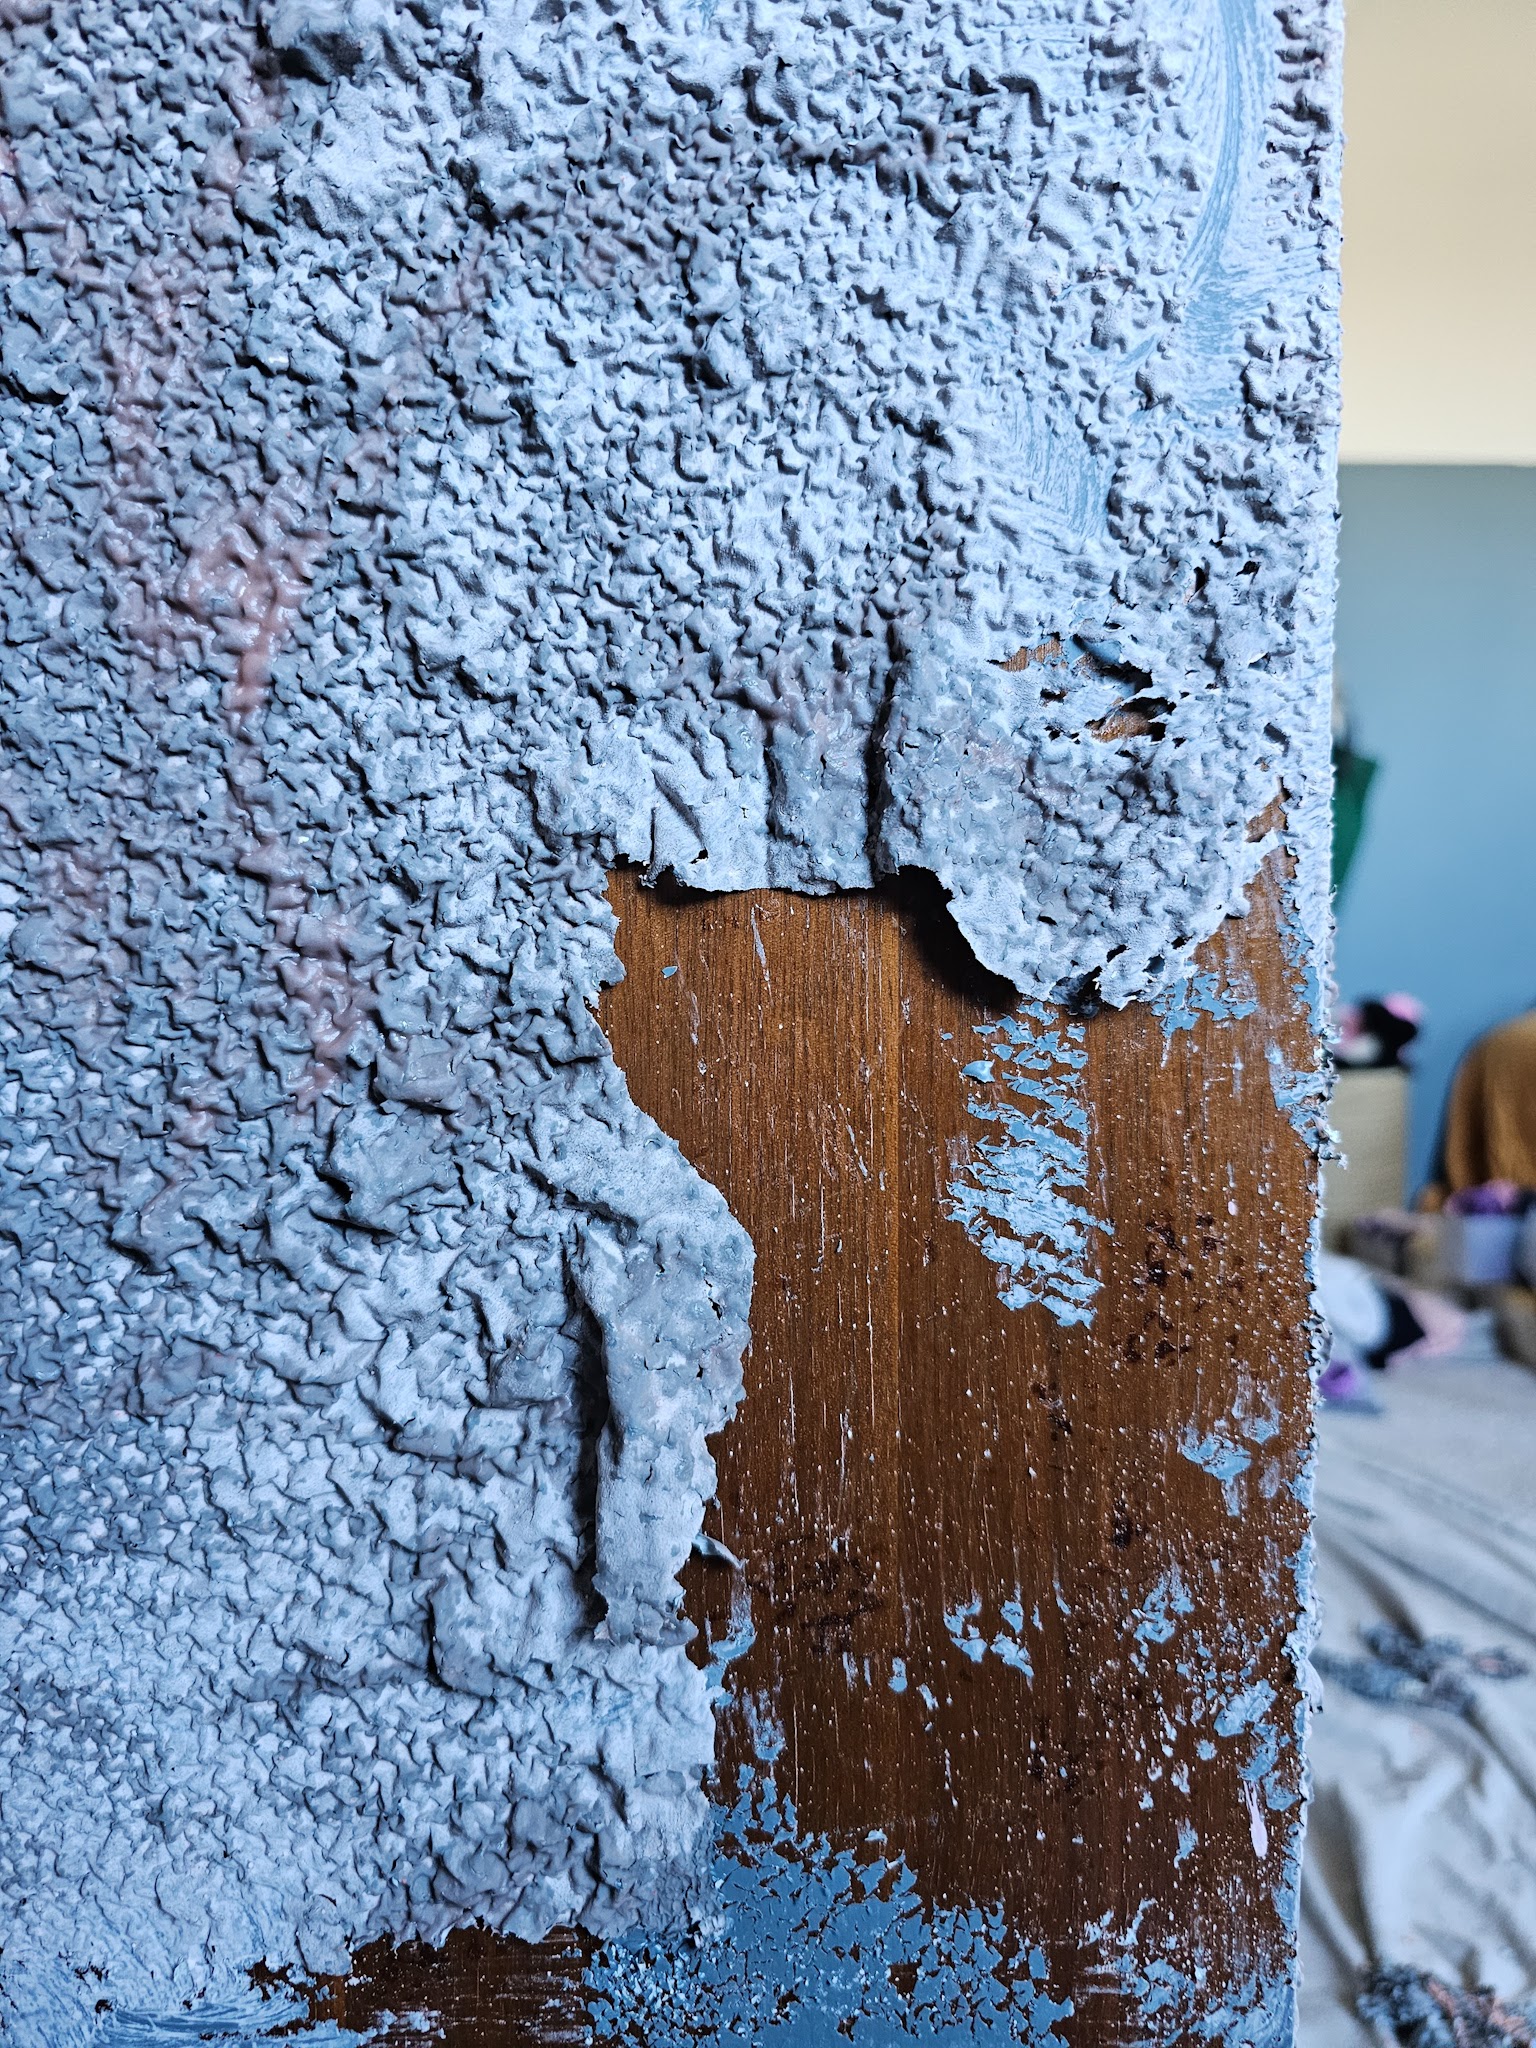
I stashed the brush in a ziploc baggie and let the Citristrip soak in, quickly learning that leaving it on longer produces better results. You don’t want it to dry out, but you do want to give it time to work. And when it works, it looks wild!
My mind was blown! I kept thinking the paint looked like really elaborate frosting and couldn’t believe how much it bubbled up. The first round, where I did a light layer and only left it on 30 minutes, left a lot of residue but the second round, where I poured it on thick and left it on 2 hours, took nearly everything off!
I used a plastic scraper to remove the paint; sometimes I needed to do a bit of extra scraping to get it all off but it did not require a lot of muscle or effort to do the vast majority!
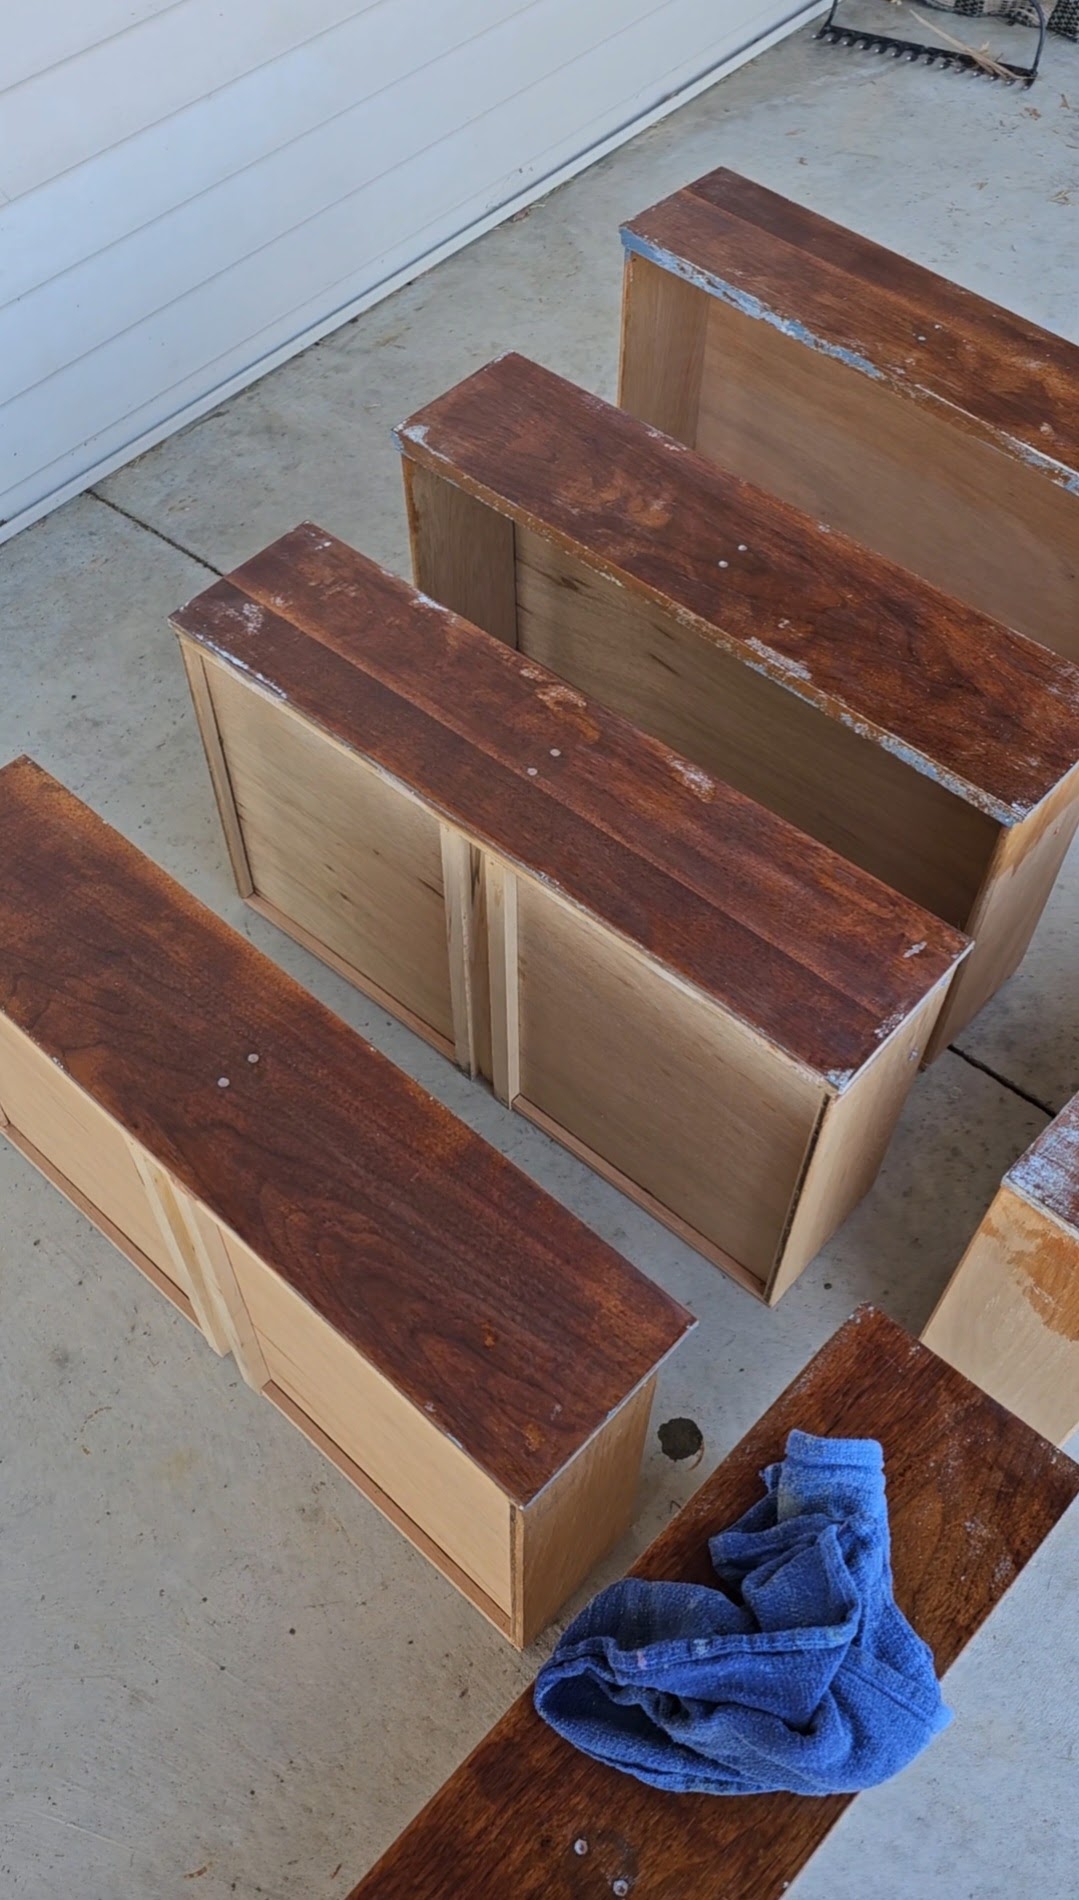
The main frame of the dresser took an extra round of Citristrip because the paint layer was thicker, but once I got everything stripped it was time to clean off the reside. I used mineral spirits (again, you want ventilation and gloves!) and a clean cloth to wipe down the surfaces; it works best to give the mineral spirits plenty of time to fully dry before sanding.
The dresser had a very thin layer of wood veneer on almost everything (more on that in a bit) and sanded well for me. I used an orbital sander, first with 80-grit sandpaper, then 120-grit, then 220-grit to get the surfaces down to raw wood. At this point, I started to feel optimistic that this was actually going to turn out well, because things were looking so much better!
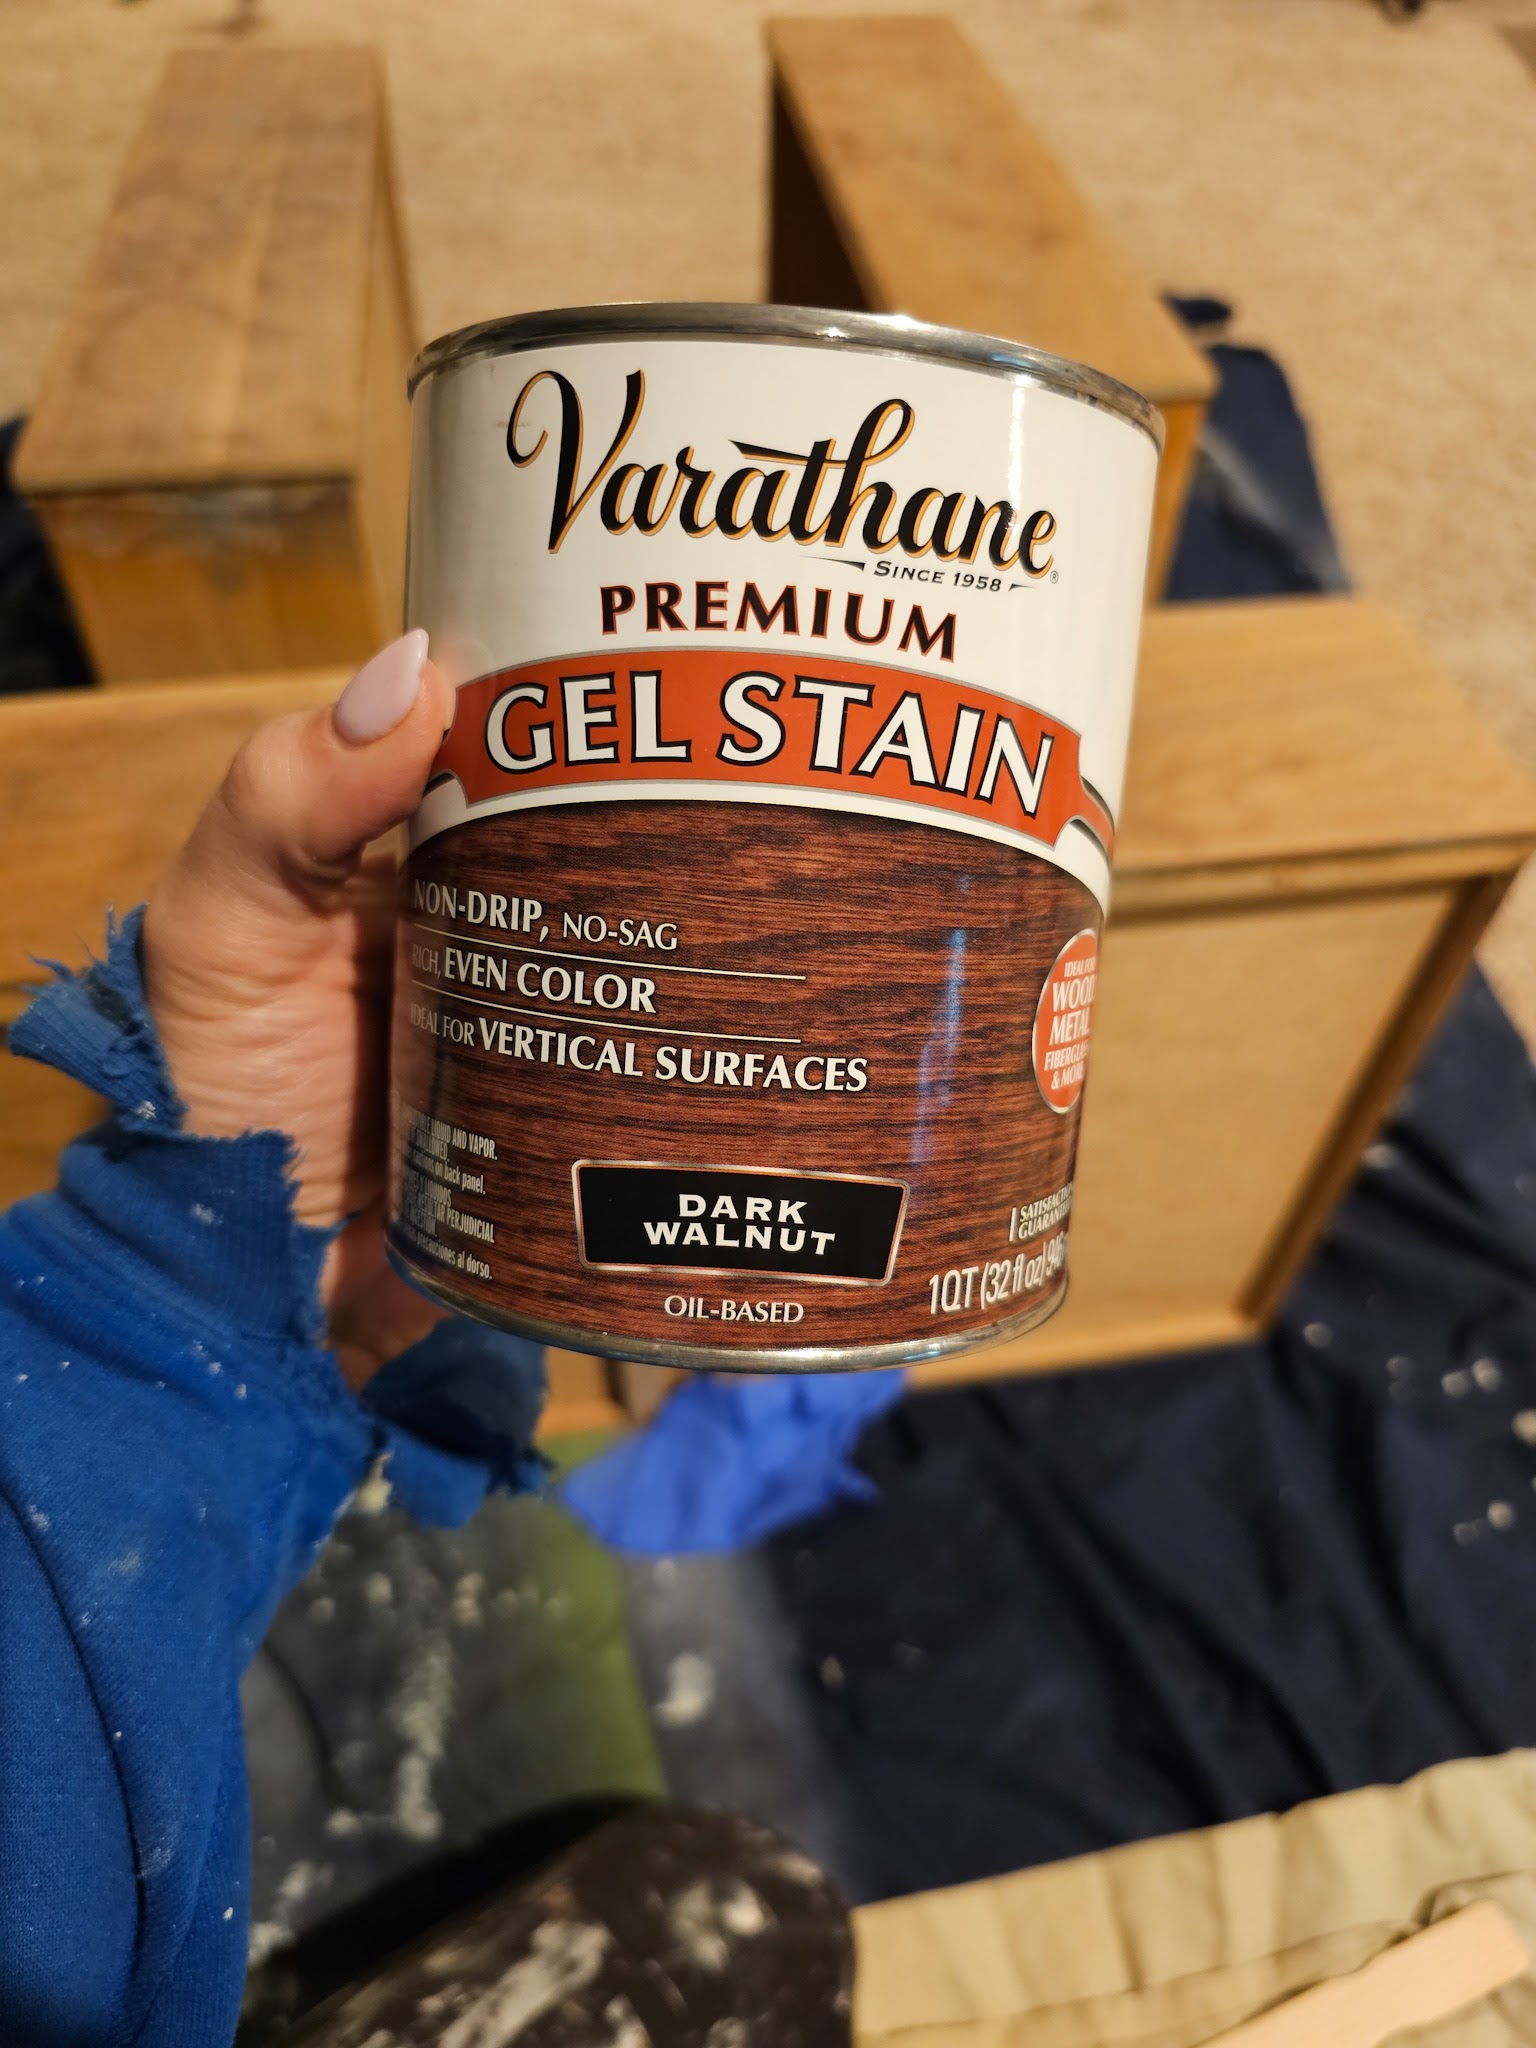
I have never used a gel stain before but it’s super easy to apply: I painted the stain on using a brush, first going in the direction against the grain, then immediately going over it with the brush again (without adding more stain), this time with the grain.
I let it set 2-3 minutes and then wiped it off with an old pillowcase (I’m telling you, save your old bedding for projects!) Here’s a look at two drawers in the process, one with the stain wiped off and one with it still soaking:
One unusual thing I hadn’t remembered about the dresser was that the top is actually laminate. Hmmm. The paint stripped off it fine and I used 220-grit sandpaper to get the remaining residue off, but it’s hard to tell how much of the gel stain it took. The walnut color I chose pretty closely matched the original color and I was afraid of blotchiness so I did the whole top at one time; it looks great with the rest of the dresser and definitely did darken, so it at least took some of the gel stain. It worked out and I’m happy with the result!
The legs did not take the stain well, although that’s probably because I didn’t want to sand them, so I decided to pivot and use Rub n Buff. My goal was to try to match the patina of the original brass drawer pulls. I removed the legs and used just a tiny bit of product, rubbing it in with an old cloth. I was pleasantly surprised to see the legs really did look similar to the drawer pulls!
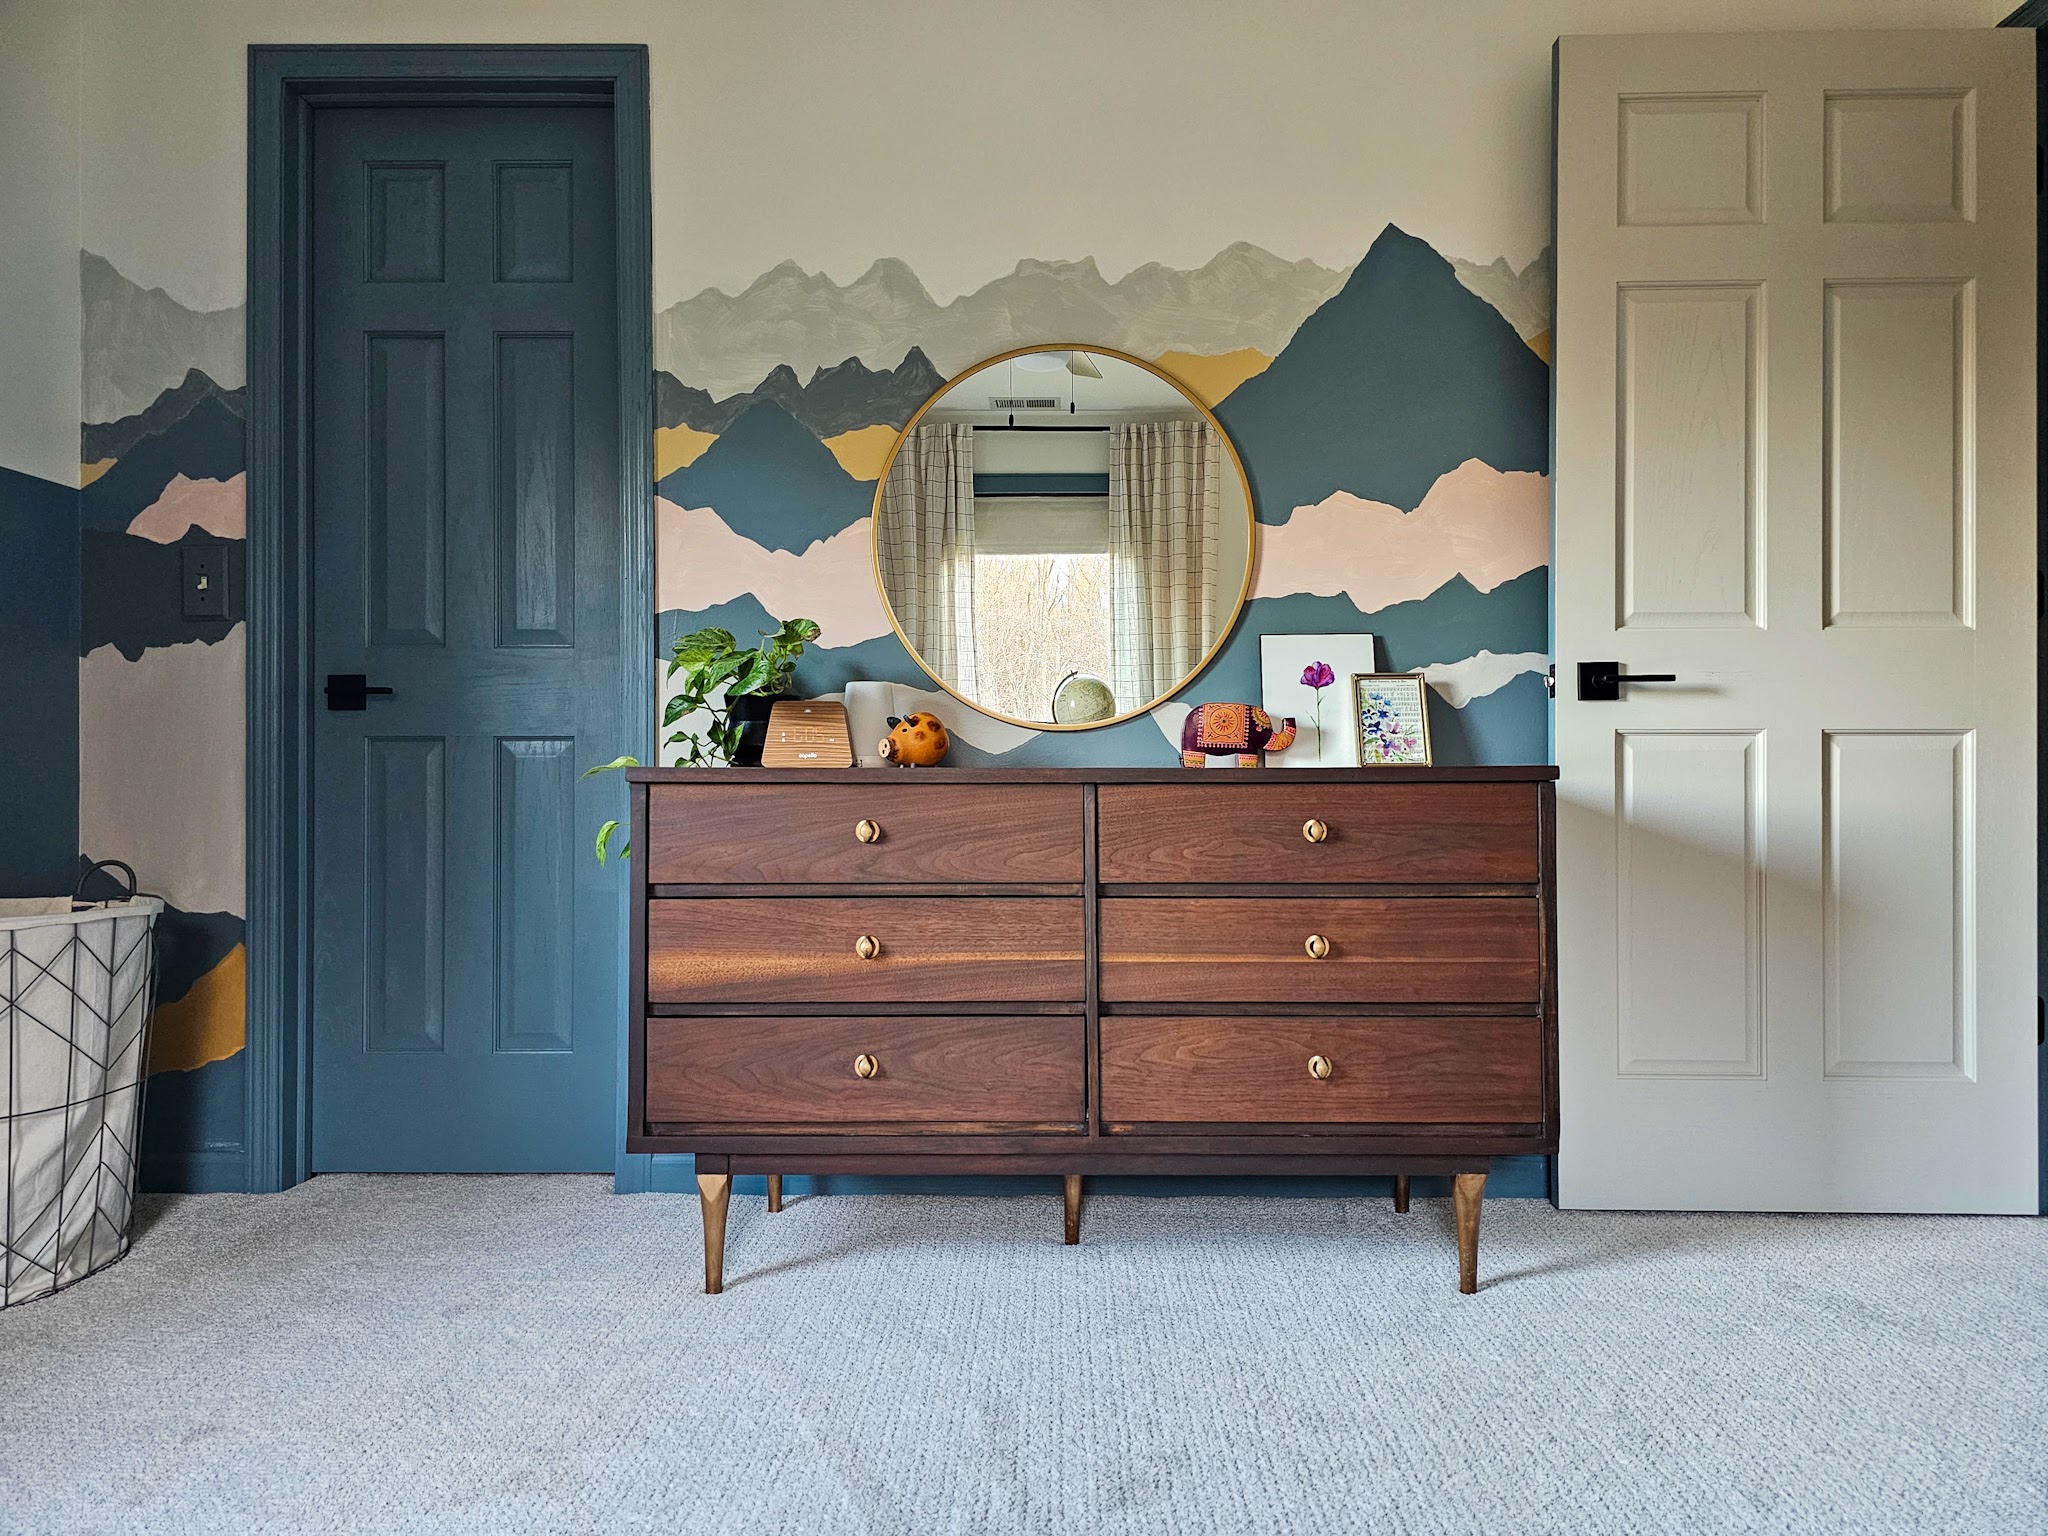
After everything had a chance to dry, I put it all back together in my kids room and WOWZA, this was exactly what the space needed!
I LOVE the richness of the warm walnut color. It is seriously stunning, and the patina on the brass hardware + faux patina on the legs brings so much character!
This is still a $30 thrifted dresser, so it’s far from perfect, but I just think she’s a showstopper now. I am so so happy with how this dresser now ties in with the other wood tones throughout and completes the room . . . even though I don’t really ever think a room is totally finished. Our needs and tastes are constantly evolving and I like to make little tweaks to our rooms here and there along the way. Plus this room will likely need an overhaul of sorts down the room when there are two teenage boys sharing it (!!!) That being said, the kids’ room feels like it’s in a really good place for their current stage of life so for now…it’s done. 🙂
Sources:
Wall Color: Sherwin Williams Eider White and Nordic Bleu
It’s been five months since I shared my mood board inspiration for leveling up the living room. It’s been four months since I painted the walls white. It’s been two months since we installed the sconces . . . and nothing much has happened since. In terms of speed, this room transformation is practically glacial.
You may or may not have noticed, but I’ve slowed down on the pace of home projects around here lately. This was a choice I made very intentionally for a few reasons, and I can honestly say it’s been such a healthy decision for me and my family. Today I wanted to take a minute to just talk about why I’ve moved to a more sustainable pace and how I approach slowly transforming my home.
One big reason I’ve slowed down is: money. The vast majority of our projects up to this point have been on the smaller scale. I’ve gotten creative with finding ways to transform a space with a small budget: stenciling instead of wallpaper, upgrading thrifted furniture, painting cabinets, painting countertops, etc and we’ve done the large majority of work ourselves. Now we’re looking ahead to hiring out some bigger projects in the next year or two, so we’re quicker to save money and slower to spend on smaller projects.
Another, probably obvious, reason I’ve slowed down lately is due to time. I have three kids, so life is full! I’ve learned I can take advantage of nap time and preschool and yes, their daily allotted screen time to get things done. I can work late at night or wake up early in the morning. I’m good at finding ways to squeeze in projects but also, I don’t want to spend all my time on projects. I’m so aware of how fast these years are going and have been working really hard to strike a healthy balance of life and projects.
A great example happened this past weekend: we had a gloriously empty calendar where nothing was planned for anyone in our family. It was the perfect opportunity to update the kids’ bedroom dresser. It was also the perfect opportunity for some quality family time. We landed on a best-of-both-worlds solution: for our family, we chose a Saturday family adventure day (science museum, lunch, walking to a bakery for a special treat) and Sunday afternoon campfire (popcorn + smores!) together.
For ourselves, Justin played tennis with his friends Saturday morning while I played with the kids, then he took the kids in the evenings and Sunday morning before church so I could have time for the dresser. Saturday night we even had a movie-in-the-basement date night while I waited on the paint stripper to work its magic on the dresser. We both got time away for hobbies that energize us AND we got quality family time and couple time together. True, the dresser could’ve been completed if I buckled down and said no to all the other things, but that’s not healthy for anyone in my family. We’re ALL much happier with a slower project pace and a balance of time together and time on our own things.
The last reason I’m slowing down is hard to describe, but is a mixture of learning contentment and leaving space to figure out how this home can best serve our family. It takes time in a space to discover what it needs. Do I want a gallery wall here or one large piece of art? Do I want a console table here or something with storage? Learning to live with a blank wall or empty space in the meantime has been an exercise in contentment – I don’t truly need anything and I don’t want to buy things just to fill the house, so I’m okay with nothing until I find just what I want. Spending time in spaces helps me hone in on a vision and think through possibilities, and half the fun is in anticipating/dreaming/planning anyways. Just recently I decided that eventually, I’m going to swap the dining room and playroom. Not now, because our current setup is working in this season, but long-term, the switch will make more sense for us. It takes time to let my mind wander and think through these possibilities. In the meantime, I’m learning to be content with my house as is and let me tell you, there’s joy to be found in that contentment too.
So how have I been approaching a slower, more intentional way of working on my home? I’ve been reflecting on this quite a bit lately and here are some of the things that come to mind:
Thrift for Budget-Friendly Items
It’s no secret that I love thrifting. Buying secondhand is sustainable for the environment and easier on the wallet – a win-win in my book. I have had great luck slowly sourcing items over the years, thrifting everything from bigger items like chairs, side tables, and dressers to smaller décor pieces like picture frames, planters, and little tchotchkes. Thrifting has allowed me to fill my home with unique items and allows me to try out different things without a big commitment. I can also hold onto items loosely – if it breaks or ends up not working in our home, it’s easier to let go of.
All that being said, thrifting is not a quick, one-click process. It took me months to find a little lamp I loved for my kitchen countertop! I try to carve out time once a week or every-other-week to pop in to a thrift store, whether I have an hour to browse or just ten minutes to glance around (if you’re not sure where to start or how to maximize a quick trip, I wrote a post about making the most of thrifting when I’m limited on time). I’ve been thrifting for items for years and over time, my home is slowly filling with items I truly love. The hunt for items that speak to me takes time and patience, but it’s so rewarding once I find a gem for our home!
Use Placeholder Items to Determine What I really Want
I bought a teal-colored accent chair for the living room in our last home and absolutely loved it there. We moved here with it and it just hasn’t translated the same way. I’ve tried it in multiple rooms and in multiple places and have come to accept it just isn’t going to be a piece I keep long-term in this home. BUT! It has been an excellent placeholder for me while I determine what I do and don’t want.
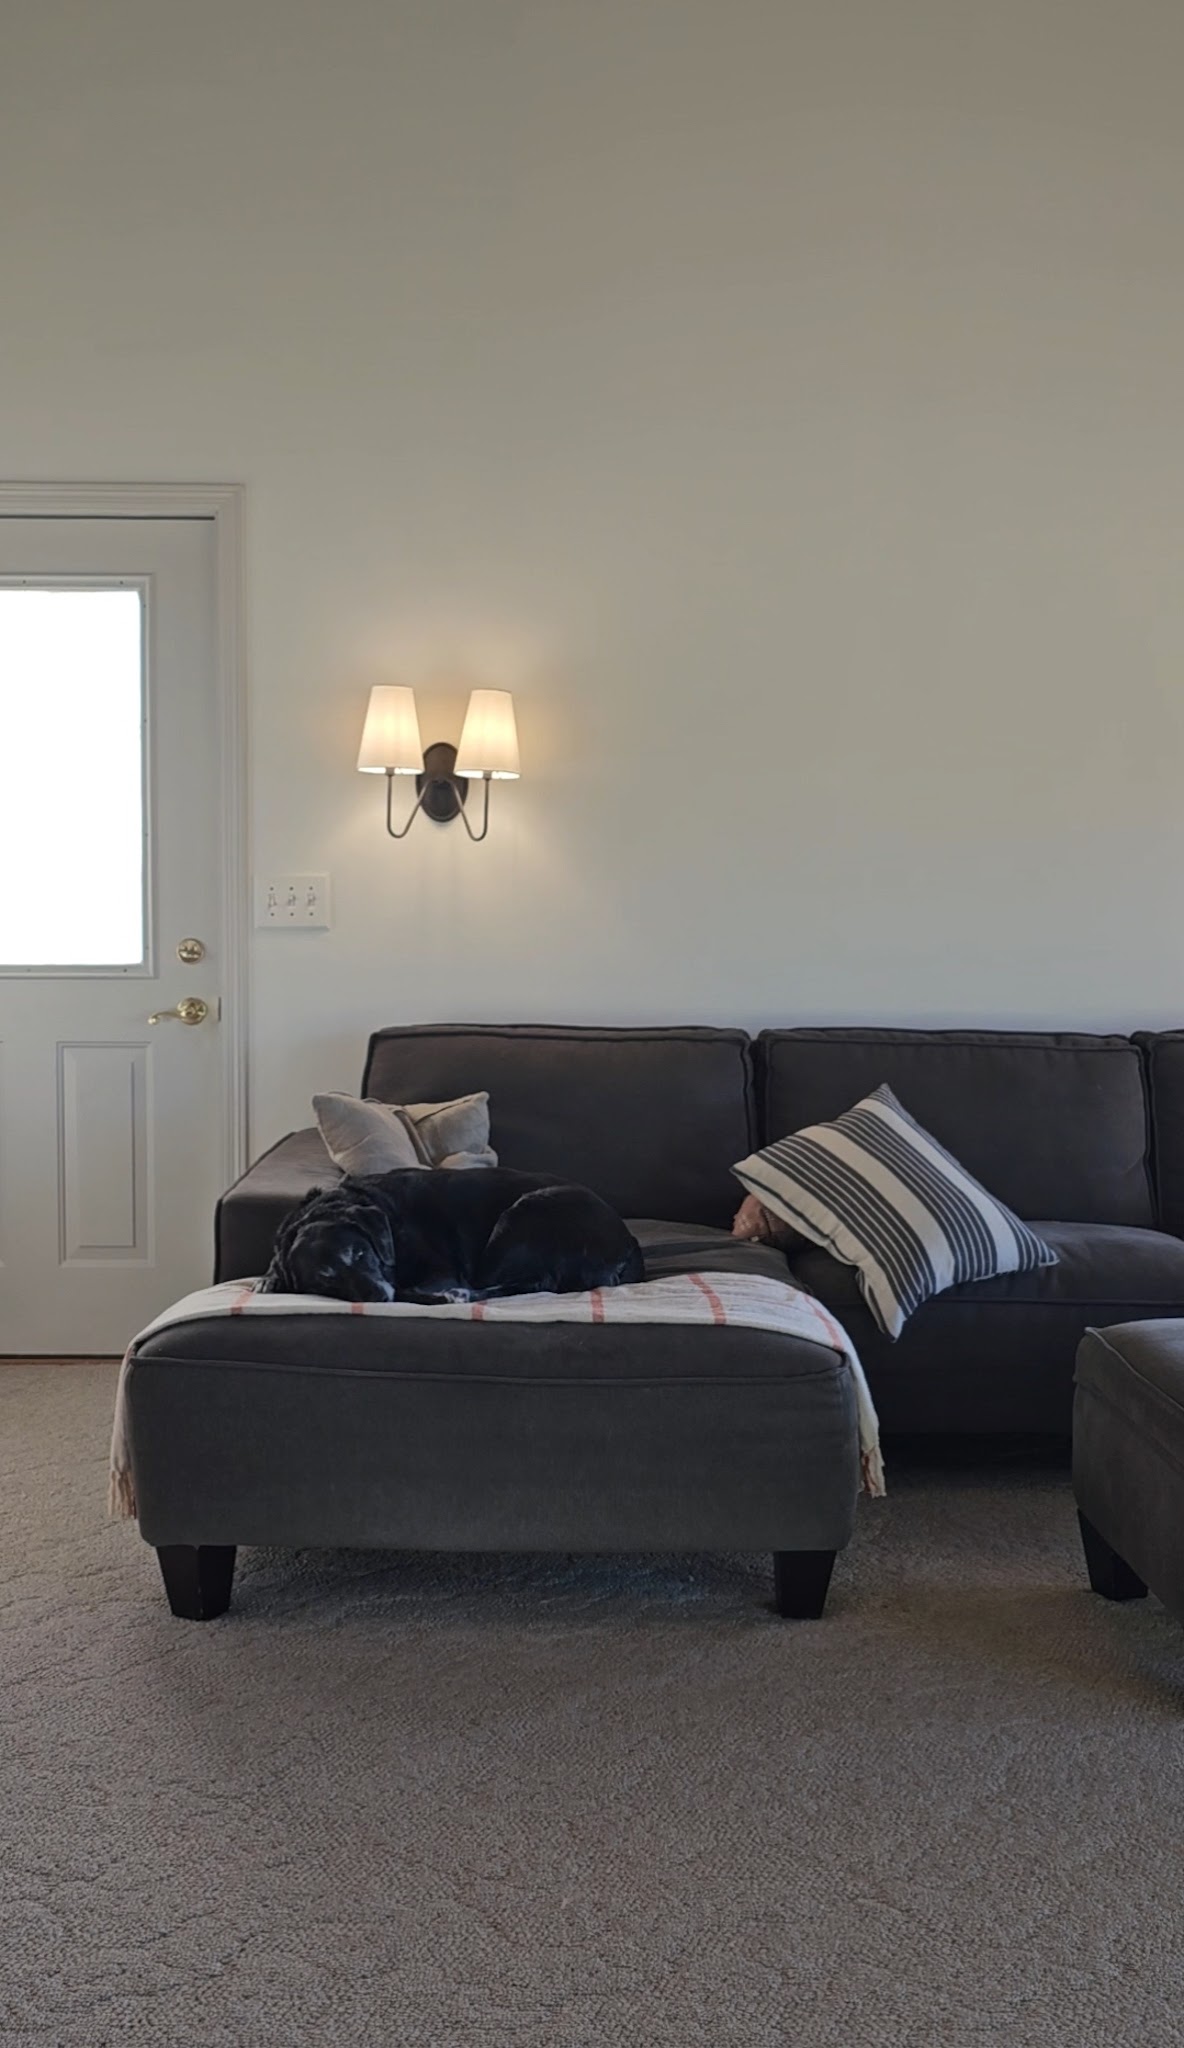
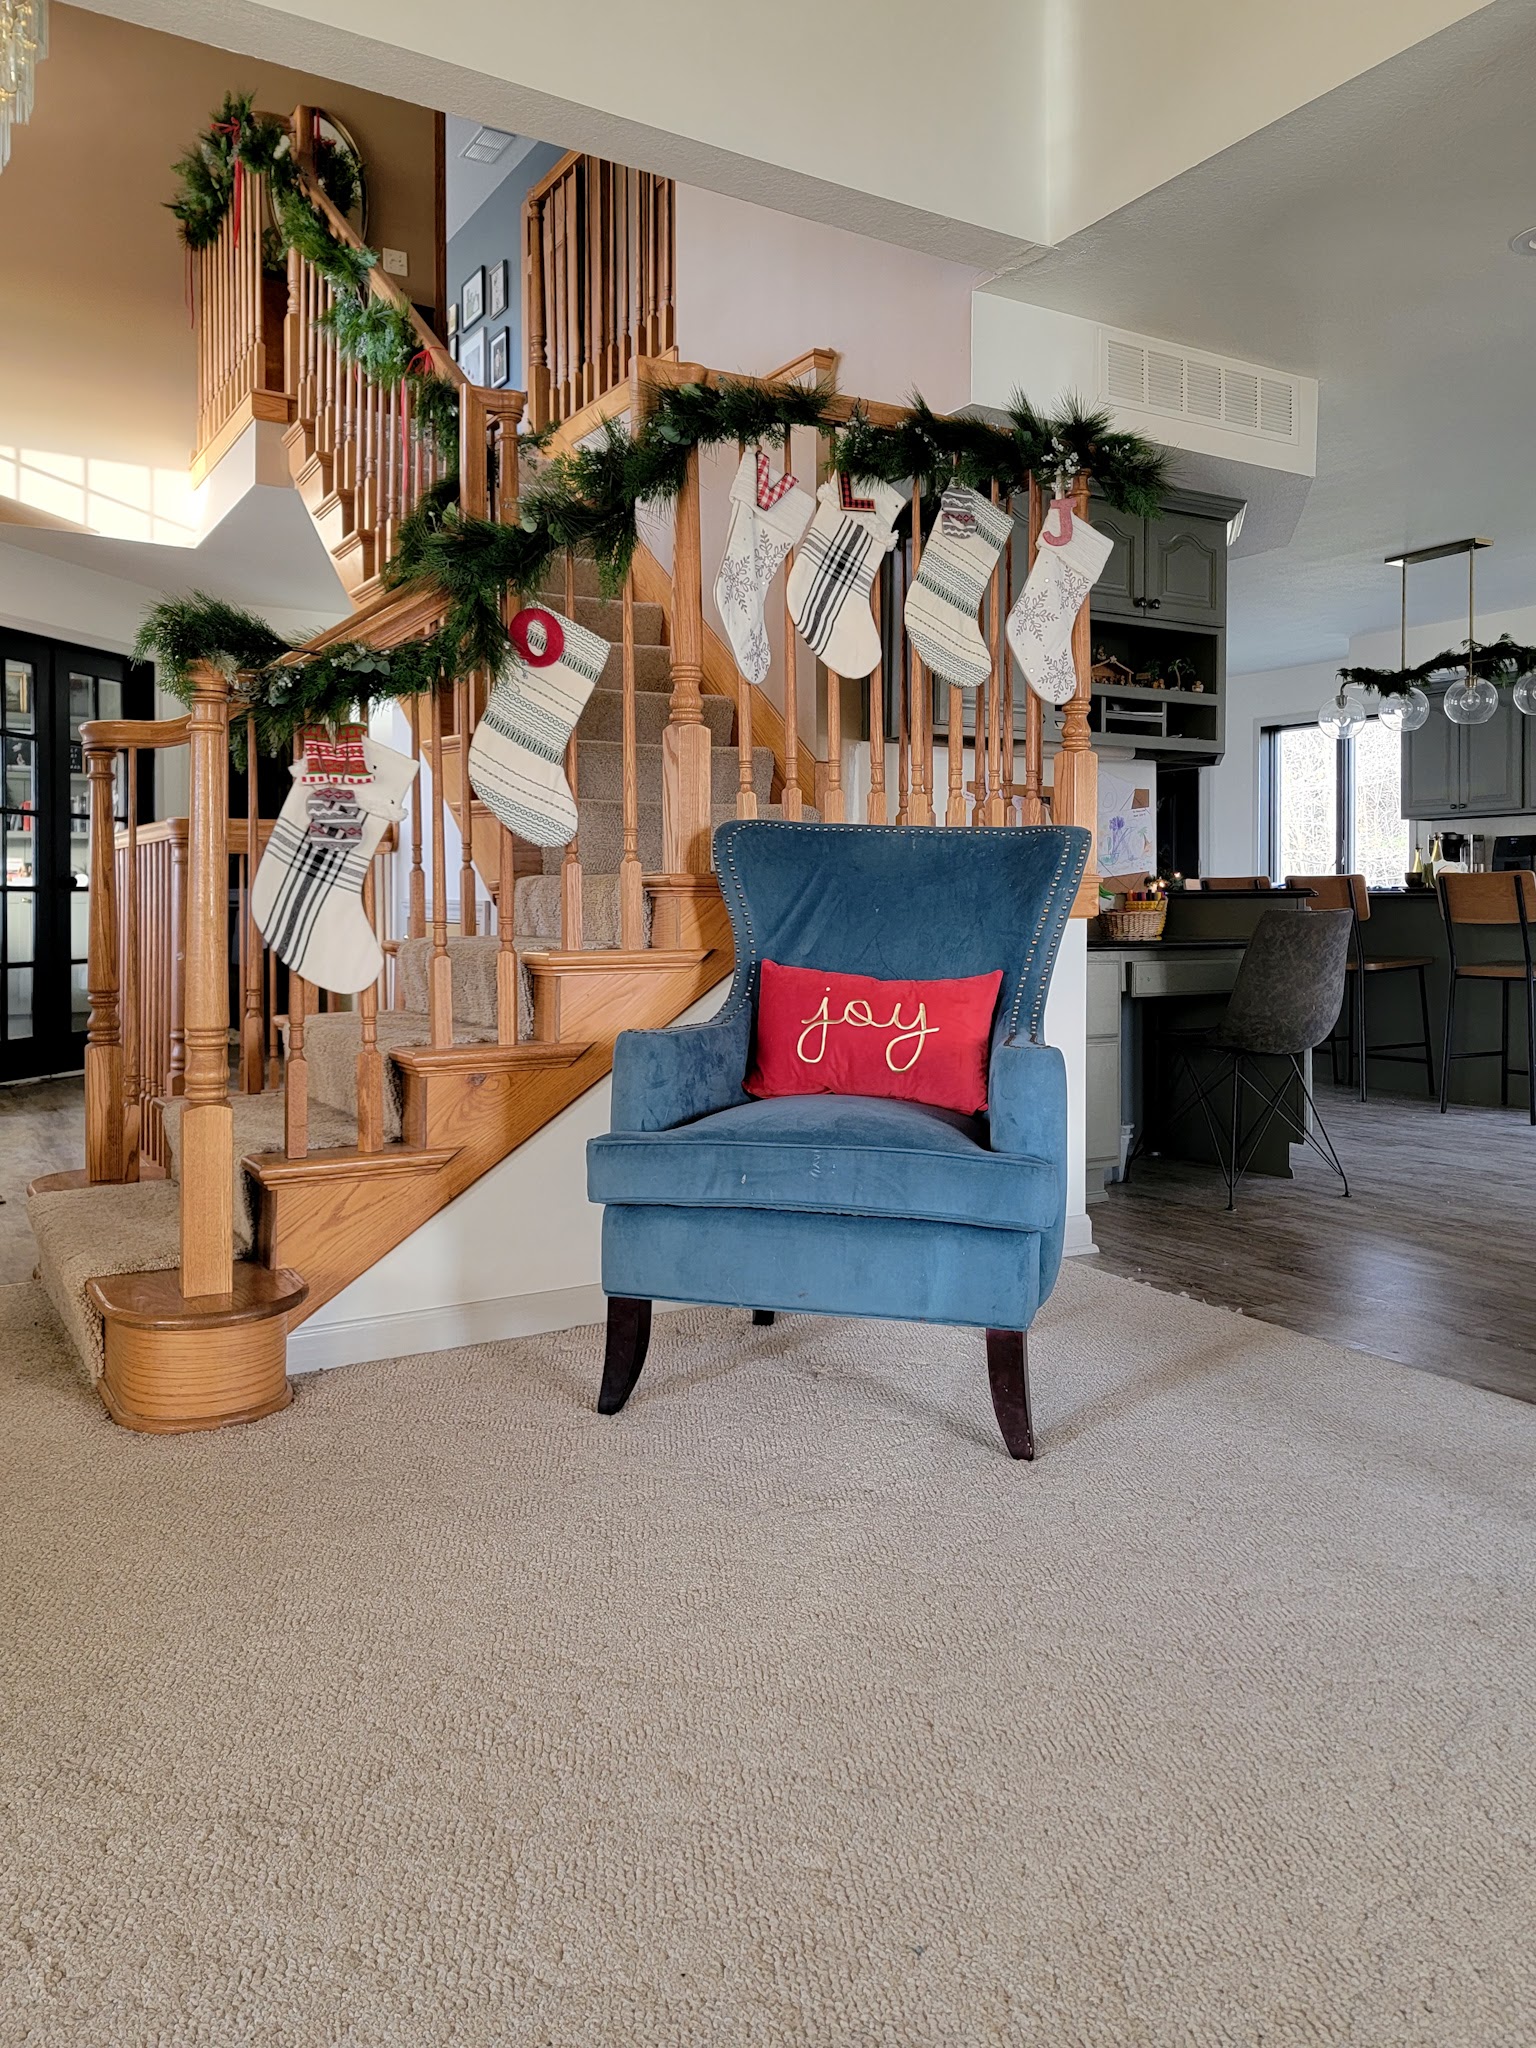
When it sat in the playroom, it helped me determine I wanted a couch instead of a chair for more seating. When it sat in my office bay window it helped affirm that space worked perfectly for a chair – and I soon thrifted my beloved yellow chair. When it sat against the stairs in our living room, it made us realize that the extra seating was nice but the placement felt odd so we’d have to find the perfect option, otherwise it’s better to have nothing there. When it sat against a small wall in our living room, it helped me determine I really needed something with a smaller profile, leading me to this $5 thrift store chair.
Now it sits in the bay window area of our living room and has confirmed we do want another chair there (just not this one). And with that, I think this chair is ready for its next home. I’m glad we kept it for so long, even when I knew it wasn’t meant for this house, because it helped us figure out what DID work here. Now that we’re filling up with things we love and that work for this house, it’s ready for its next life . . . at my sister’s house! I’ll be sure to visit 😉
Shop My House
I love shopping my home to find just the right thing for a space! This is different than a placeholder, because these are all items I use, love, and want to keep in my house. I used to get stuck in a rut with thinking one item had to stay in the place where I first put it, but I realized once I held a looser grip on arrangements, it became so much fun to see the same old items in a new way! If you want to know more about how I do this, I wrote a whole post about shopping my home.
Again, this takes a little time to walk through my home and try to look at items individually and objectively. And then obviously, when I move something to a new place, I might have a blank space where that item used to be for a while. Maybe I’ll thrift a new item for that spot, maybe I’ll find something else in my home, or maybe it will be an empty place for my eyes to rest for a bit. It’s a process!
Live with Less
It’s actually pretty refreshing to have some blank space in my home. For example, my dining room is pretty bare – just a hand-me-down table and chairs and a large blank wall – but there are perks to that. It’s super easy to clean and maintain. My kids love racing around the table and there’s space to do that. We have a nice big floor area beside the table to make messy art projects. The blank slate-like nature of the room also makes it easier to dream of the future possibilities. There’s no clutter distracting my mind and I can just breathe and imagine what it could be . . . while enjoying the freedom that comes with less for now.
I realized that living with less also helped me recognize when an item really speaks to me – if I see it in the store and it feels worth giving up the blank space for, I know it’s a good one!
Enjoy the Imperfect House
I have been craving slowness in other areas of my life and lately I’ve been leaning into leaving space for that. I love to curl up with a blanket and a good book. I love the rhythmic process of baking homemade bread. I love sitting around the table playing the 15th round of Old Maid or Go Fish (my kids are in an era of loving games and it’s so much fun!) Life is happening in this home whether it’s “finished” or not, and I have been savoring the moments I step back from the projects and just enjoy living here.
We live in an era of instant gratification (Streaming services! Same day delivery! Instant downloads!) and I think this impacts home renovations too. You can turn on HGTV and watch an entire home undergo months and months of renovations in the span of 60 minutes. Before-and-after pictures on Instagram can show you a room transformation with just a simple swipe of your finger. We’re used to the process happening quickly, or at least, being shown to us quickly, but that’s not reality. Most transformations happen slowly and I have become much happier with a slower pace.
It also feels worth ending on this clarification: my chosen pace feels slow to me, but may not feel slow to you. Previously, I was going from project to project, finishing one and jumping right in to the next. I was challenging myself to complete entire rooms in a small amount of time and I was working on big projects one after another. My current pace is much slower and is more sustainable for my life and my family; it’s a balance that works for us. What that looks like will be different for every person – maybe one space a year is all you have the capacity and resources to handle and my pace seems unsustainable. Or maybe you have the capacity and resources for one room a month and my pace seems super slow. It’s true what they say: comparison is the thief of joy. I encourage you to find a pace that feels right for YOU and enjoy how that works for your life rather than dwell on anyone else’s.
Now I’m off to keep working on my kids’ dresser – slow and steady, just the way I like it. 🙂